
|
|
The ads above are Google-sponsored.
Clicking on them at every visit helps support this website.
Clicking on something INSIDE the advertisements, gives even more help!
For history of this website, the future of it, how I run it, donations, etc: CLICK!
TOOLS for Airheads.
https://bmwmotorcycletech.info/tools.htm
65
© Copyright 2023, R. Fleischer

Before we get into the meat of this article, here an alphabetical list of terminology.
You can entirely skip this longish section if you have no sense of humor right now ....because (pick a reason).......>>....
AIR COMPRESSOR:
A machine with various uses, including collecting water vapor from the atmosphere & attempting to mix it with paint by using special attachments, strangely called guns. Some say that it is a machine that takes energy produced in a coal-burning power plant hundreds of miles away & transforms that into compressed air, that travels by hose to a Chicago Pneumatic impact wrench, that grips rusty bolts last tightened 50 years ago by someone, someplace .....and breaks them; or, at least, rounds them off nicely. Air compressors are often used with an Air Wrench (see next item). A prime purpose of compressor ownership is to tempt fate by seeing how much pressure a tire can hold. Compressors are also used with a hand-nozzle to blow small parts into corner areas where they can not be found. This is always accompanied at the same time with a loud expression of such as "Oh Jesus" ....no matter, ...or not ....if a Christian. Some loud expressions are not publishable in family media.
AIR WRENCH:
A tool used with an air compressor, often used to seriously cross-thread fasteners; to wake up your neighbors; and to test bolt material strength in a non-laboratory setting.
ALLEN SCREW:
A usually female hex head screw (aptly named, FEMALE and HEX) that is designed to frustrate you because it is never marked as to size, nor if Metric or American. Rounding one off leads to increased vocabulary practice. A special female head version with a raised post/tit in the center is especially designed to frustrate your attempts at doing anything but stare at it, for reasons I am unable to describe on a family-type website. See BRISTOL wrench, below.
ARC WELDER:
A device that produces an electrical short that allows 'welding rods' to be stuck to the surface
until they glow red. The operator wears a hood he cannot see out of. An additional feature is that stuck welding rods cause the welding machine to hum a musical tune.
BANDSAW:
A device used to destroy circular shaped metal bands that have teeth on one edge.
BATTERY ELECTROLYTE TESTER, GLASS, WITH FLOAT:
A handy tool for transferring sulfuric acid mixture from an old-fashioned flooded (slosh) battery to the
inside of your toolbox after determining that a battery is dead as a doornail, just as you thought. It does double duty for bleaching & destroying blue jeans in small spots. Cleverly made with undecipherable paper printed charts glued to the float, designed to last only a few years, at which point the chart unrolls, the float sticks to the glass walls, and you need to purchase a new tester.
BRISTOL WRENCH AND BRISTOL SCREW:
Bristol wrenches fit Bristol screw heads, for which an exceptionally brief glance seems to appear to be of the Allen type. Those with slightly longer brief glances may even think it is a Torx, or some other new-fangled screw head. The real Bristol screw is PURPOSELY designed to frustrate, so as take extra time in determining the course of action, and require numerous pints of some sort of warm brown liquid, all of which is endemic to the Country that seemingly invented, and, strangely, actually used, Bristol screws and wrenches. There is no such thing as a Bristol nut to fit a Bristol Screw; other than if you are a nut from Bristol. No auto-parts store clerk or hardware store clerk in the USA under the age of 80 has ever heard of the name Bristol Wrench, nor has heard of nor seen the screw, except some may confuse the name with some Wench or someplace in England. Clerks will look at you weirdly if you ask for a Bristol screw or Bristol wrench. BMW has wisely declined to put Bristol parts on its motorcycles, in favor of more popular (in Germany) methods of annoying you. The only more confounding item are Whitworth nuts, bolts and tools, which are fully understood by those who grew up when England was called Great Britain or Brittania, and used tall-masted sailing ships with cannons to annoy its neighbors.
BUNGEE CORD:
A stretchy thick round rubbery tool, often used in place of proper ropes and belts, always covered by spectacularly colored braid, designed to temporarily hold pricey Therm-a-Rest sleeping pads on the rear of motorcycles, where they can be lost, never to be found again, except by wild animals. Occasionally used to suddenly stop a motorcycle quickly & spectacularly. Come in a variety of colors and combination colors, even stripes, which makes them especially noticeable when wrapped-up in spinning wheels. They have been known to suddenly disconnect, and thereby able to smack someone indiscriminately, leaving a bloody mess.
CELL PHONE TOWER:
A tall structure made to look like an off-color lousily-leafed-and-branched tree, that grabs the signal from your cell phone and refuses to pass it consistently or sometimes never, to anyone.
CHUCK KEYS:
One of the most commonly lost tools, but, strangely, never lost by anyone named Chuck. You never know what type & size to purchase after you lose one, & don't understand the numbering system anyway, & neither does the clerk at the store who thinks you are looking for Chuck's car keys.
CORDLESS (anything cordless):
Primarily developed to enhance the profit & loss statements of the battery industry; and, soon afterwards, similarly, the cordless tool manufacturer, who brings forth a new model every 3 years, using a differently shaped battery, that will not fit any other tool made by anyone, anyplace.
DRILL PRESS:
A machine useful for suddenly snatching flat metal bar stock out of your hands so that it smacks you in the chest & flings your beer across the room, splattering it against that fender, fuel tank, etc., that you meticulously prepared & painted today, and which is still drying.
DRYWALL SCREW:
A very sharp pointed screw left on roadways in front of construction projects, the purpose of which is to puncture tires, especially the sidewalls, thereby enhancing the tire industry profit and loss statements. A secondary use, which is kept hidden from commoners who do their own Airhead repairs, is being able to be modified for use in a pop-rivet 'gun' for installing BMW's hollow rivets at the BMW windshield mounting systems. It is said that drywall installers have even used these screws for drywall installation, as opposed to wetwall installations.
EIGHT-FOOT LONG DOUGLAS FIR 2X4 (two-by-four):
A piece of a Fir tree, made into a long rectangular piece of wood, that is named to confuse wanna-be home-dwellers, and is really 1-1/2" x 3-1/2". Used for levering a motorcycle upward off a hydraulic jack.
ELECTRIC HAND DRILL:
Normally used for spinning pop rivets in their holes until you die of old age, but is also great for drilling mounting holes in fenders just above the brake line that goes to the wheel; if no brake line, there is always the tire.
EXHAUST FINNED NUT WRENCH:
Used with lots of hand-force to destroy exhaust port threads on BMW Airhead Motorcycles. Except for cracking hard-covered edible nuts, there is no other known usage for this wrench ....besides to have it adorn one's pegboard covered wall.
E-Z OUT, OR OTHER SUPPOSED BOLT & STUD "EXTRACTORS":
A common tool of many types, miss-named and misspelled from a bastardization of a Mr. E. Z. (well known for having a 'difficult' personality), as well as "extractor" being attached as to its true purpose, which is to extract money from the purchaser. Officially, these tools are designed to, themselves, break on angles so that they can't be easily center-punched for drilling & removing. They are always designed to be ten times harder than any known center punch and drill bit. Some say their primary purpose is to break themselves in bolts already broken that you were already trying to remove. Rumors are that these tools are designed & sold by companies who also manufacture cheap poorly-made torque wrenches. Further rumors are that some Countries, one of which is called China, are additionally in the business of making easy to break bolts.
FLASHLIGHT:
A container used to store dead batteries that are leaking; which, strangely, also contains a small light bulb.
GASKET SCRAPER:
Theoretically useful as a sandwich tool for spreading mayonnaise or mustard. Used mainly for getting dog-doo off your boot. All scrapers should be inspected before making sandwiches.
HACKSAW AND AVIATION METAL SNIPS:
One of a family of cutting tools built on the Ouija board principle. It transforms human energy
into a crooked unpredictable motion. The more you attempt to influence it's course, the more dismal your work becomes.
HAMMER:
Originally employed as a weapon of war & later seen being thrown for fun in the Greek Olympics and for describing the effects of overindulgence of alcoholic drinks, due to miss-hammering, the hammer now-a-days is used as a kind of divining rod to re-locate expensive parts far from the object we are trying to hit with the hammer. Some say that the real purpose is to discolor your thumb on the hand NOT wielding the hammer, thereby creating new loud phrases, and possibly resulting in visiting a local establishment for the purpose of, strangely, 'getting hammered'. The process of 'getting hammered' has resulted in many new hammer designs, and, not strangely, many dozens of not so clever ways of thinking about hammers, some of which are actually put to use at 7a.m. on Saturday mornings:
If you can't fix it with a hammer, get a bigger hammer.
If you can't fix it with a hammer, it's an electrical problem.
If you can't fix it with a hammer, it ain't worth fixing.
If it ain't broke, fix it with the hammer until it is.
If it ain't broke, you're not trying.
It is important if purchasing a new hammer of any type, to specify if it is a left or right handed hammer. Failure to specify to the store clerk will mark you as an amateur for life.
HARBOR FREIGHT (often just known as HF, of which there are several interpretations):
A seller of Chinese-made tools & accessories with Americanized names, that may, or may not, fit whatever you hope they will, & that you hope will last for even as many as three uses (seriously, most of the tools are OK). HF entices you daily, if not hourly, with advertisements, especially tabloid-sized & folded-over types. Others are snail-mail sent 'brochures', and back pages in your spouse's magazines and in local flyers. These advertisements all have prices that can vary for the SAME specific item ...depending on WHERE you got the brochure or advertisement from. You are not supposed to know that. The coupons/prices are honored at all HF. Serious "Harbor-Freighters'" save those coupons for what they are, or may be, interested in,
& often collect enough for the SAME item, to enable selecting the lowest price for any one item,
since the prices are, as noted, often different depending on where you see the advertising. Sometimes
this pays off mightily ...such as for motorcycle lifts ...and FREE STUFF! Don't keep the out of date coupons. HF is also good for tools you seldom need or do not mind losing. HF does have some useful stuff, of interest to Airheads, including common hand tools, multimeters, battery load testers, etc. (an awful lot of ETC).
Even serious Wrencher's often own something from Harbor Freight that has, mysteriously, held-up over time & use. A specialty of Harbor Freight is a line of hard-to-read & sometimes INaccurate torque wrenches; so difficult to read that major $$$ mistakes are possible in their use. Harbor Freight has you covered on that too, because they also sell items to fix problems caused by those torque wrenches. Harbor Freight has digital multimeters that are strangely accurate and surprisingly useful, that they often give away, if you purchase anything...so see their coupons, buy something! They may offer similar 'deals' on such as scissors, LED lights, etc. ...all of which can be surprisingly usable items ....and all of which are certainly worth their FREE cost to you (unless you must travel far to get to the store; or, you purchase lots of 'stuff', or many 'some things').
HOSE CUTTER:
A tool used to cut hoses 1/2 inch too short.
HYDRAULIC FLOOR JACK:
Used for lowering a motorcycle to the ground after you have installed your new front disc brakes, trapping the jack handle firmly. Sometimes used to break fins off oil pans and to crush feet from whatever it is you are lowering, such as motorcycle lifts.
IMPACT DRIVER:
An ingenious & substantial round metal device with a hidden internal cam and a square 3/8" drive; used for loosening tight or otherwise frozen fasteners, especially on old Japanese motorcycles, or any with phillips or similar appearing heads, by using the natural muscle spasm of the operator holding the tool, when his hand, at the webbing between thumb and forefinger, is struck by the hammer in his other hand. Known to be accompanied by loud screams; which are distinguishable from other emanations of emotion occurring during the brief period of time just after using this tool to remove frozen Bing Carburetor dome screws, during which you have broken an ear off the carburetor, due to failure to put a substantial block of metal under that ear. Not only is the carburetor ear offended, but so are the ears of bystanders. Bystanders are often female humans. Motorcycle technicians who are older than the hills, and spent their youth working on the earliest Japanese motorcycles, have permanent and prominent marks on their hands from this tool, facilitated by the small sledge-hammer used in the shop where he learned how numerous and ingenuous swear words can be.
MECHANIC'S KNIFE:
Often called a boxcutter. Used to open & slice through the contents of cardboard cartons delivered to your front door; works particularly well on boxes containing seats & motorcycle jackets; has been known to cause visits to places that stitch up wounds. These are not allowed to be carried onto airlines by passengers due to a propensity to cause major tall buildings to collapse.
OXY-ACETYLENE & PROPANE & MAPP TORCHES:
These are various tools often simply called a
PHONE:
A device originally invented by Alexander Graham Bell, who called it the Telephone; and who, strangely, invented it while working at a school for the deaf. Though he is credited with its invention, Alexander Graham Bell refused to have a telephone in his study (we don't have such rooms in homes anymore, because no one STUDIES, particularly teenagers), fearing it would distract him from his scientific work. Unfortunately, this good attitude has not transferred to today's users of "smart" phones, who are wearing the whorl's off their index fingers in using them, constantly, 24 hours a day. Some very popular types of early telephones sort-of looked like candlesticks, so the style was named that, your great grandfather and grandmother are still using theirs.
Modern portable versions are used extensively for such as a flashlight; or, popularly, for calling your neighbor to see if he has another hydraulic floor jack; or, could he come by and help get your bike off you before you are further crushed. At least, you WOULD be calling him ....but you left your phone in your car, parked out in the street. A more important use for modern phones is for testing the Cell Phone System on a rainy night in nowhere's-ville, with a bike that won't start because your battery is older than the hills ....and; you are with your special passenger, never having been on a long ride before, and whom you are trying to impress (and is wondering if motorcycling is really fun) ....and, you are wondering about the tent & sleeping bag you did not bring along (which would have made the situation tolerable, and even allow a Fun-ner Time). (Note: The cell phone tower is too far away, so the phone wouldn't work anyway ...which is good ...or bad ...depending on who you will be spending the night with, sans tent).
Today's portable phones work using with a new type of battery designed to fail at the best inopportune moment. The phones that appeared a few years ago, are called a Smart Phone. They are sold and signals processed by companies in the business of making Smart amounts of money. The purpose of a Smart Phone is to increase profits tremendously of telephone companies who can't make enough money on reliable old land-lines. The specific method used to extract lots of your money from your wallet is called a Data Plan. Most Smart Phone users have worn tips on one finger. Many have lost their phone on occasion, and have spent, over the years, about a quarter of their retirement money for their Data Plan and/or old-style Roaming "features". Many have replaced the special glass screen after testing it against hard objects. Smart Phone manufacturer's love customers, because these customers always want a Smart Phone that is the newest, the greatest, that does more 'stuff', thus every year (or two) Smart Phone owners simply MUST have a new one; and Capitalism reigns Supreme, again....and again.
PLIERS AND VISE-GRIPS:
Used to round off bolt heads. If nothing else is available, they can also be used to transfer intense welding heat to the palm of your hand.
POZIDRIV screw; also known by unmentionable names:
Unique screw that is often tightened or loosened with a Phillips screwdriver that normally will slip before proper torque can be applied and will always damage the screw. If you have a genuine non-slipping Pozidriv screwdriver, you may consider yourself 'informed'. If you have a SupaDriv screwdriver, and know the difference from a PoziDriv, you are an Advanced Nerd. If you know what a Reed & Prince screwdriver is, you ARE a REAL nerd, or may have worked in the aircraft industry. If you know what a Frearson screwdriver is, you are so old that you already have ordered a headstone and have a pre-paid
funeral contract.
PRINTER:
An electric powered device that is vastly updated from its originations in the 15th Century as a manual press, by the inventor, Gutenberg. Present versions are digitally operated, and sold well-below cost, are made of plastic, and designed to last long enough to almost use up a pricey case of liquid ink cartridges that dry out or clog quickly; or, similarly, to use part of a case of pricey, often black, "toner powder" cartridges. The main purpose of selling printers well below cost is to sell cartridges at a large profit. Amateur motorcycle mechanics (AKA "parts breakers" in the USA, and not in England, where Breaker's means something else, but the end effect is the same) need printers so as to make paper copies of BMW assembly parts sketches, which are NEVER accurate, because they were NEVER designed to show the actual order of parts assembly, only to show parts that might have been made sometime, for something having to do with some sort of motorcycle BMW made. The reason for needing paper copies is so would-be home mechanics can be confused long enough to support local doughnut shops to the same extent that shop mechanics do; and, be able to write indecipherable notes on the soon to be too black and greasy sheets of paper to read anyway.
PRY BAR:
A tool used to crumple the $$ metal surrounding that clip or bracket you needed to remove in order to replace a 50 cent part.
RAZOR BLADE, single edge:
A sharp tool having nothing to do with shaving a man's face. This tool was specially designed to create nicks in aluminum castings & associated parts where an oil-sealing gasket fits.
SCREWDRIVER, STANDARD FLAT BLADE SIZE & TYPE:
A very versatile tool. Used for opening paint cans & splashing paint everywhere. It is often used on American single slot screws that some idiot used on your metric motorcycle, but also has one really practical use ....with a heated red-tip to remove the plastic oil level sight-glass on BMW K-bikes and Oilheads, etc. Secondary purposes, amongst MANY, are to check the color of your blood when left in a rear jeans pocket; or, to test the puncture resistance of motorcycle seat fabrics.
1/2 x 16 INCH SCREWDRIVER:
A large motor mount pry tool that inexplicably has an accurately machined screwdriver tip on the end opposing the handle.
SCREWDRIVER, PHILLIPS TYPE:
Specially designed to cam-out when you are removing a screw, and thus you round-out the screw, which never again can have proper torque applied, same as the last time. Bing carburetors are equipped with screws, but most had either one slot screws at the top covers (very early carburetors); or, have something that only retired, or dead, Bing screw procurement guys know the truth about, but might be PoziDriv screws, which are NOT Phillips. Use of a Phillips screwdriver will damage PoziDriv screws. No one understand tip sizes for ANY of these. Phillips screwdrivers are an abomination, foisted upon the world to confuse & increase the sales of screw removing tools, which mostly do not work well; thus increases the sales of most anything. Available high quality steel models are available by Snap-On, at prices designed to make you stop breathing, at least momentarily. The most common use of the Phillips screwdriver was to stab the lids of old-style oil cans and splash oil on your shirt.
SCREWDRIVER, by BMW:
A short red-plastic-handle convertible shaft type, found in Airhead tool trays that is occasionally found in the original two pieces, but most often found with the reversible metal portion missing and the plastic handle cracked. When complete, this tool slips or cracks and slips when trying to tighten or remove any type of screw. No one knows exactly who might make screws it really fits; as even the grind angle of the standard blade end does not fit any known screw, and no one knows what the so-called Phillips end fits. Does not properly fit PoziDriv carburetor screws, which is almost the only screw on your motorcycle, except the ones on your instrument pod, which it does not fit if not always correctly. Mercedes Benz uses the same Heyco screwdriver in its tool kits that came with its cars. Some believe that this tool is incorporated into BMW and Mercedes Benz vehicle tool kits as a practical joke ....bordering on a private pun, that no one understands anyway. Some say it was developed originally as brown plastic, to be sympathetic with the Brown Shirts movement of the 1930's; but wrongly came out red. It is recommended that if you have such a tool, you place it in a noticeable place in your living room, perhaps on a mantle piece below your genuine Rembrandt reproduction. This should be where you entertain valued guests. If they ask about this "screwdriver", feel free to make up a wild story on any spur-of-the-moment (perhaps about German babies, toddlers, being introduced to tools); told with a straight face with a solemn, all-knowing look.
SNAP-ON:
A distributor of high-quality chrome-plated or polished tools of vast numbers of types, having Snap-On emblems or engraving. The engraving and high polish is highly prized for tools that cost enough to have you visit a loan officer at the bank (or, you may take 'advantage' of Snap-On's "forever" financing). These tools are displayed on your shop's wall in a visually-impressing layout to impress visitors to your garage with your status in life. Your real working tools are actually old, lifetime warranted Sears Craftsman (as opposed to limited lifetime, or Craftsmen with an 'e'). If you are a wannabe, your tools come from Harbor Freight Company; or, if your wallet was a quite modest amount fatter, you have a large fairly decent quality set of various tools from CostCo. Snap-on is a company with a unique sales structure ...that sells products from converted lunch wagons (EX-Roach Coaches). Snap-On is in the business of selling/accepting long term contractual forever mortgage payments for its products. Snap-On has more outstanding moneys-due, than inventory at their warehouses, endearing itself to Accountants.
All mechanics, even if very poor, have, or aspire to have, a few Snap-On types used for showing-off, at any and all occasions where wannabe Wrenches and other Admirers grovel at their feet, awaiting pearls of wisdom from the unwashed.
Those that are in the top 30% of income in the USA ....may have a vast collection of Snap-On tools, displayed on Pearl-White vertical boards covering their workroom walls. These are designed to "WOW" onlookers, unless they belong to an exclusive Country Club that admits only white folks in the upper 10% of income. Perhaps strangely, poor wannabes that not married, have no children and live in a hovel, may have small collections, but will use common brown peg-board for displaying them to the Public (the reverse side of the peg-board, viewable only from the shop interior (forbidden 'by insurance regulations' from being seen by "customers"), has all the old tools, many of which were found on the road, as old pickup trucks with worn shock absorbers bounced along, spilling old nearly worn-out tools of various and unfathomable uses.
More to the truth (warped slightly):
Ordinary mechanics who own more than just a few Snap-On tools are hard-working honest folks actually trying to rise up in their profession and appreciate the best tools money (lots of it) can buy. Folks who own hundreds of Snap-On tools are either retired, or nearly; probably forced to from bankruptcy proceedings; or, in a few more rare instances, have inherited Dad's repair business. Snap-ON has an interesting business model ...a shiny overpriced product that dazzles wannabees and serious Wrenches alike, and can be sold mostly due to Snap-On's pay-weekly policy; said policy was developed at Harvard Business School by Yale students who failed at being proper humans, a specialty of Yale. Snap-On sales people show up in their converted Roach Coaches just before or during lunch-time, which is a carefully formulated plot, worked out by many psychologists and psychiatrists. The Wonderment Of The Age is how one Snap-On man can be at every business in his County, at exactly noon, on the same day. Rumors that they are clones is seemingly the only answer. Snap-On also sells rollaway tool chests, the price of even one of which is equal to a modest fraction of the National Debt. Snap-on tools are of unquestioned quality. A rumor, passed around everywhere's, all the time, is that some Wrench, a friend of a friends distant cousin's uncle ....someplace ....actually owns nothing but Snap-On tools, has EVERY ONE ....and actually gets away with charging customers 3 times the going labor rate ....his tools are prominently displayed through a large window in the Waiting Room (which contains two large flat screen TV's). One, near the women's restroom plays women's favorite soap operas; the other TV has a 65 inch screen, is located near the men's toilet, and plays exactly..and only....four channels ...at the same time, ...one in each of the 4 corners....one plays constant ticker-tape displays from Wall Street, ...one
plays NHRA car racing ....one plays ice hockey, ...and the other has a variety of Dallas Cowboy CheerLeader commercials with the occasional Cowboy's game. The audio from all four is turned off, creating a peaceful atmosphere, quite different from at home.
TIMING LIGHT:
A flashing light stroboscopic instrument for illuminating grease & grunge buildup on rotating machinery. Some models have a dial, of which the owner seldom knows how to use; or, more likely, uses wrongly.
TOOL BOX:
A place to store tools that you never need, except for glass battery testers that are leaking small amounts of battery acid, because the tester is never rinsed nor hung up afterwards to dry. Tool boxes are also for placing in slippery beds of pickups, so as to be more easily lost with the tailgate open (and, especially if the tailgate is missing). Master Mechanic Tool Boxes are a special variant, these are often called Roll-a-Ways, because once they are full of Snap-On tools, they have been known to roll-a-way, in the middle of the night, never to be seen by you again. These types are made in many varieties, with the best brands having roller bearings, pricey slides, & large roller feet that might even swivel, usually in the wrong direction, so that you cannot move the roll-a-way in any sort of straight line once it contains a thousand pounds of your tools ....that means you will covet and maybe purchase another. Wiping and polishing your tools and placing them in a very precise & exacting positions in a very specific drawer is part of the mystique; and is known to lower productivity on actual jobs, but to greatly impress wannabees ....and, customers who don't know a wench from a condom.
TORQUE WRENCH:
Originally designed to offer a method of tightening fasteners to specified torque amounts so that airplanes stayed in the air. Now, all except professional tools, and two models of moderate-priced semi-pro Sears Craftsman torque wrenches, are commonly used by non-professionals to loosen, tighten, establish levels of broken bolts and studs..... or to remain hidden in some obscure drawer, someplace. Except for pro and semi-pro tools, all seem equipped with strange exceptionally difficult to read and understand characters, which are engraved or stamped on the too-shiny outside of the barrel of the tool, so as to make them nearly impossible to read clearly. 'Sales Engineers' have spent a lot of time designing torque wrenches, so that you can more easily WRONGLY interpret engraved or stamped-into-metal printed figures; which helps the sale, and continuing replacement, of easy to break stud and bolt removal tools, which have higher profit margins, particularly good when they need to be replaced often, due to them being broken. Makers of $$$$ industrial electric equipment to remove broken studs, broken EZ-outs, broken bolts, etc., own most of the stock in chrome-barrel torque wrench companies. While some torque wrenches have been used as light weight hammers, most of these tools are used to test the ultimate strength level of various fasteners and threaded joints.
TORX:
Mysteriously designed fittings & companion tools, supposedly stronger than Allen and other types, with a name that seems to be a bastardization of how you think about them. Torx tools are used to install or remove like-named fasteners. No one fully understands the numbering system. These are scheduled to be slowly phased-out by car companies, as newer mystery fasteners are developed. There are several previous types of mystery fasteners that at first quick glance look like Torx parts, just one is your Airhead's rod bolts, but they turn out to be a different type after a first close-up view occurring after you ruined the bolt which is a BMW-only part, and never in stock at a BMW dealership. No one understands three point rod bolts. A special Torx screw has been designed with a raised tit (we don't use the description 'sharp looking nipple' here) in the middle, purposely to keep your grubby wet hands out of various electronics products located in your home. The people who designed the Torx security screw are the same ones that ceaselessly re-design one-way screws of various new types, and often test them on men's and woman's public restroom stall doors. These screw designers all belong to the International Torx S & M Club. It is from that Club that the infamous saying came, "Torx Your Nuts, Sir?".
TROUBLE LIGHT:
These sources of occasional light are always designed by lamp manufacturer's, and sometimes called a drop light because they are constantly sliding off whatever you want the light for, and dropping on the cement floor. Most of the design and development time was spent on the handle, so it looks wonderful, but becomes extremely slippery with the slightest grease on your hands, so that when you drop it (in case sliding off your work area did not function), the lamp breaks. The most important purpose for Trouble Lights is to support the continuing manufacture of 100 watt incandescent lamps (ooopps! ...I mean 95 watt, it being illegal to make 100 watt lamps and sell them in the USA). Advantages of actual operating trouble lights are said to be, and wrongly, that they MIGHT be a minor source of vitamin D, "the sunshine vitamin", which sunshine is not otherwise found under motorcycles nor cars, nor pickup trucks, at night, in a garage. Health benefits aside, its main purpose really is to consume light bulbs of whatever type you have hand, and have installed in it. More often darker than light, its name is some-what misleading, due to a typographical error when originally naming it, the comma between the two words was inadvertently left out. Many folks can be found shaking these tools as the light goes on and off. Some folks, including the writer of this drivel, have used such tools to burn or otherwise damage small but visible places on $$$ motorcycle seats; and thus have switched to coiled CFL lamps that do not get as hot, but can release mercury into the air when broken, as they WILL be, by being dropped, or engaging contact with your dropped wrench.
TUBING BENDERS, Flexible type:
These come in various designs with the main purpose being to bend a perfectly good piece of tubing into various shapes that are good for absolutely nothing, in which case you find you now cannot remove the Tubing Bender, and thus must purchase another.
TWEEZERS:
One of the few tools actually used often. Tweezers are an indispensable item, used with various magnifying lenses, for removing microscopic whiskers of metal that jumped into your fingers. Often used with pins or sewing needles from spouses sewing kit, to enable a modicum of pain whilst removing the metal whiskers.
TWO-TON HYDRAULIC ENGINE HOIST:
A handy tool for testing the strength of ground straps & brake lines you forgot to disconnect.
WARRANTY:
A piece of paper with size 0.50 font printing on it, listing complicated methods, which typically costing more than the tool originally sold for, including YOUR paying for return shipping, for coping with the tool's insane warranty. No one keeps the Warranty or Guarantee paper since it is indecipherable and not understandable about what it really means & everyone hopes that their tool will last forever; or, at least to complete the job you purchased the tool for; whichever comes first. There are notable exceptions, notable because they are hardly ever noted. Some manufacturer's have talented Warranty Writers on staff, and some of them have been promoted to top management levels due to their ability to write warranties that either mean nothing; or, that have special features that allow the product (already designed to fail at a very certain point of time) to be used as a trade-in, for another similar product, with pricing factored into the original Warranty. This is cleverly done by the Best Writers, so that customers will purchase the same product, at an increasing price, forever. The very best of these Writers learned at the feet of a vehicle battery manufacturer salesman, whose brother was the battery production design engineer, & whose cousin was the battery product developer. They have recently come up with a lighter battery, named for an aunt of one manufacturer, Lithiel, a foreign name which is Lillian in American-speak, which resulted in the battery name of Lithium. These batteries are wonderful, because, at least for the manufacturer, they can be sold for 3 times any other battery type, and can be destroyed by discharging them near fully even once; or using them on 'wrong' chargers (manufactured by 'others', OR THEMSELVES); likely another company which they also own;....as well as owning their own chargers [to get you coming and going] (hopefully going...). I understand that many of these
Best Writers have changed employers, and may be found now at tire manufacturer's distributorships.
If you need to use the warranty that comes with your SNAP-ON tool, be sure to bring it to the SAME Snap-ON man who sold it to you. If he is dead, retired, etc., try some other way to get the tool replaced; whining loudly on the Internet may not work.
If you have a broken tool sold by Sears Roebuck, aka Sears-K-mart, or just Sears; or Sears Holdings, or purchased for a dollar in bad condition at a garage sale ....be sure to go to the nearest law library to read up on company products names, including the difference between Craftsman and Craftsmen and the limiting dates on the paperwork you threw away. Craftsman tools were once made by Stanley ...this was for about 50 years ...then the contract was lost in the 90's to Delmar, who owns many industrial brands like Matco and Channel Lock.
Craftsman tools are now made in China (these are NOT your Father or Grandfather's Craftsman/Sears tools guaranteed for a lifetime). Craftsman tools are now rather considerably overpriced, compared to Harbor Freight for equivalent usability cost. Pittsburgh Pro is Harbor Freights better quality line. The Craftsman brand are often better finished, which adds nothing to their utility. However, some Craftsman tools, especially when 'on-sale', could be strongly considered. The Digi-Tork line of torque wrenches, of the type NOT having engraved or stamped chrome barrels, but windows for viewing the internal settings are an example. Read the warranty on anything you purchase ...even if you have-to open the sealed box.
WHITWORTH SOCKETS & WRENCHES:
A thread design from the 1840+ era, by Joseph Whitworth, the purpose of which was to specify formal standards for thread design. Unfortunately the result was similar to the Country wherein Mr. Whitworth lived, which has never quite figured-out what to call itself, or its people. There was a Kingdom of England; a Kingdom of Scotland, they combined around 1600, but it was 100 years later by the time they made up their collective minds. Ah, the Kingdom of Great Britain. Britain? Great Britain? United Kingdom? Brits? Briton? Limey? Pommu? Tommy? Tan? British? The British, to this day, are confused, about many subjects, not just THEIR Subjects, and this includes Subject-to problems. I am sure I am not the only person in the America's that is confused. Yes, even the English, a misnomer if there ever was one, are confused. Probably due to the poisoned product from various colonies, called Tea, grown by folks quite tired of being 'subjects', with a lower case s. There is an infamous incident that occurred when honorable folks in a far away land, being put upon by British tea-mongers, tossed the British bales of tax-poisoned tea into a place called Boston Harbor. Just how these Colonies folks became addicted to drinking ground up leaves is for another time.
Once used for almost anything, including steam engines, old British cars and motorcycles, Whitworth wrenches (don't bother to try to understand the threads, or, GASP!, purchase a Whitworth screw or bolt ....if there is no immediate need) are now used mainly for impersonating the 9/16 or 1/2 inch socket or wrench you've been searching for ...for the last 15 minutes. Occasionally Whitworth tools, which confusingly have two sizes for EACH end of the wrench, including one with a W next to it, are used to impress people with your background of working on unreliable British machinery. No one outside of residents in old age homes in the "UK" understands the numbers, or how they are used, on ANY Whitworth item. Some say that the wrenches are used to tighten oil drain plugs, which makes them leak more, and that Whitworth is a code name for, well, crazy.
WIRE WHEEL:
Cleans rust off old bolts & then throws the dust into your nose and the part somewhere under the workbench at the speed of light. Also removes fingerprint whorls & hard-earned guitar calluses from your fingers in about the time it takes you to say "Ouch....". Thrown wires have been known to remove eyesight permanently.
A (Thank You Lord) final entry into this drivel was planned, but the Author and collector of these half-assed witticisms was stoned to death, then pushed over a cliff, by Lemmings.
OK, let's get serious about BMW Airhead tools........
I may have some BMW tools for sale from time to time. If so, they are almost always listed in this article: https://bmwmotorcycletech.info/sale.htm
You may be thinking of 'jumping in' and purchasing a lot of pricey tools from such as Snap-on. Even if you are planning to be a professional, I do NOT recommend that.
If you do not already have a fair collection of good usable general purpose tools, you COULD go to CostCo or similar and purchase one of the large tool sets for about $100-$150 if you want to make a fast entry into tool ownership. You will STILL have to purchase some tools occasionally.
After purchasing such a big set of tools; OR, DEPENDING ON WHAT YOU ALREADY OWN, I suggest you purchase only what you need at any one time to augment what BMW originally provided in the bike's tool tray items. NOTE that some of the tool tray BMW tools are not needed, or not what you should have. IMO. Purchase tools, from whatever source, that you are SURE you need, and then add to your collection slowly, as your needs and wants change over the years.
You WILL need at least one torque wrench. A Sears Craftsman tubular clicker will do fine; a Snap-On is better, but vastly more expensive. There are other good brands. Don't get a simple cheap beam wrench, unless you are also getting one of the tubular clickers. If you DO get a cheap beam wrench in addition to the clicker, I suggest one of ~75 ftlbs maximum indication, but not over 150 ftlbs. Consider your first tubular clicker torque wrench as a LIFETIME tool, and buy accordingly, even if a Sears Craftsman (many of us have those, and the DigiTork is fine). It should read in foot-pounds (perhaps 75 max) and/or Nm. To help avoid errors, the type with two little windows, one for Nm, the other for ftlbs, is good; and worst is a tubular clicker that has engravings or stampings on a chrome shiny barrel that is confusing and hard to read and understand. Your torque wrench can be 3/8 or 1/2 inch drive. Consider selecting the drive size based on sockets you already own, if extensive. I use my 3/8" square drive tubular clicker two-window torque wrench, with maximum reading of 75 ftlbs, more than any other. You will need two or three extensions, perhaps one a couple of inches, one 6, one 12 inches. While it is perfectly OK to purchase used tools if in good basic condition at yard sales, you should NOT do that for the torque wrench unless KNOWN perfect. Because of that, I advise buying your torque wrench brand-new, because you have no good way of determining how much abuse or accuracy it has had, & a torque wrench is a CRITICAL tool. I suggest you test your torque wrench. I suggest you put off obtaining an inch-ounce or inch-pound wrench until it is going to be needed. You do NOT need expensive tools. I would not skimp on the torque wrench, get a decent one. Harbor Freight is NOT the place to purchase a torque wrench; but HF might, since I wrote this, have some good ones.Many tools at yard sales are worn-out, but sometimes you find tools that are poor-looking because they are somewhat rusty ...and a bit of work with a wire brush will make them very usable. These may be available very cheaply with a bit of bargaining.
Be sure you have basic screwdrivers, basic wrenches, a digital multimeter (even the cheapest or free one from Harbor Freight are quite adequate), a timing light (you do not need the dial adjustable type), feeler gauges,.... and Allen wrenches in metric sizes. If you intend to open a shop or work for a dealership, you will need more tools. If working for a dealership, you will find the dealership stocks BMW special tools.
Surprisingly(?), MANY of the BMW-sold tools are often NOT expensive. Your BMW Airhead came from the factory with a GOOD, made of high quality metals, tool kit ....with ONLY A VERY FEW EXCEPTIONS. This was especially so for the earlier models.
Here are those exceptions:
(1) The red-plastic-handle-short-screwdriver (Heyco) with the reversible Phillips/conventional tip, was cheap junk. Barely usable; wrong shaped tips, very crackable handle. Many better screwdrivers are available. Note that most of the carburetor top screws are NOT true Phillips. See 71-11-1-103-086 well below for deeper discussion.
(2) The BMW pliers should be discarded in favor of one more useful and easier to use. The stock one is also typically way too stiffly assembled and hard to loosen-up.
(3) There is no good reason to purchase BMW sockets, etc.
Before I get more deeply into this article, I want you to know that a very few of my articles call out for tools, even home-made tools, that MIGHT NOT BE LISTED IN THIS TOOLS ARTICLE. This should not be any problem for you. If you find an instance where it is a problem, please contact me and let me know the specific details!
Basic description of BMW original tool kits as shipped (or available) with the motorcycles:
There was a Master Tool Kit, possibly you may have heard it called a PRO tool kit, or Super Tool Kit ....part 71-11-1-237-840, that had extra items, & some slightly different versions of some of the standard tools. This kit would hardly, in its roll bag, fit your bike's tool tray. DON'T purchase this kit unless you either can't help yourself, or it is amazingly cheap. SOME of the tools in the Master Kit had different COMBINATIONS of SIZES at each end. Some of those tools later became the standard for the bike's kits as shipped. In a number of instances some of the original standard tools ordering numbers were superseded by the Master ("Super Tool Kit") part numbers; and, both tools, in some instances, were identical, an example would be the 27/36 mm dogbone tool. Either of those tool kits, regular or Master, are quite adequate for many needs. The Master Tool Kit contains too many little or never to-be-used items, and is not worth purchasing. One of the things not so well-known, is that this Master Tool Kit Professionals' tool set had sockets, a test lamp, etc. You are not likely to need nor want those items from BMW, because there are equal or even much better items available, rather cheaply.
BMW included (in the original owners tools, which came with every Airhead, a BMW name & logo printed rag. Also included was a small open end (both ends) wrench. There were TWO versions of this particular wrench. One version was 7 & 9 mm; the other was 7 & 8 mm. I STILL, after all these years, do not have full information on why. BMW did have BOTH of those wrenches in a few tool kits; but usually just one or the other. BMW did the same sort of thing with one other wrench: 10 & 11 mm & 8 & 10 mm. BMW never included any 9 mm socket in the PRO (Master) version. There were some throttle cables made with locking nuts with 9, not 10 mm size, & some manufactured very slightly over 10 mm, strangely. I think the difference came about from what company made the various control cables for BMW.
To properly maintain your Airhead, you won't need but a modest collection of other tools. DO NOT go overboard! Get tools for your home shop/garage when truly needed!
This article lists various tools, and BMW part numbers. This article also lists specialty tools. Only a very few of these tools should be in your bike's tool kit. The owners set varied over the years. Perhaps you already know that a few of the tools were changed a bit, or eliminated. For instance, the /5 had a 'rod' used in adjusting the steering head, which was later dropped because the later steering heads used an improved adjustment method. The points and valves tool (small feeler gauges, etc.) assembly was dropped, after an interim period where it was first modified (with a tool being part of it that adjusted the ATE master cylinder piston distance). This points, valves and master cylinder tool-in-one, is rather neat and takes up very little room in the bike's tool tray, there are two photos of this combination tool and a further description, later in this article. See: 71-11-9-090-154, below, and paragraph following it too. That tool is still available, even aftermarket. Part I: Some tools you can consider, SOME you WILL want, SOME that are a waste of money, SOME are NOT needed. SOME for only AS NEEDED, if at all. Discussion at various places here. Pick & choose as needed/desired. Some tools will NOT be applicable to YOUR bike. It is a very
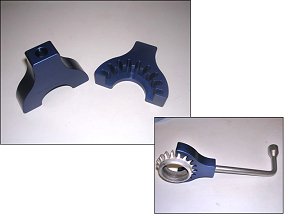
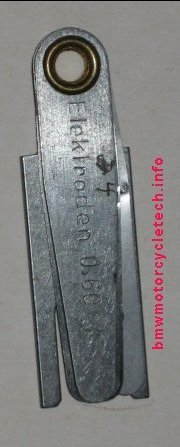
good idea to inspect your own Airhead & determine just what tools you need at home, & what tools you need on the bike, & in some FEW instances you need two of one size (I have some notes later about that). If you mix American and Metric fittings, which is NOT a good idea for your bike for several reasons, you may have to carry more tools ...best not to do mixing. BMW has made hardware changes that will, or could, affect what tools you carry. BMW has not announced this in a special bulletin. In instances where you are purchasing nuts & bolts from BMW, be sure that your new nuts & bolts have the SAME WRENCH SIZE HEADS as your originals. BMW has made changes to SOME bolt head sizes, USUALLY using the same part number. As an example, a bolt may have an 18 mm head, instead of the original 19 mm; 16 mm head,instead of the original 17. If you find this situation at the dealership, ASK if they have any original 19 or 17 mm; they may be in the same box, as they may have same part number! There is no good reason you should have to carry both 18 mm & 16 mm wrenches besides the normally carried 19 mm and 17 mm, if you knew about this ....and, now you do! Just be sure to check YOUR BIKE, to be sure you have all the sizes of wrenches (and different types, A/R) as needed. It is BEST to look at catalogs, including on-line dealer fiche, or see at your dealers screen or the actual tools; or, whatever you have available to you that shows drawings or pictures of any tools, before you purchase any. Check the sizes of the tools YOU need, and how many of each! If using a BMW part number for such as on-line fiche, or searches in general, be advised that for some on-line parts service pages you cannot use hyphens in the part listing, and some won't work with spaces. Some won't work with either. As an example, the first part number, below, would best be searched-for as: 71111232356. 71-11-1-232-356 This small wrench is three in one, with a 7 mm and 8 mm at one end & middle, and a open 9 mm at one end. Not very useful in actual practice, except on earliest Airheads somewhat. 71-11-1-237-858 Hook wrench. You may or may not need nor want this one. 71-11-9-090-129 Tubular two ended wrench used at the valve cover acorn nut, & a few other places. There are much better tools. This tool fits sloppily, but usably, at that acorn nut. You MAY like to have it in the bike tool tray. I think this wrench is 15 mm and a sloppy 19 mm. 71-11-1-230-684 (the original number). Special two-ended wrench often called a Dogbone wrench from its appearance. Fits 36 mm fork top caps, 36 mm top center acorn nut, 27 mm headlight ear 'nuts', 27 mm swing arm lock nuts. Replaced by 71-11-1-237-857 which is the SAME tool. A version with 41 mm instead of 36 mm is for later bikes, although it is best to own BOTH. See the next paragraph for why. I believe you should own a dogbone tool, and if a late model Airhead, you likely need both dogbone tools, explained below. Modify your tool in accordance with my information, if applicable to your bike. BMW sells this same style of dogbone wrench but with a 41 mm flat end (but same 27 mm tubular hex at other end). Used on some much later Airhead models and for the Earles fork pre-Airhead models. 71-11-2-303-517. For both the 36 mm end version and the 41 mm end version, these are VERY tough metal in the flat portion, can be used with a quite substantial hammer if using the 36 or 41 mm ends. The 27 mm 'tube' end is for emergency use at the swing arm nuts (because it is rather easily bent/twisted at high torque levels), although usually plenty strong enough for use at the headlight ears fasteners. One other modification to the dog bone wrench should be considered: As noted, BMW also sells the dogbone wrench with a 41 mm flat end (but same 27 mm tubular hex at other end). Used on some later Airhead models and for the Earles fork pre-Airhead models. 71-11-2-303-517. BMW has both 36 and 41 mm items at the tops of the forks on the very last of the Airheads. Some carry both sizes. I do not. See additional information 3 paragraphs below. This photo above is of an UNmodified dogbone wrench ...but I've identified the area for thinning the wrench, which I suggest be done on only one side of the wrench, best the TOP SIDE as shown in the photo. Bikes vary some, & you don't likely need very much thinning. Check YOUR bike, to see how much thinning works, or will not, for you. This wrench happens to be a 41/27 mm type, but the 36/27 looks the same except the flat end is 36 mm and is stamped 36, not 41. Remember, you are grinding the flat hex end a bit thinner, and only if needed to fit the flat end onto the acorn nut at the top center of the forks (the top plate area), so handlebars don't need loosening or removal. This is not so for all bikes, so check yours. For the hex tubular end, you are sanding or grinding the end flat and square to remove any internal taper. You may have to grind the 'points' of the hex a bit to fit the swing arm locking nuts properly. I suggest that use is for emergencies only. Some very late model Airheads need BOTH sizes of these dogbone wrenches. These particular bikes needed 41 mm for the two forks tops; and 36 mm for the central locking nut at the steering stem. Be sure you have what you need. You usually do not have to carry any of these dogbone wrenches in the on-bike tool kit. NOTE that some GS and G/S models use one or the other or both, of these wrenches. See Part II, below, item #26, for the modified SOCKET you should have, to fit the 27 mm swing arm nuts, to keep in your home garage tool kit ....it is vastly better than the dog-bone tool ....for that particular purpose. 71-11-9-090-139 Old exhaust pipe hook wrench used for early models through /6 that have holes (dimples) in the sides of the exhaust port nuts. Don't purchase unless you have the need. I recommend you use an aftermarket finned wrench if you have finned nuts. Various exhaust finned nut tools are available. For emergencies you can purchase a common Strap Wrench at autoparts or tools stores, but these CAN cause damage to the fins although that that can be minimized with a bit of old tin can or part/piece of your leather waist belt. Some carry some form of exhaust pipe finned nut wrench in the tool tray on the bike. I NEVER DO, unless taking it along for a TechDay. DO NOT FAIL TO OWN ONE OF THE AFTERMARKET FINNED NUT WRENCHES. I show three good types below. YOU WILL use one these tools at least once a year, as YEARLY unfastening, cleaning, & applying fresh antiseize compound is a MUST for the exhaust port finned nuts. Stock type, $$$$. Aftermarket ones are fine, and MUCH cheaper: The first photo is of a small tool-tray-sized version of a finned wrench, available from aftermarket suppliers. It is used with a square drive socket wrench, so you have to carry that tool too. I did see an Airhead owner who had welded a square nub onto another tool he carried, making it a dual-purpose tool, so it could be used as a square drive wrench. If you actually wanted to measure the torque you are applying, this tool can do that with appropriate calculations ....but, so can most other exhaust port finned nut tools. I do not measure the torque, I tighten by feel. I use a fair amount LESS torque than BMW specifies ...I believe BMW's spec is considerably too high. To contact cycleworks, use cycleworks.net
You may want to see the contact information in this article, way below, at #20. Below is what I recommend, because there really is hardly any reason to carry any sort of finned nut wrench on your motorcycle. Check with your BMW dealership & other sources, as to where to get one like this. They are substantially-made of cast or forged aluminum. I have seen a version of this tool that had fewer contacting surfaces, and I don't like that one very much.
Five Allen wrenches as follows. You certainly do not need BMW's own, but they are tough.
07-11-9-906-032 8 mm allen wrench; 71-11-1-237-849
07-11-9-906-026 6 mm allen wrench; 71-11-1-237-850
07-11-9-906-020 5 mm allen wrench; 71-11-1-237-851
07-11-9-906-014 4 mm allen....was erroneously sometimes -914 (?), replaced by 71-11-1-237-852
07-11-9-906-008 3 mm allen wrench; 07-11-1-237-853
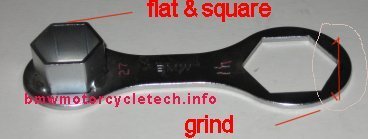
Grind the flat part of the 36 mm end of the wrench for perhaps 90 or 120 degrees circularly across the top, so that the end of this 36 mm end is slightly thinner; this allows the tool to fit over the top acorn nut without having to remove nor loosen the handlebars. See the crudely drawn circled area on the photo below, with the line and arrow showing the direction of grinding thinner.

Below is an interesting version made by Guy Hendersen. This is a good tool.
http://www.hendersenprecision.com
71-11-1-237-855 SHORT tire iron, was replaced by -871 which is the longer one. I prefer my on-bike tool kit, if I have tube type tires, or simply carry tools to help others with, have TWO short & ONE long; but I am OK with all being the long version. BMW discontinued the -855 short irons. If you do not have or can't find the shorter ones, then I'd purchase and carry three BMW long ones, -871; or, whatever you like. Three tire irons are much nicer than having only two, particularly with a tube in the tire. There are aftermarket tire irons available that are quite good. Most are much longer, and may not fit your motorcycle tool tray. See my tire repair article for specific recommendations for tire irons, bead breakers, and LOTS more:
https://bmwmotorcycletech.info/TireRepair.htm
Tire repair kit:
Type depends on whether or not you have tubes in your tires. It also depends on if you carry parts to repair other folks flats. While you will want to carry a tire repair kit, I recommend against ANY size of CO2 cartridge/bottle. I dislike those high pressure cylinders; seldom enough of them with you; and a very small 12 volt compressor, see below, is VASTLY better. Even a cylinder operated as a compressor is better. Be sure that if you use that cylinder spark plug hole style of compressor, the compressor hose is long enough.
Important to have is something to de-bead the tube-type tire; and, an air compressor. I have made such tools from C-clamps with welded pieces on the anvils, & there are commercial types available of strong light plastic that are cleverly designed. Others are metal and/or massive. There are some complete kits ....well, almost, of tire irons, patches/plugs, glue, whatever, ....available. These may include a cylinder (via spark plug hole) operated air compressor or a 12 volt compressor & both work fine. If not purchasing a complete kit, purchase what you want/need. You can purchase, very cheaply, under $20, a very small 12 volt electric compressor, these are all made in China. Remove the innards including the fan, make a plug for it to fit your BMW Hella style auxiliary jack ....or alligator clips, as most compressores come with (or, cigarette lighter plugs) to go directly to the battery. BOTH of these types of compressors ...spark plug hole ...or electric ...are FAR better to have than the near-worthless BMW hand pump that fits onto pegs for it on the upper left rear frame. The electric compressors are also available for nearly $80, mounted in a modest sized can/box; I think them a waste of money. You can purchase small low-cost compressors at such as WalMart, & then remove & toss the case. WalMart also likely has really small cased versions that need no modifications except the correct BMW accessory plug (if you want that). Coleman and SLIME also sell quite small compressors that do not need the case removed. For some other ideas on tire repairs ....see: http://www.stopngo.com. Stop'nGo plugs don't work as well on steel corded tires, but if you ream the hole really well on those tires, you can use them, but be prepared to replace the plugs if on a long trip.
Do NOT forget a bead-breaker ....unless you are confident of using your foot (never good for me, I weigh 150)....or one side of the center-stand or the side-stand, etc. Be SURE you have practiced! There are quite a few types of bead-breakers on the market. I carry my homemade one, made from a very large C-clamp, with some added curved pieces welded to the anvils, ....same shape as the wheel rim edge...so it fits the tire right next to the rim. I really do NOT ADVISE you making one like mine. I suggest you get yours from BestRestProducts ....they have the tire tools you might want or need. http://www.bestrestproducts.com/
Recommended tire repair tools are also located here:
https://bmwmotorcycletech.info/TireRepair.htm
71-11-1-230-752 The stock standard on-bike tool bag itself. This is the one to get if you want one. The larger bag for the master tool kit was 71-11-1-237-870; and is NLA.
71-11-1-103-092 Pliers w/side cutter.
71-11-1-237-861 A side cutter only tool.
$$$. For both of the above, there are MUCH better ones from most hardware stores, even Harbor Freight, and MUCH cheaper than BMW's. I prefer a good heavier-duty side cutter pliers & a good old-fashioned pump-slip-joint-pliers. Consider having a good side cutter PLUS a separate tool, a slip-joint type called a Channel-Lock. BMW's version of the Channel-Lock is 71-11-1-237-862, which supposedly replaced the 71-11-1-179-522; but probably only the -179-522 is actually available, $$$$, and there are much better available, at much less cost.
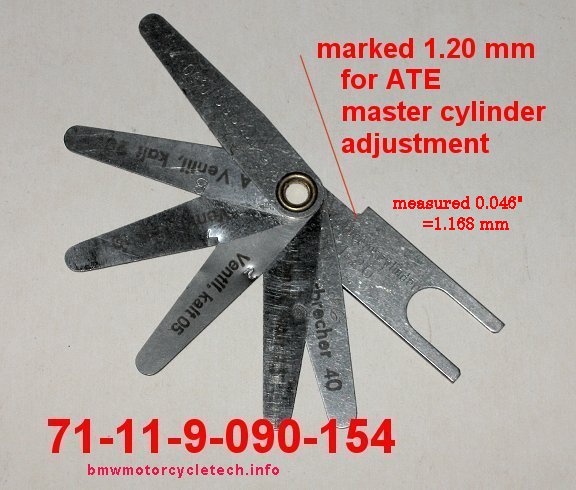
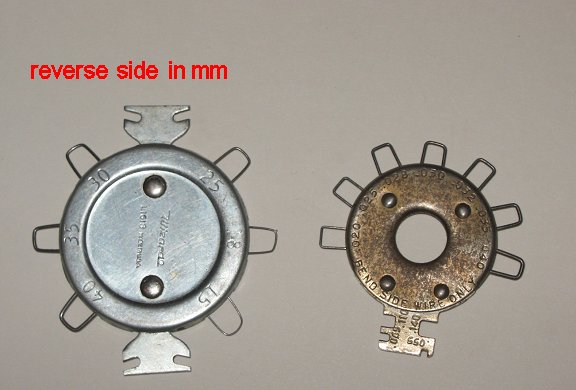
71-11-9-090-154 Feeler gauge & versions had a ATE master cylinder adjustment gauge set. This is a small riveted-together multi-tool item, of good quality. Photo below. You don't have to have this tool but these are nice AND SMALL. NO LONGER AVAILABLE FROM BMW; but are, elsewhere's. Particularly convenient if you have have ignition POINTS where you have little room to work in. For adjusting the valves, a common set of feeler gauges, in 'go, no-go', is nicer; I keep those in my garage-shop. You CAN use this BMW type multi-tool for the valves. MANY FOLKS PREFER THIS BMW TOOL! Minimalists carry just the BMW small standard feeler blades tool. You could also just disassemble any common feeler-gauge set & carry just the minimum. Sizes you would want are ~.017" (if you have points), .004" or .005" and one of .008" or .009" for setting valves. A gauge for spark plugs is part of the -154 tool but that is for brand-new plugs ONLY, and is NOT the best tool for the job, which requires a wires-type ...that is shown below after the -154 tool. I personally prefer this round circle type of spark plug tool, which has graduated hard wires, they include a bending tool. Wires do a much more accurate job on worn spark plugs as the grounding electrode gets concaved as the spark plug gap wears. This is a moot point, because I highly recommend you do NOT EVER change the gap of USED spark plugs. Even if used just once. Once a spark plug is run, the ground electrode metal undergoes a metallurgical change; if you try to bend it, you may weaken it; there have been quite rare instances of electrodes breaking off & doing internal engine damage.
A later version of this -154 BMW tool had a gauge for the ATE master cylinder that is under the fuel tank. ATE Master Cylinders require an adjustment, which was done with a special U-shaped flat metal tool, that BMW provided in the owner's tools...it is combined with the feeler gauges, as shown in the photo below. This tool sets the master cylinder piston FOR THE FREE PLAY AT THE BARS LEVER. The real purpose of the tool is to be sure the piston in the master cylinder sticks outwards JUST the correct amount, so the bleed-back hole in the MC is not 'covered'. The handlebars lever free play, which is not critical, is to be 0.16" to 0.24", as measured where the lever end contacts the casting. When the lever is not under hand pressure, the BARS lever end CONTACTS the bars casting; just to make this measured point clear in your mind. To set this bar lever free-play, by some published methods, you must remove the fuel tank, insert the special tool (pry off the rubber cover) into the master cylinder after loosening the cable adjuster locknut located at the MC. There is a groove in the MC piston for this gauge. Adjust so the tool is JUST free to move, then tighten the locknut. There is nothing OVERLY critical about this tool, but it should be flat, smooth, & the thickness fairly close to the original. I measured an original one of the type that was in the bike tool kit, as in the photo below.
The thickness of the metal is important, the original one was 0.046"THICK. That is 1.1684 mm, which is pretty close to the factory adjustment tool specified at 1.20 mm (the blade in the photo is marked 1.20, which it is not exactly). The tool length is not important, the original was about 2". The width of the tool was 0.592". The slot in the tool's long end was to a depth of 0.642" with a full radius at the bottom; the slot width was 0.363" which is 9.22 mm, which is very close to the factory tool of 9.25 mm. You can also make the tool with some tolerance, but keep the THICKNESS. NOTE that you can adjust the master cylinder so the bars lever has more free play, for smaller or less muscular hands.
NOTE! The figure in the photo, below, 1.20 mm, is the actual size of the FACTORY tool, but this feeler gauge tools actually measured 1.168 mm, as noted above.
Below are two types of proper wire type spark plug tools. The one on the left is larger, easier to use, has mm equivalents stamped on the reverse side, is NOT expensive. The one on the right is an antique of mine. Photos of spark plug adapter tools for synchronizing carburetors will be found here: https://bmwmotorcycletech.info/synchcarbs.htm
Below are two photos of round cylindrical tools for help in setting the Airheads (pre-1979) points. These are not required, but many find them useful/helpful.
The first photo is of the tool from Northwoods Airheads.
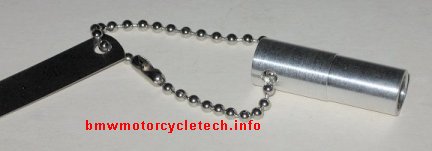
The dimensions of the cylindrical tool has varied between those who make them. They need to fit smoothly and not excessively tight ...nor too loose. Paul Tavenier, see next paragraph, made the original, and, after doing thousands, still makes them, and they are precisely made using the same final-stage reamer and are finely finished. Highly recommended by me, Snowbum. Comes with the feeler blade points gap setting gauge too, as shown in the next photo.
Below photo is of the original & still-made tool by Paul Tavenier, shown here and also on the
http://www.Cycleworks.net website, but made by Paul. THESE ARE REALLY NICE! You may contact Paul, see his E-mail address in the photo below, repairhead@sbcglobal.net, and purchase the tool directly from him. He makes a similar tool for the /2 bikes...and also makes a tool for those who have, unfortunately, a broken camshaft tip. The /2 points setting tool has an outside diameter of 0.689 to 0.690, and the inside diameter is with a 12 mm reamer.
Paul makes the Airhead tool precisely to an outside diameter of 0.471-0.472". The inside is reamed by a 9 mm reamer, to 0.3543". For those interested in the dimensions of the Airhead ATU unit, the bore is typically ~.355"....and the cam tip area is .3535".
71-11-1-234-860 The classic BMW tire pump that fit on the left side of the rear frame. You will find this strictly a nostalgia item, as it is a hassle to use ...can take an hour to pump up a tire & you risk bending the valve stem too much. Preferable is the spark plug adapter type of pump, or, especially, the $12 WalMart or other 12 volt Chinese-made compressors, as noted well above. Don't bother buying the BMW pump.
51-25-1-238-375 Cable lock. Fits in the frame tube under the fuel tank. Plenty of other choices on the market. Your Airhead's steering head neck has a key lock.
71-11-1-237-854 Pin (also called a drift). You need one of these for the holes in your BMW tubular wrenches, and miscl. uses. Some folks have sharpened one end to a point, other end to a sharp chisel-scraper, having three tools in one. I don't, as I like to use the drift as a drift (and I may square off the end). You don't have to have this tool, but probably should have one in your on-bike tool kit; but, you can substitute a larger screwdriver that has a round shank blade, for turning your tubular wrenches.
71-11-1-237-856 Two-ended socket (tubular) wrench, also see 71-11-9-090-105.
71-11-1-237-859 Point contacts file. Filing points is an emergency fix, and a diamond type thin blade fingernail file works better if you have to have a file for your points.
71-11-1-237-860 Tire gauge, pencil type. Don't bother owning this BMW tool. Are better choices.
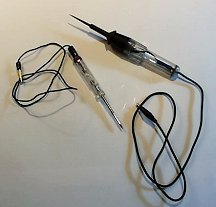
71-11-1-237-863 Test lamp, called a Control Lamp by BMW. Don't bother getting the BMW one, unless you simply must have it. Do get a test lamp tool and learn what it can do, which is a lot. You can get a simple test lamp with alligator clip on the long lead & a sharp point on the end, from any autoparts store (or Harbor Freight for free or cheap). Get the type that does NOT contain a battery. Radio Shack; Harbor Freight, most hardware and auto parts stores also have them. CARRY the non-battery-containing type of test lamp tool on the bike & LEARN HOW TO USE IT! This is a very simple but VERY USEFUL tool. It is OFTEN vastly faster & easier to use when tracing an electrical problem. Shown below are two types, either is fine.
MULTIMETER:
You don't absolutely need a digital multi-meter (volt-ohm-ammeter-diode-transistor tester, all in one) to carry on the bike. If you want one for the bike, get one that is small. Get a DIGITAL type, not mechanical (called analog), perhaps for free from Harbor Freight. See my article
https://bmwmotorcycletech.info/multimeters.htm. Below photo is a Harbor Freight freebie, still packaged. There are two or three versions of these from Harbor Freight, and all are GOOD. This particular one has the OFF-ON slider switch. DO own at least one of these types of tools, and learn how to use it (see the article). I carry both a test light and a multimeter on my bikes. I maintain my bikes electrical systems very well, so have hardly never needed the meter or test lamp for myself, but I seem to end up helping others a fair amount, particularly at rallies. NOTE! The only real problem with these Harbor Freight sold meters is that the test probes have very skimpy interior wires, and tend to break the wires after considerable use. You can easily repair them...or, just purchase a nice set of test probes, that fit the meter's female jacks.

71-11-1-230-000 A thin round rod was used on the OLD /5 style steering head clamp arrangement, to hold the collar during adjustment. You don't need this and could substitute an allen wrench already in the kit. The /5 parts can be replaced by the /6 type parts, then the steering head is easier to adjust. That modification is recommended by me.
71-11-1-237-872 15 mm x 17 mm fork ring wrench
71-11-1-237-864 through -869: These are a ratchet handle drive, sockets and extension, and there is NO good reason to purchase them nor to carry them in your bike tool kit. You probably have similar or better tools from other manufacturer's anyway. The sockets were, in mm sizes: 13, 12, 10, 6. That makes them of little use.
71-11-1-237-841 7 mm x 8 mm open end wrench
71-11-1-237-842 10 mm x 11 mm open end wrench
71-11-1-237-843 12 mm x 13 mm open end wrench
07-11-9-999-119 12 mm x 14 mm open end wrench
71-11-1-237-844 14 mm x 17 mm wrench. GET TWO, carry both.
71-11-1-237-845 17 mm x 19 mm wrench. GET TWO, carry both.
71-11-1-237-846 24 mm wrench.
71-11-1-237-847 10 x 12 box end wrench, which replaces 71-11-1-230-579.
71-11-1-237-848 19 x 22 box end wrench. You MIGHT want two.
Alternator rotor removal tool for the stock BMW Bosch Alternators:
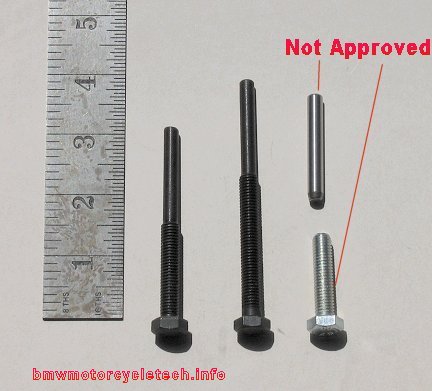
Carry this alternator rotor removal tool if you have the Bosch alternator. You will probably never need it, but someone might, and if you need it, it takes up very little room. Either get the official BMW tool, 88-88-6-123-600, or get a good substitute from the aftermarket. DO NOT! use the homemade tool on the right in the photo below, unless you are absolutely SURE it will work properly & WILL NOT NOT BEND, NOR WILL IT'S INNER PIECE COCK SIDEWAYS INSIDE THE ROTOR. That means testing it. Maybe testing with a rotor already removed. The photo below shows three types of these tools. The factory tool is similar to the left & center types. Those are grade 8.8 hardened, and so marked on the heads. The right-most tool consists of two pieces, one is simply a hardened bolt, one hopes in grade 8.8, & the other piece is a roller bearing part, used as a spacer pin; although some have made it from a piece of bolt shank. Use of the tool on the right, shown as Not Approved is for absolute emergencies, as there can be VERY serious problems if dimensions are wrong in either or all the diameter & length & end taper. If you INSIST on making this tool, it must be of grade 8.8 steel or 10.9 steel. DO NOT use an old drill shank for the upper piece ...they can be brittle. Think before using such a tool, because if you can find a way to get home or to place of repairs and use the proper tool you did not have in your on-bike tool kit, you may be much better off. If you do NOT use a proper hardened tool, and there is a problem with your tool inside of the rotor, then you may be in DEEP trouble. Besides the stock Bosch rotor, where I recommend you do not use two piece tools as shown ...ALSO DO NOT use any such two piece tools in aftermarket rotors, such as the EnDuraLast Alternator or the Omega Alternator, unless the tool is known OK.
Part II: Tools you MIGHT want, now or later (or, not!), but certainly need to know about:
1. 8 mm SMALL (not long) combination wrench. An 8 mm box end on one end; preferably a 12 point, but harder to find?, with an 8 mm open end wrench on the other end. You MAY want to BEND this wrench with an oxyacetylene torch. Use for the diode board nuts located on the REAR side of the upper timing chest casting wall, that is, below, forward, of the starter motor area. BUT, see item 2, below....
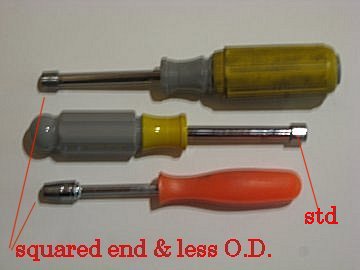
2. SpinTite (or equivalent brand) TUBULAR wrench, 8 mm hex size, female socket on end of the barrel, usually with a wood or plastic handle but METAL handle is better than the type of plastic handle that does not have the shank strongly mounted in the plastic. You might be able to substitute a modified 1/4" drive 8 mm socket. I modify the working end of my 8 mm tubular wrenches, so there is NO internal taper that would prevent use on a very thin nuts, for this it means squaring off the working end, so there is no internal relief left. I also grind the outside diameter of the 8 mm end down some because I use these tool in tight quarters. Do NOT overheat the end when grinding the very end or the diameter. Do not make the working end too thin. Check your diode board nuts to be sure your tool fits properly. This tool is useful not only for the diode board outer (forward) nuts, but in removing other nuts such as at the alternator brush holder. The T-handle type (especially if all metal) is fine but does not fit in the tool tray as nicely, and I have not shown one of those here. Check the fit of your tubular wrench at the diode board nuts.
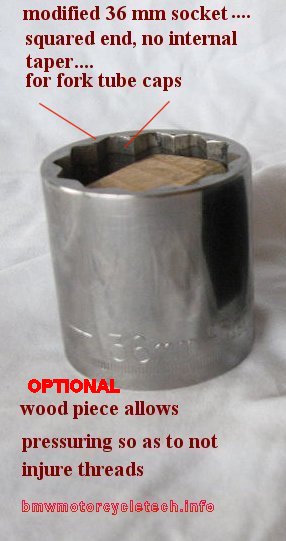
3. 36 mm socket, SQUARED-OFF at the working end as shown below, eliminating the internal taper at that end. Do this on a lathe, unless you are good at grinding or sanding, as the end MUST BE FLAT AND SQUARE. See notes on photo. The comment about pressuring is because the fork springs are often under pressure during installation of a top cap, which has an non-threaded portion and a threaded portion, and can be hard to push down to engage the threads. You do not have to have the wood piece. Note that the Dogbone wrench does a good job of loosening and tightening the fork tops, although installing the fork cap will require some goodly downward pressure if the fork spring demands such.....so this socket tool is something for home use, IF you want one. Not a must. SEE #26, WELL BELOW, for a modified 27 mm socket.
4. 88-88-6-002-560 BMW tool, or equivalent, to allow a torque wrench to properly fit the special driveshaft bolts at the transmission output flange. The BMW-sold tool is crude but effective. It consists of a 3/8" square drive female part with a slit in the side. Pressed & brazed into that slit is a 12 point 10 mm off-set box end wrench. That box end wrench was simply a double ended wrench of some sort, cut to be shorter, one end discarded (or, making one, keep the other part!). When using the tool, typical is to use it straight-out with the torque wrench, not at any angle to the torque wrench. The center-to-center distance of the working ends of this tool, compared mathematically to the distance between the working center of the torque wrench square drive & the center of pressure of the torque wrench handle, will determine the torque wrench setting THAT WILL BE LOWER than the book value, due to the added length. In ALL instances except if used at 90°, the torque wrench will be set to LESS than the value that will be APPLIED. If the tool is at 90° to the tubular torque wrench, there is NO correction needed. I am fine with you using 1 drop of Loctite BLUE on clean threads, then 25 ftlbs. The official maximum torque amount is 29 footpounds. I wish to make CLEAR that the torque value, my suggested 25 to 29 ftlbs, is the torque APPLIED TO THE BOLT.
Old Airheads (and even PRE-Airheads!) came from the factory with a split lock-washer under the that bolt head. If you have washers, including split washers, remove the bolts & washers & get the new shorter BMW bolts & do NOT use any washers. Details on this website: https://bmwmotorcycletech.info/drvshftboltstoolstorque.htm
Here's are HINTS!....if you don't want to purchase a -560 tool, or a Snap-On adapter, or adaptor of some sort such as shown below, here is how to get by for possibly no cost:
Dig into your BMW tools for a combination 10 mm wrench. That word 'combination' is universally used and means, here, that it has a 10 mm 12 point box end and the other end is an open wrench. Some combination wrenches are just one size. If you are lucky, you have a somewhat rare wrench, that is 10 mm box at one end and 11 mm box at the other end, that came in some of the BMW on-bike tool kits. That is a preferred wrench for this hint: The 10 mm 12 point box end fits the driveshaft bolts. If the other end is a 10 mm open end, simply use that with the 3/8" drive of the torque wrench, and do not let it slip out while in use. If you use this wrench as an adaptor with your torque-wrench, straight out, you must reduce the torque wrench setting, in accordance with the method shown in my torque wrench article (with notes on being sure). If you use the wrench as an adaptor with your torque wrench but at 90 degrees to the torque wrench, you need NOT do calculations, just read the value off the torque wrench (29 ftlbs, applied to the bolt, max. for U-joint bolts at the transmission output flange on Airheads). If you have the rare 10mm/11mm dual box end, the 11 mm BOX end fits the 3/8" square drive of the torque wrench! I prefer either of the two tools below, or its home-made equivalent. You CAN use the dual box-end wrench in the on-bike tool tray, with a rag to protect your hand and a GOOD GRUNT, with or without a torque wrench. Using a known good torque wrench setup IS BEST. Three photos here of the -560 type offset wrench are the actual factory tools. The 4th photo, of the flat tool is a small & simple tool, available from cycleworks.NET, that will work well for you. You may have to use a fine file on the square hole to have it fit YOUR torque wrench perfectly. It is 1.5 inches center to center, and very hard metal, which I think is laser-cut, so any filing takes awhile.
You really don't need to carry any of the below tools in your tool tray on the bike; because the 10 mm 12 point wrench in the bike's tool kit would work for a field situation.
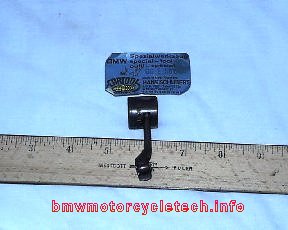
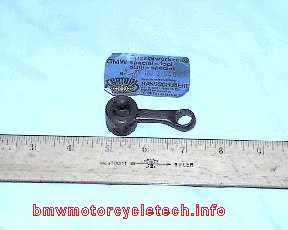


There have been instances in which someone has questioned just what BMW means by its torque figures. This question arises now & then for other areas of the bike, not just the output driveshaft bolts. Using a torque wrench at a limited clearance area of such as the driveshaft U-joint flange bolts requires an adaptor, see above 4 photos, which can, if used at any angle to the torque wrench (except exactly 90°), add to the working-length of the torque wrench, increasing the torque value from that set on the torque wrench. My torque wrench article describes using extensions more precisely ...but, here, I will add brief commentary. When this question comes up, it almost always is in regards to the tightening method for the 4 driveshaft bolts, that hold the U-joint flange to the transmission output flange, because you cannot put a torque wrench with a socket, or with an extension to the socket, directly onto the bolt, as the U-joint body will interfere.
BMW's torque figures are the value on the bolt itself, whether or not you use an adaptor between the torque wrench & the bolt. This is standard for industry, & applies unless specifically noted to be different by the manufacturer. BMW never made this clear & BMW's own wording, particularly when in English, can be wrongly interpreted. The factory specified torque is what IS to be applied TO the BOLT, & you MUST calculate the adjustment factor for the torque wrench IF the adaptor is not used at 90°. In every instance, where the adaptor extends the working distance of the torque wrench, the torque wrench will need to be set to a value LESS than the value of the actual torque you want applied to the bolt head. I recommend you use the adaptor straight-out, as it is easier to deal with. Any angle besides straight out or 90° requires trigonometry calculations. If used straight out, the calculations are simple mathematics. To make this 100% clear, if you use the adapter straight out from the torque wrench, you MUST do calculations, but NO trigonometry is needed. If you use 90° for the adapter, there are no calculations needed, simply read the torque wrench. BE SURE you understand all this!
5. 6 mm and 8 mm male Allen Wrenches with 3/8" square drives. The 6mm one is used for adjusting the swing arm with your torque wrench. The 8 mm one is used at the lower triple clamp bolts. Home tools. You will want these.
6. Piston ring compressors: One of the ways of installing pistons is to insert them into the cylinders so only the hole for the piston pin is showing, then install the pin and its locks. Another method is to leave the piston on the rod when a cylinder is R/R. You need strong fingernails to compress the rings, and must do so carefully in any event ...you do not want to break the fragile rings or damage a piston. Many prefer a ring compressor tool. If you are likely to almost never need a ring compressor more than once, and are a cheapskate (perfectly OK in my book), then you can make one from a strip you cut from a metal coffee can; or, use a very large band clamp, etc. If you want a real ring compressing tool, I suggest you get one that allows it to be used even when the cylinder is partly onto the studs. That means a compressor with detachable bands. A nice tool is made by KD Tools, their model 850, a set of bands and handle with excellent adjustability. About $50-$60 when discounted ...do an internet search. Whether or not to own such a tool is debatable, unless you do a lot of piston installations. If I was to make a recommendation, it would be to install the piston into the outer end of the cylinder, as it will be much less likely for you to break a ring....and it is not difficult to have the piston installed deep enough to allow the piston pin and clips to be installed to the piston and connecting rod.
7.Torque wrench:. For your first one, get a GOOD QUALITY, easy to read, tubular 'clicker'. Don't skimp on quality, you need this wrench to be reliable, accurate & to last a lifetime. Snap-On torque wrenches are lovely, but very pricey. The Craftsman DigiTork from Sears/K-mart is OK.
Bottom (minimum) reading is going to be maybe 5 to 8 foot-pounds, top (maximum) reading of 75 ftlbs. If you go to 100 or more ftlbs for a maximum reading torque wrench, then it is very likely that the lower end will be less usable and less accurate, thus I have recommended the 75ftlb size. I recommend EITHER a half inch drive, & obtain a 1/2 to 3/8 inch square drive adapter; or, a 3/8 drive torque wrench, with a 3/8 to 1/2 adapter. Consider the socket set you already own. You will also want a 2 inch and a 6 inch and a 12 inch extension (all male-female) in the same drive size as the torque wrench. This allows you to space the torque wrench outward if you need to ....even if you already have deep-well sockets.
If you already have an BEAM type torque wrench, of the type that twists a pointer, that is OK, but if not a good DIAL-beam type, which is quite pricey, you should NOT use it for critical things like head nuts. You can use just about any type of torque wrench for such things as the 27 mm swing arm locking nuts as the setting is not critical. There ARE places on the motorcycle where a torque considerably over 100 ftlbs is needed, such as at the transmission output flange large nut, and rear drive, but you are unlikely to need it more than once or a few times in your lifetime. Some tubular clicker wrenches are hard to read; best to get one with TWO EASY TO READ WINDOWS readouts ...one in ftlbs, one in Nm. The Sears Craftsman DigiTork is like that. Avoid shiny chrome barrels with markings, they are often difficult to read properly.
Avoid particularly inexpensive Chinese-made torque wrenches, that have awfully faint clicks, by feel and sound, at low settings.
Do NOT trust any tubular clicker wrenches at the lower end of the adjustment range ....that means under ~8% of the maximum setting.
It really is best to store your torque wrench at a LOW setting, but it does not have to be at the very bottom-most setting. Do not ever set it below on-scale. Three articles are on this website on torque wrenches and torque settings: #71A, 71B, 71C.
Torque wrenches are a primary tool for the home mechanic and the professional; they are not to be used like common wrenches, and in almost all instances are not used to loosen anything. If you do not own at least the 75ftlb type, then you are not serious about maintenance on your BMW motorcycle. There are more sensitive torque wrenches, but you won't typically find many uses for one. Places I can think of are the pan bolts and the nut on the end of the pre-1979 camshaft where the ATU is mounted; there are a few others.
8A. Tool to hold crankshaft from moving forward:
If you want to remove your flywheel for any reason, be sure to do two things first. Set the engine to OT (top dead center Oberer Totpunkt). The OT mark should be showing in the timing window located near the oil dipstick. It is a MUST to mechanically block the crankshaft from moving forward before removing a flywheel. This can be done in several ways. I recommend you DO NOT use a towel or stuffed-rag in the timing chest. A neat method (MINE!) is to just make a tool out of a piece of 6 mm Allen wrench material, and SQUARELY weld a 1" (or so) steel disc or 'fender washer', maybe 1/16" thick, onto one side, making the length such that its Allen end fits into the alternator bolt, and the disc end presses against the outer timing chest cover. Usually 3/4 inch overall ...BUT ...The length should be such that you can obtain some light pressure by the cover, the cover being screwed back onto the engine LIGHTLY, ...YET...the cover can't quite fully be brought back to the engine surface due to this tool's length. THAT ensures there IS some pressure. This is for your home tools, ...but ....since so small, you could carry it in the tool tray on the bike, but you are UNlikely to ever need it while touring unless to help someone else with a major problem. The last time I made one of these, I made it to fit my 1983 and 1984 R100RT bikes, and the OVERALL length actually was 3/4". There is a cautionary article on this website, dealing just with the crankshaft problem, with additional details in case you accidentally (?) goof-up. Go to: article #81, but here is a direct clickable link:
https://bmwmotorcycletech.info/flywheelremovalwarning.htm
 This is the tool I invented and made for myself and a few other folks. NOTE!.... You can also eliminate the welding and washer, by grinding the outer end a bit rounded, then smooth it some. ....and:
Don't want to make that tool? Just use a 8 mm bolt, screw it into the rotor; leave enough of the bolt sticking out of the rotor, so that the front cover will bear on it. Be sure the bolt is slightly pressured by the outer cover all the time the flywheel is being removed and is removed, and during re-assembly of the flywheel to the crankshaft. NOTE that the only trouble with using the bolt method (or, allen with washer) is if you rotate the flywheel ....the bolt might also rotate, and unscrew enough to allow the flywheel to then move forward ...a big NO NO! You can avoid this by rotating the flywheel, facing it from the rear, ONLY counter-clockwise, which will tend to loosen the 8 mm bolt from the rotor, but that means it tightens against the outer cover, putting additional pressure on the crankshaft, which is fine, if that is all that happens. JUST BE CAREFUL. NO WAY do you want that crankshaft moving forward.
8B. Flywheel holding tool. This tool allows you to unscrew, or tighten, the 5 flywheel bolts. See item 24 for more clutch and flywheel tools.
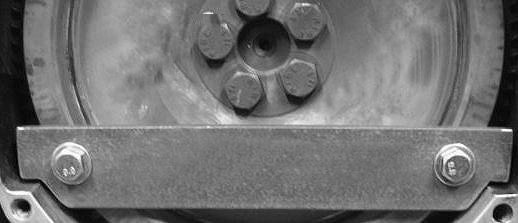
9. This is a tool that is very simple, solves a problem, but you may never need to use it. Make this tool if and when you need it. ZERO cost. On the FAIRED models, BMW uses a tubular (hollow) rivet, to fasten a black plastic trim piece (that may contain a clock & voltmeter) to the fairing. You need a tool to replace rivets or tighten them, for such as fairing repairs & installations, loose dash pieces that can cause difficult to find noises, installation of Parabellum windshields that use an additional black plastic cover piece that fastens to two centered BMW rivets, etc. The BMW hollow rivets need to be moderately tightly fastened, but not overly. The problem is how to tighten them; without spending $$$ for a special pliers tool. BMW has a tool, but it does not work real well.
The secret is very simple! You obtain a drywall screw. The proper size is just a wee bit too large in the drywall screws threads diameter. Carefully grind (do not overheat the screw which is very tough unless overheated) the threaded area as in the photo, so that the threaded area will just smoothly enter the 'chuck' of a common pop-rivet installer hand lever tool, using the 3/16" hole diameter chuck. Be sure that you grind the screw threads over the full length, as the screw must fit the rivet so the screw HEAD will be able to push into the rivet! To use, insert the screw from underneath via fingers or forceps, use the pop-rivet tool on the outside. The reason to not use over a 1-1/2" screw is so it is easier to insert from underneath. IF the outside of the rivet does not flatten properly (you want the ends cup-shaped), reverse the screw for the final moderate tightening. Do all the rivets, there are eight of them. HINT: Do the tightening for one, then another, back and forth...all, in small steps...do NOT try to tighten just one rivet fully at a time!
HINT: If installing a Parabellum windscreen, BEFORE installing the rivets, sure the black plastic cover piece from Parabellum does NOT interfere with the top of the gauges, if it does, sand or file or grind it a bit, otherwise it will make squeaking noises while riding, and wear the top of the gauge bezels.
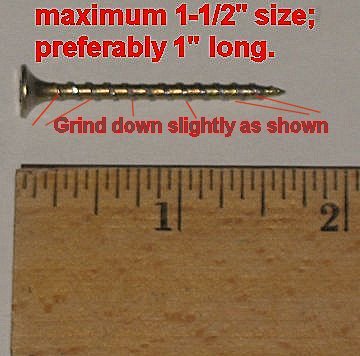
10. You won't find too much need for this tool, but when you need it you will cuss without it. This tool is called an impact driver. The brands are named IMPAKDRIVER made by the H.K. Porter company; and, PIT120 by Snap-ON. These neat gadgets are hit with a metal hammer, while you hold selectable rotational direction pressure on the tool. The hammer blow rotates the assembly in the tool around a hidden internal cam, which pushes the tool tip (lots of tips available) into the screw or whatever, and the cam causes rotation at the same time! This tool was a MUST with old Japanese bikes, using it with CCW force for LOOSENING nasty sort-of-phillips screws, that had corroded and seized in the engine cases. With a few assorted bits you will find it valuable when needed. NOTE that the right photo shows an adapter that allows common hex tool tips to be used. Use these tools VERY CAUTIOUSLY on such as carburetor top screws; don't break the carburetor ears ....support the area underneath the carburetor ear you are working on! These impact tools are good for nuts & bolts, not just screws. I get this tool out BEFORE I round out a screw head; and in many instances it will help remove an already rounded-out screw, without you having to use an electric drill. These tools have a 3/8" square drive, thus can be used with your sockets. They are a simple way to avoid a much more expensive electric or air-operated impact hammer, drilling, chiseling, etc; and are much safer to use.
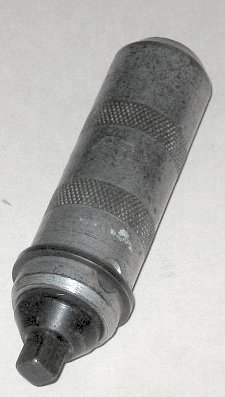
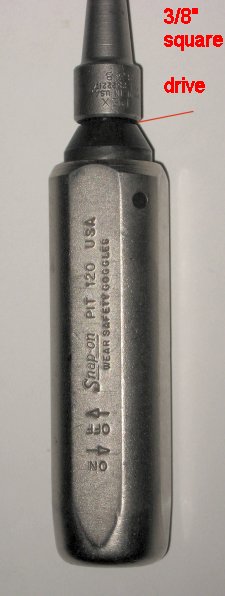
11. T-handled Allen wrenches with fairly long Allen shanks. Get a small assortment of these, you won't need any larger than #6 or at most, but UNlikely, 8 mm (for 8 mm, you usually want a 3/8" drive type). Don't get the cheap plastic handled ones unless the metal extends, and is cross-wise at the handle end. Best to get the metal handled types. Most plastic handled ones are not good and will eventually slip inside the handle ...or break! BUY QUALITY. You will have these for a lifetime and will find these usefull. It is up to you if the tips are the ball type Allen or regular Allen. The ball type can be more versatile but I am not pleased with some for strength and toughness. I use the ball type for the screws at the oil filter cover, when they are Allen, and not hexhead. T-handled tools are for your home shop. SOME folks carry one of these, and a shortened L allen wrench, when on long tours, helpful when changing the oil filter. You can drill the RT fairing for one of those screws if it is hard to get to. T-handled tools are also made with socket ends, turning them into tubular wrenches. Be sure the inside depth is good enough, and square the socket ends. Those are generally not for tightening nor loosening, just installing.
12. Jumper wires (2). Keep this on your motorcycle. You need two types. The first type is used to bypass the stock or aftermarket 3 spade terminals voltage regulator. It can be 4 or 5 inches or so of insulated stranded copper conductor wire, 18 ga is OK, nothing critical about wire size. At each end put a MALE standard 1/4" spade connector. The second jumper wire is an insulated test lead jumper, 18 or 16 gauge is fine. Make this with a standard medium size alligator clip at each end (rubber boot insulator covered). Maybe 4 feet to 6 feet long.
13. HINT: When trying to clean off old gasket from aluminum parts, spray WD40 on the old gasket remnants, or a gasket remover solvent (autoparts stores). Use a plastic scraper, not metal unless you are very careful. Plastic blades are available from many sources, including your local auto-parts store. Remember, it is easy to nick an aluminum surface with a metal razor blade or metal scraper ....and those nicks can often cause oil leaks.
14. You may be able to substitute certain sizes of tools, such as wrenches & sockets, especially because many tools and hardware and other items are not perfectly sized. Allen wrenches & screws/bolts tend to be more precise, so substituting may not work for them, but you can try. I've even seen folks purposely modify extra wrenches they had ....& grind the number off the wrench, and etch the new size onto the wrench.
8 mm, which is .315"; try 5/16" which is .3125"
11 mm, which is .433"; try 7/16" which is .4375"
13 mm, which is .512"; try 1/2" which is 0.500"
14 mm, which is .551"; try 9/16" which is .5625"
16 mm, which is .630"; try 5/8" which is .625"
17 mm, which is .669"; try 11/16" which is .6875"
19 mm, which is .748"; try 3/4 inch which is .750"
27 mm, which is 1.06"; try 1-1/16" which is 1.0625"
30 mm, which is 1.181"; try 1-3/16" which is 1.1875"
15. A credit card & a phone card; maybe a cell phone. Any old cell-phone, whether you have a cell-phone paid service OR NOT, can be used to dial 911 for emergencies (if it is charged!). Emergencies are not that you need gasoline or have a flat tire; although these have been used for that purpose. Old cell phones for such uses are often available free. They don't work unless you keep them charged!!
16. Spark plug shorting tools. Information AND PHOTOS on those, utilized when synchronizing carburetors, will be found here: https://bmwmotorcycletech.info/synchcarbs.htm. Some keep them in the tool tray on the bike.
17. You may have reason to remove & replace a pin contact in one of BMW's connectors (or, maybe you are replacing a poor connector or multi-pin connector). BMW has a tool for this: 88-88-6-611-132. -131 and -133 are also pin removal tools. These tools are $$. If you are careful, you can use something like a very thin Jeweler's screwdriver or modified very thin finishing nail. Push the very thin tool in from the wire end, release the wee tab that sticks out & locks the pins into position to a corresponding notch in the inner body of the connector. The -132 tool, the only one I have specs for, has a 3.75 mm plunger diameter and a 3.9 mm ID barrel ...that is 3.9 mm x 4.4 mm OD. I do not own any of these BMW tools. I use a thin jewelers screwdriver, or, special tools from my electronics shop. The very thin jewelers screwdriver works almost every time.
18. Making a CHEAP and useful hydraulic bottle jack modification: https://bmwmotorcycletech.info/hydraulicjack.htm
19. Engine Cooling Fan: Go to one or more local heating contractors, until you find a cooperative one ("sure, you can have an old squirrel cage heater motor, for free"). Heating/cooling contractors are always removing old home heaters & replacing them. Most of these heaters contain a perfectly good motor, of the type that has shafts running out both ends of the motor, & the shafts have mounted to them squirrel-cage type rotary blade fans, all surrounded by a housing (which is needed). You want the type with a squirrel cage at both ends, so as to cool both BMW Airhead cylinders. There is a surrounding metal shrouding that you want too (or, some of it). Most of these motors are heavy duty capacitor-start types, with plug tap selection for speeds. Adapt a power cord & maybe add a simple wood piece to keep your new fan from rolling about on your garage floor & to aim the fan slightly upward, and ....you have a dual output high volume cooling fan! You may want to put some screening or even chicken wire over the intake ends to prevent things in your shop, like rags, or your dog/cat, from getting into the fan intakes. There is no screening in the fan assembly in the photo below. The lowest speed setting is usually the correct one. You will find this fan also very nice to use after a ride to cool the engine (and exhaust pipes!) rapidly ....for other work. That is my fan & my 1995 R100RT. I've given away the fan, and sold the RT.
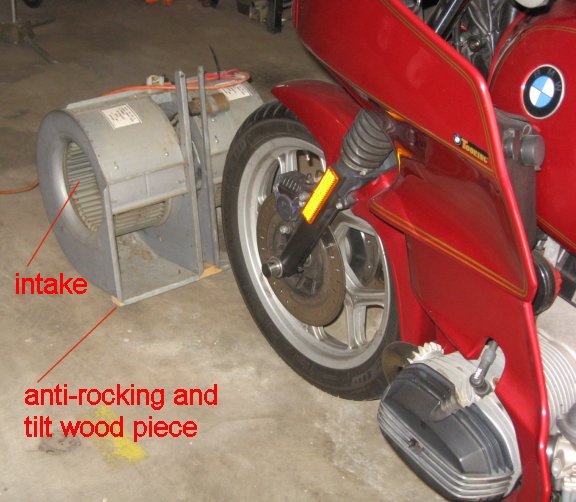
20. Cylinder stud thread repair:
Ed Korn previously did business as Cycle Works, in the town name of Oregon, in the State of Wisconsin. He did machine work, designed & made lots of useful tools (& some parts) for everything from the Isetta cars through the /2 era & for all Airheads. Many were very cleverly designed, & he had instructions, videos, ....all sorts of stuff. Doing a run-through of the website was informative to many folks. Ed sold the business to Dan Neiner, who runs it as Cycle Works LLC. The present location of Cycleworks is 5405 SW U.S. Hwy 40, Blue Springs, MO. 64015. (913) 871-6740.
Dan@cycleworks.net NOT .com. The website is:
http://cycleworks.net/ NOT .com. Dan Neiner will sell ...or loan-out ...his version of the cylinder stud hole thread repair tool & Helicoil items for $45. I suggest you review what is on that website. There are many tools for Airheads and other BMW bikes. See other areas of my website about Ed. Also see #21 below.
High Precision Devices (HPD) of Boulder, Colorado, has its own version of the thread repair tool. Very nice it is too, and uses proprietary inserts.
http://www.hpd-online.com/stud-tool.php (303) 447-2558 4601 Nautilus Ct S Boulder, CO 80301 USA
Phone: +1-303-447-2558
99 mm opening size. HIGH Quality!
Willcraft Company, of Boulder, Colorado: https://willcraft.co/products
Jeff Trapp jefftrapp246@gmail.com
http://www.northwoodsairheads.com
There is further information in my REFERENCES
article on Jeff. He will sell tooling, but he also has available a complete "loaner" kit ....for repairing bad cylinder stud hole threads.
http://www.northwoodsairheads.com/cyl-stud-jig.php
For a video of how this loaner-kit is used: https://www.youtube.com/watch?v=12sdNORHI7s&feature=youtu.be
NOTE: There are two cylinder opening sizes in Airheads, 97 and 99 mm, the larger size was incorporated in 1976.
NOTE: Note the similarity in the tools from those two sources.
CAUTIONS: The video does not get too deeply into cleaning the repair as you proceed; nor, does the video tell you to remove the excess Loctite after the Loctite cures (I would allow 1 full day MINIMUM for a cure). Loctite only 'cures' where oxygen is not present, so liquid Loctite on an exposed surface does not cure properly. If there is excess Loctite, the stud could become almost non-removable in the future (without the insert coming out too, or, some other complication). It is your choice to remove the excess Loctite, or not. Pay particular attention to what the video shows about insertion depth.
All of Ed Korn's & Jeff's stud repair tools were probably originally inspired by John Chay's design. The background of the cylinder stud thread repair tools goes back to around the year 2000. Oak (Orlando Okleshen, THE Airhead GURU in the USA) and Oak's precision-machinist friend, John, made a very precise tooling/jig for this job.
I had my own crude version in the early seventies, made from a bad cylinder & hardened commercially available drill guides. The stock cylinder base holes are not precisely-enough located, IMO, I had to very slightly, offset a couple of the holes to be perfect, ....& it is [almost] better to make a base from scratch. I have made tooling to repair bad threads at the cases, where the 4 cylinder studs fasten. You can make your own if you have the machinery and talent. If you wish to use an old cylinder, use a lathe to cut off the major portion of a later model cylinder (1976 and later are more precise), & some of the spigot. Then get some long commercial hardened drill guides ($$), drill & ream the base holes. Do your machining for these holes precisely, and at exactly 90 degrees, on such as a milling machine. Stud centers are 93 mm x 72 mm, & I suggest you leave some of the spigot, note that there are early sizes of 97 mm, and all later ones are 99 mm. Unless you have the machinery to make things in a precise manner, and wish to spend the money on the hardened guides, you are best advised to see the above sources, to purchase or rent, if you need to repair 'pulled studs'....OR, farm out this work to an well-experienced professional Airhead Wrench.
WARNING: There have been instances of damaged motors from failure to remove all chips from from the engine block and oil pan, from drilling and tapping operations on the engine block. Don't forget to remove the oil pan & clean it out; clean the threaded holes from inside & not just outside. I use high pressure compressed air to do it. When trying to clean the cylinder top holes, also supply the air at a point down the oil gallery where the tiny chips will go out the top studs areas, NOT further into the engine; in fact, THAT should be done before the pan removal. See the oiling sketch! https://bmwmotorcycletech.info/oilsketch.htm
WARNING: The above information in this section 20 is not complete! Be sure to read the entire section on repairing these threads, etc., located here (scan down that article to find the proper section):
https://bmwmotorcycletech.info/break-in.htm
Be sure to read Brook Reams' website articles. You may also want to see Airmail of November 2023.
21. Tool for the conrod bolts: This is a 10 mm triple-fluted tool, which looks something like a Torx. One description of this tool, the one NAPA uses, is "10 mm, 12 point, fluted wrench". You will use this tool with a 13 mm or 1/2" socket. The NAPA part number for the tool is #2305. The tool is also available from Cycleworks, see above or my references article:
https://bmwmotorcycletech.info/references.htm.
22. SEALS & BEARING PULLERS:
On later wheels to 1984, outer races are removed mechanically & hubs are NOT heated for this, although modest heat is not injurious. An exception is the 1978 REAR DRUM BRAKE SNOWFLAKE WHEEL. ALL early wheels MUST be heated. Contact cycleworks, see #20 above, for a clever tool for removing wheel bearing outer races (also works for swing arm bearing outer races); or, have a mechanic with the correct puller; even a dealership; do it for you. For those with larger wallets, get the Kukko puller, which works well in such blind holes, where the inner edge of the outer race is not easily grippable ...usually due to it having the same diameter as the surrounding supporting metal. The Kukko needed is #21/5, used with the #22/2 'bridge'. With a 21/6 puller, same bridge, you can do the steering head bearings. NOTE that some axles, such as your front axle, may be very useful!
You may have occasion to remove various bearings, etc. The Kukko tools, above, are nice, but if your wallet is small, you might be interested in cheaper items. Harbor Freight also has an inexpensive equivalent for the above BLIND HOLE puller. I do not know if they sell kits with attachments that are large enough ....adapters? ..... to fit such as the outer races in the wheels.
For SEALS, such as for the crankshaft seal, transmission input shaft seal, & many others, you may be able to use a small punched or drilled hole in the metal seal, & screw-in a drywall or sheet metal type screw, & pry on it. Often some HEAT helps. For some situations you might want to purchase a cheap seal puller, like the Lisle 58430, check the Internet for that cheap tool. Harbor Freight does have an inexpensive seal puller, like the Lisle. Here is a photo of their SEAL puller:
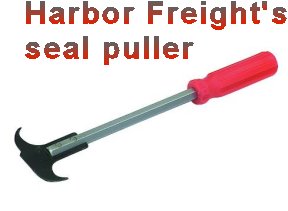
23. Various types of rubber tipped adaptor tools for grease guns are available for greasing the swing arm, via greasing into the Allen wrench hex recess of the swing arm adjustor pin. Chainsaw dealers sell a chain saw greasing tool. Napa sells a rubber tipped air blow gun nozzle #90-583. Napa also has a replacement tip 715-1201 which is for the 715-1217. They carry a couple other types of tip tools, one of which can use the 715-1217. These are actually greasing tool items.
24. There is a factory tool to help line up the clutch disc. You don't absolutely have to have one, as your eyeball is possibly good enough, or, it will take you a try or three. CycleWorks probably has an alignment tool available. You can also get them from other sources. If you want to make this type of tool, here is MY version (see the RIGHT MOST item in the photo, below):
The tool, overall, is roughly 133 mm long. Starting at the taper tip: The non-tapered portion of the tip is 8.2 mm diameter and 5 mm long. The taper is a simple rounding, or, just do a 90° tip, not sharp though. So, with taper, the tip is a tad longer than 5mm...maybe 8 or 10 or whatever. Back of the tip is the second section: 29 mm long by 20.7 mm in diameter. The 'handle' portion is 95 mm long and 22 mm in diameter. Hyperlink to a drawing/sketch of that tool, for your machinist (or?): https://bmwmotorcycletech.info/CLUTCH-TOOL.pdf. Print it, annotate it, have it made, or DIY.
Here is a photo of some of the factory clutch/flywheel release/removal tools, AND, of that clutch disc alignment tool. You can use common bolts, you need three, to release the early clutches, so the tools in the photo are not absolutely needed. Clutch release tools are not needed for the 1981+ type clutches. See also 8A and 8B, above.
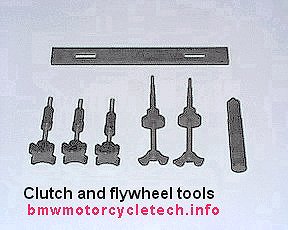
25. Homemade universal shock absorber tool. Simple adapters to fit the coils are not shown here. You do not have to have this tool. You can make a quite adequate one from two round "Floor Flanges" which you can get from any plumbing or hardware store. With two pieces of all-thread; some nuts and washers, that is all you need. For some shocks, you bore/drill out the center hole in the floor flanges some. You do not need the mounting eye holder & the plate, marked in red in the below photo, which is in my slightly better tool. You will save a lot of effort by just buying the floor flanges. I happened to have metal, & machinery to make what is below. If you want an exceptionally nice tool, get the Ohlins shock absorber tool. In the below photo of a quickly-made tool I made, the top plate is flat, not counter-bored below. I did not have a lathe nor mill available to me at the time. By making the underside of the plate have a milled area that is of approximately the diameter of the spring diameter, yet that lathe made or milled area is on the underside only, then the top plate will not 'walk' from the spring moving sideways, which is a Pain In The Ass using my tool without it. Make the top plate of rather thick material, aluminum is OK, half-inch or more is a good thickness, and add the underside counterbore area ....you will be GLAD you did. If making another top plate today, I'd use my lathe, probably make it 3/4" thick aluminum, and with a goodly deep counterbore area. Those owning a hydraulic press can fashion something nicer and quicker to use.
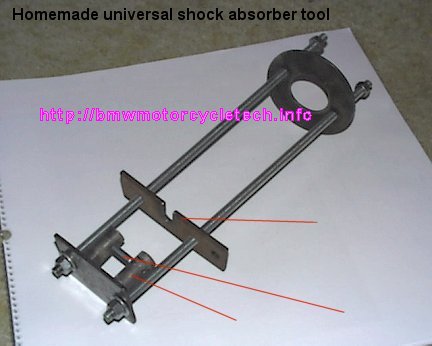
26. 27 mm ( or 1-1/16" ) 12 point socket, 1/2" square drive (EITHER 27 mm or 1-1/16" will work fine). Modified. Home tool. This is for the swing arm nuts and you must modify the socket OD (to enable fitting all the various swing arm cavities), and square the end (eliminates the socket internal taper). 12 point is FAR better than 6 point ...as the outer walls are much stronger after modifications. Use a lathe, or grind, sand, etc., the open 12 point end, so that there is NO internal taper at the very end, in other words, flatten/square that end off. Be sure that it is square to the main body ....you don't want it fitting poorly onto the thin nut of the swing arm. Do that modification first. It will be much neater, nicer, and will fit best, if you do it on a lathe. THEN: Use the lathe, or grinding wheel, etc., and make the O.D. 1.35" for a distance of ~11/16" from the 12 point end. This is not critical, but the diameter must be small enough to allow the socket to fit into your airhead swing arm frame cavity ...past the TWO diameters there (on most). This will be a far better tool than trying to use the 27 mm tubular end of the dogbone wrench! You do not have to use a 1/2" square drive, you CAN use a 3/8" square drive, if that is what your sockets & wrench already are. Cycleworks has this and MANY other tools for sale.
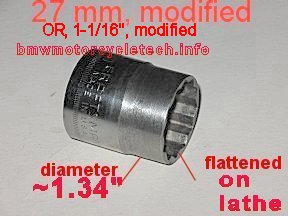
27. See my article covering replacing the rear crankshaft mainseal, on use of these below plate tools, etc:
https://bmwmotorcycletech.info/flywheelremovalwarning.htm
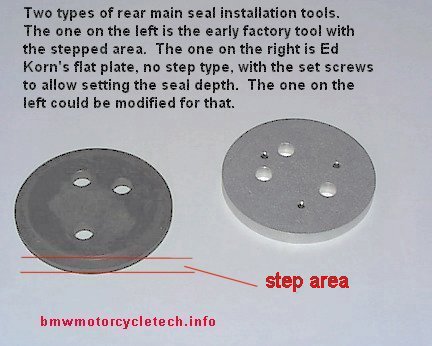
28. I am sometimes asked about how to deal with the /7 type fork lowers, with the 13 mm nut with the Allen wrench hex in the middle. If you try to loosen the nut, the allen bolt rotates. I have three solutions; there are others. One solution is to modify a deep socket for a slot along the side, into which you can insert the short end of a common Allen wrench. Another solution is to purchase an offset socket wrench. McMaster-Carr has one, item 7247A52. My final suggestion (there can be PLENTY of tools for this job, many you can make), is an interesting tool, see: http://www.culayer.com/Joes_tools.htm
29. A set of various sizes of broken screw/bolt/stud extractors that I own & use. The left photo is of stud removal tools that came from Bridgestone Tools, a very long time ago. They do not break as easy as an EZY-OUT brand (long removing tool) does, which is in the right photo, but I have found the need for both these types. There are quite a few various types/styles of extractors, even a type from SNAP-ON. Ask me about proper usage of these types of tools; when to use a Dremel, or when to use an Electric Discharge Machining (EDM). I have used EZY-OUTS, & many others, quite successfully. You can too, if you are careful. OVER-torque causes headaches, such as spreading the item you want to remove from the pressure, and making it even more difficult to remove. The set on the right is from the Cleveland Twist Drill Company, now owned (?) by Greenfield Industries. These were the original, REAL, EZY-OUT's, often all these type of things are generically called EZ-out's. My set on the right was probably purchased by me when I was about 15 years old.
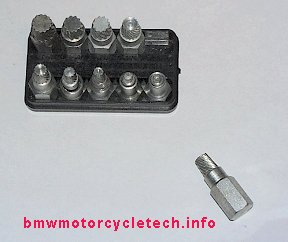
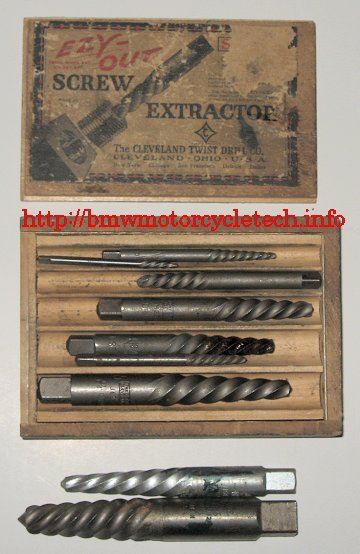
30. 11-42-1-335-394 Special BMW 23 mm bolt for filling the thermostat/cooler during oil changes when you are changing the oil filter, or have, for whatever reason, disconnected and drained the cooler. Using this tool will prevent the rare damage to a cooler radiator from high impulse pressures at engine startup when the oil is cold ....this is a really rare occurrence, and probably (??) occurs more when someone blips the throttle excessively (higher than 1500 rpm??) during quite cold startup with an empty oil cooler radiator. If you never change engine oil in quite cold situations, this tool is...maybe...moot.
****Do NOT use if longer than 23 mm!!! MUST have a full and smooth radius'd nose!
In the below photos, the short PROPER bolt, marked 23 mm in the photos, actually measured, from under the head to the tip, 0.918". The longer, WRONG bolt, measured 1.184" from under the head to the tip. THE LONGER ONES WERE ALSO MADE BY BMW AND ARE NOT TO BE USED! Both bolts are shown with the noses rounded (radius'd), and this is necessary. THE NOSE MUST NOT BE SHARP edged nor pointy, not even close to that!
I like the nose (tip area) somewhat more rounded than as shown in the below photos; and I polish mine.
As noted, you don't really have to use this tool after an oil change (in which you unfastened the thermostat assembly), unless you just want to be very 'extra sure' about startup-lubrication ...in very cold weather (Mostly/usually). DO NOT blip the throttle!
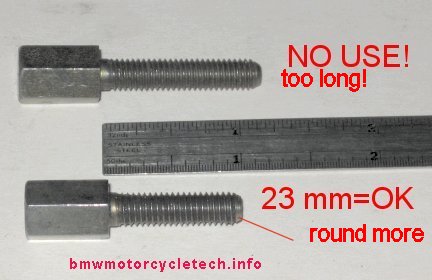
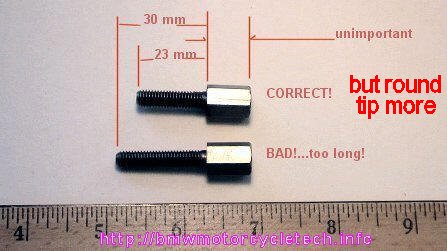
31. Deleted
32. When adjusting the valves on pre-1985 models, it can be helpful, if adjusting rocker end play, to have a couple of very simple washer tools made up. A photo of these, and how to use them, is in https://bmwmotorcycletech.info/setvalves.htm. I suggest you read the article, then decide whether or not to make these simple washers. From 1985, there is no adjustment possible for rocker end play by trying to adjust the position of the rocker blocks, end play is set with shims.
33. Tools for emergency shifting of the 5 speed transmission when the pawl spring breaks.
https://bmwmotorcycletech.info/emergency-shifting-tool.htm
This is a tool I MIGHT recommend for riders that are world adventure travelers.
34. A tool rarely needed, is a mandrel for installing pushrod tubes. Seibenrock makes a pushrod tube mandrel ...I have NOT inspected one of them. A front axle may work for you.
35. Degree wheel and piston stop. You may never have a need for them. You will find description and photos, here: https://bmwmotorcycletech.info/F,OT,S,Z.htm
36. Clutch disc centering tool. Not absolutely necessary.
https://bmwmotorcycletech.info/CLUTCH-TOOL.pdf
Very special tools are needed for certain jobs. Sometimes you can borrow a tool that you need perhaps only once or twice in a lifetime. Rental of the tools/jigs to fix cylinder stud stripped holes are listed well above in this article. There are very special tools required to do certain jobs, such as shimming transmissions and rear drives, and maybe a dozen total specialty jobs in all that require special tools.
A source, mentioned well above, Cycleworks, has a lot of clever tools, some of which you will find exceptionally handy, for simple jobs like bearing R/R, but also for doing a timing chain and timing sprockets job. Here's a repeat of prior information on this source:
Clever BMW tools, videos, and help was available from Ed Korn, who previously did business as Cycle Works, in Oregon, WI (yes, that is the town name in the State of Wisconsin). He did some machine work, had lots of tools, and some parts, for everything from the Isetta cars, through the /2 era, and for Airheads, until the stopping of production of Airheads ~1995. He had a rather extensive variety of tools, some VERY cleverly designed, and he had instructions, videos, all sorts of stuff. Doing a run-through of his website was informative to many folks. Ed sold the business to Cycle Works LLC, located at 5805 Haskins Street, Shawnee, KS, 66216 (913) 871-6740. Contact the new owner, Dan Neiner, at: Dan@cycleworks.net NOT .com! The url is:
www.cycleworks.net
Screwdrivers, .....a whole blasted section on ....screwdrivers?? ....well, YES! 71-11-1-103-086 BMW's on-bike tool kit red plastic handle screwdriver. Phillips and standard single slot, the single shank reverses for this. Even Mercedes has included these. For BMW, it is usually Heyco brand. It is flimsy, the handle breaks, is not the correct tool for the carburetor top screws, nor the pod screws, and BOTH ends are NOT ground properly. The cross-point tip is NOT a quality Phillips ...nor is it a Pozidriv nor a Reed & Prince tip. I suggest you purchase a Snap-on screwdriver of the type that has a hollow chamber, & put a few hardened removable tips in it. The proper Phillips size is #2 for the carburetor top screws WHEN they are real Phillips screws. The Bing carburetors that BMW installed on your Airhead has top dome screws are not always really Phillips screws, they just look that way at a quick first glance. They could be Phillips, or could be 'PoziDriv' type' ...and ...they could even be other styles. Much of the Public thinks of any cross-slot screw is a "Phillips". The ancient aircraft tip screwdriver, with the sharp point, is called Reed & Prince (Frearson) and has a 75° angle & works OK or relatively nicely on Phillips & PoziDriv screws ....as, of course, does the real PoziDriv. The PoziDriv tip is EXCELLENT for REMOVING the Phillips type, if the Phillips is way tight, and sometimes the PoziDriv will remove a rounded Phillips. Generally install a real Phillips type with a Phillips screwdriver, but the other types of screwdrivers can work better. If the screws are frozen, you can try a variety of ideas. The Phillips type of screw was ORIGINALLY DESIGNED to not slip as much as others of its time ...but, also WILL SLIP after a certain torque is reached. Many seem to think that they were designed to slip. That is not true. What happened, is that the dies, etc., that are involved with making the screws, and screwdrivers, wore some after many years, so the company (I think) announced that the Phillips system was designed to cam-out after a very high torque level was reached. This is, plain and simple, a fabricated excuse, turned into a sales opportunity. This is why removing a stuck Phillips screw is so annoying ...especially after some wear on the screw or screwdriver. Methods of adding friction for easier removal includes valve grinding compound for a better grip. For egregious instances, I use a substantial steel block underneath on the carburetor ears to protect against breaking them ....and an Impakt Driver with the PROPER FITTING TIP. Tips for interchangeable-tip type tools are available from a variety of sources, including Snap-On, whose tips are hardened nicely. The PoziDriv tip is also available. Some have installed Allen head screws at the carburetor tops. They are OK, but don't over-tighten, as many of these have a very small allen & can round-out more easily. No matter what screw you install, including the original type, put a tiny dab of anti-seize compound on the threads and on the taper. Some early carburetors had common slot screws. BMW & possibly Bing, have shipped either PoziDriv or Phillips screws; and I have seen Japanese ISO types ....so ......be sure that your 'screwdriver' fits them. Remove the screws one at a time, coat the threads ...and under head taper ...with antiseize ...and replace the screws without tightening too much. You will appreciate these hints much later on. PoziDriv screws generally have some radiating lines to indicate they are not Phillips type. Pozi type screwdrivers will usually work well on Phillips screws. Try to use a screwdriver that, upon close inspection, really fully fits the screw, wiggle it a bit in the screw...and look at it when it is in the screw head. Below are photos of the Pozi-Drive screw & the matching screwdriver tip. Note the differences from a Phillips ....the nearly flat bottom in the screw and the corresponding flat top of the screwdriver tip; note also the angles and the extra 'lesser splines' in-between the major splines. If the screw looks the same, but no tick marks, it may be a SupaDriv. A bit more 'education': Japanese JIS B 1012: These are different, but look like Phillips screws, & CAN be used with a Phillips screwdriver. These screws are identified by a single dot or a tiny x, on the head. The Pozidriv screw and driver combination is unique & superior to the Phillips. The tip of the driver is blunt, which helps it to seat better into the recess in the screw, unlike the Phillips which comes to a somewhat sharper (but NOT SHARP) point. This becomes a problem as the factory tooling that forges the recess in the head of the screws begins to show signs of wear. The recess becomes more & more shallow, which means the screwdriver will bottom-out too soon and will cause the screwdriver to cam-out. The second unique feature is the large blades on the driver have parallel faces, where the Phillips blades are tapered. The straight sides of the driver allow additional torque to be exerted without fear of cam-out. A Phillips driver will have problems driving a screw with a Pozi-recess, as a Pozi-driver-screwdriver would have little luck driving a Phillips head screw. It is possible to drive Pozi-drive screws with a Phillips driver, but you will need to grind down the tip slightly, and expect some slipping to occur. Revisions: © Copyright 2023, R. Fleischer
Return to Technical Articles LIST Page Last check/edit:
Monday, January 01, 2024
Nothing annoys real pros (...well...me) more than seeing buggered up and rounded-out screws and other fittings, such is the result of amateurish work. Perhaps even more annoying, is to you, when a screwdriver slips, rounds-out a screw, or whatever. There are a lot of types and styles of screwheads. There are even types needing triangle screwdrivers, square screwdrivers, etc. This section applies to common situations for Airheads.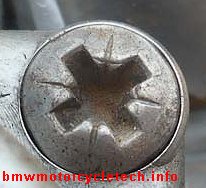
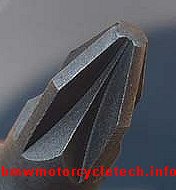
The Frearson (Reed & Prince) screws used a screwdriver with a sharp tip, and a wider angle, thus the screwdrivers could be used on a wide range of screw head sizes. These are now a very old design, not hardly used since the seventies. The typical use was marine hardware and aircraft. The Phillips has a more rounded and tapered shape. There is another name, often used with or similar to the PoziDriv (note that this screw is actually POZIDRIV...there is NO E on the end), and that is SupaDriv (also no E on the end). They seem the same; their respective screwdrivers will work with each other, but not quite perfectly. The SupaDriv allows a bit higher torque than the Pozidriv, and the screwdriver can have a modest ANGLE to the screw ....thus is nice for overhead use. The POZIDRIV has tick marks, see photo above. USE OF A PHILLIPS SCREWDRIVER ON THESE SCREWS WILL DAMAGE THE SCREW. All these screw forms are actually pretty old, the Pozidriv came in 1962, but hardware doesn't change across industries very fast.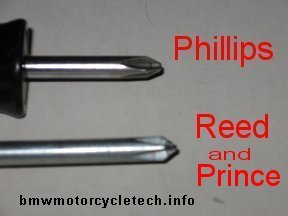
For a much more complete treatment of these & various other screw heads:
http://en.wikipedia.org/wiki/List_of_screw_drives
Updated all to 03/01/2006, minor clarifications...and add #22 entirely.
04/22/2006: Add #23.
04/23/2006: Add emphasis note on screwdrivers for the Bing tops.
04/24/2006: Modify that note.
08/15/2006: Edit #20.
09/24/2006: Minor clarifications.
04/17/2007: Add #24.
05/08/2007: Add photo to #24 and add #25 (3 photos).
05/11/2007: Add hyperlink in #8, clarify some minor details here and there.
08/14/2007: Joe's Tools hyperlink/url obtained, item 20.
01/19/2008: Update 20, 22.
10/08/2008: Edit article for clarity, add #26, etc. NO errors in the article, just clarifications needed.
12/30/2008: Add information about Jeff Trapp.
04/19/2009: Add 27.
05/01/2009: Add pdf drawing to item 24.
05/21/2009: Clarify number and use for the 41 x 27 mm dogbone.
03/09/2010: Add information on Jeff Trapp's loaning of cylinder stud threads fix kit.
03/12/2010: Add information on Dan Neiner's offer to loan the cylinder stud tool.
03/13/2010: Update item 20 in depth; move one item to new #29.
04/25/2010: Add photos of Posi-Drive screwdriver tip and screw.
07/03/2010: 41 mm dogbone wrench part #. Add 36 mm socket photo. Clarify details on socket and dogbone wrenches.
02/27/2011: Fix HPD url.
03/17/2011: Add note to #28, and some minor updates elsewhere's.
09/03/2011: Add photo of the impact driver, which was not hyperlinked originally either.
03/28/2012: Add info to #24.
04/26/2012: Remove photo of dogbone tool, spoke tool, Schrader valve tool, rear drive ring tool. Re-arrange numerous items, add individual photos on some of these items; add more commentary on what to get and NOT what to get.
04/28/2012: Finish cleaning up article.
07/10/2012: Add 32.
07/15/2012: Add 33.
08/08/2012: Add photos of exhaust finned nut tools & some commentary & links; re-arrange some items; a lot of cleanup.
08/24/2012: Re-arrange top part of article, and add a few things.
10/02/2012: Add photos and text regarding the BMW feeler gauge tool; add QR code, add language button, update Google code.
11/15/2012: Clean up article. Minor improvements; numerous clarity improvements; change article width so better works with smaller screens. Repair unclosed html tags, etc.
01/16/2013: Expand 25.
03/08/2013: Add Esoteric section.
11/16 & 22, 2013: All for item 22: Add more on pullers; including seal puller photo, clean up wording.
11/29/2013: Add notes on making the shock spring compressor better.
Sometime in 2013: remove language button, as the javascript was causing problems with some browsers.
04/01/2014: Improve clarity in a few areas.
05/04/2014: Add #34, which was noted in my head assembly article but erroneously not put in the tools article.
05/21/2014: Add#35.
07/08/2014: Add warning note on removing chips, etc., to item #20.
08/11/2014: Add Cen-Tech photo.
09/30/2014: Clean up article.
10/25/2014: Add note to #4, in Part II.
02/12/2015: Modify photo of rotor tools to include NOT APPROVED. Edit associated text.
02/17/2015: #13 had been blank.
02/28/2015: Clarify use of torque wrench adaptors.
06/19/2015: Add note for tire repair article.
06/22/2015: Add Cycleworks.net torque wrench adaptor info and photo.
08/10/2015: Fix hyperlinks for cylinder stud repairs items.
08/16/2015: MINOR clarifications and a final cleanup on 09/15/2015.
10/04/2015: Add hyperlink for spark plug shorting tool source: http://www.northwoodsairheads.com/
11/01/2015: Add #9, which had been previously deleted/moved.
12/24/2015: Meta codes; clean up entire article, clarify some details, improve for smaller screens.
01/06/2016: Meta-codes updated. Fonts increased. Left side justification mode intensified, horizontal lines characteristics changed....and, some clarifications and updating.
03/27/2016: Add #37.
04/12/2016: Completely updated. Metacodes, colors, layout, fonts, clarifications, dogbone photo annotated, etc.
11/26/2016: Add .gif of screw heads.
12/19/2016: Revise entire article for clarity, ease of use.
02/10/2017: Add cycleworks in a second place, near end of article, modifying (adding-to) the text a bit.
04/29/2017: Expand #19, with photo and additional comments.
11/18/2017: Add to info on exhaust finned nut wrenches.
12/05/2017: Update Joe's Tools listing.
01/19/2018: Convert ATE M.C. measurements to mm, and add them; and, add measurements of the FACTORY tool, to the information on the BMW feeler gauge unit I measured.
05/12/2018: Article overhaul. Reduce html excesses, colors, fonts, add 10 pxl margins. Re-arrange & improve layout, interpretations & information. Add EZY-OUT photo.
11/24/2018: Add more information about the threads repair, the video URL's, notes, etc., to item #20.
01/28/2019: Remove dead wirewerks link and fix clutch tool pdf link.
03/21/2020: Update Heyco screwdriver information a bit.
05/04/2020: Fix in item 14: 30 mm, which is 1.181"; try 1-3/16" which is 1.1875"
03/07/2021: Add table box around the dogbone area, to better differentiate the information.
06/06/2021: Update the dimensions of the ignition points setting tool; and, add for the /2 also.
11/15/2023: Update section 20 on the cylinder studs.