
|
|
Bing CV Carburetors,
part 2 of 2 parts.
Notes; tuning; overhaul, needle seats, starting problems; plus lots of hints....
...including details about the plastic tubes, O-rings, clam-shell versus
rectangular airbox differences; bowl and body casting material; needle wear; ....ETC!
For Part 1:
https://bmwmotorcycletech.info/bingcv.htm
There are more than just 2 BING CV carburetor articles on this website. See the fuel section of the Technical Articles List.
A basic mini-overhaul can be done with the carburetors in place on the engine. This is often quite enough. Two articles, the one you are reading, and https://bmwmotorcycletech.info/bingcv.htm are not just about how to overhaul a Bing CV carburetor. These two articles are specifically designed to fully inform you what you need to know, as an Airhead owner/rider, about these carburetors. The one exception is if you have an R75/5, which has a particular, and troublesome version of the Bing CV carburetor. For those carburetors, you should review the above linked article and the one you are presently reading; AND, in particular, THEN review the following one, which is article #6:
https://bmwmotorcycletech.info/earlybingR75CV.htm
1. Starting problems:
|
It was in November of 1971 that BMW first, and almost lastly, recommended opening the throttle during cold starts. That can be a necessity depending on the bike, temperature (does not have to be very cold), & how the carburetors are adjusted. That is still true for later models, but BMW dropped the recommendation of opening the throttle. SHAME, because it is still often needed. |
Starts OK, enrichener (choke) in use, then seems to run out of fuel, after perhaps 15-30 seconds:
Partially clogged jet at the bottom of the bowl well; OR ...bowl gasket or enrichener gasket/screws problem;
OR ...wrongly assembled enrichener. If one or both bowl corner jets is clogged badly enough, bike might not start at all. Both situations are often much worse on cold days. Check the tube leading into the well for cracks. Very early Bing CV carburetors have pressed-in float bowl enrichener jets, not screwed-in. The enrichener jet in the float bowl MUST BE CLEAR, NOT CLOGGED!
Consistently hard to start:
Sometimes there are complaints of hard-starting bikes & the owners have checked everything, including valve adjustments, compression pressure, spark plug wires & caps, coils, everything ....and the bike still does not start OK. Check the slides on CV carburetors, be sure they are fully bottoming ...there is a spring on top of the slides on some models, to help with this. Polishing the slide may help; and I have had, sometimes, to polish the inside of the carburetor!
Having an enrichener disc installed wrongly, whether by you mixing up left & right parts; or, the factory goofing on the punch prick mark; or, inserting the shaft into the enrichener disc wrongly ...which amounts to the same thing; or, you installing the punch prick mark wrongly can result in all sorts of various problems, not only for starting but in poor throttle performance at moderate throttle/rpm. Usually the primary symptom is that the engine is very difficult to start, or starts only on one cylinder (neither, if both discs are in backwards). One of the easy tests, once the engine is started & you can keep it running with a small amount of throttle, is, with the enrichener (choke) lever OFF: LIFT, one carburetor at a time, its choke/enrichener outer cable at the carburetor. If no bogging down of the engine (or other substantial change is heard), then that carburetor has an enrichener problem of some sort. If the enrichener cover is loose you will have surging ...see item 2. below. Note that part 1 of this article has photos showing correct marking and installation. BTW...I have seen a Clymers manual in which it said to use the clam-shell enrichener lever BACKWARDS. It is HORIZONTAL for OFF.
One cylinder not firing & hard to start, then works OK as throttle is turned up, ...and ?:
Check the carburetor float bowl corner jet, be sure it is filling with gasoline. Be sure the tiny pipe that comes down from the carburetor body, and into that corner area, is not cracked or full of crud.
Besides a wrongly installed enrichener, the SLIDE may not be returning & you may end up polishing the slide & carb body & installing a very soft spring above the slide. Was no such spring on the early carbs & even some later ones. You can check the slide returning by looking at intake end of the carb after removing the plastic tube from the carb-to-aircleaner. Fix that by installing spring 13 11 1 335 324 above the slide. See Bing's manual on various strengths of the spring. The following was reported to me by Tom Cutter: Tom says the modification, installing a longer & softer spring on the slide, will smooth the idle transition at the 1/8th to 1/2 throttle movement. Tom said that the shorter, earlier spring, used on the 40 mm Bing CV carbs, was 13 11 1 335 324. He installs the longer softer spring 13 11 1 338 134, as used on the 1988-1995 R100 models using the 32 mm carbs (these springs, per Tom, are used on the EURO R100GS 40 mm carbs). I have my own input on this: Some folks prefer the more abrupt throttle action of the stiffer spring, which is about 115 mm long and has about 30 coils. The softer springs are about 120 mm long and have about 20 coils. NOTE that ignition problems can cause hard-starting problems with just one cylinder firing first, until, after a short while, the other cylinder begins firing.
2. Surging at steady 30-50 mph:
The 4 screws that hold the enrichener assembly plate to the carburetor are well-known to loosen, & the gasket is then sucked inwards. Early model /5 had no such gasket. Disassemble the enrichener (do NOT mix up parts, especially left-to-right); lightly lubricate things (the faintest amount of silicon grease that you can use is the correct amount), do NOT 'plug' the enrichener disc holes with grease! ....use a new gasket, seal the screws with a SMALL drop of Loctite medium strength blue.
3. Having to synchronize the throttle cables too often? You may have old worn-out cables. Do NOT oil them except as a last resort before you get your new cables. Genuine BMW cables have a nylon or similar lining, so use only genuine BMW cables. This is a good time to do the bi-yearly cleaning & re-greasing of the throttle assembly at the handlebars; note that those gears must be lined up at their marks on their teeth during reassembly. There are two basic version of the cables, easily identified. If you have ONE cable at the throttle, then, under the fuel tank, is a T adapter. Adjust it for a maximum of 1/8" cable free-play, minimum about 1/16". That T adaptor is NOT to be oiled or greased internally.
HINT: When doing the final adjustment of your carburetors during synchronization, adjust the cable lengths at ~300-500 rpm above idle rpm. This is the more critical point, where the butterflies are just barely off the idle stops, so it is the best point to adjust the throttle cables. Be sure you end up with a bit of slack in the outer sheath of the cables with the throttle off (and hand off the throttle). Up through 1980, engines can usually be idled at about 900 rpm, although I still prefer a bit higher. Later ones seem to do better at about 1025 pm. I prefer 1025 for ALL Airheads, no matter the year or model. If you adjust at near sea level, use perhaps 1050 or 1100, and then the rpm will not be too low at high altitudes, assuming proper idle mixture adjustment. These rpm values are OK for the stock single spark plug engines ...& also for a dual spark plugs conversion. DO NOT try to get the engine to idle lower than 900 rpm, that will be bad for chain & sprocket oiling when the engine is hot idling. It is more difficult to properly synchronize the carburetors at 900 rpm or below. On models with ONE cable at the throttle at the bars, there is an adjustment in a barrel unit under the fuel tank for the slack at the throttle (must have a bit, 1/16" to 1/8" is usually OK). Throttle slack for the lower cables is always set at the sheath ferrule located AT the carburetors ....there must be some slack, throttle off, hand off the throttle, yet these are adjusted for equality of synchronization at maybe 1300-1500 rpm.
4. It is normal for the engine idle rpm to change with altitude changes. This can be minimized by careful adjustment of rpm & idle mixture screws. You can do some compensating (for altitude effects on idle rpm) by adjusting the idle mixture screws a wee bit, such that when you change altitudes the rpm effect is smaller. See #3 above for just the rpm adjustment. Adjusting the Bing CV carburetors idle MIXTURE by the easiest method is to adjust the mixture very slowly inwards until the engine just barely falters at all (you hear a slight lowering of rpm), then back out 3/16th of a turn. This will work reasonably well at any altitude. You MUST go back & forth with idle rpm, balance, & idle mixture, until you get perfection. Once done properly, all three are stable for long mileages.
5. NEVER try to adjust the carburetors without FIRST knowing that the ignition timing is proper, & valve clearances are correct. NEVER make the final adjustment of the carburetors without a thorough engine warmup. Garage warmup is NOT adequate except for initial adjustments. Go for a minimum 10 mile ride! If you can not do a ride, then use a large fan to keep the engine from overheating; run the engine at about 1500 rpm for 10 minutes.
6. Float level: The original method of adjusting the float level (single piece floats) is to have the carburetor upside down & the float structure NOT doing anything but lightly kissing the float needle (certainly not being finger-pressed to move the float needle spring loaded tit, used on all later models). That method is NOT needed, but can be done on the workbench if the carburetor is being overhauled or otherwise worked on off the bike. A good method, when the carburetor is already on the engine, is to turn the gas off, remove ONE bowl, then turn gas on. Lift the float slowly & gently, until the gas JUST BARELY shuts off. At that point the top of the float should be parallel with the bottom of the carburetor casting. Double-check this by LOWERING the float quite slowly ...until the fuel just BARELY starts to flow. The approximate same parallelness should exist. You should do this second step (or, do it as the first & only step) due to the spring loaded plunger at the lower end of some of the float needles; as well as some variations in the sloppiness of the float needle & floats hinge pin. It eliminates errors. In a rare case that you find the float needle plunger tit (most models have that type of float needle) frozen up, fix that, usually with a new float needle. An alternative method of checking float adjustment is that the fuel level should be half-way in the bowl from the gasket.
If you experience surging or similar running-out-of-fuel effects at FAST and high throttle cruising, & you open the gas cap ...with no help after 10 or 15 seconds, ...& fuel filters & actual fuel flow HAVE BEEN PROPERLY CHECKED to be OK ...then you may have the adjustment of the floats for fuel level to be too low:
Actual bowl fuel level check: (and, the alternative method too)
Turn the fuel off, remove one float bowl, empty its fuel into the tank (look for globules of water, if any, toss the fuel someplace, like your cleaning tank or can), replace the bowl, turn gas on, allow bowl to fill (10 to 15 seconds), turn gas off, THEN
remove bowl quickly & squarely. Measure the fuel depth from the center bottom to the fuel top. I suggest using a thin, narrow, machinists steel rule. Do your best to have the bowl sitting flat & level on its base, & estimate the best you can with #1 eyeball (yes, will still be meniscus errors), the exact height of the fuel from the bottom. For the 32 mm carburetors (except early /5 motorcycles, which have their own article, https://bmwmotorcycletech.info/earlybingR75CV.htm, use 24 mm fuel height. For the 40 mm carburetors, use 28 mm fuel height.
If your find your gas level quite high, and you DID set the float adjustment properly for fuel flow/stop, float top parallel with the body, then the one-piece white float unit may be bad. Information on the floats is posted in a companion article on this website, https://bmwmotorcycletech.info/bing-floats.htm. Refer to that article for information on removing/replacing the float. The stock floats last about 30K, sometimes considerably more. ALWAYS replace the float needle at that same time.
Alternative height method: the fuel level should be half-way in the bowl from the gasket.
If you have, or intend to have, the Bing Independent Floats conversion, read: https://bmwmotorcycletech.info/bingindependent.htm
If the carburetor fuel supply, by measuring flow rate (by MEASURING! ....the amount for a pint), is good, but you are running out of fuel (stumbling, etc.) at high speeds, you may want to try two or three more mm of fuel height. Be cautious about making this change. You want to be sure the flow is not only correct, but remains correct as the fuel tank level goes down. The test is best done starting with a full tank. Running out of fuel check?....open the fuel cap! Only if fuel flow through the bowl AND the cap check is known OK, should you change the height of the fuel.
NOTICE: There have been instances of late model Airheads (particularly R100 engines) with (or without) stains at the top area, but in which fuel mileage is poor. The problem is that the rubber hose between the carburetor and the engine is of the wrong material, and lets the carburetor vibrate at certain rpm and conditions, which lets the float needle to admit more fuel into the fuel bowl than is proper. The stock original hose was 13-72-1-338-360. Remove and replace with 13-72-1-254-654. There is a Service Information bulletin on this, 13-020-90 (2414).
It is my opinion that a second, unsaid, reason for the change, was probably due to wear on the later carbs which used aluminum alloy needles.
7. After perhaps 60K, the steel slide needle & associated needle jet & the diaphragm will need all need replacing. See https://bmwmotorcycletech.info/bingcv.htm for more information on needles & the clip. The 1985+ aluminum needles as used on the 32 mm carburetors tend to wear considerably faster, particularly at the clip grooves. This is the time one usually cleans out the central jet assembly, & installs a new O-ring in the central jet assembly. Cautions on this work are in https://bmwmotorcycletech.info/bingcv.htm. Don't dip carburetors into commercial carburetor dip-tank solutions, that will almost for sure eat up the butterfly shaft (throttle shaft) O-ring, necessitating its replacement ....which involves removing two peened screws ....and the need for careful alignment & avoidance of reversing the butterfly. Photos of the butterfly both correctly, & incorrectly installed, are in the linked article. Be sure to read item #21, well below.
Berryman B-12, in the particular spray can version called 'Choke and Carburetor Cleaner', without CA or Ca or CA in the model number on the can, works quite well to clean out passageways. Use three times, with each spray (via the thin plastic tubing) allowed to sit a minute or three. If you remove the butterfly shaft, put silicone grease on that butterfly/shaft O-ring. It will last far longer & operate far smoother. After mild grinding so you can remove the peened butterfly screws, be aware that peening new screws is not absolutely necessary, Loctite (blue) seems to work OK. Again, be SURE the butterfly is installed correctly; do not fully tighten the screws unless your finger is holding the butterfly valve against the carburetor throat body, to be sure it is fully seated & centered. If you reverse the butterfly, the carburetor will NOT work properly near idle & just off-idle.
Note again: from ~1985 or 1986, Bing installed a rather soft aluminum SLIDE needle. These wear fast, compared to earlier models. They usually will not last the 60K miles I mention, above. The result will begin slowly, probably with POOR fuel mileage and poor throttle feel.
8. Be very cautious about installing the needle jet assembly if the slide & needle are already in place. The atomizer must stick up into the throat (it fits only one way, the two ends are NOT the same diameter). Even if the atomizer is correctly installed, you do NOT want the needle to hang up on an edge/corner of the atomizer. WATCH, and BE CAREFUL! ALSO ... AVOID pressure, do NOT bend that needle! NEVER force the central jet assembly ...it should NOT require excessive force with wrench or fingers, to tighten it up. Silicone grease, faintly, its new O-ring before installing. The trick to installing the O-ring is the faint grease (& it extends life) & a temporary piece of tape wrapped on the threads ....I use plumber's Teflon tape.
9. The earlier needle mounting method is such that the needles are adjusted to the desired 'notch', by rotating the needle 90 degrees & pulling down or pushing up during that slight rotation. Down/Up depends on which way you want to move the needle. Needles are held-in by a hidden clip, later added was a screw from the top of the slide. The topmost notch on a needle is the #1 notch. I recommend that you check that on both carburetors. ACTUALLY MEASURE for the needles, & write that value down. Measure, with vernier calipers or similar, from center area of the base of the slide to needle tip. Try to hold measuring accuracy to .015" or so on this. This is also good way to ensure that you don't put the needles into the carburetors in the future by mistake on the wrong notch. One notch is a BIG difference in mid-range carburetion! ONE notch on a carburetor needle is equivalent to 2-1/2 to 3 sizes of needle jet.
10. If your bike tends to stumble & run out of power at regular cruising ...OR... after a good uphill climb OR a higher speed run down the highway (this could happen quicker with a fuller tank), loosen the gas tank cap ...if there is a whooshing noise & the bike runs well again after waiting 10 seconds or so, it is the tank venting that is clogged. Similar problems with fuel flow can come from clogged in-tank or in-petcock filters, or clogged aftermarket filters. As noted earlier, too low a carburetor fuel level can also cause this sort of problem.
11. Most petcocks (there are at least 5 models), if they get stiff, can be taken apart, cleaned & silicone-lubed. Versions of two of the petcock styles had a tall screen that stuck up inside the tank. In one version of those tall screens there is a white colored spacer well up the screen, to help with wear from inner pipe contacting the screeen. All the earlier screens used a separate reddish-brown cambric washer. Remove washer & screen & replace with the later one-piece bonded metal screen/washer .....it not only screens particles better, but seals better. Do not use the Cambric washer with the new style screen that has the bonded washer. Some petcocks have a screen built into the lower outlet ...remove and clean it regularly. If you have a plastic outlet, be careful, don't bust it by yanking on the hose. Remove, clean, & dry out the tank every year. The original /5 'bullet' petcock is rebuildable, IF..IF...you can get it apart, which really will...or can... mess-up the appearance. It is nice to have an original bike appearance, but the much later petcocks work fine; are easily rebuildable...often only cleaning & a tad of silicone grease is all that is required. There are specific details on this website about cleaning/lubricating/fixing petcock problems, including modifying them for faster fuel flow, when needed.
12. The band clamp that holds the curved plastic intake tube that fits between the carburetor intake & the aircleaner housing should be installed with the screw portion of the clamps on top ...or at least not at the bottom, at the carburetor end. This will help avoid breather oil dripping on your foot. While this hint was mostly applicable to just the /5 models, DO check the plastic pipe that connects the air cleaner to the carburetor, & if it has slots at the bottom of the end that fits over the carburetor inlet, then follow this advice. I do it as a matter of habit, to all Airheads; and, the fact that when they are quite tight, it "may" help even with non-slotted intake tubes.
The plastic tubes that connect the air cleaner to the carburetor are not identical to each other on the clamshell models. For the rectangular air cleaner models, the tubes are identical, as the cylinder offset is taken care of by the position of the outlets. There are also a lot of variances with other things associated with these intake plastic tubes.
There is a fair amount of complication about what parts fit what bike model and year, and which side. There are differences in the plastic pipes, O-rings being used, changes in the clamshell airbox, etc. I have never done a complete article on these differences and how YOUR bike should be assembled.........luckily Anton Largiader HAS, with photos!
http://largiader.com/articles/intake/
There was a crossover period in late 1978, when the clamshell and the rectangular air cleaner housings were both available, or nearly. Check carefully before ordering the parts. The part numbers include 13-72-1-258-059 and -060; and, 13-72-1-262-787 and -788. Check the fiche carefully. Look at the numbers inside your old ones.
To install the tubes, do so with all clamps quite loose, otherwise you will not be able to install easily, and do slide the adaptor hoses down at the airbox end as applicable. Tighten clamps properly when done, of course. Be cautious about which tubes you use. Some can be installed upside down. I have all clamps between the carburetor end of the cylinder head hose and the airbox, quite loose, and install carburetor and plastic intake tubes, etc., as a unit; and never have problems.
13. FOR SURE use a faint dab of anti-seize on the dome top screws threads AND the taper under the head ... before assembly. Tighten them evenly. USE THE CORRECT SCREWDRIVER that REALLY fits the cross-slot screw.
14. If the carburetors are being worked on off the bike, you might consider doing a few even-pressured figure eights; and ROTATE now and then during that process. Do this on a piece of glass or other FLAT surface. Do this with the carburetor upside down and on 220 grit sandpaper & then followed by 360 grit sandpaper. Do only for the carburetor body, at the top. Just enough to clean it up, & a tad more. It will help stop those ugly gas stains, & might solve some strange problems you had been having. Here are the finer details:
Fairly often I see carburetor top stains where they join the body of the carburetor. The tell-tale sign is a brown (usually) stain around the diaphragm joint interface, caused by some tiny gasoline weepage. I was never bothered by this, as the 'problem' is sporadic & minuscule. However, Oak sent me (in 1984!) a bulletin he made up describing this situation as not necessarily being caused by the lack of the diaphragm acting as a seal, but rather that the compression of that diaphragm was insufficient for a COMPLETE sealing. He recommended removing the carburetor & flat sanding the carburetor top itself, with 220 grit wet type paper, kept wet with water, figure eights, carefully, until the groove, which he said was 0.155 to 0.156 inch deep in the troublesome carbs, is reduced by about .007 inch. He said to shoot for a final depth of about 0.147 to 0.150. Remove all grit afterwards, of course. I have done this to several carburetors, & it DOES stop the staining. Few of you have the gauges to measure this, so you could try just a few figure eights. TEN is plenty appropriate, LIGHT medium pressure. Do them EVENLY. Once the fresh sanded surfaces are evenly fresh all the way around, that is likely enough. Do not overdo this. Clean/reassemble. See the next paragraph!!
Some BMW/Bing diaphragms are a bit thinner than many years ago. If the groove in the top of the carburetor body, where the top casting meets the diaphragm & seals the diaphragm to the carb body, is too deep, there may be leaks of air, not just weepage of faint amounts of fuel. This has happened even with the correct thick diaphragms. The result may or may not be dried fuel stains on the top of the body, but may also, especially with the thinner diaphragms, be revealed as a LEAN RUNNING CONDITION, perhaps in the mid-range. You can, if experienced, 'feel' the leak by the sound/pressure of the slide, etc., moving the slide up &down with your fingertip, carburetor fully assembled. If you have MIDRANGE lean mixture surging, & it is fixed by moving the needle up one click, and you have checked for needle free play, then remove the top & diaphragm/slide; sand the carb body until the groove depth is ~0.146". You might want to go back to the stock needle setting, see how it runs ...as it will save fuel if not now running lean. An entire notch is a big jump.
15. LEAKY TOP PLUGS:
Some carburetors (not the flat top ones) have had leaky steel plugs on the domes ...that shiny center area. You can easily test the plugs for leaks when the domes are off for servicing the carburetors, simply put some fuel in the top, upside down. DO NOT
allow any leaks ...that will act like a torn diaphragm. Plugs can be crimped or epoxied. I prefer crimping with a tiny tip punch
& then epoxying. I am fine with you just using epoxy ...if prep'd first. Some folks have used a toothpick & aluminum paint. If your plug has a letter C stamped into it, do not cover that up, it means something ....it identifies an early modification in the /5 era. There is a BMW Roundel that can be epoxied to the top of the carburetors (they fit the small top ones, also the flat top ones, which can also use much larger ones too). See
https://bmwmotorcycletech.info/roundel.htm article on this website, for a
huge list of Roundels, including exactly which fit nicely the small tops. When cleaning the area for epoxy or aluminum paint, etc., it is very difficult to get sandpaper into the corner. I use a dental pick or awl. If your top has a C on it, and you cover that with a roundel, I suggest you engrave a C next to the part number.
16A. Diaphragms:
Here is a link to information on earliest Triumph Spitfire.....you will have to wade through menus to the fuel system...the link may still work: http://www.spitbits.com. Stromberg CD150 "supposedly" uses the same diaphragm (B20924??) as the Bing 32mm. For 40 mm, it was CD175. See also 1970's to 1980's Volvo. My personal opinion is that the Stromberg diaphragms are not the same in flexibility, vary otherwise too...and....are for emergency use only ....& you could, if yours gets a rip or tear, simply glue it, or use a glued-piece of condom, or whatever. It is my belief that the Stromberg diaphragms vary greatly with supplier, & if too stiff,
you will have LOUSY power availability, & likely an inability to rev high enough. There is a rumor, that I do not know the truth for, that Bing USA has sold the Stromberg diaphragms under their own Bing label.
My advice remains exactly the same as it has been for decades; ...do NOT buy diaphragms from Bing USA. In fact, my advice is to not purchase any carburetor parts from BING USA ...UNLESS the parts you need are NOT sold by BMW. Use genuine BMW parts. STRANGELY, your BMW dealership usually sells carb parts cheaper than Bing USA.
With some Airhead carburetors; BMW does not offer just the diaphragm, & wants you to purchase the slide with the diaphragm attached. This may occur with the models where the diaphragm is attached by a pressed-on nylon ring. You could purchase the diaphragm from BINGUSA. Note my cautions. You CAN pry the ring off gently without breaking it, if you soak the slide and the ring assembly in very hot or boiling water to soften & expand the ring. This avoids breaking the ring when removing and replacing it. Expand the ring with light pressure only enough to remove it.
The diaphragm has a locating tab, that lines up with the similar recess in the carburetor body. Do not allow the diaphragm to slip out of position during assembly. The slide has a couple of holes in the bottom, they face the engine. Do NOT allow the slide to get nicked. Don't leave out the spring ...if your carburetor has one ...on the top of the slide assembly.
16B. Parts:
I recommend you do NOT get carburetor diaphragms & rubber parts from BINGUSA; get them only from a BMW dealership, they will very likely be of correct color, type of rubber, etc. They should come in BMW-marked containers. You can NOT depend on Bing USA parts being of the same quality as the BMW sold parts. Interestingly, BMW prices for Bing parts are often cheaper! Be careful! .....and do NOT use Stromberg diaphragms!
The 32 mm overhaul kit from BMW is 13 11 1 258 051
The 40 mm overhaul kit from BMW is 13 11 1 336 902.
Bing supplied a 26 mm slide carburetor for some early Airheads. The kit for them is 13 11 1 258 050.
The very earliest /5 diaphragms were replaced by a thicker type, which is all that is available now from BMW. Some of those very early ones might still be around.
There are a number of rubber O-rings used in the Bing CV carburetors. All should come with the rebuild kit (5 O-rings).
These are BMW part numbers:
13 11 1 257 739 Used at the throttle shaft, 6 mm x 2 mm and rather thickish.
13 11 1 257 819 Used at the enrichener shaft, 5 x 1.5 mm and rather thinnish. There is an O-ring internally on later enrichener models. I lightly silicone-grease that O-ring. EARLY versions of the Bing CV, as on the /5 carburetors, had two different styles of enrichener covers and disc/shaft. If your cover has a depressed area at the outside, where the shaft comes through, then the rubber O-ring fits there, and NOT INSIDE.
13 11 1 257 812 Used at the main jet assembly, 8 x 1.5 mm. (will measure ~1.75 mm)
13 11 1 254 735 Used at both the idle adjustment screw and on the idle jet, 3 x 1.75 mm
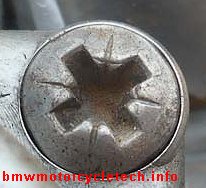
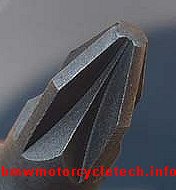
17. Carburetor Top Screws, all about their screw heads & Screwdrivers (an educational treatise):
Screws are M5 x 0.8 x 12 oval head. BE SURE to put a trace of antiseize compound on the top screw threads AND the screw taper. DO NOT overtighten these top screws.
BMW supplies a screwdriver 71 11 1 103 086 in the on-bike tool kit. "Phillips" & standard flat blade ends, reversible. The "Phillips" end is NOT a PoziDriv nor is it a Reed & Prince tip. It is also not a nice Phillips. There are better choices, stronger, longer lasting, but it is not always easy to find a screwdriver that is small, and has both phillips and slot ends, and fits your tools bag for the on-bike kit. Some folks purchase one of the SnapOn types, with assorted hardened magnetic tips that fit inside the handle. If you have the room and budget, the Snap-On is a QUALITY tool, that almost never wears out the tips. Be sure you have the proper size tips. The proper Phillips size is #2 for the carburetor top screws WHEN they are Phillips.
BMW carb top "phillips" screws are not always really Phillips screws, they just look that way at a quick first glance. They could be Phillips, OR could be 'PoziDriv' type'...I suppose they could even be other shapes. Someone might even have changed them to allen head types. The ancient aircraft tip screwdriver called Reed & Prince (Frearson) works relatively nicely on the PoziDriv screws....as, of course, does the real PoziDriv. The PoziDriv tip is EXCELLENT for REMOVING the Phillips type, if the Phillips is way tight. Generally install a real Phillips type with a Phillips screwdriver, but the other types of screwdrivers DO work better. If the screws are frozen, you can try a variety of ideas. The Phillips type of screw was DESIGNED to not slip as much as others of its time...but, also designed so the TOOL WILL SLIP after a certain torque is reached. This is why removing a stuck Phillips screw is so annoying...especially after some wear on the screw or screwdriver. Methods of adding friction for easier removal includes valve grinding compound for a better grip. For egregious instances, I use a metal block underneath and an Impakt Driver brand or equivalent cam-operated impact driver with the PROPER TIP. Tips for interchangeable-tip type tools are available from a variety of sources, including Snap-On. The PoziDriv tip IS available. Some have installed Allen head screws at the carburetor tops. They are OK, but don't over-tighten, as many of these have a very small allen & can round-out more easily. Some early carburetors had common slot screws. BMW & Bing may be, and have, shipped EITHER PoziDriv or Phillips screws......be sure that your 'screwdriver' fits them. Remove the screws one at a time, coat the threads ...and under head taper...with antiseize....and replace the screws without too much torque;.....you will appreciate these hints much later on. BMW's red plastic-handled screwdriver that is in the BMW on-bike tool kit, the one with the reversible insert, probably Heyco Germany brand, is NOT NECESSARILY THE CORRECT TOOL for the carburetor tops ....this tool is a common Phillips, and not a good one. The PoziDriv screws generally have some radiating lines to indicate they are not Phillips type. Note, again, that the Pozidriv type screwdriver will usually work well on Phillips screws.
Try to use a screwdriver that, upon close inspection, really fits the screw. Buggered-up screws are a sign of poor workmanship!
Here are photos of the PoziDriv screw, and the screwdriver tip. Note the differences from a Phillips....the nearly flat bottom and the corresponding flat top of the screwdriver; note also the angles and the extra (lesser) 'splines' in-between the
major splines. If the screw looks the same, and no tick marks, it may be a SupaDriv.
A bit more:
The Frearson (Reed & Prince) screws used a screwdriver with a sharp tip, and a wider angle, thus the screwdrivers could be used on a wide range of screw head sizes. These are now a very old design, not really used since the seventies. The typical use was marine hardware. The Phillips had a more rounded and tapered shape. There is another name, often used with or similar to the PoziDriv (AND, note that this screw is actually NOT POZIDRIVE ...there is NO E on the end), & that is SupaDriv. They seem the same, but while their respective screwdrivers will work with each other, not quite perfectly. The SupaDrive allows a bit higher torque than the Pozidriv, and the screwdriver can have a modest ANGLE to the screw....thus is nice for overhead use. The POZIDRIV has tick marks, see photo above. USE OF A PHILLIPS SCREWDRIVER ON THESE SCREWS WILL DAMAGE THE SCREW.
It is not uncommon to have the top screws on the Bing CV carbs seize & freeze-up. This will not happen if you use a faint bit of antiseize compound when you reinstall the screws ....on both the threads & taper area.
a. Be sure you use some sort of pointy thing to clean the cavity of the screw head before trying to remove it.
b. Use the proper size & type of screwdriver. Use of a too-large one will damage the screw, could cause the screwdriver to slip out. PoziDriv tips for changeable tip screwdrivers ARE available.
c. Using a tiny amount of valve-grinding (gritty stuff) compound can often help if using a Phillips screwdriver, to grab the screw better.
d. With single slot screws you should have a screwdriver that actually fits the groove without a lot of play, and fits the width of the screw fully, but not wider.
e. Do NOT use an impact driver with hammer, if you do not support the carburetor boss area. Impact drivers (hand operated devices) are very handy hand tools for loosening fittings. They were a MUST on the old Japanese bikes with their 'Phillips' screws. To use one safely, you must either have the carburetor off the bike with the boss properly supported on the work bench, or support the boss area somehow & KNOW how much force is safe! DO NOT GOOF ....you can break an ear off a carburetor. SUPPORT THAT EAR FROM BELOW. I use a metal block under it. 18., below, describes the impact driver tool.
18. You won't find a lot of need for this tool, but when you need it, and it is a tool to have at home, you will cuss without it. This is a tool called an impact driver. The brand I have is IMPAKDRIVER, made by the H.K. Porter company. This neat gadget is hit with a hammer, WHILE you hold CW (tightening) or CCW (loosening) pressure on the tool. The hammer blow pushes the tool tip (lots of quite common tips available) into the screw, and the internal CAM of the tool causes rotation. This tool was a MUST with old Japanese bikes, and with a few tips, you will find it rather valuable when you need it. Use this tool carefully, on such as carburetor top screws (don't break the carburetor tab; do support the area!). Good for nuts, not just screws. I get this tool out BEFORE I round out a fitting. More information (and photo): https://bmwmotorcycletech.info/tools.htm
19. Strange stumbling or 'funny' throttle feel and possibly weeping/leaking from float bowls, etc.??.... I am not talking about larger fuel volume leaking from a poorly sealing float needle. Possibly your slide needle is excessively wearing?....VERY particularly the right side ....and either grommet (those hoses from carb to cylinder head) are sagging (or allowing excessive vibration):
First, a bit of background. In the mid-eighties, BMW made a change to the hose ('rubber grommet' in some parts books) that couples the carburetors to the cylinder head intake stub. BMW softened the rubber compound of the hose. Only 32 mm carburetor bikes went to the USA, and with 13 72 1 338 360 hoses. I suggest replacing them with the older style of stiffer hose, which was 13 72 1 254 654. You can also try raising the float bowl fuel level by 2 or 3 mm, which applies to both sizes of carburetors. For the mid-eighties and later, 40 mm carbureted bikes were NOT shipped to the U.S. These bikes had 13 72 1 338 362 hoses and I suggest you change them to 13-72-1-264-392. The true story of this hose change is not all that clear, not even when reading BMW's bulletin on the subject. Supposedly the problem was first found on the R100GS/PD. I guess that the problem was then found on the R80GS. In any event, two things happened. First, vibration, road shocks, whatever, could cause the float bowl to overflow. BMW also found foaming & frothing of the fuel in the bowl. So, BMW changed to a softer compound in the hose. NOTE that it is NOT easy to test both types of hose with your hand to find out which is which (you mostly have to look at the printed number on the hose!). BMW's fix did not work. The new hoses sagged, over time that got worse. Hoses LEAKED vacuum. I have seen them look good, but sagged, and no amount of band clamp tightening fixed it. In fact, my own 1995 R100RT USA model, had the problem. CHANGE the hoses as described. THEN, also check the fuel level, and run the fuel level slightly on the high side of specifications, but only if you need to. IT HAS BEEN REPORTED THAT THE SOFTER SLIDE NEEDLES AS USED ON THE LATE MODELS WILL WEAR THEIR SLOTS EVEN MORE EXCESSIVELY FASTER IF YOU USE THE SOFTER HOSE. WORN SLIDE NEEDLES RESULT IN GROSS CHANGES IN FUEL-AIR MIXTURES. SOME NEEDLES HAVE WORN A STEP ON THE NEEDLE COMPLETELY AWAY. If you have the -360 hoses, change to the -654 hoses. This was reported by Tom Cutter to eliminate the excessive needle wear. However, I still think the aluminum needles wear too fast. BE SURE TO READ ITEM #21, BELOW!
....................................
NOTE that there are several reasons to change those hoses, and BMW did have one bulletin, but it did not cover the needle wear. Read the following:
There have been instances of late model Airheads (particularly R100 engines) with (or without) stains at the top area, but in which fuel mileage is poor. The problem is that the rubber hose between the carburetor and the engine is of the wrong material, and lets the carburetor vibrate at certain rpm and conditions, which lets the float needle to admit more fuel into the fuel bowl than is proper. The stock original hose was 13-72-1-338-360. Remove and replace with 13-72-1-254-654. There is a Service Information bulletin on this, 13-020-90 (2414).
..................................
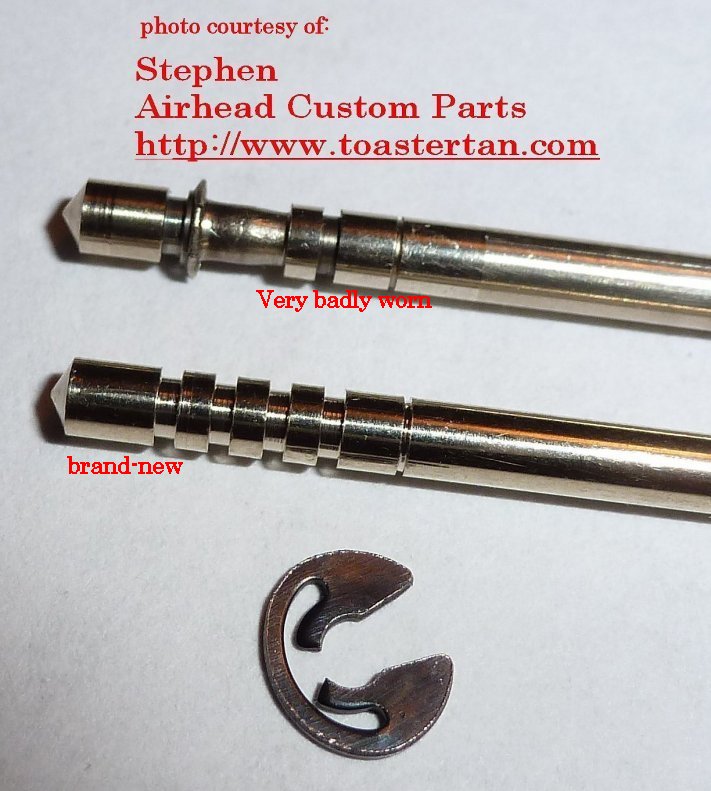
Note that BMW has never said anything about the hoses and the seriously badly worn slide needles. Below is a photo of a new and a badly worn-out SLIDE needle. NOTE that it seems like the RIGHT SIDE carburetor is the one that has all this needle wear! If you have such wear problems, consider the coupling hose change it does seem to help, sometimes a lot. I've even tried the slide spring as a dampener, etc. I have not yet done vibration instrumentation nor spacer discs at the clip, to see if I can reduce the wear.
20A. FLOAT NEEDLE SEATS:
It is relatively rare, but occasionally there is a need to replace a float needle SEAT. Usually this is because even with a new float needle, gas still gets on your foot and you HAVE determined that it is not the sealing O-ring, hidden inside of the inlet pipe that is pushed into the carburetor body. You may hear that the seats are not replaceable, or that only Bing can do it. NOT SO. Some folks have drilled them & used an EZ-Out to remove the old one. That can be dangerous to the carburetor. These seats are rather strongly pressed into place. I suggest you do not try to remove them without heating the carburetor, and suggest you use a hair dryer, only. Before you replace the seat, try refinishing the seat with a pointy wooden tool to which you apply a bit of FINE valve grinding compound. That might stop the leaks.
Here is the method to replace a seat:
Tap the seat with a 7 mm x 1 mm tap. You could use SAE taps too...with American threads. Try 5/16" x 24. Use a screw of 7 x 1 mm thread, or 5/16 x 24 American threads if you used that tap ...maybe 50 mm (2") or so long would be nice, but you can certainly use a shorter screw.
For the metric size tap and screw, you need something like a bushing or something to substitute for one, of perhaps ~8+ mm INSIDE diameter, & ~ 14 mm OUTSIDE diameter. This bushing could be around 25 mm long. NOTHING is critical here except that the OD be such that the bushing fits the carburetor body area & not the needle seat; and, the inside diameter is big enough to allow the old seat to come up into the bushing. You can now use the screw & the bushing (and maybe a washer if needed) to DRAW OUT the old needle seat. Heating the carburetor body MAY help .....as I think the carburetor body material expands slightly faster than the needle seat material. Use a common hair drier, NOT any sort of flame torch. You can even use a common NUT, with appropriate i.d., for a bushing. When inserting the new seat, freeze it before installing; and, again, have the carburetor body reasonably hot from use of a common hair drier, and tap it into place with a flat ended tool.
20B. The float needle tips tend to get faint grooves in them after a lot of miles. If a rubber-tipped type, the tip "rubber" material gets slightly harder, & with modern gasohol, perhaps, it also deteriorates. When the needle tip has grooves then the needle tip does not seal well, causing the bowl to overflow onto your foot. This commonly happens if a quite small particle of dirt, deteriorated rubber hose, etc., gets into that float tip & mating seat area. The stock float & float needle probably should be replaced every 30,000 miles. It is quite common to see a carburetor overflowing onto one's boot. Most Airhead owners have had this problem at one time or another; sometimes many times. The fast fix is to turn off the fuel petcock(s), remove the bowl & jiggle the float up & down with the fuel ON, which USUALLY flushes out any particulate matter in the float needle-seat area.
It is important to keep the fuel tank clean. As tanks age, the interior reddish-brown lining deteriorates, clogs screens, etc. Rust also develops at the bottom from failure to clean out accumulated water regularly; and, eventually, the tank seams rot away. You do NOT want the tank to rust out; NOR do you want debris to pass through the tank screens & get into the carburetor. Use of aftermarket fuel filter(s) below the petcocks is almost a necessity now with our aging bikes. Information on screens, filters, updates, etc., is elsewhere's on this website.Except for the earliest carburetors with no plunger on the float needle (models with no rubber tip on the needle too), if you left the teeny clip off the float needle & float, the chances are that the float system will work just as it is supposed to. You COULD, however, have a situation where the needle 'stuck' to the needle seat, & no gas flowed. It is rare. FYI, I used to purchase these wire clips several dozen at a time & I used to need one rather too often when I had my BMW shop. It is ever so easy to have one flip someplace while trying to install or remove ...especially when on the bike. I never really learned my lesson ...but, I tried to use a 3 power magnifier on my eyeglasses, and do the work on a piece of old white bed sheet! ...or white cardboard ...whether the carburetor was on the bike ...or on my bench.
The earliest carburetors had all-metal float needles. They could be a bit troublesome. Soon the float needle was changed to a rubber-tipped type. Later, the float needle lower end was drilled, the needle got an internal spring loaded-plunger with a teeny hole at the bottom end on the plunger side, & the teeny fine-wire clip was added. I believe Bing incorporated the spring loaded plunger so that the fuel level sensing was more accurate, needle wear probably was less. The leverage & spring effect is such that as the fuel level rises, the pressure on the seat increased rapidly, compared to a very small fuel level increase. This is difficult to see; a nerdy point anyway. I have another theory, however. I believe that as the plunger tip wears, which it does and the wear shows as a ring/groove area, the needle, being loose-enough in the vertical well area it fits up into, could cant sideways a bit. That MIGHT allow the grooved fuel shutoff needle to hang-up ever so slightly in the SEAT. Since only the needle weight, plus a mixed effect of the weight of fuel above the needle seat, and maybe vibration, etc., is going to be helping, with gravity, to move the needle downwards to let fuel in, Bing incorporated the clip, so as the float assembly went down as fuel level in the bowl dropped, the float assembly positively pulled the needle off its seat.
21. Some very late model R100GS, and possibly others, & probably only 32 mm carburetors (at least for the USA), may be found with a groove machined into the upper area of the slide, with an O-ring installed at that point. The purpose is to help eliminate a rattle these sometimes had. It isn't necessary to retrofit your bike with these, unless you have a bad rattle at idle (often on right side), and dislike the rattle. HOWEVER, I have theorized that the rattle, with no O-ring installed, might be partly responsible for the faster slide needle wear that is often seen, and, strangely, mostly in the RIGHT side carburetor. I have no BMW number for the large O-ring used on these last generation of 32 mm carburetors. The O-ring had a Bing part number of 165-723 and the slide was 22-913 (possibly with some ending numbers added. Bing stated that they also modified the carburetor body "dimension", but I have no information on that, including WHAT was modified. Here is a copy of the Bing drawing:
22-913-101-02-bing-carb-slide.pdf
You could contact BingAgency and ask them.
22. When assembling the enrichener valve, etc. https://bmwmotorcycletech.info/bingcv.htm, I recommend a VERY FAINT smear of a NON-RTV type gasket sealant. This should be on both sides of the gasket. Gasgacinch or Permatex Form-a-Gasket non-hardening version, or similar, is fine. The reason is not to prevent leaks directly, but to prevent the gasket from sucking-inwards, which then DOES cause leaks, which upset the throttle operation. These 4 screws have a reputation for loosening.
23. High idle rpm after warmup (and sometimes before full warmup): This section has been moved entirely, and expanded, into: https://bmwmotorcycletech.info/bingcv.htm
24. Except for the /5 models, lighter force carburetor exterior throttle return-springs are available ....they are not the same for 32 (two types for them) & 40 mm carburetors. Check with http://www.RubberChickenRacingGarage.com who stocks them; or, your dealership; or, Ted Porter's Beemershop in California...or, direct: BMWthrottlesprings.com. Type 606 for the 32 mm carburetors that have 3 digit model numbers; type 908 for the earlier 2 digit 32 mm types; type 312 for the 40 mm carbs.
25. DO NOT use a "Colortune" for tuning your Bing carburetors. YES, I know Bing Agency in the USA sells these. It will show over-rich indications, or otherwise wrong indications for idle. I do not trust the threads quality. It is a nearly completely worthless tool, it does NOT show what is advertised.
26. The carburetor butterflies must be installed properly, and part 1 of the BING CV articles fully describes the way to do it, with annotated photos, etc.
27. The following information between the double-quote symbols, said information slightly edited by ME, Snowbum, was supplied by Brian Mehosky, of the Slash5United mailing list. It is interesting for the nerdy...especially me, as I have always 'assumed' that the bowls were a zinc compound. Many thanks to Brian for doing these spectrometer tests...AND...letting me use his information. Note that in addition to minor editing by me, Snowbum, I found that the alloy has had other names assigned over the years. Examples are British Standard LM6; SAE standard 305; and ASTM is A13 or S12A, and, finally, the UNS is A14130.
"""A question was posed about the alloy used to die cast our carbs. I had the opportunity to test a 1972 R75/5 carb bowl on a spark mass spectrometer. While it might not be the same alloy used on other carb component parts, or on other carb bowls, the alloy used on the carb bowl from a 72 R75/5 (Manufactured 11/71) is A413.0. I took four readings on the bowl, and the average composition (all in weight percents) was:
Aluminum – 83.8
Silicon – 13.7 (A413.0 max spec is 13.0)
Iron – 0.742
Copper – 0.566
Manganese – 0.214
Magnesium – 0.0417
Zinc – 0.561 (A413.0 max spec is 0.500)
Nickel – 0.107
Tin – 0.0139
One internet article says, “The castability of this aluminum alloy makes it a great choice for die casting intricate components”.
"""
28.
Tuning Bing Carburetors...a brief outline...covering jetting changes & high altitude riding, etc.:
This is an edited version of a reply I did on the Airheads LIST, on November 27, 2009
Each needle notch is roughly the equivalent of 2-1/2 to 3 steps of the needle jet. Needle jet sizes are such as 2.64; 2.66; 2.68. Thus, a needle notch is a relatively coarse adjustment. Needles are made in both different lengths & tapers to match the carburetor & engine requirements; and I absolutely do NOT recommend changing from the stock needle to any other needle number; doing so would open a Pandora's box of problems. Changing the stock needle position in its clip or changing the needle jet, is not in that Pandora's box category. (BTW...There are two types of needle mountings in the slide, described much earlier).
The question came up as to whether or not to change "jetting" if riding at a mile high. Firstly, understand that the word 'jetting' is often used to mean anything having to do with jetting, including the jet, the needle, and any associated part. Secondly, one mile high, that is, 5280 feet, can be MUCH higher than 5280 feet in what is called high "density altitude".... that is, it will be in hot weather. Engine and carburetors respond to the actual air density. Air density decreases (increases in density altitude) rather fast with temperature increase (only a little with humidity changes); and is also affected by the barometric pressure; which is generally also not a large effect.
For every physical mapped altitude, there is a corresponding temperature on a chart of "standard values". For one mile high physically mapped, the equivalent standard temperature on the chart will be approximately 40�F. This means that if you are in an area that is ~ 5280 feet in elevation above sea level and the air is warmer than 40�F, then the altitude that the engine & carburetor thinks/feels/acts-like it is, is HIGHER.
Example: My house is at 6174 feet above sea level. At times, in the Summer, the density altitude can be towards 9,000 feet. People that come here in the summer & hike into our higher mountain areas, might find themselves quite out of breath ....and the density altitude in the mid-mountain areas of a hike can exceed 12,000 feet on a warm day, & I think I saw nearly 14,000 once at about a real 9000 feet or so. Your engine will lose power output and maximum power output as you go up in altitude. There is simply less air, and air is needed, together with gasoline, to produce horsepower. The power decrease comes from several effects, including mixture richness change and effective compression change. The effect is usually quite noticeable by about one mile high. It gets much worse, & at a faster rate, as you go above 8,000. You will also likely notice that your idle rpm has dropped, annoyingly perhaps. The power output DEcrease can be offset SOME by carburetion jetting (main jet change & maybe needle jet or needle clip adjustment change) modifications by only a modest amount ...although above 12,000 feet the need is increased.
If the fuel level in the float bowl is correctly adjusted; & the engine is stock, & the air cleaner is not clogged; needle & needle jet not worn;....ETC....then the STOCK jetting is generally OK for BOTH sea level & anything reasonably higher. "Jetting" here means main jet & needle type & position and needle jet number.
As you go UP in altitude, the carburetor will operate richer. The fuel per amount of air is INcreased. That fuel may not be able to be burned efficiently. This is more so on the slide carburetors, as the CV carburetors tend to compensate SOME for density altitude changes. While a richer mixture might burn more fuel than necessary; & ultimately carbon-up the combustion chamber more, it is SAFE. If you were to use a leaner "jetting" ("jetting" used in its broad sense here), power will be increased some; more or less depending on the density altitude. But, the problem is that if you change the jetting by more than a rather modest amount leaner for riding at high altitude, then as you go down in altitude, say to sea level, you may be running too lean, and if excessive, this could possibly burn a hole in the piston or otherwise cause lean over-heating, if extreme enough. Thus, unless you plan to be exclusively riding at around a mile or more high in density altitude, I recommend you DO NOT change any of the jetting from stock. "Jetting" as used here includes both needle position & main jet size, or even possibly the needle jet; and, rarely, the pilot jet.
If you were going into very high elevations, perhaps very consistently over 5,000 feet, then I would lower the main jet number, by 5 points (more if over 8,000 feet); and I'd also lean the needle jet one or two sizes or even one needle position. Be very wary of going back to lower elevations; change your 'jetting' back to what it was, before doing so. I'd pay particular attention to the idle mixture adjustment...and use about 1/8th turn outwards from the point the engine just barely starts to bog down...and, use 1050 idle rpm.
The Bing CV carburetor tends to compensate SOME for elevation changes relatively well, except not so much for the nearly or actual wide open throttle position (where the MAIN jet is almost 100% controlling the jetting). The compensation here is for mixture, and NOT for maximum power output. Thus, even with jetting changes to compensate for altitude, you will always lose power when going up in density altitude, unless supercharged or turbocharged.
The Bing CV carburetor needle & needle jet operate primarily in the mid-range of throttle position, that is, roughly from 1/4th (or, tad less) to 3/4 throttle, ...with some lesser effects somewhat lower & somewhat higher. That is, the needle & needle jet have very little effect at full throttle; and only a quite small effect below 1/8th throttle, and basically nothing at idle rpm.
Bing publishes a booklet on their carburetors, that has a lot of information in it. The booklet covers all the models by number, parts numbers used for that model, and extensive information on how the carburetors operate; are tuned, etc....in case you might want to make changes. You can actually calculate main jet numbers from the math information given. But, Bing has NOT put any really easily usable information on tuning the needle position nor needle jet for altitude into that book. Bing also does not explain how to PROPERLY adjust the idle mixture. I can't really say that the information is all that helpful, particularly if you can read spark plugs after a proper run-test (this is not easy to do anymore, with lead-free gasoline and alcohol); and, especially, have an exhaust analyzer available. I recommend purchasing the book only if you like having such things; or, tend to be somewhat on the nerdy side. Keep in mind that some of us, me included, have many years of experience with Bing CV carbs, and we have information on what "jetting" works best for UK and USA bikes, ETC.
Revisions:
Final update and release to website 12/08/2002 5:35 p.m., PDT., includes through item #10 only.
03/04/2007: All prior updates checked; minor clarifications including #13 added, and re-released to Internet.
12/01/2007: Update entire article; rearranging and simplifying in some areas, expanding in others. Add information on the soft needles.
11/27/2009: Add bottom portion on tuning. Fix some errors (wrong hyperlink), and other minor things.
04/20/2010: Minor updating and clarifications.
04/25/2010: Add photos of Posi screw and tip; and later in the day, updated the article for clarity and appearance (NO changes to content details).
04/30/2010: Remove, then replace, the two above photos, as the link did not work, even though it appeared-to.
05/16/2011: Clean up article a bit, clarify some details. No important changes.
06/07/2011: Add #23.
06/08/2011: Add #24.
08/15/2011: Expand #16 and edit.
05/17/2012: Expand #24 with my own comments.
09/19/2012: Edit article to remove some redundancies, clarify a few details, add QR code, change Google code.
11/21/2012: Rework #19, delete #24 (move and consolidate in #16).
10/09/2013: Rework slightly so there is a 20A and 20B, B being totally added.
10/14/2014: #23 expanded and moved to bingcv.htm.
07/15/2015: Minor unimportant changes; minor re-arranging on 09/12/2015, due to changes in two other Bing articles on this website.
11/22/2015: Add note to the -812 O-ring, that they measure ~1.75 mm
01/07/2016: Update meta-codes; clarity changes; font upsized, etc. Fix bad link to roundel article.
05/09/2016: Final update on meta-codes and layout.
02/13/2017: Add note about early /5 carbs with the enrichener O-ring being on the outside.
03/07/2017: Add information to item 21; including the pdf drawing.
03/15/2017: Fix typo (grammatical) in 19. Update 21.
08/15/2017: Clarify somewhat on the intake funnel tube numbers .....in item 12.
09/02.2017: Update item 19.
09/03/2017: Add photo to item 19.
11/17/2017: Go through entire article. Reduce font and color changes, layout improved, HTML excesses removed.
01/27/2018: Modify 25, add 26 and 27.
04/07/2018: Revise #12: include the link to Anton's article and revise my commentary some.
06/13/2018: Minor updates in emphasis and unimportant typos.
06/21/2019: Clarify fuel bowl fuel level and add reference to https://bmwmotorcycletech.info/earlybingR75CV.htm article.
08/28/2019: Modify item 24 to add Rubber Chicken Racing Garage and the original maker.
06/18/2023: Add item 27.
09/17/2023: Add additional emphasis about the needle wear being on the right side.
� Copyright 2024, R. Fleischer
Return to Technical Articles List Page
Last check/edit: Thursday, May 23, 2024