
|
|
The advertisements above are Google-sponsored. These
support the testing I do. Thank you for clicking on them at
every visit, and for your donations! The Donating article
extensively explains this website's history, philosophy, and
operations.
Ignition.
Both single spark plug points and dual-plugged points models.
DWELL angle, in depth (single and dual plug)
Installing & adjusting points. Automatic timing units (ATU)
for both single-plugged & dual-plugged Airheads.
Coils, broken cam tips ......etc.
This article, #29, is STRONGLY INTENDED to be used with these articles:
https://bmwmotorcycletech.info/Ignition.htm (that is an extensive ignition article, it is #30)<<<
https://bmwmotorcycletech.info/dualplugging.htm
https://bmwmotorcycletech.info/ignitiontheory.htm
https://bmwmotorcycletech.info/F,OT,S,Z.htm
I advise you to read all of the above four articles!
You may want to additionally read this one:
https://bmwmotorcycletech.info/sparkplugs.htm
©
Copyright 2024, R. Fleischer
https://bmwmotorcycletech.info/ignitionsingleplug.htm
29
Points removal ...replacement ...adjustment ...maintenance ...amplifiers/boosters.:
See section on points amplifiers:
https://bmwmotorcycletech.info/Ignition.htm
It is extremely common to hear about a poor running engine, and often a hard-starting engine ...the cause being nearly completely closed-up points. Other common causes include closed-up valve clearances. There is more information in this article, below.
When I install brand-new points, I set them slightly wide, usually to about 0.019" (that is for all Airhead points models, and I am very careful to lubricate (VERY SLIGHTLY!!) the cam and the felt (no felt on canister models, which had points in 1979-1980). Since I have to remove the ATU (on models up through 1978) to replace the points, I also lube the shaft, and inspect the ATU. Do not fail to faintly lubricate the points cam, otherwise the points rubbing block will wear rapidly, causing rapid closing of the points. Lubrication is done sparingly! .....do NOT put so much grease on the cam that it is thrown-off by rpm and heat. Use a grease designed for high temperatures or specifically for this purpose. On the 1979-1980 models, the points are located in the canister; but, you still must have a faint trace of lubricant on the points cam. To measure or set the points on the canister points models you must have the outrigger bearing in place and rotate the engine until the opening gives you access.
I've heard dry points rubbing blocks make squeaking noises (which means fast rubbing block wear) due to lack of cam lubrication. You can sometimes hear this even with the outer engine cover in place. Bosch has lubricants for use at the points cam and at the ATU shaft. I greatly prefer to use the original specified lubricants, but I will use almost anything in a field repair ....any good high temperature grease .....even something like BMW #10 red grease will help. I still have tubes of my original Bosch greases that I purchased decades ago. The Bosch numbers were: Ft 1 v4 for the felt; Ft 1 v22 (or 26) for the ATU. Do not over-lubricate the cam nor felt. You do not want lubricant to fling off and contaminate the points. That can cause burning and misfiring. The Bosch lubricants, used sparingly, do not tend to fling off nor evaporate and contaminate the points.
https://bmwmotorcycletech.info/chemicalsetc.htm has more information on greases for this purpose. See part 6A in that article.
Regarding the ignition points for 1970-1978 Airheads: BMW has, at times, shipped badly-made points sets, made in China. The rubbing block is too long (wide), and you cannot get proper adjustment and timing. I suggest the Noris (NOT Norris) points from independent Airhead servicers if you cannot get your points properly adjusted and timing set properly. If you cannot return your faulty Chinese-made ignition points, you can try to very carefully modify the rubbing block. Noris of Germany was an original supplier.
Rotating the points plate clockwise will retard the spark.
1970-1978 Airheads points are located on the forward end of the engine's valves opening camshaft in a small engine cavity. The lower points screw head is very close to the points spring, and if a wrong screw or washer is use, the screw can contact the spring and the points are then shorted, and you get no ignition. This is seen now and then right after someone replaces the points and can't understand why the engine will not start.
There can be another reason and this shows up immediately ...or later! The wire from the points cavity to the rest of the motorcycle fits through a wire-protecting rubber grommet, and this grommet often gets displaced from its slot when working in the area, or, simply removing and replacing the outer engine cover. Do not reinstall the outer cast metal front engine cover until the wire and grommet are in proper position, or you could cut through the wire and cause a short circuit when replacing the cover. The typical result is no ignition, or ignition works only at some temperatures. That fault might not occur right away. It is important not only that the grommet be placed properly, but that the rubber seal in the irregular shaped groove outlining the cavity be in good condition. Otherwise dirt & moisture can get to the points. More on that rubber strip just a few paragraphs below.
HINTS:
Clean the points by rotating the engine until the points are closed (so are pressured by the points spring blade). Then open the points by hand only a small amount, just enough to slide a piece of paper between the points. Absorbent paper of some sort, but not a linty paper towel. I use a non-glazed business card or small piece of common printer paper (not the semi-glazed type for photos). Put a couple drops of a fast drying solvent on the piece of paper first. Acetone is fine (not wife's oily based acetone). That will eliminate any oil film layer on the points. You do not want to file the points unnecessarily because that removes the special metal layer on them.
If you have to file the points because there is a pronounced tit and valley on the points from electrical wear, then do it only lightly, and use a fine grit points file or thin flat jewelers file. Keep the tool square to the points and do not pressure the points much.
Be sure to lubricate the felt and cam, but only slightly, with any good soft non-fibrous high temperature grease. Use the proper Bosch greases if you wish, they don't wear off nor get thrown off easily. Check the points every 5,000 miles for proper gap and points condition, & clean and refresh the grease, and check timing.
Be sure the points cavity area is clean and dry. Pay particular attention to the rubber grommet and wire as you put the front cover back on the bike.....:
Regarding the rubber sealing strip (BMW supplied this points cavity seal as a strip of round rubber.....in both short pieces and longer ones for shops. You can also use a proper sized O-ring, cut to fit):
The seal for the points cavity occasionally is found in poor condition and thus needs replacing. It is used/located in the PRE-1979 timing chest, in a groove surrounding the points cavity, and has had multiple part numbers over the years. The situation with them can be confusing. The material comes in both short strips, and much longer pieces. Clean the cavity groove quite well before installing a new seal. You should find out which rubber will properly fit. Install a precisely cut length or slightly longer length than needed ....after cleaning the rubber and groove with acetone or any strong NON-water-based solvent. Put small droplets of cyano-acrylic glue (Crazy Glue, etc.) in the cavity groove, before installing the seal. Push the rubber strip a few times into position, as needed. If it needs cutting, do it with a sharp Xacto knife to fit. Push it into deeper position if you can; ....and let sit overnight.
After curing fully, which really does takes overnight; clean lightly (acetone or other good solvent on a clean rag), to get any excess glue removed. I recommend against doing what some have recommended...so, DO NOT rub with a bar of soap after the final acetone or other solvent cleaning. I DO smear a VERY SMALL amount of silicone dielectric grease on the rubber surface, using my finger, before replacing the outer cover. The combination of that grease, and the sealant you used (cyano-acrylic?), will, over time, secure the rubber strip very well, as engine heat-cool cycles accumulate. Done correctly, the seal will last many years.
Any confusion is usually over the size of the rubber strips. 11-14-1-265-394 is supposedly 3.2 mm, used until approximately 1974. However, some fiche imply to 1975. Thereafter (and some fiche say for 1976 to 1978), you are to use 11-14-1-262-644 which is supposedly, in some fiche, 4.2 mm, some fiche say to use after 1974. Awhile back, if you were to order either, you would probably will get the -394, 3.2 mm size. Maybe.
You can use a Classic K bike oil filter plate cover O-ring, which is 11-13-1-460-425, even a used one works well! Thanks to Tom Cutter, for that hint! Added by me, is that this O-ring is 88 mm x 3 mm in size, and is used on the Classic K bikes which are K1, K75, K100, K1100. The O-ring is also used at various places on such as a R1200GS, and K1200.
My recommendation:
Check the particular groove in your Airhead, see what fits, then clean that groove and the O-ring using a strong evaporating solvent, and then install with Crazy Glue (or, similar), wait overnight, outer cover still off, then clean surface again with solvent, add a quite faint smear of silicone grease, and then install the outer cover, watching the installation carefully for that already mentioned rubber grommet which has a groove that mates with the outer cover ....you do NOT want to pinch the wire from the points.
Note: Some folks are/have been using solid copper wire, such as the wire used in building's walls, for a seal. I am not convinced this makes the best seal, and you must be careful of the thickness (wire gauge is the name for the conductor part of the wire). I prefer to use rubber, as outlined.
Pre-1979 cam tips:
On BMW boxer Airhead PRE-1979 motorcycles, there is no canister ignition assembly. The discussion in THIS section is for pre-1979 models, not a canister model BMW Airhead motorcycle.
The pre-1979 ATU (Automatic Timing Unit) is mounted to the forward end of the engine camshaft by one nut (and a waverly washer). The ATU needs to be secure from rotating in relationship to the engine camshaft to which it is affixed, so the ATU has a precisely shaped female D hole, which mates to a male D shape on the forward end of the engine camshaft. It is the tip (threads and D shape) area of that engine camshaft that is under discussion here.
The forward part of the camshaft, that nose area, which is the threads and D shape, can be found bent at times. The amount of bending is not visible to your eyes. There is a way to fix it, with a small brass hammer or regular or dead blow hammer with a piece of brass to pressure the cam tip during the light blow. The bending may be as much as a few thousandths. The result of the slight bending, as the ATU rotates, is that the points do not have the exact same gap and thus do not have the same timing point, for both ATU timing lobes (there are 2). This will result in a dual-image when using a strobe lamp on the flywheel.
Since the two cylinders of the engine do not fire at exactly the same timing point from the above fault, this results in vibration, often at one or more narrow ranges of RPM. This type of problem is often wrongly interpreted as carburetors being out of synchronization. While the Dyna dual-pickup separately adjustable electronic ignition will usually eliminate some double-timing, the camshaft tip is usually fixable by slightly and very carefully using a small brass or small dead-blow hammer on the tip area, but avoiding the threaded area ABP. I do it with a hammer and a piece of brass rod so it can be precisely placed against the cam tip area, and avoid the threads ABP. Another cause for this sort of timing irregularity is advance unit wear, and rarely irregularity in the factory grinding of the cam lobes. BMW at one time recommended 'stoning' those lobes to equality. Don't bother unless you are nerdy...and capable...and...it is tricky to do! BTW....you need an accurate machine-shop type of dial-indicator unit to read the cam tip non-threaded area.
A rather poor ATU needs fixing. If the dual timing images are over ~3/16" apart, you could consider fixing the problem. A worn timing chain, worn chain guides, & wear on one or both timing sprockets, will also cause double images. Quite noisy chains are indicative.
The brass hammer 'fix', should you want to try it, must be done carefully. You must NOT crack nor knock off the threaded cam tip. Use of a "dial indicator" on the smooth side surface of the cam tip is how run-out is measured and is a must to prove if the tip is bent, or not. Do not try the brass or dead blow hammer fix unless you know what you are doing, have a dial indicator, & know how to use it.
If a cam tip is broken off, and this usually happens not from the above brass hammer work,
but from someone over-tightening the nut, the older Boyer ignition can be used, and was popular for this. Other methods include several types of ignitions that mount to the alternator area, and thus are crankshaft driven, which can be a very accurate ignition method. Broken camshaft tips can often be center-punched using a guide piece, drilled, and then tapped for threads; all using guides made on a lathe. You can also contact: Paul Tavenier, repairhead@sbcglobal.net.
Details on how to center-punch, drill, tap, etc., the broken end of the pre-1979 camshaft tips is located at:
https://bmwmotorcycletech.info/cams.htm
Caution! The nut on the BMW Airhead motorcycle camshaft tip (through 1978) must not be over-tightened! I tighten this nut with a short 4 inch wrench, by feel. I don't use more than a few foot-pounds. Specifications are 4.3-5.1, and AFAIK I never use quite that much. A waverly spring washer belongs under the nut. Be extremely careful here. The previous owner or maintenance person might have over-tightened that nut, & the threads could be damaged & ready to give you a real problem, such as by snapping off the threaded area. If you use a torque wrench, DO NOT use one reading in foot-pounds, such as a max 75 ftlb type. These do not read accurately at a low setting such as 4 or 5 footpounds; most can't even be adjusted that low. Use an inch-pound torque wrench or a metric torque wrench and convert properly. Do test the torque wrench before using it! 4.3 foot-pounds is 51.6 inch-pounds ...I suggest you carefully tighten to the skimpy side of that; in fact, perhaps do a fair amount less, then do a manual feel with a short wrench, then re-do with the torque wrench. The idea is to get an idea of what a 4 or 6 inch long wrench feels like at not quite 4 ftlbs. AGAIN...be most careful!
When setting the ignition timing, the points gap must be set first. The points gap is always set with the points rubbing block on/at the exact point of the ignition cam that results in maximum points opening. Don't forget to first lubricate the cam with a faint trace of high temperature grease, otherwise the rubbing block will wear fast.
For timing purposes, rotate the points plate CCW to advance the timing.
For the canister type of ignition, that means the whole canister is rotated, just loosen the two screws holding the canister, and hand-rotate the canister. If you only loosen the screws only a small amount, you can rotate the canister with the engine running, and canister will not come off the engine. Notice that advancing the timing causes an rpm increase; or, maybe you want to memorize the direction to turn the canister? ...or mark the canister or timing chest?
Points wear is of the rubbing block, and deterioration of the points. There is also a very small amount of tension lessening of the points spring. It is usually recommended to never 'file' the points. I think a bit differently, and I am fine with a careful points filing if there is a tit showing on one point, and certainly I am OK with mild/moderate filing if it is more or less an emergency in-the-field problem. Quality points have a rather thin layer of something like tungsten (?) on them, and the filing, certainly if excessive, can remove that hard layer. Any filing should be done squarely. Don't open the points quite wide with your fingers when installing or filing, ...you can take some of the tempering spring action out of the points leaf spring ....and then the points might 'bounce' at high rpm, causing misfiring of the ignition.
In depth ...the ATU ....& about irregular timing images (dual images, etc):
Fatigued springs on the pre-1979 ATU are relatively easy to see with your eyeballs; not so the later versions. On the 1979-1980, you must remove the canister, pry off the elliptical side cover, and look inside carefully, using a tiny tool of some sort of move the weights, and it is still not easy to see any problem with the springs (or, the effect of slacked springs). For the pre-1979, you don't have to remove the ATU. At rest (engine off), the springs must exert a very small amount of tension to keep the weights in the fully closed position. If the springs are 'worn', often called 'slacked', they don't necessarily enable fully closed timing weights at startup, nor at quite low rpm. You don't want "advancing" to begin until the engine rpm rises a fair amount, typically a few hundred RPM above idle. You can see the problem of worn springs with a close-up view of the timing springs.Further tests are probably advisable before making a decision, although you can get away with slightly sacked springs, in particular if using higher octane fuel.
Use a strobe light on the flywheel markings, and have the engine at idle rpm. You can slow the engine further, and you can also raise the idle. For lower rpm, it may be helpful to have a buddy slip the clutch and hold the brake, and maybe have the front tire up against a wall, that way you don't have to fiddle with carburetor adjustments. I will explain this.....
The very earliest ATU's (very early /5) started their advance at ~800 rpm, per some books, but many may find the advancing already underway, which is/could interfere with the higher normal idle rpm that you may use, especially since that is best for the engine. That is why many will slip the clutch to reduce rpm, and hold the brake, while a buddy looks at the timing marks. The carburetors, and engine, prefer about 1000 rpm. IMO, idling the engine around 800 is not a good idea, as it can reduce chain and sprocket oiling and speed up the need for timing chest parts as the chain will be jerking around more at low idle rpm. So, if testing a very early ATU-equipped bike, be sure to slow the idle during testing. Many an early /5 has had its springs or ATU changed. BUT....from the /6 days, the ATU's got factory modified, and for our purposes here, it is the springs-change that is most important. Every ATU has a Bosch number stamped into the outer plate ...and there is a cross reference chart, later in this article, listing them. The Bosch number is NOT A BMW NUMBER. The springs could have been already changed, and typically without a new number engraved. In some instances someone might have shaved the weights a bit, to increase the rpm at which maximum advance is had.....that was not commonly done, but will raise the rpm for maximum advance, particularly helpful, sometimes, with the R50 and R60 Airheads.
For the /6, or a ATU with higher rpm springs, the rpm at which advancing began ....was boosted to around 1550 or so....and it is easy to see, and you don't have to slow the engine below a decent regular idle (~1025 rpm). TEST: raise the rpm slowly and nothing much should happen to the timing mark until ~ 1550.
The final test is to find out at what rpm the advancing QUITS. Early spring models are at about 2000 rpm, and /6 and later and any early models with the stiffer springs, are all at about 3000 rpm. These are not absolute rpm values, and there were some differences, perhaps as much as 300 rpm. Knowing at what rpm the advancing stops at can be useful. The ignition advancing with increased RPM should stop the advancing near the RPM noted, and then, at that RPM, the flywheel indication with your timing light should be the maximum advance mark which is the F dot, or, on later bikes, the Z mark). It is the maximum advance point that is important, the S mark need only be approximately centered in the timing window.
The change to 3000+ rpm springs will reduce pinging problems. With today's lower octane 'regular' gasoline, with or without its likely alcohol component, going to 3500, can be even better. It might allow more use of lower octane fuel ....but, be cautious. The power difference is very minimal during acceleration. Going to 3500 is usually done by using the 3000 rpm springs and then hand-filing the advance weights a bit (same amount for both of them); or, drilling a hole in both weights. DO NOT STRETCH THE SPRINGS! If you have a high compression ratio, these modifications can often be 'musts'. Sometimes, dual-plugging is also done, which can be especially effective, and you may not need to think about playing with springs and weights.
Split or dual images are very commonly seen with a timing light. Small distances between the dual images are not of much importance. As the distance gets greater, more engine vibration and unbalance will be noted. Specifically identifying what the problem is usually means some careful work, but some of it, such as measuring run-out on the camshaft tip area, is not difficult. The camshaft tip can be re-bent, but I advise against it, unless you have practiced & know what you are doing. You do NOT want to break off that threaded tip area by hitting it at the wrong place. Adjustment amounts made are small ....typically on the order of 0.001" to 0.002". All models of all stock Airheads can have dual images ...but, obviously, those after 1978 do not have the old points at cam tip design, but the points (or electronics pickup) is in a canister, and the canister ignition is more precise, but still not perfect, because there are places the drive to the ignition can become irregular, such as the chain, sprockets, chain guides, etc. Too low an idling rpm will often be some of the cause for excessively split images.
There are two lobes on the timing cam in the ATU for the points models, and on very rare instances these lobes are not precisely ground by the factory as identical. This takes some sleuthing, but on a practical basis, the performance difference is small, showing up as a split image but a slight additional motor vibration. I don't bother playing with 'stoning' (as BMW called the fix for the cam lobes).
For the 1970-1978 models, we are seeing more and more instances of excessive wear at the D-shaped-hole in the middle of the forward plate of the ATU. When that D hole gets worn enough that the ATU is not well-clamped in position, there can be problems with obtaining proper timing. ATU's are, unfortunately, $$$$. Do not over-tighten the nut, and do use a waverly washer under the nut. If you UNDER-tighten, and/or fail to use a waverly washer, there is more chance for the ATU to get loose, and wear the D hole! Conversely, if you OVER-tighten, you might break off or otherwise weaken the threads at the cam tip.
A worn chain guide and/or tensioner .... & worn sprockets ....and a worn chain ....are going to give multiple images and cause poor power and more vibration. Once the ATU is ruled out for weak springs or badly worn pivots, and the shaft is not running-out excessively; or, you want to try this anyway, there is a sort-of test to hopefully get some ideas about the timing chest parts. Have the valves, ignition, carburetors, all properly adjusted first!
1. Go for a ride, at least 10 miles, preferably more. The idea is for a full-engine case warmup.
2. Put the bike in neutral and on the center-stand.
3. Tie the on-bars clutch lever full back. This will ensure the transmission will be totally unpowered by the engine, as sounds in the hot transmission can mask, particularly for the inexperienced, the sounds you will listen-for.
4. Start the hot engine, and let it idle. An idle rpm around 800 to 900 is best FOR THE TEST, but anything under 1200 is usable.
5. Listen to the engine.
6. Raise the rpm slightly and keep listening.
7. Find the rpm in-between just a small amount above idle, and a very small amount faster than that. This will require tiny manipulations of the throttle. As you raise the rpm maybe 100 or 200 rpm, and then back it off the same amount, there is a sound change. Engine rattling noise changes will be quite noticeable with worn parts.
8. Then listen at a slow idle.
With a bit of experience and practice, you will be able to identify the source of the rattling noises. If the clutch lever was not pulled back and tied back, you might be hearing the very common hot-oil transmission rattling and be confused....or, in some instances, the differences will be easier to hear!
MORE ...and a somewhat different way of explaining things:
There are two lobes on the Automatic Timing Unit (ATU). On the models up through the 1978 model year, the points and timing unit are mounted at the nose of the camshaft, and not in a canister like the 1979-1980 models. The forward part of the camshaft, that nose area, of non-canister models, can be found bent at times. The bent amount is not visible to your eye. There is a way to fix the bent tip, with a small brass hammer or hammer and brace piece, but that is not the main point of what I want to say here. When the tip is bent, the bent part may be only a fraction of a thousandth of an inch, to a few thousandths; then, as the ATU rotates, the points do not typically have the exact same gap and ignition spark timing point for both ATU timing lobes. This will result in a dual-image when using a strobe lamp on the flywheel and will result in vibration, often at one or more narrow ranges of RPM. In some instances, the effect at higher rpm is one of points bouncing, due to the irregularities. BOTH of these types of problems are often WRONGLY interpreted as carburetors being out of synchronization. The Dyna dual-pickup and dual-adjustable electronic ignition will eliminate some double-timing, but the camshaft tip is fixable for the use of the stock ATU and points (or, points with amplifier), although you will never get the ignition timing 100% perfect. Another cause for this sort of timing change is some advance unit wear, and faintly slight irregularity in the stock grinding of the cam lobes, but mostly it is pivots wear and springs wear. BMW at one time recommended 'stoning' the lobes to equality. Don't bother! But, a really poor ATU needs fixing, as does a bent cam tip ...if timing is excessively poor. Worn timing chain, chain guides, and wear on one or both timing sprockets will also cause double images and the same sort of timing irregularities. A quite noisy timing chest, at idle rpm, is a strong indication. You can determine if the problem is the ATU or the chain, guides, and sprocket(s), by very carefully rotating the engine very slowly in one direction and checking the timing via a test light or meter connected to the points, and comparing the results between lobes, to the flywheel markings. You can then repeat in the reverse direction.
If the 1970-1978 cam tip is bent, the points gap will vary for the two lobes. The brass hammer or hammer and brass piece 'fix' can be done very carefully, not knocking off the threaded cam tip, and using a dial indicator on the smooth surface of the side of the cam tip. Do not try the brass hammer type fix unless you know what you are doing, have a dial indicator and know how to use it.
Due to the disaster that can happen if you break a points cam tip, I recommend you do NOT try to re-bend the cam shank (which is just barely inwards of the threads).
Points, Condensers, Amplifiers/boosters, ATU, Dwell:
If the capacitor (aka, condenser) (which is probably rated at 0.2 microfarad, if you are curious) fails, the ignition can either quit, or the points starting burning up or otherwise wearing, at a fast rate. Points will last about 12,000 to 25,000 miles without an amplifier or booster; and considerably longer with one. You do have to maintain a slight lubrication on the cam that drives the rubbing block on the points if you want the points to last. You might have to, contrary to typical advice, file the points very lightly in order to get the last wee bit of life from them. Contrary to my own general advice, on two of my touring airheads that had points (and no amplifier/booster), what I actually did was to, yes, very lightly file the points ...one light pull-through ...with a very thin diamond coated blade (300 or 400 grit) every ~5000 miles when I set the valves. I checked the valves first, on a cold engine, before checking the points, so I did not have to wait for the engine to cool after setting timing. I checked the cam lube, checked the gap, checked the timing at high rpm ....and rode the bike, and synch'd the carbs .....this was standard at ~every 5000 mile interval. Points amplifiers or boosters are a nice addition to the motorcycle, as points can last for tens of thousands of miles with just cam lubrication, and a booster and no filing, just checking and maybe cleaning/setting the gap and setting timing. You mostly eliminate wear of the points themselves when using a points booster. You still have to replace points eventually, for rubbing block and other wear, but they will last a long time, if you keep the cam lubed and use some sort of points amplifier. By keeping the capacitor in its normal place you can, if the amplifier fails, convert to the stock system in a few minutes! Dyna still makes points amplifiers. There are others, including the Boyer, and there is the Velleman kit https://www.velleman.eu/products/. See: https://bmwmotorcycletech.info/Ignition.htm
There are full electronic ignitions available, from such as Boyer-Brandsen and Dyna....and there are types that attach to the crankshaft at the alternator, but if these types fail on a tour, you are less likely to fix it as easily as with the simple points amplifier equipped bike. If you install a Dyna pickup unit, in place of the stock points, follow Dyna's advice about a drain hole.
Occasionally a capacitor (condenser) will partially disconnect inside. That causes the points to develop a hill and valley appearance at a much faster rate than otherwise. Usually this looks like a relatively sharp tit on one point with the other point having a sharp corresponding depression. This type of thing is actually modestly normal, but if extreme you should install a new set of points and new condenser (capacitor). If fairly bad, you can file the points for a temporary +- fix. Condensers have also been known to short completely. A fully shorted condenser will not allow the engine to start and run. Usually, the failure is a pinched wire from not being careful when re-installing the outer alternator/ignition cover.
You CAN file the points if a serious tit/valley situation is seen, but do it SQUARELY, and realize that you are probably removing a long-lasting tungsten layer on the points. I WOULD do it; as there is nothing to lose when the points wear is high enough.
It is probably reasonable to carry a spare condenser in your bike's tool tray; even though they seldom totally fail. All condensers are not the same, and I do not mean just the physical mounting nor wire lead. Some condensers are not really manufactured to hold up to the heat in the Airhead engine. Condensers have an electrical capacitance value. That value works with the ignition coil to deliver a proper spark. In any emergency, almost any small condenser used on any car's ignition (or even for noise suppression) will likely work temporarily. Values of 0.2 to 0.5 microfarad will work adequately, and the condenser should be rated (if marked, many are not) at 400 volts or higher. Electronics repair shops usually have a capacitance checker, and can also check for condenser leakage (but, so can you, with a a high range ohmmeter ...in a multimeter you may already own).
If you use a points amplifier it is more important than with the stock setup to never let the points nor the cavity get even slightly dirty/oily/greasy. When stock, the larger points current helps keep the points 'electrically clean' ...that is, in usable electrical contact when closed ...although allowing pits and valleys and burning to occur.
A points amplifier, at its simplest, is typically not more than a transistor (or two) and a few resistors and maybe a diode, and not much else, although other electronics items could also be used. The main transistor, a 'power' type, acts as a switch, triggered by the points, perhaps via a small transistor. Since a common transistor is, at its heart, a current amplifier, then the current that used to be passing through the points, can now be greatly lessened. Thus, points wear, as far as erosion and wear from electrical sparking, is greatly reduced. "Points life" is not infinite as the points rubbing block will wear (greatly lessened by a very thin grease layer on the points cam) (and its associated felt on pre-1979 models). There is a very slow deterioration of the points spring tension (depending on the spring quality), and other wearing things, but these are small effects, very long term effects. Points amplifiers can substantially extend points life. If the amplifier fails, one can always, and rather simply, go back to the stock points triggering, just by moving around a couple of wires.
The 'canister' began in 1979, and incorporated points for the first two years: 1979 and 1980. The 1979 and 1980 canisters with points did not have a felt pad to help keep the points cam lubricated; hence, if the lubrication on the cam dries out, the rubbing block and the cam, together, can make a very loud chirping/squealing noise sometimes even audible with the outer engine cover in place. If the cam is not kept faintly lubricated, the rubbing block will wear fast. I think BMW's idea was that there was enough oil vapor in the canister to keep the cam faintly lubed. I am not convinced. Remove the outer lid (2 screws) and lubricate the cam very sparingly with a high temperature grease. Put one drop of a good oil on the outrigger bearing. The points can not be adjusted without the outrigger bearing in place. You will need to rotate the engine, to get the plate opening at the correct position.
HINTS:
Some Porsche points with stiffer springs will fit the canister and provide better performance near red-line rpm in some instances. Do not install those points unless you have problems with very high rpm ignition irregularities. The 01-011 VW points may also fit the canister.
PRE-1979: The automatic advance unit is indexed to the camshaft by the D shaped flat on the nose of the camshaft, where it was designed to fit precisely the same D shape on the automatic advance. These D shaped areas sometimes wear, often due to improper assembly and tightening; perhaps with no waverly washer. ATU units are very expensive if you must purchase one because the D has gotten very sloppy. Fixing a worn D is possible, but takes knowledge and considerable labor.
There is an aftermarket sleeve tool available that some folks like, it allows the old style ATU to be removed and the points adjusted without the fun of small feeler gauges in cramped places. There is a SMALL feeler gauge tool that used to be shipped with the early bikes, the feeler gauges were for setting the valves and points gap, and those that had ATE brakes had an additional U-shaped blade in that tool for setting the ATE master cylinder piston distance.
See: https://bmwmotorcycletech.info/tools.htm for a complete description of the feeler gauge tool (& photos), sleeve tool, etc.
Here is a photo of one of the aftermarket-available sleeve tools:
BMW first modified the original automatic ignition advance unit as used on the 1970 /5 models (Automatic Timing Unit, ATU) near the end of 1972. Other changes were made in the early years to the mechanical advance unit and later included a change to the flywheel markings. The stamped part number on your automatic advance unit is a Bosch number. Not only was the cam profile of that automatic advance unit changed from 110° to 78° dwell with a sharper shape, but the weights were modified; and, springs were changed. Not all these changes were done at the same time. Changes to the flywheel were incorporated again with the 1978 models. A 3 degree change was made in the camshaft gear drive, necessitating a change in the flywheel marking, and not all models had these things done at the same time. DWELL, RATE of advance, and RPM at which the advance stopped advancing, and flywheel markings .....were all changed over the years. On top of those things, there was a change (the 3 degree change) that was a slight bit involved due to shipping times and USA emissions requirements, with a sharp cutoff date of January 1, 1978.
Some few flywheels did NOT match the camshaft sprocket gear, a rather rare situation. Determination is made with a degree wheel on the crankshaft, with a piston stop on the cylinder, etc.
Below is the background technical information on the automatic advance units used on the NON-canister bikes (ALL prior to 1979). Keep in mind that it is possible that someone has changed the springs on your automatic advance, or even otherwise modified it ...in fact, you might have any of the ATU models in your 1970-1978 BMW Airhead motorcycle.
In late 1972 BMW made changes to the automatic advance (centrifugal advance unit, automatic timing unit, ATU). This was done in TWO stages:
To the R50/5 after chassis 2901787 with the second change as of chassis 2905857; to the R60/5 after chassis 2932689 with the second change as of chassis 2946096; to the R75/5 after chassis 2973307 with the second change as of chassis 2996220. The first Service Information bulletin came from Munich, dated Nov. 1972, and the bulletin was numbered as 4/72 (041 M)e.
The second bulletin was also from Munich, numbered 1/73 (056 M)e. Both referred to SI 284e, Group 13, page 2., which is unimportant HERE. Don't be overwhelmed ...I'll get deeper, but will explain it all.
Parts shown below described as 'fully suppressed' mean the Authorities (police) models that had radios, and needed radio frequency interference reduced from such as the ignition and some other electrical noise producing items in the motorcycle.
From November Bulletin:Here is a .gif of one of BMW's Euro bulletins (yes, Snowbum has Euro info too!). This bulletin was dated 3/73. Pay a bit of attention to this chart. Note that the End of Advance is NOT the typically discussed 2,000 rpm and 3000 rpm, but seen here as ~2500, ~2200, and ~3200. Note too the timing advance point on the flywheel. This chart information is unlikely to be found elsewhere's. If you are hopping-up an Airhead, you may well be especially interested. I've added the 012 unit, etc., under the chart. Further down this long section is a lot more on Bosch and BMW ATU numbers, so be sure to read that.

...012 The Bosch -012 was the final version of the non-canister points plate and ATU and springs. The Dwell was 78°.
The ignition plate was BMW 12 11 1 353 640 as on late /6 & /7. The ATU was 12 11 1 357 626; which came with springs
12 11 1 357 627.
In 1979 and 1980, BMW had canister-mounted points. The Dwell angle was 120°.
From 1981, BMW continued with the canister, but the canister points were replaced with a Hall element (a type of transistor sensitive to magnetic fields). A rotating butterfly-shaped piece of metal 'triggered' the transistor, which fed electrical information to an electronics controller module located under the fuel tank; which turned off battery voltage to the coils at exactly the correct moment, causing the spark at the spark plugs. The Dwell was 104°.
Few dwell meters have a 2 cylinder switch position, if so, use the 4 cylinder 4 stroke position and multiply the reading by 2. There is no strong reason to ever use a dwell meter on the electronics canister ignitions.
Before actually using the above (and chart) information, read the rest of this section, because the above chart does not have all the information needed for a full understanding.
WHAT IS DWELL ANGLE?
Dwell, or dwell angle, is usually described in one of two ways. One is the number of degrees the points touch each other electrically ...in other words, it is the number of degrees of rotation during which electric current can flow for charging the ignition coil(s) magnetically during engine operation. It is that fraction of a rotation that the points are closed versus open. But, dwell is really more precisely the time in degrees that current is flowing in the primary circuit of the coil, which is very slightly different. Dwell thus can be described for both points, as well as electronics means of coil charging or coil current flow.
To explain this a bit more, you can easily see that with a cam lobe (two lobes on the Airheads) the points are, due to lobe shape, open and closed for certain degrees of rotation. The points need to be closed for a very much longer time than they need to be open, to ensure full or nearly full coil charging during the points closed time. The cam lobe shape also affects the speed at which the points suddenly open and close. There are racing points cams, used a long time ago, that had different cam lobe shapes on the rise, than the fall. But, consider the two basic types of full electronics ignition. These do not use points. Some types of electronic ignition use timing built-into the module. Most, especially older electronic ignitions, use the shape of the butterfly vane, wider being a longer dwell. Some types may use combinations. The width and shape of the butterfly vane in the 1981 and later Airhead ignition controls dwell (the later electronics modules have a bit of effect too). Using a combination method, which was seriously addressed in the very last of the Airhead modules, allowed BMW to eliminate false ignition triggering/sparks. I get into that subject ...some ...in the ignition article: https://bmwmotorcycletech.info/Ignition.htm. The discussion in that article is needed, as coils and modules were changed numerous times by BMW and some combinations will not work well, or, can be unreliable.
The longer the dwell time, the more time for current to flow and charge the ignition coil. BMW changed the dwell initially way back in the /5 and /6 days, because the Authorities (Police) motorcycles, which had metal shields over the coils (which retained more heat), had overheated coil problems, particularly when the engines were idling and not moving through the air. THIS SITUATION WAS WORSE WHEN THE BIKE HAD THE KEY ON, ENGINE OFF, AND THE POINTS CAM HAPPENED TO HAVE BEEN ON AN AREA OF THE CAM THAT LET THE POINTS BE CLOSED. But, for a rotating engine, BMW found that 78° of dwell was more than enough for coil magnetic charging (saturation) at any reasonable RPM, so all units were changed to 78° dwell (until the canister models). The Bosch -007 unit (it is the long version of that number that is stamped into the ATU) had 110°, and it then became 78°, with NO change in part number. There is no good reason for you to change an ATU for dwell reasons, although if I was racing an Airhead on the racetrack or otherwise using very high rpm, with points, I would want an ATU with long dwell. 78° is plenty of dwell for coil saturation for the Airhead engine rpm range. Racers with hopped-up engines might get a bit more ignition performance by installing the early 110° ignition cam, which gives more coil charging, but points don't like super-high rpm, although the stiffer spring points spring mentioned well above (and a Porsche ignition spring points for the canisters) do help.... and racers are much more likely to be using electronic ignition, perhaps even crankshaft triggered ignition. Keep in mind that if the points cam shape is such that the rise of the cam is too sharp, then the points might not 'follow' that sharp shape, and the points could even bounce, causing seriously poor performance. DO NOT modify your ignition points is my advice....you may open a can of worms for yourself, for almost no improvement.
The BMW engine combustion chamber characteristics and sound radiation from the cylinder and head fins is good at telling you, by noticeably audible pinging (pinking), of an over-advanced or poor gasoline octane situation. Hence, it could be 'possibly acceptable' to advance the timing until pinging at low-mid-rpm is heard under high throttle, then back off a bit. I don't recommend it.
Some old-timers don't use point gap, but dwell angle, when setting the points gap. This can result in points gaps which can cause points wear from electrical arcing outside the design range. Please do not set points by dwell angle, unless you are very familiar with various effects. I am well aware that what I say here conflicts with some other 'experts'.
CONFUSING THE ISSUE FURTHER(??), IS THE FOLLOWING:
In the same, in general, era of BMW's phasing-in of many of the noted changes, BMW was finding a lot of pinging (pinking), in countries where the gasoline had a relatively low octane. Pinging is bad for the engine. BMW installed, or made available, compression lowering shims for use at the base of the cylinders. Additionally, BMW again changed the automatic advance, so that the prior maximum advance which was obtained at about 2200 rpm, was now 2800 (some literature in a few places, erroneously), 3000 or 3200 rpm (also depending on which literature you are reading, including mine). The previous 'new' mechanism, 12-11-1-353-639 retained that same BMW part number. But the Bosch number on the automatic advance changed, and the only actual change was the two ATU springs to slightly stiffer ones, which slowed the advance rate. There is even more on this later in this article.
0232 002 007 Bosch, BMW 12-11-1-353-639, was now Bosch 0232 002 010
The fully suppressed assembly was 0232 002 008, was now 0232 002 011. Fully suppressed means in regards to radio interference....this was something for the Authorities bikes (Police).
The early springs were BMW 12-11-1-356-142, the newer, slightly stiffer springs, were 12-11-1-356-546. So, by simply changing those springs, the ATU got a new number from Bosch, but not from BMW, and the maximum advance point went up roughly 1000 rpm higher. That is, the maximum advance point was no longer ~2000 rpm, but ~3000 or ~3200 rpm. (most are actually ~3000).
Performance bikes, with higher octane gasoline, will perform very slightly better with the early springs giving the faster advance and one might well consider using the 110° dwell unit, which, again, helps ONLY slightly at very low or very high rpm, for differing reasons.
An even later automatic advance unit was made, carrying the Bosch number ending in -012, and was used on the late /6 and /7 to 1978, still with 78° Dwell. Units ending in Bosch numbers -007-012 had advance limited to 34° BTDC. Only the 005 unit had 39° BTDC (sometimes said to be 40°). The early advance looks the same but the holes in the cross plate allow the advance to swing a bit more open. Those hotting-up their bikes may want to know about this. The 5° of extra advance can be worth the effort. DO NOT do a modification for this if you have dual-plugging.
In 1979 BMW went to the canister system. 1979 and 1980 models had 120° dwell, using POINTS. With the increased dwell and the later coils, and the canister points ignition with its better mechanical drive method, the ignition was considerably better than before. One particular improvement was especially nice; that drive method, in which the engine valve-opening camshaft had a new nose. The new camshaft had a flat forward end having an offset driving slot, and a matching offset tang on the canister. Problems with slightly wobbly or broken cam tips were gone; the points were no longer exposed to dirt and oil contamination that was possible with the old style method of 'sealing' the points area. The entire ignition system had higher output and more precise timing, especially comparing one cylinder to the other.
In 1981 BMW kept the design, but went to full electronic ignition (except for the ATU which remained mechanical). The dwell was now 104°, and the coils were changed and ignition output increased, and that increased output became even more dangerous for electrical shock hazard. Along the way, BMW changed coil characteristics and specifications. Over the 1981 and onwards years to the end of production of the Airheads in 1995, there were three changes to coils and numerous changes to the ignition modules. This is a complex subject, and is fully treated here: https://bmwmotorcycletech.info/Ignition.htm
There is an OT marking on the flywheel for top dead center (exactly and fully, both pistons outwards), used mostly by owners for setting valves and putting the flywheel or clutch carrier back onto the crankshaft in the correct position with regards to the bolts.
Some Airhead motorcycles flywheels (clutch carriers) have some markings with two lines, they are 6° separated. These show the official limits for double images (use a strobe lamp), and thereby show maximum allowable differences between cylinders.
I am well aware that there may be conflicts here with some publications regarding setting the timing at the S mark. Many years ago, the idle timing mark, S, often called static timing since it could be done with engine off, was used on points-containing engines. This was done by setting the engine off points opening position with an ohmmeter, voltmeter, or test light, or even some extremely thin paper like cigarette rolling paper. Strobes were not plentiful nor overly cheap, so those methods sufficed, although always a compromise, as the range of advance and the maximum advance point, all with the engine running, taking up various mechanical clearances, etc... are more important. The proper method is to set timing so the mark, F or Z, is centered in the timing window and will not rise further as rpm is increased further. As you already know, the rpm at which this is to happen has varied with the timing mechanisms over the years, but is at approximately 3000 rpm on all later models. This means to let the S mark be wherever it is (within reason, unspecified). If the S mark can then be seen in the window at idle RPM, that is usually going to be OK. The reason the maximum advance point is more important is that under high throttle setting and particularly when combined with high RPM, pressures in the cylinder are greatly increased, and excessive timing will potentially be destructive; while insufficient timing advance will not allow full and proper performance, and there will be heating effects.
All BMW Airheads use a similar (but not exactly the same) mechanical ignition advance assembly. The timing weights area on the timing units tends to wear very slowly, and the wear tends to increase the amount of total timing advance available ...which is usually OK (although sometimes the timing is a bit less stable) .....but may be marginal on some older BMW's, such as the R60 models, which tend to need super premium fuel, especially with considerable carbon deposits in the combustion chamber. This is moreso if one has the 39° (40°) advance unit. In fact, many of the old models are fitted with compression lowering plates, to allow use of lower octane fuels. The very mild valve timing of the R60 models tends to make it rather a lot more sensitive than other models to pinging (pinking). That is because quite mild valve timing means the dynamic engine operation is such as if the cylinder pressure is even higher. The best cure for pinging, even before all else has been tried including de-coking, is conversion to dual plugging, which offers many advantages, and FEW disadvantages ...modest cost being just about the only one of importance. One may also be able to eliminate compression lowering plates (do clean the cylinder wear ridge) and gain some power. If not going to dual-plugging, you should try using the more restricted advance unit or just add sleeves to the pins on the wider range ATU, and add the slightly stiffer springs if not there ...and, be sure to reducing the weights size (or, just use even stiffer springs), to raise the maximum advance to about 3500 rpm. This rather often works well enough, and is cheap to do.
Octane in this article is R+M divided by 2, that is the American (USA) calculation method. In some instances, an engine may exhibit pinging (pinking), especially if a high compression model or an R60, unless you have as high as 98+- octane gasoline. Generally speaking, early higher compression engines are OK with 91 or 93 octane fuel, with the R50 and R60 often being marginal in this regard. A machine that can use the faster advance of the early ATU's (the ones with weaker springs, and ~2200 RPM for the maximum, as opposed to ~3200 RPM), will accelerate only very slightly faster from low rpm with large throttle amounts. Racers usually want highest possible performance though. Having the wider advance plate can help sometimes with lower rpm power output.
BMW airhead engines USUALLY give plenty of warning about pinging, and in many instances a small, perhaps 3° more advance (sometimes 4°), is advantageous for performance ...this is especially so at higher elevations, where pinging may not show up even on 87 or even 85 octane grade gasoline, especially on later Airheads with lower compression ratio, as common on U.S. shipped bikes. Move the Z or F markings into to the upper half of the window, and see. Pinging, if it occurs, will usually show up first on poorer gasoline's, at near sea level, on a hot day, under moderate to heavy throttle, typically well under 4000 rpm. This advance setting modification does not work well with the R50 and R60 motorcycles.
OT, S, F, Z marks: when the OT mark is centered in the timing window, assuming the flywheel is properly installed, both pistons are very precisely fully outwards. The most often use for the OT mark is for setting valves clearances. One must rotate the engine 360° from one cylinder on compression stroke, to the other cylinder on compression stroke, when setting valves; that is, you can NOT set the valve clearances on both cylinders without rotating the engine from one OT mark to the very next one. 1981+: the LINE next to OT is TDC. It is easiest to start with the left cylinder, since you can watch the valves and know what the compression stroke is.
S: Static timing. Lines, if present, are 3° from S, for maximum limits for split images being 6°.
F: Full advance, at rpm for that or above. For 1970-1980, the actual F place is a machined dot-depression.Z: 1981 and later, full advance. If a line is present, Z is that line.
NOTES:
1. The timing advance should begin on /6 and later machines at ~1500 rpm, & quit at ~3000. Some books specify 1550 for the beginning of the advance. Some will say 3200 for the end of advance, and this includes BMW's Euro chart for the ATU's. The early /5 advance timing started, per some literature, at 1200 rpm, but most books will say advance begins at 800. The truth is mixed, with some advance already underway at 800. The /5 advance quits at about 2000 in some books, 2200 in others, & one factory manual, wrongly, shows it quitting at 2500 rpm. With today's poor gasoline's, having the advance quit at the higher rpm is better on mostly stock engines; performance suffers only very little. Performance above 4000 RPM is not improved by the various advance curves....except that the wide range (39/40°) ATU's do help a wee bit with maximum power output.
2. 2 mm (.08") on the flywheel is one degree (1.5 mm, .059", on R65 and R45 which have smaller diameter flywheels). The 1980's and later flywheels are called clutch carriers, and are not a continuous metal part showing in the window, but the information is similar.
3. Later models may have two lines, one above & one below a timing character letter, these are spaced at 3 degrees from the timing mark, and are there for reference to factory spec limits.
4. If your strobe light shows double timing images, that can be due to one or a combination of the following: worn timing chain, bent cam tip (on NON-canister models), worn automatic advance unit, unequal timing bumps of the two bumps on the cam of the automatic advance unit, worn chain sprockets, worn chain guides.
5. 1979 and later models have either points (1979-1980) or a Hall Element (1981+) (a type of transistor that is magnetically sensitive) in a canister, driven by a new style nose of the camshaft: flat, with offset keyway. CONTRARY TO SOME "INFORMATION" in some aftermarket books like Clymers and Haynes, you can NOT put the canister into the engine with the keyway wrongly engaged (due to the keyway being offset). This type of drive is more stable, and cam tip irregularities are eliminated. The automatic advance units in these canisters is known to get gummy or otherwise stick in an advanced position, usually this happens after FULL engine warm-up, and the engine will idle much too fast. You may be able to remove the small oval plate on the side and spray in some oil (NEVER WD40), and fix the problem for awhile. A full disassembly and cleaning is the proper answer, often with some minor metal burnishing. The effect is provable by slowing the engine using a stop like a brick wall in front of the front wheel (or use the brake), and easing the clutch to slow the engine to normal rpm ....if the strobe shows advanced timing, you found your problem. An article on the canister and electronics will be found here at:
https://bmwmotorcycletech.info/Ignition.htm
6. Ignition cutout problems after some miles down the road on 1981 and later models is quite often due to a failure to clean off, and replace, the heat sink grease, located beneath the ignition module, which is under the fuel tank. Every two years is probably OK. Allowing repeated cutting-out from excessive heating will result in module failure. Radio Shack has heat sink grease. Use of common autoparts stores Dielectric Grease is acceptable. The white-colored Dow Corning DC-340 is the BEST coating. Latest modules, which are riveted, are exempt.
7. COILS:
Be sure to read article #30: https://bmwmotorcycletech.info/Ignition.htm
(a) The airheads before 1979 had an extended nose camshaft, points in their own 'cavity' (which needs to have its rubber surround intact and usable). Those bikes used two each 6 volt coils, 1.5 ohm primaries, connected in series, for a total of 3 ohms. If you use coils with lesser resistance the points will be burned & not last long. For two stock coils of 1.5 ohm primary each, or one twin tower coil of 3 ohms; or, in some few instances even lower primary resistance coils, you can use a points amplifier, and the points will then last a very long time if you regularly (~5,000 miles) faintly lubricate the advance cam and clean the area.
(b) 1981 to 1984, all models (except the G/S and ST), used 2 each 6 volt coils, but they are higher performance coils, drawing more current. These do not work reliably with points amplifiers unless the amplifiers are capable of handling the extra current.
(c) From 1985, and a few earlier bikes like the ST and G/S, a single 12 volt coil with two towers was used, originally gray in body color (which cracked and were not reliable). The Bosch number on these bad coils was 0 221 500 200. They can be upgraded with an Oilhead coil; or, BMW has a more expensive replacement for the Airhead, 12-13-1-244-426, it looks a bit different, but fits OK. The Bosch number on that coil is 0.221.500.203. Lots of ignition problems from old gray coils, including the acting up of the electronic tachometer. My favorite fix was to use two of the 6 volt coils from 1981-1984 ...and you can remove the single gray dual tower 12v coil and install two of these earlier 6v coils, which are very reliable. Be sure to read my article #30, link at the end of this paragraph ....lots of information on coils and modules, read it because you do not want to use the wrong parts! The article may be more up-to-date than the article you are reading, here. The last of the coils are 0.5 or 0.7 ohms, depending on who is doing the measuring (they are actually a hair over 0.5), and the module was changed to handle the increased current and with some internal changes to shorten what is called the time-out period and there was another change in the module to improve stability of the spark. This is complicated, and the information is in my ignition article. One should not use the old modules with this 0.5 ohm coil, but has been done. https://bmwmotorcycletech.info/Ignition.htm
The two last changes to the modules incorporated a integral riveted module onto a heat sink. There was a third version, just different mounting, but it was the first of the three changes on the way to the final module. The intermediate modules ...and all earlier versions too ...are no longer available. Thus, there is only the final module version, for 1981 and later Airhead motorcycles, all of which came with BMW's Bosch electronic ignition. If you have an earlier mounting (on the horizontal pad under the fuel tank), you will need minor mount changes, parts are available, see the on-line fiche). The last of the modules that are riveted supposedly never need heat sink paste renewal; and, the very last version (with turquoise lettering) works with any of the BMW coils, that means any two 6 volt coil and any 12 volt twin tower coil including the very last low primary ohms version, of 0.5Ω. The ignition article points out the differences between all modules and coils, etc.
8. In the canister models the innards....ATU ....is not easy to get to for cleaning, possible burnishing, and re-lubrication. It is buried at the bottom of that canister ...and the canister is generally taken totally apart for that work. It is possible to remove the side oval metal plate, and spray lubricant inside, for a possible temporary fix for some problems, such as a sticking ATU (which results in high idle speed, usually after warm-up). Some have had decent results by spraying a mixture of a mild solvent such as kerosene mixed with a lubricating oil.
This somewhat nerdy section may require some 'critical thinking':
BMW made some changes as the cleaner emissions models were phased-in. INITIALLY ....a change was that BMW changed the CAMSHAFT sprocket by 3°; this is same as 6° measured at the crankshaft as far as valve timing is concerned. BMW changed a flywheel marking, by repositioning it, when the 3° change in camshaft timing was done. The new timing point was placed 6° before the original marking, as seen in the direction of the moving flywheel. That was 12.5 mm on the flywheel, in the direction of the TDC (OT) mark. The STATIC ignition timing (also called idle timing, or the S mark) remained at 9° BTDC. Obviously, OT, top dead center marking, was not changed. Think about the differences of no-change at S, and a 6° change at the maximum advance point. Yes, if you have a wrong flywheel, or just want to know, you can measure the S mark and see which flywheel you have.
When BMW made those changes to the camshaft sprocket timing, BMW suggested those "upgrading" the ATU should "repaint" the timing marks. This was because if one put a 007 unit into a 005 bike, the F mark would not come up far enough if trying to use the original F mark. If one timed at the S, it was OK ...but you would have to ignore the F mark ....but, S is not the real place to time a bike, the F mark is THE important one, leaving S to fall in the window someplace. The later flywheels (Clutch Carrier) had the new markings. Those can often be safely advanced several degrees, that is, timing would have the Z mark up the window some; usually near the top, or call it at 3/4 window.
The S mark continued at 9° BTDC until 1978 mid-year production. After Jan 1, 1978, bikes were officially 'emissions controlled' and the S mark was moved 6° BTDC, and; thereafter. Changes were made at the BMW distributors for all 01/01/1978+ before being released for sale to the public. The engine camshaft timings (not talking about the ignition advance cam, the ATU, here) were changed during 1978 production too. All these changes in the automatic advance unit, and the flywheels, can be confusing. Those playing with any sort of changes to the engines, including even stock components, and certainly if changing compression ratios, camshafts, timing, gasoline octane's, and lots more, may well be advised to try things such as adding a bit of ignition advance beyond the S and F or Z marks, and various types and combinations of ATU parts.... etc.
Many have advanced the timing a few degrees, gaining some slight performance. In general, even the stock 1978+ engines will benefit slightly, from moving the S mark and the maximum advance to 3/4 up the timing window. Using faster advance will help slightly too...if CR is high and fuel octane is high. This is especially so if compression ratio is higher, common with Euro-shipped bikes.
It is possible for you to purchase a bike with wrong components, done by the previous owner (or?). It is also possible for you to install the wrong components, particularly the ATU and camshaft sprocket when doing a timing chain job, so be cautious!
You may be interested in reading this article:
https://bmwmotorcycletech.info/timingchain.htm
and
https://bmwmotorcycletech.info/cams.htm
Those articles contain more insights about the camshafts and ATU; and, see other recommended reading, at the very beginning of this article).
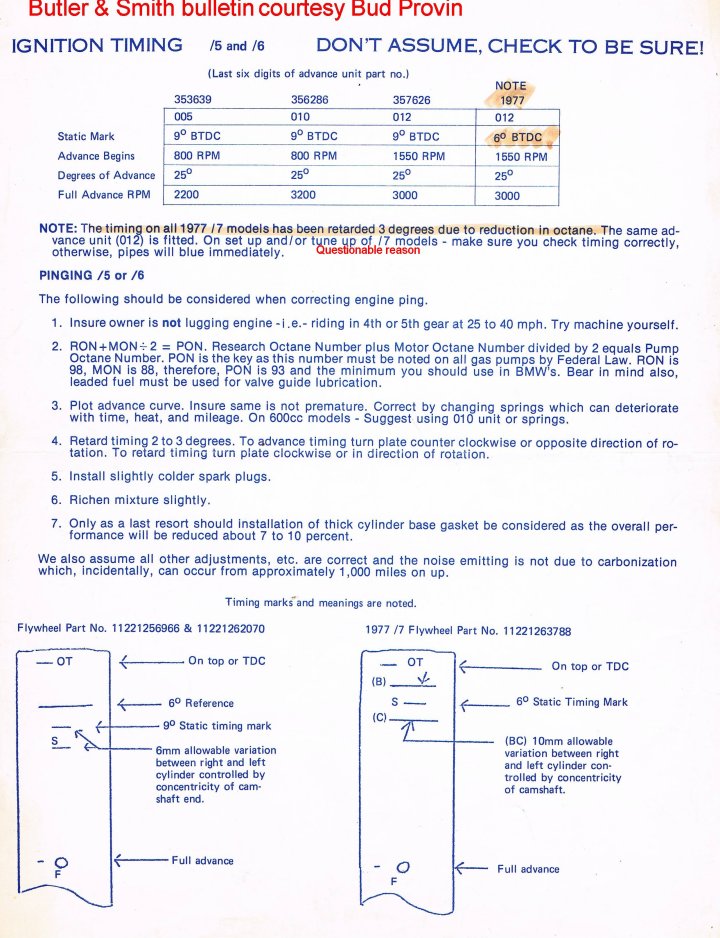
Here is a link to an old advisory bulletin from Butler and Smith (BMW importers-distributors, from long ago). This is the flywheel marking bulletin, and some notes on it from me:
https://bmwmotorcycletech.info/flywheel-markings-B&S-bulletin.jpg
Information on Butler and Smith is located here:
https://bmwmotorcycletech.info/roundel.htm The information is in a large red-outlined box.
A reference article. See a fuller listing of links at the very top of the page you are reading this at: https://bmwmotorcycletech.info/F,OT,S,Z.htm
Coils, Spark Plug Caps; Module; Heat Sink Paste Renewal; Miscl:
1. Be sure to use the proper coil; there are several different ones for points and several different ones for electronic module models, and some modules will possibly fail if used with the lowest ohm coil.
2. The old black Bosch coils, with the lightning bolt on the side, can be used with any of the ignition modules. These old black Bosch coils, with the lightning-bolt on the side, which are BMW 12-13-1-244-142 (these coils are not marked 6 volt), are the best old coils to use with the electronic module ignition. In all cases of using two separate single tower coils, terminal 15 on one coil goes to terminal 1 on the other coil. That leaves one terminal 15, which is for the GREEN lead; and the remaining terminal 1 lead goes to the BLACK lead.
If you are replacing a two-tower stock coil with two separate lightning-bolt coils, you will have to fashion mounting...one can go where the original coil was, the other to the rear....under the relay bracketry. Have the rear coil fire the right plug. A common reason to install the lightning-bolt coils is that a stock grey-bodied early twin tower coil has cracked, and started to fail, usually with moisture conditions. If you can dry out the coil, you can epoxy or otherwise seal the crack ....but this is a very temporary fix ....and sometimes or often will not work. Even if the coil has OPENED its secondary winding, this still may work to get you home.
3. Coil secondary's are approximately 4000 ohms for the two separate coil models, and approximately 8000 for the twin tower single coil model. For any coil, clean the top now and then, maintain a good rubber boot fit and condition, and inspect the metal contact at the bottom of the tower after removing the boot (inspect wire clip too)...clean out any internal tower corrosion, use a bit of silicon grease (on the RUBBER insides).
4. Early spark plug caps were ~1000 or ~1200 ohms, and are fine for any points ignition bike. Electronic module with Hall element canister bikes must use 5000 ohm caps. NGK 5000 ohm caps are OK. Caps that measure 4000-8000 ohms are OK. Do not use resistor spark plugs!
5. It is perfectly acceptable, on any Airhead, to connect a spark plug resistor cap at its inside metal fitment (where the spark plug threaded stud pushes into), to a cylinder fin, to ground out the ignition. Do it securely. Simply push the cap onto the sparkplug, lay the plug metal onto the cylinder/head, and secure it there, so the spark plug metal body is in contact with the cylinder head metal (or, cylinder metal). Never, on any Airhead, allow the spark plug cap to be off the spark plug, with the ignition ON....you can ruin a coil and other items and the resulting damage may not appear for months or years later. One of the better methods of securing a spark plug metal body to a cylinder head is to use a long spring sold at hardware stores as a Sash Rod spring. A screen door long spring will also work. A bungee can be used. Any of those things can be wrapped around the head or cylinder, holding the spark plug metal to the engine metal. In this way, the spark plug can dissipate the high voltage spark in a more or less normal manner. Be very careful ...because if you do not secure the spark plug, and it falls off the engine metal, extremely high voltages can be developed, and the coil (points OR electronics models) and/or module and Hall device can be damaged.
6A. The Control Unit (module) under the tank, if non-riveted type, needs fresh heat sink grease every year or three, otherwise it overheats.
6B. There is a detailed article on the canister electronic ignitions here: https://bmwmotorcycletech.info/Ignition.htm ...but below are a few hints on troubleshooting. I almost never do these below tests, because the next-following paragraph's (6C.) tests are almost always adequate, and much easier to do ....and no metering nor fuel tank removal, etc., is needed:
Power is supplied to the control module at its pin 2 (ground, earth, or -, negative 12 volts) and pin 4 (+12 volts). Note that the KILL switch on the bar and the key switch must both be on and in RUN position. If the voltage is present, turn off the key switch, and reconnect the meter between pins 5 (+ trigger) and pin 3 (- trigger), and re-power. This is the trigger assembly output (from the canister). There should be at least 5 volts, if not, the fault could be EITHER ignition unit. Disconnect the plug from the module, which is located under the fuel tank. In order to remove the plug you MUST remove the very thin steel bale-wire first....it simply clips around the plug assembly, there IS an opening in it, it is not a complete sealed loop. With the plug removed, withdraw pin #5 from the plug (you will need a very thin tool to press the hidden release point tab) and then reconnect the plug. Connect a milliampmeter between the removed pin and the module pin 4. Turn switch on. If the reading is 3-20 milliamperes, the control unit is faulty, if more or less than that value range, the trigger (Hall) is faulty.
6C.This is how I actually do testing, nearly 100% of the time:
These are very nice tests. Be sure to have a proper spark plug and cap safety setup to see the spark! For both tests, this means: Remove both spark plugs, and with the spark plug securely pushed into the spark plug cap, tie the spark plug metal body to the cylinder or cylinder head securely.
(a) Turn on the key ignition. Move the kill switch repeatedly back and forth from center to one side. There should be a spark each time. If this works, the module is very likely OK. Turn the ignition key switch off. This is not a sufficient test, particularly for the last modules, so I suggest you also do (b).
(b) Remove the battery negative wire(s) at the battery itself (or transmission if only the one thick black wire) to ensure the battery has no negative connection to anything. Remove the front timing chest cover, then reinstall the battery (-) wire to it grounding point. Remove the bale clip and then disconnect the three pin plug assembly coming from the canister (key is off). Turn on the key switch (kill switch centered). Momentarily and repeatedly connect the center terminal of the 3 pin plug (not the canister side plug, but the engine side plug) to engine ground, with a jumper lead or bent metal paper clip, etc. A strong spark should occur each time. If it does, then the problem is almost for sure the trigger Hall device if normal rotation of the engine via the starter motor, with everything connected, does not produce sparks at the spark plugs. Be sure your bike's kill switch is centered, or this test doesn't work. There have been instances of slight unnoticeable, or actual noticeable, corrosion on the three pin plug connections. Push the plugs back together, and see if the engine will start. Pushing them together does mild cleaning of the connections. It the engine will now start, unfasten and properly clean and treat the connections. Return the bale wire to its normal place at the plugs when done.
7. To retard the spark, turn a canister clockwise; and to advance the spark, turn it CCW.
8. HIGH IDLE RPM after full warmup: there is a detailed section on that problem in article #30: https://bmwmotorcycletech.info/Ignition.htm
© Copyright 2024, R. Fleischer
Return to Technical Articles LIST Page
Last check/edit: Thursday, May 30, 2024