
|
|
The ads above are Google-sponsored.
Clicking on them at every visit helps
support this website!
Clicking on something INSIDE the
advertisements helps even more!
Camshafts. Broken cam tips. Cam sprockets.
Lifters (followers). Alternator & cam seals. Crank
nose bearing. Sports-cams.
Assembly lubricants.
� copyright 2023, R. Fleischer
Article 60, sub-section 7
https://bmwmotorcycletech.info/cams.htm
This article is meant to be used with the following articles:
https://bmwmotorcycletech.info/timingchain.htm Comprehensive on the crank, timing chest seals, oil pump, etc.
https://bmwmotorcycletech.info/flywheelremovalwarning.htm (A MUST KNOW!)
Most any engine oil will work reasonably well for the engine, but there are specific areas of the engine that WILL BE damaged, and perhaps expensively, if the oil is not of proper quality and that means not only the base qualities but also the proper additives that are blended by the oil makers. The author's website, https://bmwmotorcycletech.info, contains several articles on lubricants, one is very detailed about how oil really works, what oil should be used, etc. Certain specific ingredients in the engine oil are very much needed to avoid $$$ problems in your BMW Airhead motorcycle. THREE are critical. One of them is ZDDP (or ZDP). The amounts in common car oils have been DEcreased, over time, in accordance with API, SAE, and oil and auto manufacturer's changes. Your Airhead motorcycle REQUIRES this substance in a minimum (and not over maximum) amount, to avoid $$ spalling and other deterioration of the camshaft and cam follower surfaces. Another ingredient is needed to be sure that under nearly any storage condition, short and/or long term included, the cam and followers (and other items in the engine) do not have the oil dripping off and leaving the metal unprotected at engine startup. The final ingredient (of major importance) is that the amount of detergents (increasingly higher in modern car oils) should not be excessive, as that would tend to defeat BOTH long term storage metal protection AND the protection of ZDDP.
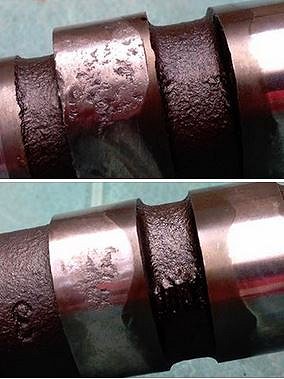
Here's a few photos of cam and follower damage. An expensive major failure would have been coming soon, if this engine was in use with these items.
Base Circle
The base circle is the round portion of the cam lobe where the valve lash adjustments are made. A slight high spot on the base circle is called base circle runout.
Cam Lift
This is the maximum distance that the cam lobe pushes the lifter. Because the rocker arm ratio will multiply the overall valve lift, this should not to be confused with valve lift.
Cam Profile
The cam profile is the actual shape of the camshaft lobe. A flat tappet camshaft is slightly more pointed on the nose of the lobe, while a roller lift camshaft has a more rounded profile on the nose of the lobe.
Degreeing the Camshaft
This is a process that synchronizes the camshaft with the crankshaft. For best engine performance, builders use a degree wheel to dial in this measurement. Most manufacturers will list the exact specifications for each cam on the cam card. In some situations, the term Degreeing the Camshaft will mean you or someone will use a degree wheel on the crankshaft, and then measure valve lift (or, other specified area), and reference that to, typically, 0 degrees of crank, also called Top Dead Center (TDC), or, on German motorcycles, OT. It is fairly normal for specifications for degreeing (aka cam timing) to be done at a specified amount of valve lift, to reduce errors. The same amount of specified valve lift is usually used for the next, below, subject, Duration, and often for other measurements as well.
Duration
The length of time the valve is held off the valve seat from the cam lobe. This is measured in degrees of crankshaft rotation. A typical example of Duration would be degrees of crankshaft rotation from when the valve is open (let's say 2.0 mm) until it is the same amount, 2.0 mm, before closing.
Gross Lift (Valve Lift)
Typically camshaft manufacturers list this measurement by multiplying the cam lobe lift by the stock rocker arm ratio, usually 1.5:1. For example, if your cam lobe lift is .319 and you're using a 1.5:1 rocker arm ratio, you can take .319 x 1.5, which is .479 inches of overall valve lift.
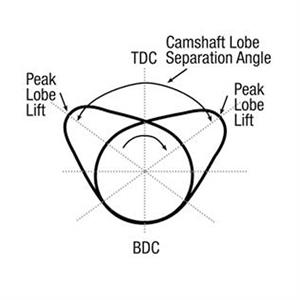
This is the angle in degrees between the centerlines of the intake and exhaust lobes. A 112-degree lobe separation angle means that the peak opening points of the intake and exhaust lobes are 112 degrees apart. This measurement is another way of expressing valve overlap, which is the amount of time that both valves are open on the same cylinder. If the lobe separation angle were 0 degrees, both the intake and exhaust valve would open and close at the same time. Measurements typically range between 104 and 115 degrees.
Broken tip on pre-1979 Airhead camshafts:
This relatively serious problem is seen now & then. The cause is typically from over-torquing the nut holding the automatic advance unit to the camshaft tip. It could have been abused long before you got the bike, weakened, then it was your unlucky day to snap off the tip ....even using proper torque. Officially the nut torque, at least in one BMW manual, is .6-.7 Mkp. 0.7 Mkp is 6.86 Nm or 5.1 ftlbs. I would not go that high. 4 footpounds is, I think, more than plenty high enough. Most torque wrenches that read, perhaps, to a maximum of 75 foot-pounds are not accurate at low settings of 4 or 5, even if they can be set that low at all. If you must use a torque wrench, use an INCH-pound wrench at maximum 48...or some other lower torque type of wrench (inch-ounces??), with appropriate conversion of values ...there is plenty of information on torque, torque values, etc., using the torque wrench, conversions, etc., on this website, see articles 71A, 71B, 71C.I personally tighten these nuts by feel. I use the original type of washer or a waverly locking washer. I do NOT use a split-type of washer. Nuts need NOT be overly snug, but must be snug enough so the nut does not back off! I NEVER over-tighten these nuts! NO Loctite on these nuts! If your 'feel' for torque is not quite good, use a torque wrench!
What to do if the tip does snap off:
A Boyer ignition will likely fit, but you can likely fix the tip, if you do the following very carefully:
1. File the cam nose smooth & flat and as square as you can. Do NOT remove any of the D shaped boss area.
2. Center-punch the exact center of the cam tip, with a quite sharp and hardened centerpunch. You need to make up something or use the proper centering tool, to be sure that it is dead-centered. I cannot emphasize that enough. A machinist can do that for you, or, contact one of the Airheads LIST guru's. You also need a drilling guide and tap guide made up.
3. Using your drilling guide, drill the cam tip, very slowly, very carefully, to a depth of 7/8", using small sized increments of drills, ending with a diameter of 11/64". Use a GUIDE for at least the initial drill bit! Do NOT break the drill bits! Clean out the chips often. Use tapping oil & tap for 5 x 0.8 thread (see next paragraph regarding the thread size), to a depth of 3/4"....carefully! DO NOT break the tap! Use a GUIDE for the TAP!
HINTS: Use a brand-new tap of the taper tip 'starting tap' type, do a thread or two, then back out & repeat. BE ABSOLUTELY SURE that you select a thread pitch that you can purchase screws for at the same time! 5 x .7 and 5 x .8, etc., are metric sizes, but you may find that the .7 is not common for tap & screw. Yes, I know that many of you will use American size taps and screws and not Metric. Do it right, use metric. BE SURE to pay attention to my remarks about centering, and using drilling and tapping guides. You MUST have a proper drill guide, etc. Here is a contact for information: "Paul Tavenier" [email protected]
HOLD the advance unit counter-clockwise while snugging the screw you install; ...against the D-flat, ....to remove any slop & prevent shifting movement.
STOCK, original equipment camshafts:
For the stock cams, at .0787" valve lift (2 mm), the timings are as follows:
R50/5, R60/5, and R60/6 to 1975:
BMW issued a SI on that camshaft, saying that some published information was NOT correct. BMW said the correct figures are:
Intake Opens TDC; Intake Closes 40� ABDC; Exhaust Opens 40� BBDC; Ex Closes was illegible, but I am sure it said 40� BTDC. If you were to look up the sprocket and camshaft in the present parts fiche, it would be 11 31 1 250 253, sprocket.
284� camshaft, used UP TO 09/1975, 11 31 1 259 262.
UNfortunately, BMW is confusing itself. You will find that other manuals say Intake Opens 40�ATDC....all the numbers are 40�; that INCLUDES the intake opening at 40� ATDC.
Maybe the confusion came about as the R60/6 for 1976 and the R60/7 for 1977 had the following timing:
INtake opens TDC; closes 40 ABDC. EXhaust opens 40 BBDC; closes TDC.
If you were to look up the sprocket and camshaft in the present parts fiche:
/7 to 09/1977, sprocket 11 31 1 250 253, camshaft 284� 11 31 1 262 999.
From 07/1976 to 11/1977, sprocket 11 31 1 335 588, camshaft 284 � 11 31 1 336 374.
If you look carefully, you will see there is an overlap, not-explained, on the manufacturing dates, and the parts associated. NOTE that the SAME sprocket was used to September 1977, yet the last item, above, shows a 588 used earlier.
Some of this confusion has to do with the changes for the bikes actually shipped to the USA. January 1, 1978 was the absolute start date for the emissions bikes for the USA. There is more to all this, including changes for associated things...such as that cam seal. The whole camshaft, oil pump rotor, etc., needs to be carefully looked at depending on what your bike actually has. This is one of those instances that a look-see is needed, as well as using the serial number of the engine, when looking into the fiche. Even then, could be anomalies. Be Cautious! Read this entire article several times! If you are into your engine in depth, ask about seals, camshafts, pump rotors, etc, on the Airheads LIST, if you have the slightest confusion. Be sure to read this ENTIRE article, as I explain many things later.
R60/7 1978:
INtake opens 6 BTDC; closes 34 ABDC. EXhaust opens 46 BBDC; closes 6 BTDC. Note that these figures are 6� different, due to the change in the keyway placement of the camshaft. This camshaft, or the engine, or, however folks tend to describe it, is the first "emissions" engine. Yes, you can get mightily confused when you see the identical sprocket numbers in parts fiche, that is because it was the CAM keyway slot that changed!
One of the confusing things (that few seem to notice) is that BMW's literature, or some of it, show the R60 models having the exact same horsepower & torque at the exact same rpm, no matter what year and camshaft.
R75 (all) and R90; R100/7; R100S; 1977 R100RS:
INtake opens 10 BTDC; closes 50 ABDC. EXhaust opens 50 BBDC; closes 10 ATDC.
DURATION CHART (Duration versus CAM LIFT ITSELF):
https://bmwmotorcycletech.info/CAM-DURATION-R75.pdf
R80/7, R100/7, R100S, R100RS (1978):
INtake opens 16 BTDC; closes 44 ABDC. EXhaust opens 56 BBDC; closes 4 ATDC.
After 1978, Country Dependent (R80/7 & larger):
INtake opening 10 BTDC; closing 44 ABDC. EXhaust opening 56 BBDC; closing 4 ATDC.
I am not sure about the R45/R65.
Sometimes cams are spoken about as total degrees; the 1978 would be 308�. Note well above, the description of 284� earlier camshafts. What is total degrees? How is total degrees calculated? Total degrees means the difference between closing and opening angles. The number of degrees is given in crankshaft degrees, and is the number of degrees that valves are off their seats. This can be exceptionally confusing because different camshaft makers, difference engine manufacturer's, etc., can and do specify such degrees at varying amounts of valve lift, including, of course, zero. Also, the same manufacturer may specify the 'degree' of any camshaft, as for a quite different valve lift, than for the TIMING of the individual cam events. Are you thoroughly confused yet?
BMW uses 2 mm clearance and uses 2 mm (.0787") valve setting lift as the reference point for cam events timing; tolerance on timing is + or - 2.5�. If you are measuring at the CAM lobe itself, the R60/7 had a 0.2417" lift; and the later larger bore engines had 0.2634" lift. The rocker arm ratio on the engines is 1.39, so for valve lift you multiply the cam lobe lift by that 1.39 factor. If you are doing measurements, a quite small change in valve lift can mean a fairly substantial change in the TIMING of opening or closing of a valve.
For especially nerdy folks:
http://www.tildentechnologies.com/Cams/Tip_DegreeCam.html
http://www.tildentechnologies.com/Cams/CamBasics.html
http://www.tildentechnologies.com/Cams/CamDesign.html
http://W6rec.com/
also see Clymers, Haynes, BMW factory manuals, etc.
This short section replaced some of my own information, regarding removing the camshaft sprocket, etc.....and dealing with the required cam nose spacing, removal and replacement, etc. What follows IN THIS SECTION, comes from a posting by Tom Cutter, on December 8th, 2019, on the Airheads LIST. It is better than what I had written, and I wish to give full credit here to Tom; and, I have not edited this beyond cleaning-it-up. Tom wrote this in response to an inquiry "1983 R00RS Pulling Camshaft Timing Sprocket":
From: Tom Cutter
Sunday, December 08, 2019 12:04 PM
To: Brook Reams <[email protected]>
Cc: airheads <[email protected]>
Subject: Re: 1983 R100RS Pulling Camshaft Timing Sprocket ...
Brook Reams asked: I'm ready to do this in preparation of removing the crankshaft. The plan is to use a 3-jaw gear puller included in the Cycle Works Stage III tools. Are there any cautions or gotcha's, I should be aware of?
Tom replied:
Yes. Don't do that. You'll bend the sprocket and make it laugh at you. Remove the camshaft WITH the sprocket attached. You can grind a 10MM-1/4" drive socket down a little and get the bolts out through the holes in the sprocket. With the cylinders and cam followers removed, the cam and bushing will pull right out the front. First thing to do is use a feeler gauge to measure the end-play between the cam shoulder and the bushing flange. If it is over 0.005", then the sprocket has moved. In this instance, BMW recommend securing the sprocket with Loctite on re-installation, as described below.
To remove the sprocket from the cam, use split plates in the press and an old wristpin to push the cam out of the sprocket. A little heat on the center sprocket hub helps, but it will still need a healthy press to get it off. DO NOT try to press the bushing and sprocket together, the woodruff key on the cam will destroy everything. For reassembly, set up the cam clamped vertically in your vise, clamping on the oil pump flats. When you're ready to re-install the sprocket, grease the bushing surfaces liberally and place a .004" feeler gauge between the bushing shoulder and the cam flange shoulder. Wipe the cam above the bushing with acetone or lacquer thinner to remove the grease where the sprocket will mount. Take the clean dry sprocket and heat it to 290F in the oven, After 15 minutes in the oven, take the sprocket and quickly wipe a thin film of Loctite RED high-strength retaining compound INSIDE the sprocket hub bore, then quickly slip the sprocket onto the cam. As soon as it stops, pull out the feeler gauge. If it is already stuck, relax. Rotate the bushing while pulling the gauge and it will come right out. The grease in the bushing will act to keep the Loctite from locking the bushing onto the shaft. The Loctite will act to secure the sprocket from moving in service.
When re-installing the cam into the engine, coat all cam lobes and bearing surfaces with a coat of molybdenum-based engine assembly lubricant (https://uedata.amazon.com/Loctite-1787494-Engine-Assembly-4-oz/dp/B00O542WG2). From that point until the engine runs, keep the assembled bottom end sealed in plastic to prevent dust from gathering on the lube. Immediately prior to final assembly of the engine top end, use an oil can, squirting in through the cylinder holes, to flood the cam lobes with fresh engine oil, thus rinsing off any possible dust or debris that may have gathered there. Coat the cam follower faces and sides with the same assembly lube, too. --
Tom Cutter, Yardley, PA. http://www.RubberChickenRacingGarage.com
If you are changing to a NON-stock camshaft, this article does NOT cover all the possible problems you may run into. This can include such as spacing rocker blocks, modifying piston valve pocket areas, valve sizes, compression ratio problems with pistons & valves, non-compatible drives to the oil pump inner rotor, 0 and 3 degree types of camshaft to crankshaft timing, flywheel markings, and a LOT MORE. Do your homework. I am not able to supply all the information you could possibly need in this article, although I will try to incorporate most things.
Changing camshafts....to stock or to "Sportier":
Because of the large amount of confusion & various parts numbers & combinations from BMW, I recommend that those wanting to change camshafts should purchase the cam & sprocket, using the information about them (& the oil pump drive and the seal size), from a truly knowledgeable 'guru', or; these folks: http://www.motoren-israel.com/
Sometimes someone has to replace a worn-out stock cam with another stock one, or they decide to go to a sportier cam. Whatever the reason, you may or may not be able to get the exact original camshaft like the old one, from your BMW dealership. You will have to look into that. Be very careful about details.
BMW NEVER installed the "336" Sport Cam in a stock motorcycle. The so-called "336" sport cam will NOT perform well in the lower rpm ranges, nor at idle, due to the timing of the camshaft lobes. I am not going to get into the background of this cam as originally designed, nor all (just some) the details of how to make it work for you. The 336 cam will NOT work well, unless you run the RPM up considerably higher than normal. If the rest of the engine is mostly stock, performance will SUFFER below the mid-range. The cam detracts so much from the bottom end of the RPM range, that you MUST have high compression, and it will have to come nearly entirely from the PISTON selected, not by shaving the head or cylinder; ....although those are some of the part-of-the-story options.
To use this, and most all other Sport Cams where it truly helps, you must do all the other things that serious engine builders of hot rods know about. You MUST be sure the piston & valves never touch; nor, with big valves, that the valves never touch (remember, the valve timing is changed). You will HAVE TO modify the heads for large carburetors unless you already have 40 mm carburetors. Changes on the R100 engines will be more than on the smaller engines. You must be sure the cam aft end fits the oil pump rotor ...or, change yours ...I note the number for that part change below.
It is possible that BMW's classic division, whatever they are calling it now, will have some parts you need.
The complications are considerable. Possibly the better approach is to either get into it deeply on the Airheads LIST; and also contact an aftermarket supplier of the camshafts, like Motoren-Israel, etc. ....who have the experience to give you solid advice. You will want to know every detail!
The valve pockets in the pistons might have to be modified if you change camshafts. You may have to modify not only the piston valve pocket, you may have to sink the valves deeper into the head and relieve the area.
The 284� camshaft has 8.62mm lift (0.339"); the 308� camshaft has 9.40 mm lift (0.370"), for some reference points here. Yes, you multiply by the rocker arm ratio, to get actual valve lift. Yes, these figures may disagree by a FEW thousandths. Yes, it seems to disagree with the following. But, keep in mind the variables in how lift is measured!
Numbers on cams are likely to be CASTING numbers, not the part ordering number.
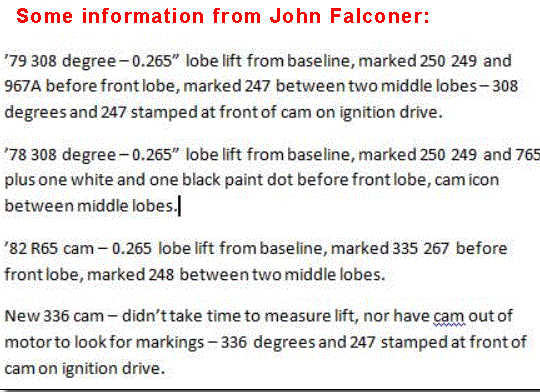
336 degree camshafts, the so-called Sport Cam, are the ones ending in part numbers 053, 412, 848 and 393. Note that the last batch of the 336 cams was for the square drive oil pump; the cams came with the oil pump parts. The 336 cam has about a .424" lift, rather mild soft rise ramps, & runs strongly between 5700-7700 rpm, with roughly 8000 max rpm.
If you seriously take into consideration the performance of the various camshafts that are available from BMW and from aftermarket sources, & you delve deeply enough into all details, you may decide that the BMW factory '336' cam is the one to install ...providing you do much more than just change the camshaft. It really performs well, if you raise the compression ratio to a minimum of 9.5, and it is entirely possible to use up to 10.2 or even a bit more (even on 91 octane fuel at sea level, and maybe 89 at altitude). I suggest dual-plugging with Accel coils and using electronic ignition. The stock ignition, but dual plugged, and used with twin tower Accel coils, is fine for 1981 & later. You can also retrofit the canister ignition from 1979-1980. Modify the advance in accordance with the RESTRICTED advance RANGE, which is one of the two choices shown in my dual-plugging article. Use 40 mm Bing carburetors or the Del Orto's from the R90S, and use the 40 mm exhaust system. The stock BMW mufflers will work fine.
DURATION CHART (Duration versus CAM LIFT ITSELF):
https://bmwmotorcycletech.info/CAM-DURATION-336.pdf
There is a 320� camshaft available, 11 31 1 338 498, that I have no further specifications on, at least not yet. BMW installed it in some ECE delivered countries for many R80 engine'd models. It is a simplex drive, that is, the nose is flat, for use with canister ignition and simplex chain. I suspect it was used for Authorities bikes.
Alternator and camshaft seals used in the the inner cover:
All models use 11 14 1 255 011 alternator seals, probably 28 x 47 x 7 mm.
One of the changes was due to the camshaft seal, the early one being 12 x 25 x 8 mm. The seals are usually described as the Small Seal, and the Large Seal. See the timing chain article: https://bmwmotorcycletech.info/timingchain.htm
Obviously, a larger seal matches a larger cam diameter at that point. The rotor of the oil pump was also modified to fit the rear end of the camshaft.
The camshaft seal up to models built from 9/1975 was 11 14 1 261 193. It must not be used in later models, or there will be leaks. The later cam seal, that is, from 09/1975, is 11 14 1 262 977, is 20 x 32 x 7 mm. To change any of these seals, if leaking, you do not have to remove the casting. Remove carefully. Clean off old seal residues; that can be done by moistening a rag or paper towel with a slow drying solvent, such as WD40 or even kerosene. Use a very fine grit paper to clean any sharp seal entrance area. Reclean. Push the seal into place.
Centering the cover, at the camshaft seal:
I do not use BMW's centering tool (there are two of them, old and later seal sizes). Heat the cover, and install it. Have the bolts barely installed...that means finger tight or wee bit more. Let the cover cool a few minutes. Loosen the bolts a wee bit. Move the cover back and forth at the cam area. It will move a very small amount. Measure, using a caliper, from each side of the cam to the points plate bore; lightly tap on the cover to match the left & right measurements.
Cams/Seals/Pump Rotors:
11 31 1 338 302: 308� camshaft. The -412 cam is for the large seal.
11 31 1 258 053: Has small cam seal, used on /5 to R90S (to 1976 model year); was replaced by the 11 31 337 848 cam. Officially up to 9/1975 ...but in some instances a year later, & now used only with the oil pump rotor 11 41 1 335 194.
11 31 1 263 412: Large cam seal, used on R60/6-R100/7 (to 1979 model year); replaced by the 11 31 1 337 848 for both /5 and /6. Officially up to 9/1975 ...but in some instances a year later; now used only with the oil pump rotor 11 41 1 335 194.
11 31 1 336 393:
Canister ignition models. Cam was available in TWO styles. Both have a slot on the front face (flat nose) for use with the canister ignition; the large seal is the difference. The cam is only available in the advanced timing version. The cam is likely stamped 336 on the end. The actual sport camshaft, often referred to as the 336� cam, if sold for the early models, is for the large seal. If you have an early bike, with the engine cover that has a small seal, you need to get a later large seal cover; they are available with & without the tach cable hole area.CAM SPROCKETS. There are THREE:
11 31 1 335 588 is likely in the literature as for 09/78 to 09/84; you may see it then continued, date-wise use for flat nose camshafts (canister ignition models).
11 31 1 250 253 is for up to 09/77.
11 31 1 335 241 is from 09/77 to 09/78 in the literature.
SOME explanations:
By the time you get into all the above, you probably will find all sorts of problems with cam availability, your dealership may be able to supply just the last version cam, etc.....creating problems for you. At the end of this section is another reference to Motoren-Israel. You might want to contact them.
BMW presently sells a 336� cam to fit early models; but it is for the large seal. If you have an early bike, with the engine cover that has a small seal, you need to get a later large seal cover...and you can get them with or without the tach cable hole area. If you order that 336� cam, it comes with a oil pump rotor. The cam end that drives the pump has two flats, while the original rotor was keyed.
Do NOT use the BMW Airhead one-piece pushrods with non-stock camshafts!!
Do NOT try to use the 1 piece pushrods with a 336� camshaft.
To further confuse things, there were TWO versions of the -053 and -412 camshafts. The difference is the KEYWAY IN THE CAMSHAFT for the gear. The later version is advanced 3�, so the valve timing versus the crankshaft is changed 6�. The -393 flat nose cam is available ONLY in the advanced version. The cams are not easily identified by appearance, and must be measured. If an old cam is installed in a 1979+ engine, the slot is retarded 3 degrees.
Some of the part numbers (last dash number) will seem to disagree with information on what BMW sold, is in present fiche, etc. Sorry, but things changed over the years!
Here is a link to the BMW factory information on the 336� camshaft. There are FOUR pages to it:
https://bmwmotorcycletech.info/336-cam-factory-literature.pdf
A bit of background on how this .PDF came about ...and some additional information:
In 2006 John Falconer came across a German language document on the "336�" camshaft. John did some preliminary translation, & a bit later, David Paulus finished the document, making it a pdf. While the document seems to reference just the 053 & 393 part numbers, you can see equivalents/changes, by going to any BMW dealership's on-line fiche. I believe there is an error in that pdf, as far as you using the information now. The second cam listed should be 11 31 1 263 412, which is the cam for the /6 & some later, using the large cam seal. The 1 mm R69S washer is fibre, part 11 34 0 026 186, & fits. You are unlikely (OK TO TRY!) to find the correct size washer, other than that one. This washer is fiber, & has the additional benefit of reducing spring temperature.
You will still probably find old & new part numbers somewhat confusing. Keep in mind the type of nose on the camshaft & the type of oil pump drive, & if the proposed camshaft is a 0�, or a 3�. Keep in mind the difference in cover openings for the cam seal. Once those things are decided, then it is 'just' a matter of obtaining the correct parts if and as needed, and then fitting things properly, paying attention to the various things about spacers, rocker arms, pushrods, valve pockets, etc., that I have mentioned.
If you are purchasing a camshaft from such as Motoren-Israel, they can certainly supply you with INDIVIDUAL ADVICE. You can also post questions to the Airheads List.
UNconfirmed data for the sport cams, where P=(inches):
4000 rpm, 3� cam, P= 46. For 6000 rpm P=30. For 7000 rpm, P= 25. for the zero degree cam, add about 2 to the P figures above.
BMW does not have many of the old camshafts available, & only had one, the so-called 336�, for most bikes. BMW never supplied R65/R45 special camshafts, AFAIK. One company that I know of that has a LARGE assortment of camshafts, even 'modernized' versions of the "336", even R45/65 cams, & even cams for the
Krauser 4 valve heads, ETC...is Motoren-Israel
http://www.motoren-israel.com/
They probably can supply a camshaft to fit any Airhead, for any purpose, & they
probably have enough models to reduce changes you need to make, such as on
the oil pump or simples/duplex, sprockets, etc.
Explaining the 3� and 6�...additional explanation:
In 1977-78 BMW made changes that amounted to a 6� difference in crankshaft to valves timing. This was done for emissions purposes. This was done by changing the keyway position in the camshaft that mates to the unchanged sprocket, by 3�. Engines/bikes SOLD in the U.S. from January 1st of 1978 HAD to have the advanced timing, to meet the 1978 emissions rules. Many before this date did NOT have the change. That is because "1978" models are built from the first work day in September of the prior year (BMW factory vacation/holiday period is August). Thus some "1978" motorcycles might not have the 3� changed camshaft (equals 6� crankshaft). If you are interested in another way of describing all this, see https://bmwmotorcycletech.info/timingchain.htm. Some things happened with/to these bikes that arrived in the USA, but that gets explained.
BMW had bulletins on this more than once, and in at least one of them, it said you were to remark the flywheel!
Here are some interesting ways of determining the type of camshaft; and, if you perhaps installed sprockets one tooth away from proper timing. This is an edited by Snowbum version of something passed on by Tom Cutter, long ago:
Remove the spark plugs & valve covers. Put bike in 5th gear & rotate the rear wheel in the forward direction until the EXHAUST valve rocker arm pushes the valve inwards & then JUST returns ALMOST all the way outwards. As you rotate the wheel (jerks work fine on the system backlash for that purpose) and the exhaust valve starts to come back out, the intake will start to go in. This is the overlap phase. Lay a straight edge across the adjustment locknuts (Comment by Snowbum...this should be the THREADS), from the exhaust to intake rockers. Looking straight down on the rockers, and on the straight edge from above, the straight edge will change angle relative to the valve cover gasket, as you turn the rear wheel. STOP when it is parallel. At this point, if OT mark is lining up in the window, the cam is symmetrical (Snowbum comment: early type). If it is about 3/8" below the window, it is the advanced timing cam.
Note the following from Tom Cutter in 2017, it is another way of saying the above; but these comments were about an Airlist query about whether or not the owner could have gotten the timing sprockets off by a tooth, when doing a chain job:
It is WAY easier to check cam timing on any pre-78 Airhead, all of which had symmetrical cam timing. That being the case, you simply put the motor at OT, and put a straightedge across the ends of the valve adjuster bolts (Snowbum comment...this should be the threads). If the ruler is parallel to the valve cover, the cam is timed right. Takes SECONDS to check with nothing but a metal ruler.
Yes, you can use the bolts/nuts, be careful that things are flat, square...
On the 1978 and later Airheads, the cam timing is advanced 6 degrees, so just put the motor 6 degrees BEFORE OT ( the OT mark will be barely visible if you peer way DOWN in the hole. Do the ruler test there and if the ruler is parallel to the valve cover gasket surface, the cam is in time.
MISCL:
For Airheads, you may occasionally need to know the spacing between markings on the flywheel (or clutch carrier). You may need to know the distance per degree on the circumference. The diameter of the larger engine flywheels are all the same, and there is 2 mm between each degree. For the R45/R65, it is 1.5 mm between each degree.
Chain size: 3/8 x 7/32, both SIMPLEX and DUPLEX.
Crankshaft bearing: For many years, this was number 07 11 9 981 722, and is 35 x 62 x 9 mm. The bearing number has been changed to 07 11 1 468 882. It is a common bearing, but you must get the correct GRADE. Here is the FAG part number for it: FAG16007-C3
Changing the front main bearing?... confused about its holder/carrier? Pay attention to the information in the BMW factory literature about properly positioning things, & the oil holes being vertical & about the drilling needed on the two holes through the bearing ...0.124" ...right through the existing front bearing carrier, & then the bearing area. A new locating pin hole ....taper hole, partial at 0.156", & full at 0.148" ....there is a special ream ...etc. ...all this is being mentioned for you, & not put in exacting detail.... so you will be extra cautious in not just willy-nilly changing things. More on this subject is in my comprehensive article dealing with nearly everything about the crankshaft and what is attached, etc: https://bmwmotorcycletech.info/flywheelremovalwarning.htm
Aftermarket rockers are ...or were ...available with roller tips. Installation and use are not covered in this CAMS article; nor is information on the Krauser 4 valve heads, etc. I have a separate article on the Krauser's:
https://bmwmotorcycletech.info/Krauser-Heads.htm
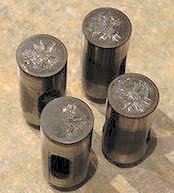
LIFTERS (Followers), ZDDP, Break-in, Rotation of lifters and valves, etc.
There is an article on this website specifically devoted to assembly and break-in:
https://bmwmotorcycletech.info/break-in.htm
The lifters are properly FOLLOWERS (I use the two words interchangeably in this article); these break-in to the camshaft lobe, & the camshaft lobe breaks-in to the lifter as well. I HIGHLY RECOMMEND that if you remove the lifters that you do NOT MIX THEM UP ...always replace them into the SAME engine case hole. Your lifters/followers ARE NOT centered with regards to the camshaft lobes. That is done on-purpose in your engine to create rotation. On some BMW vehicles, they use a slight convex crown on the lifter face, & the mentioned, just below, cam lobe. This convex crown is usually impossible to see with the naked-eye; on some engines can be as little as 0.0009", to as much as 0.015" (can seen with a straight-edge). SO: BMW uses OFFSET location followers, in relation to the cam's full lobe width.
The purpose of the offset, etc., is to ROTATE the follower, which ALSO causes pushrod rotation, which is less important, by far, than reducing over-all wear of the followers. This same offset idea is used at the valves, to rotate them, by offsetting the rocker to stem. Some uninformed folks that do BMW Airhead HEAD work do NOT understand things as well as they should ....and they FILE or GRIND the valve keepers to prevent valve rotation. This is usually done with SS one-piece valves. It can cause FAST wear on the stems, and wear at the valves/seats too. See this article for detailed information: https://bmwmotorcycletech.info/valves.htm
It is common for "flat tappet" engines (meaning the lifter/follower, here) to REQUIRE special lubricant additives to ensure low wear. The type of cam lobe shape, & how the lifter comes in contact with the camshaft lobe, can otherwise cause SCUFFING. You can think of this as wear during the wiping motion of the cam lobes to the lifter face. The best additive is known by its shortened name as ZDDP (ZDTP is used in synthetics) & is almost an absolute necessity; other additives for the purpose are not as successful. It is my belief that when the ZDDP concentration falls below around 900 ppm, excessive wear can occur. Modern car oils have very little ZDDP (IF ANY!). The oil essay & other oil articles on this website explain oil additives & properties in much more depth. Do not take oil base stock & additives lightly, they are IMPORTANT for Airheads. Note also that the heat-hardened characteristics of some BMW items has varied, that is why some have used car oils in the past & gotten away with it. I highly suggest you DO NOT use modern oils meant for cars.
Wear, scuffing, & actual DAMAGE, is highly variable, depending on oil compounding, the factory hardening process & quality of such hardening, etc. Some owners may get away with common low or no ZDDP car oils. Others may have cam and follower failures. Yes, I HAVE SEEN IT. BREAK-IN IS OR CAN BE CRITICAL, ESPECIALLY SO WITH HIGHER LIFT CAMS AND/OR HIGHER SPRING PRESSURES .... WORSE YET WITH HIGHER RPM. What is seldom understood is that the use of ZDDP produces a sort of glass-like ultra thin coating on the parts, and it needs to be constantly replenished.
On most all "more-modern" flat tappet engines (flat tappet engines are nearly all now a long gone thing) the cam lobe is ANGLED towards the camshaft. This ANGLE plus followers usual OFFSET, cause exceptionally good reliability of rotation of the follower. The angle is almost impossible to see with your eye ....it may be a degree or two or considerably more on some engines.
Brand-new lifters/followers and cam lobe surfaces should be coated with a special high pressure cam assembly lubricant when assembling the engine. Most fail to do this. If you do not use such a camshaft assembly lubricant, at least use a reasonably high ZDDP oil for break-in ...or, you can have future problems. You can use 10W40 or 20W50 Golden Spectro 4 for break-in and everyday use .....these are not car-rated (forget what the container seems to say or imply), but have relatively high old-fashioned ZDDP additive levels. There are other brands, and some with very high levels of ZDDP (NOT recommended), etc. See my oil articles for information. DO NOT USE CAR OILS, nor break in a top end on full synthetics, is my basic advice. I assemble camshafts & followers using a break-in "assembly lubricant". This is not a moly-type oil. It is a special anti-scuffing oil and the ones I use generally came from manufacturers or re-grinders of camshafts. Some of the very old products I use are no longer available. Auto-parts stores that specialize in racing items usually carry these types of assembly lubricants. One that is OK, and relatively common, is from the Royal Purple folks, their product called Max-Tuff. Doubt you will find it.
My oil articles explain in detail why certain viscosity grades of oils are not considered to be car oils, by SAE, API, and industry in general. A bit complicated. The articles explain the problems with understanding the MESS industry, car makers, SAE, API etc., got us all into ....and why engines like early Corvettes, Porsches (and Airheads....) must have ZDDP, in reasonable concentration.
I am not interested in arguments about these things. You can read my oil articles on this website. Disagree if you want to, just do not bug ME about it.
There may be errors in the above article by me, regarding part numbers and details. Double check ...no, triple check! with other information-knowledgeable sources ....before purchasing parts, doing modifications of any sort, especially machining work! I suggest you post inquiries to the Airheads LIST.
rev.:
New article, released 01/26/2008.
04/26/2010: Remove bad hyperlink.
05/03/2010: Fix two errors where valve clearance should have been valve lift.
05/21/2011: Minor cleanup.
11/06/2011: Explain cam sprockets and cam numbers here and there, a bit better. Add note about timingchain.htm article.
11/08/2012: Fix typo on new bearing number for the crank.
04/25/2013: Re-work entire article. Include pdf ON THIS SITE, eliminating hyperlink to outside sources where the hyperlinks were dead.
05/02/2013: Add two .pdf's on R75 and 336 cam lift versus duration, courtesy Stoner.
09/24/2013: Expand, slightly, the information on replacing the seals.
10/20/2013: Add section on lifters, zddp, rotation, etc...and modify other areas of the text slightly.
08/05/2014: Add BMW note/SI, on the /5 camshafts timing.
09/28/2014: Clean up article, fix a couple of MINOR typos too. Noticed article will hang up in some browsers or in Preview mode; determined that the old language scripting wan't removed in 2013 as it should have been. Fixed that.
05/28/2015: Forgot to upload 2014 update on Motoren Israel, so did so.
01/26/2016: Update Metacode. Font size increase. H. Lines adjusted. Clean up article. Expand information.
05/20/2016: Final updating of metacode, scripts, H.L., layout, improve clarity, ETC.
04/17/2017: Expand comments by Tom Cutter.
06/03.2017: Adjust fonts and colors and minor layout improvements.
07/25/2017: Add preface and photos of cam and follower damage.
07/28/2017: Add Terminology section, copied from another article.
12/10/2017: Go through entire article. Reduce excessive html. Modify the white areas containing camshaft terms and details to improve clarity. Clear up, completely (I think) the confusion over the 3� cam slot change and the non-changed mating sprocket. Reduce use of fonts, colors, etc. Improve layout and readability. Add my comments in red color to Tom's two statements.
12/08/2019: Add cleaned-up copy of Tom's posting, as noted, from Airheads list posting this date.
04/07/2021: Restored missing cam damage dual-photo.
� Copyright 2023, R. Fleischer
Return to Technical Articles LIST Page
Last check/edit: Monday, April 24, 2023