
|
|
Sleeper R75/5
(AKA, how crazy can I get....)
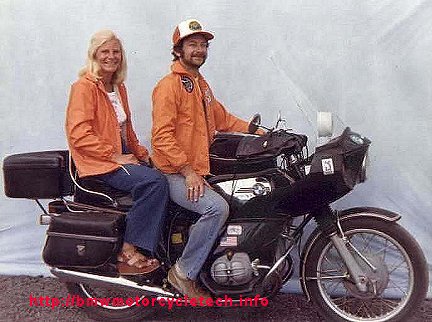
This was a posed photo, we DO NOT normally ride in jeans, nor those shoes, nor without helmets nor without leather jackets!! This photo was taken at the Prineville, Oregon BMWMOA National Rally in 1980.
What is a 'sleeper'?
A sleeper is a modified-for-performance motorcycle that purposely LOOKS UNMODIFIED. Most 'sleepers' have highly modified engines; and may have many other modified items; including suspensions, brakes, etc.
This motorcycle started life as a R75/5 SWB. I purchased it brand new, from the dealership where I worked as a wrench. The bike was shipped by the BMW distributor to the dealership WITH that AVON fairing. The white round item in the windshield area is a high power waterproof radio speaker I installed. Not shown is the later installation of a mostly hidden experimental HAM radio on this bike. The antenna is already there, but you will have to guess where it is! The hard-to-see items at the ends of the bars are a variation on a type of cold-weather 'Hippo-hands'.
The luggage-style push-latch on the left side classic Bates leather saddlebag had a raccoon push on it and the coon opened the saddlebag and ate my favorite peanut butter cookies in October, ever so many decades ago when I camped overnight near the top of Ebbett's Pass (Highway 4), in California, on my way to Lake Tahoe, to check the area out, I was just about ready to move to the area.
In the photo, wife Jean, and I, are wearing the windbreaker jackets of the Flying AAA Ranch, where we sometimes went in our 1957 Cessna 182 or my later 1967 Cessna 182, for vacations. Over many years I had also been many times to Baja with my motorcycles or airplanes (as a member of the Baja Bush Pilots).
What is so unusual about this bike is what it became; and, how stock it looked, always on purpose. The labor involved in keeping it looking stock was vastly higher than all the rest...well, sort-a. I had made lots of small to modest modifications to it over the years. Finally, with over 110,000 hard miles on this bike in mostly stock engine condition, I decided it was time for a total overhaul. It became very much more than a motorcycle that had been overhauled. I had originally intended to just restore it to showroom fresh, keeping some few previously early-done modifications. However, I had purchased another R75/5, and thought "why not go all the way with my old one".
This article is not a listing of step by step, year by year modifications, but covers some highlights. When I sold the bike it still had those bags, that fairing, that horn speaker, etc. I primarily only removed the HAM station and outboard alternator; all of which were installed in a R60/2, for a customer. In the crazy-WHAT!!...the HELL! time of this bike, it had no Ham station, no outboard alternator, etc. It just plain looked STOCK, unless...UNLESS...one looked VERY carefully....and one was very knowledgeable... about BMW Airheads.
So, at one point, the R75/5 became very heavily modified, yet it looked exactly like the above photo, except when the full HAM station was installed by me, which also required a monster outboard alternator.
I never did change the bike to the Monolever that BMW came out with in 1983. I'd thought about it, WAS going to do it, even knowing that, to the knowledgeable, it would have been a giveaway to big modifications. I never did, for two reasons, first being that I knew the Monolever, a fairly easy conversion, would be a dead giveaway that the bike was not stock, and the second reason was the bike was sold in 1985.
A few highlights of some of my modifications follow:::
If you looked VERY carefully, you would see what appeared to be a stock but somehow slightly taller (and very slightly wider) cover over the starter motor. You would have to be VERY familiar with BMW's to notice that; and I spent a LOT of time trying to make that modified cover appear stock.
You would see some beefing-up at the sides of the steering head, a somewhat weak point on the /5 models. You would be UNlikely to see anything much more that gave away what was REALLY done to that motorcycle.
When the bike was brand-new, the engine had been thoroughly gone through, as a teaching aid, by me and our two shop techs at Winkelmann's BMW, after I purchased it and it was broken in (I put a lot of quick miles on it). My shop had not been 100% through an Airhead engine before, just a few modest shop jobs, no one had been to the factory schools yet for these new bikes ...the R75/5 Airhead was a newly released model, top-of-the-line. I knew these bikes well, after this early teardown, so, I felt I could get away with most anything I put my warped mind to.
It wasn't long before I began to make the many changes. I firstly worked-over the transmission and flywheel for faster shifting ...and on and on it went ...but it remained looking very stock. Nothing outrageous at that point, at least nothing that showed (I had already removed the heads and cleaned up the intake tract, etc.). Still stock looking.
A number of small to modest changes continued to be done. The big moment of CRAZY decision came when I was given a very unique supercharger, but had no immediate use for it. From the moment I got the supercharger I was crazy with ideas (amazing what a lot of coffee ...and sometimes barley water ...will do). After making an initial list, I decided that this supercharger needed to go on my R75/5, and I began some extensive paperwork sketches, and then modifications. Modifications led to modifications, common to original crazy modification ideas in the real world. I will give you some ideas......
The very troublesome early R75/5 carburetors, already modified by me to operate better, were sold, and a pair of identical carburetors, but with broken internal main jet castings (hence the carbs were obtained for nothing), were installed. Before installation, the carburetors were completely sealed from the outside air in various ways, and then were bored and sleeved, and otherwise very much modified, so that they were, mechanically, simply straight tubes with no irregular internal surfaces. The cylinder head intake ports and spigots, etc., had already been modified including the valves and seats. The modifications to the carburetors were extreme ...but the head modifications were fairly radical too. I did not dual-plug the engine at this time. The exhaust valves were left stock, but the intake valve came from a Lincoln V-8. The valve guides were shortened and reshaped. Ports, squish, very special pistons, lots of things changed. I even removed the middle ring, and installed a low friction dual-function oil control ring and wave spring.
If I was doing this sort of installation again, supercharged, I'd probably install some low pressure fuel injectors, something like Luftmeister sold. Not sure if this link is still operating, but you can get some ideas, if it is:
http://www.rbracing-rsr.com/bmwturbos.
If I did install fuel injectors, then I'd have the supercharger provide air pressure ONLY, via heat insulated channels. You could also look up luftmeister/haltech fuel injectors, or just haltech f.i.
A substantial increase in the effective intake flow ability was made by various changes, not the least the large intake valve. The throttle and choke cables were original, not functional at the carburetors, and were left as total dummies. The TOP cables one could see at the throttle were not the original type unlined cables, but aftermarket cables from Flanders Co....so the center hole was a bit bigger, and there was no bothersome lining-core to be removed. My cables were installed by me with some very thin special wires (turntable/phonograph type) which led to an area under the fuel tanks, where the operated a control for the 1968 VW INJECTOR, which was completely hidden. BTW, those wires had color coded insulation, and were from my reel of wire used to replace bad wiring in phonograph/turntable arms. The have many strands of VERY fine internal wires, super-flexible, and were perfect for the needed job. There were NO butterflies, floats, diaphragms, or anything else inside these carburetors. The clamshell area, which normally contains the air filter, was heavily modified, partly to allow some of the supercharger nose drive parts to protrude into it and partly to add curved fins to the inside, that acted somewhat as air directors (so I hoped) and for a bit of cooling (added-to by thin ceramic wool pads type insulation where it might help, because superchargers heat the air). I did an awful lot of work to this airbox, finally using twin aircraft type temperature sensors and an aircraft differential altimeter (as inside and outside pressure gauges). All was HIDDEN. I got some goodly improvement in flow and temperature. Later, I installed a differential manifold pressure gauge to do additional monitoring. The readout was something I made up, to look stock, and part of the headlight shell....that cost me many an hour of dreaming how to hide that they existed (until powered). The hardest part of the clamshell work was making it look as stock as possible. A Heliarc machine and surplus aluminum vendor were used extensively. Eventually, I found a way to make the added alloy sections be of the same aluminum color.
The engine oiling system was modified to increase performance, including modifications to the rod and main bearings, the oil distribution at the main and cam area modified, the oil pump, the oil filter area, etc. There are many problems when RPM is raised way way up; and, yes, I intended to use supercharger output AND high RPM, to gain the horsepower I dreamed about. I had originally been undecided regarding the blower, so had planned on extending the RPM considerably higher if the blower did not work out. As it turned out, the blower and about 7500 RPM was MORE than adequate. But, I wanted to avoid problems with oil pressure and oil cooling, etc. Cavitation effects being just one of the possible problems with high RPM. The oil pump modification was done as I was worried about cavitation. As it turned out, very high rpm was NOT needed ....but I used it now and then anyway! Mostly I used 6300 as a maximum. Even at 5500 the engine was VERY sweet. I should note here that I modified the cylinder studs and the threads in the case for much increased strength; and I never had any stud thread pull out of the case. I used about 32 footpounds of torque, perfectly OK on these oversize custom made studs. I had considered pinning the cylinders, but thought better of the idea, so did not ever do it, and wasn't needed.
An oil pan modification was made for windage, & the oil pickup modified. I eventually tossed the modified pan & had started to get ready to mill my own pan (laboriously, manually) when I found out that a deeper pan that would be perfect for some of my modifications was available from Germany ...and I obtained one, and proceeded to modify it for more oil, better cooling (well, a bit), adding windage vanes and deflectors. I went a bit overboard, I guess. I think I gained some small amount of horsepower from the less violent air in the crankcase. I went to quite some length to do this, even making a sheet metal air deflector underneath the camshaft area. Drilling the engine block and threading those holes for screws to hold that deflector was not a fun job.
The dead giveaway to this being a modified bike was probably the oil pan (although modified to look as stock as I could make it) and the higher starter cover area...but almost no one ever mentioned it, even if well-versed on on Airheads, so I must have hidden things adequately, albeit at huge cost in labor, etc.
While a blower, with longer intake cam timing and larger flow at the intake valve is very helpful, I also used offset higher lift rockers together with a custom camshaft. I theorized that trying to do it all with the stock or even BMW racer's cam was not going to work well, and so I found out that was true. Even simple things like pushrods and lifters were modified. Goal was always less weight but stronger, and higher performance in any way I could, reliably. In order to reach high RPM reliably the valve gear must be lightened, polished metal where need-be, and be very strong. I would have loved to have Krauser 4 valve heads on this bike, but never did that....I never figured out how to hide it being a Krauser head!!
More on the cam: The original camshaft was to be replaced by a BMW factory racing camshaft. It proved OK, but not good enough for my bike. I obtained another camshaft and it was reground for longer duration, still with a slow ramp, and then hardened. When you do things with camshaft lobes, you often must modify the head for various clearances ...especially with high lift rockers... I did it both ways on purpose, so as to keep the cam ramps fairly gentle, that is, NOT too abrupt, which tends to cause increased valve gear acceleration and attendant problems. You don't need such abruptness anyway with most blower installations.
Initially the engine was kept a 750. Later, the displacement was increased using 900 components, but it still looked stock. I did lower the compression ratio a bit. We had 100 octane fuel everywhere back then, and I ended up with a lowered CR and slightly over-rich mixtures.
I tried using dual points, but that was a failure. The ignition I kept was the stock points type but modified ones from a Porsche for high rpm stability. The long dwell wide advance early BMW automatic advance unit was used. I designed and constructed an ignition points amplifier capable of handling any coil; using a high power SCR device. Points current ...from memory here ...was about 1/4th ampere, and the points amplifier was designed with a time filter circuit such that multiple triggering's from points bounce would be unlikely. My oscilloscope never revealed any bouncing. Later, I designed and built a Capacitive Discharge Ignition, that fired surface gap racing plugs. The final change to the ignition was to make my own pickup that was crankshaft triggered, and the CDI ignition was modified so that MULTIPLE (practically continuous for some milliseconds) sparks occurred at each cylinder's triggering. I found that projected nose plugs, as stock, but colder-rated, worked better than surface gap plugs; but I was able, due to the power and fast rise-time of the CDI unit, to increase the spark plug gap substantially. I had access to a really good dyno (Axtel's) so a lot of testing was done for these things, and many others. Much time was spent on setting up the ignition ...and the ""so-called-carburetion"" (HAH!!)
I did a LOT of work, eventually, on an electronic circuit that controlled the ignition advance. At one time I tried adding a vacuum advance unit, acting as a retard with large sudden throttle openings, but was not happy with it. I ended up back with my modified points and amp.
For those reading this article, and wondering, I DID think about driving the supercharger from the FRONT of the crankshaft of the engine. It could be done in various ways, and still use the Bosch alternator. I never did it. I am sorry I never did, because I could have had a low-noise design. I DID do mockups, as you will see a few paragraphs below.
The alternator was changed to the later, early /6, 280 watt, 105 mm type. The battery was a small multi-wet-cell nickel-cadmium type from a corporate jet, in a metal case, located inside a hollowed stock black German Varta battery case.
The exhaust system was simply a modified version of the stock system, with added crossover, and modified muffler innards. It was relatively QUIET! ...but was LONGER than stock, but hardly anyone ever noticed that.... or the faint-appearing extra seam. This was done originally in conjunction with the modified intake system. Later this was again modified. In the photo, the longer exhaust is not installed, as it was, as I remember, installed in 1981.
I made various mockup versions of the supercharger drive. Making a good drive drove me crazy. In the second version, I removed the starter motor, removed the alternator, and actually made an adjustable diameter v-belt pulley that fit in place of the alternator rotor. In fact, I made it from a bad rotor. It did not work well. I came up with how to do it much later, but never did it. The main problem with the early ideas were that I would not be able to get adequate RPM off the crankshaft nose. To this day I am sorry I did not do it, because NOW I know how to make a COMPACT drive that WOULD work off the nose and give proper RPM to the blower.
I ended up having the supercharger replacing the starter motor. It was slightly higher and a tad wider than would fit under the starter cover, so I heli-arc welded higher sides, a bit offset, to the starter cover, then machined that area, and made the cover so the engine looked stock to a reasonable look-see'r. The alternator was reinstalled, and a modified flywheel and ring gear was used to drive the blower. The gears were straight cut, since I could make them myself. Try as I did, shimming, etc., that setup would whine/scream a lot ...REALLY A LOT. I even tried a bronze drive gear with little help. I needed to make a quieter helical flywheel ring gear and drive, but never got around to that massive job; although I started some design and experimental machining work. One problem would be that if I used quieter ring gear teeth, the forces would tend to move the ring gear off the flywheel. I pinned the ring gear though. In the second major revision I ended up using a mill to "drill" the interface of ring gear and flywheel and installing 4 bearing rollers in them, tapering them and mounting each at 90�. I could write a small book on what I tried, what worked, what did not, and how the final supercharger drive ended up. It was quieter, still too noisy, but more reliable, did not get quite enough lubrication (another reason I wanted to have the nose be forward, but never did). Initially I had a lot of trouble with wear on the parts. I consulted with an old-time machinist; who had some interesting ideas. He agreed to help me make the parts, and that is what we ended-up doing. The resulting drive was quieter, & although still quite noticeable, but was less power-robbing. The teeth shape was quite interesting, to say the least, and I was simply fascinated watching him make the parts ....my talents ...at that time ...did not include that type of machine work. He also lightened the flywheel for me, which had been intended all along, so I did not have to do that myself. There is a photo on this website that shows a similarly lightened flywheel: https://bmwmotorcycletech.info/lightened-flywheel.htm
One of the problems with the drive system that my machinist friend came up with was that we had only a very crude way of adjusting the depth of engagement. We discussed that problem and I made an adjustable pair of thin but ridged wedges type mounts were made to adjust the engagement of the blower gear and the 'starter' gear. This was crude, but easily adjusted. He solved the final problem for me, over a beer with him. Lubrication for the gear drive was imperative! ....we made a partially enclosed oil mist system, using the engine BREATHER system! We tufted it, and determined how to mostly keep the mist off the clutch. It took hardly any oil on the ring gear and blower gear to keep it sort-of reasonably lubricated. At one time I had actually contemplated a multiplate wet clutch, and I began experimenting with a design for one; it was a big chore. It amazed me that the drive held up for a lot of miles before I had to overhaul it again and again. In hindsight, MANY of my problems would have been solved by driving the supercharger from the nose of the crank.
The starter, being gone, meant the engine was kick-started. Starting would have been VERY difficult (and WAS, initially!), due to the long atomized fuel path (a lot of condensation of the fuel too!) and very low amount of intake flow 'per kick' ...so a simple fuel injector was modified and installed, hidden, & used ONLY for starting. It operated every time the starter button was depressed (yes, that was what the starter button did, ONLY). That was later removed. The injector was a 1968 VW gasoline car electric injector, the same basic type I ended up using (2) at the intake of the supercharger. In a modification almost no one ever noticed, I installed a later model on-bars choke lever assembly, and put a teeny switch inside it, for the 'electric' choke (that injector for starting). Later, I thought better of this, due to the occasional questions, and put a tiny push button switch on the lower area of the headlight shell, which made it rather hidden. I went back to the other type again, eventually.
Almost no one ever saw this bike as 'heavily modified'. It had saddle bags and the Avon fairing, a voltmeter, and some unobtrusive switches, a few minor bumps on things, longer mufflers. It was noisy though...with the modified mufflers and the supercharger gear whine.
Backtracking a bit again:
The blower, initially, before the injection was installed, sucked air from a modified carburetor, a rather compact carburetor from an industrial engine ....gravity fed from the stock fuel tank. There was a pop-off backfire valve, that doubled as a over-boost release valve, crudely made but effective, in the right side clamshell area, that exited from a hole, that I told people, if they asked, that it was an extra breather outlet. The entire intake system was fully closed, and sealed from the air normally coming from the timing chest/alternator area. It was THIS carburetor that a SINGLE cable from the slightly modified throttle twist grip area, originally operated. This system worked, but had a lot of problems, so I removed it and used the VW electrically operated injectors. The injectors were fed by a very common car fuel pump initially, and later I used a hidden small aircraft electric fuel pump. The electrical signal for the injectors was a small flat industrial type Allen Bradley potentiometer, hidden INSIDE the modified (on a mill) stock-looking throttle assembly at the handlebars. It needed three wires to go to my little control box. As noted well above, I used a very tiny gauge insulated wires, run inside of one of the two original throttle cables outer sheaths...this was the top portion of the original cables, I'd cut the cables. The carburetor cable upper ends ends, not doing anything, were zip tied under the fuel tank. I was pretty proud of the throttle assembly. Only three people ever noticed the slightly funny-looking top cover of the throttle assembly (the potentiometer was relatively flat, but I needed extra clearance), and I managed to convince two of them that I had made my own throttle gear for faster action of the throttle; I told the 3rd person it was the Euro version!
So ...the control rheostat was INSIDE the throttle assembly, and wires from that control went into and down inside one modified original throttle cable outer sheath, inner steel cable being removed. Turning the throttle caused the potentiometer to change its wiper position. I did a lot of experimenting with this method, and it ended up working OK. Due to the simple method of controlling the fuel flow; over some of the throttle range versus RPM, and engine load, the engine could be lean, or rich, or VERY rich, etc. The average initial mileage was very low, and I really had to pay attention to where the next gasoline station was! I figured out a way to minimize the differences, and installed several modifications, the total of which greatly improved throttle response and fuel mileage. The system now never went overly lean. The FI system was relatively crude, but functional.
There were major hassles along the way to obtaining proper idle fuel delivery. I actually tried the butterfly method of the Bing CV carbs, but was unhappy about how it worked. I ended up using a butterfly and shaft from a much larger American car carburetor, and connected it in the intake area of the blower, and controlled it from the one-unused throttle cable initially, and used bypass-air. It was VERY tricky to coordinate the injector potentiometer and that cable-to-butterfly. I fiddled for hours. I finally found a very interesting way of doing it. A final modification was then made to the throttle. I left the potentiometer wires and system, but I put a spring onto the butterfly, and finessed it so that incoming air helped to open/close the butterfly, in stages, depending on rpm. I got the idea from a car carburetor. This worked far better than I had hoped; still, it was crude, and a butterfly acting as throttle plate would have been a wiser choice.
The rear brake looked stock, but had high friction linings, actuating cam modifications too. The suspension looked stock, but the rear shocks were opened, played with, and the front forks rather modified internally, including brazing up a couple of the rod holes, different restriction rings, etc. The front brake was much modified. Notice, in the photo, how stock it looks! That front brake was pretty touchy when cold or damp and you were on the first use in the morning ...but, after initial use it was OK. It was BETTER than the twin Brembo disc brakes of the early 1980's BMW Airheads ...at least until the brake was used so much that it got quite hot.
A fair amount of effort was made to try to get good boost characteristics. There are numerous types of mechanical superchargers, commonly seen are the vane, roots, and centrifugal, and they have differing characteristics. All pull a fair amount of horsepower from the engine, some considerably too much. The type I used was a rather sophisticated modified vane type. It was one of the very first ones ever made that had flexible vanes, and did not have too high a power drain, and it produced boost at a quite reasonable rpm, and had a rather nice boost pressure curve. The vanes were exotic; yes, they flexed to reduce effective blade pitch as rpm rose. I did a lot of work to prevent backfires (which never occurred), as I was sure a backfire would destroy the vanes and maybe pistons; I was sure I could never find another vane assembly. The supercharger had not only cleverly designed vanes, but an even more clever flexible diaphragm, that changed some clearances as rpm rose, to prevent damage and control boost characteristics. Few of these superchargers were sold that had these characteristics, before the company failed. Have fun finding out what/which!
Avon Green Spot race tires were my standard tires during one period of time, as I got a mess of them free. Previously the tires were the old Continental RB2/K112. I wore out rear tires at a prodigious rate if I was showing off what the throttle could do! I finally settled on the M88 Metzeler front and rear; I am sorry Metz discontinued those tires.
I did a lot of experimenting with the clutch. I ended up with a very strong clutch, with a light feel to the lever at the bars. This was NOT done by adding some sort of EZ-clutch pulley arrangement at the transmission lever. I 'borrowed' an idea from a Guzzi, and went a lot further. I made up a DUAL friction discs clutch. All items were modified so as to allow proper fit and operation. It was tricky only in the problem with the length of the transmission input splines. The flywheel had already been lightened, so installing a dual clutch had some constraints, but it worked fine after many initial problems. My friend the machinist had a couple of inputs into the clutch and the input shaft when I got stumped. His advice was surely welcomed. The twin clutch was not totally needed, and I may have wasted a lot of time on the project.
Now, you are probably asking, how about PERFORMANCE?
Well, let us start with the handling. With the improved brakes, modified front and rear shocks and changed springs and valving, and a sturdier top triple clamp, a frame beef-up near both the battery and steering head, and a beefy brace as part of the fender mount, ...the handling and braking was quite decent. The short wheelbase and the frame mounted fairing, made for reasonable handling. I refused to modify to the long wheelbase version (although, as much earlier noted, I had planned to install a Monolever eventually). I had this motorcycle on the Willow Springs Racetrack a couple of times.
Power: YES!! LOTS!! Power came on reasonably quickly, and just kept building. Acceleration through the gears (4) was VERY brisk. The engine idled roughly and noisily (including a modestly loud whine from the blower drive) at about 1300 to a bit higher rpm. Some of this was due to the camshaft. It was what is called a Blower Cam; with long intake duration and had a bit of increased lift ...but the modified rocker arm increased lift the most, there were technical reasons I had done the lift increase that way. I had made an educated guess on what the cam grind should be, and it worked out OK. The bike was probably a bit slower on a jackrabbit take-off unless more than normal RPM was used and since immediate torque and flywheel energy was lower, I slipped the clutch more on takeoffs. But, it was not excessive. I tried to ride the bike normally most of the time. Of course, when the adrenalin and testosterone kicked-in.....the bike would easily wheely without leaning backwards, and the acceleration was fairly intense.
I lucked out pretty good on the throttle feel, because the entire throttle system was crude. Blower drive was a fairly high ratio, which had a goodly effect on the boost characteristics (remember, also, that the blower had a diaphragm and flex vanes). After the rpm crossed about 2800, the boost came in, and it came in very smoothly, until around 3700 rpm, at which it then boosted much faster on a steeply improving curve; this was easily seen with my 'boost gauge'. There was no control to shut off boost; but there was one to increase boost. Remember I mentioned that diaphragm in the blower, it had a mechanical lever operating that, just as I received it. Approaching 5000 engine rpm, the boost rose rather fast. A lever control connected to the side of the blower, with a tricky method of moving the lever. While I could accelerate at a Gentleman's rate, I could also whack the throttle when I wanted-to. I worried, a lot, due to the RPM of the engine that was possible, that could spin the supercharger to much higher than desired rpm AND WAY TOO MUCH OUTPUT PRESSURE......initial thoughts were to use a pressure release valve. That worked pretty good for the output, but did little for the supercharger drive system, which I had many many problems with. I finally solved most of them...NOT all of them.
Performance:
Sitting upright, in normal touring position, with full throttle at about 5000 rpm, the front wheel would rise, and continue to rise to a quite nasty height as the throttle remained open and I would usually back off the throttle quickly. I only took it beyond 7000 a few dozen times, once to 8000. I'd built the engine to be able to be run at a bit over 8000, but was always very concerned as I went over 7000. In order to keep the front wheel on the ground I had to move my butt ...and also lean rather far forward, even against the windshield. If I had weighed more, perhaps less leaning would have been required to maintain control.
The motorcycle was quick for its time, but was rather radical in the motor area, & I had problems with it, particularly its throttle response could be touchy and the top end life was short. The stock 4 speed gearbox was used; although modified a second time after I experienced some breakage problems with my too-radical quick-shifting original modifications. The dyno was showing 74 corrected horsepower at the rear wheel at approximately sea level, when we destroyed the rear tire. I had not even been near my personally imposed red-line rpm at the time. This was on the best premium 102 or 103 octane pump gasoline. This type of power probably meant ~80+ could be available at the flywheel, and I felt it could not safely be maintained ...I was sure the engine would explode/melt-down. This was even though we monitored head temperatures. Full throttle runs that lasted any period of time were not performed; none were done that lasted over maybe 8 or 10 seconds. I did enough runs to make sure that the engine would run on the rich side of peak power, no matter what rpm and throttle position. This ended up being very tricky to get correct. I felt that wasting LOTS! of fuel to keep the piston and head cooler was the safest thing to do. It had only a small effect on power, but likely a lot of effect on not encouraging melt-downs!
There was never a serious mechanical problem (except with the original transmission mods), in normal (yes, even very spirited!) riding. One of my earliest rocker arms broke, and VERY luckily that did no serious damage. Problems, little ones mostly, did occur, and these, such as oil leaks, were fixed, although I could NEVER fix leaks permanently at the cylinder bases ...the power was too great for the cases and cylinders, even considering the oversize studs, etc. The method of a large O-ring that BMW introduced much later might have helped to solve that problem, but maybe not, because I think the leaks occurred at the stud threads area and from 'walking'. I suspect that too much power would always overcome the BMW case design and would always let the cylinders 'walk' some.
The was bike ridden a fair amount. I toured with my wife Jean, see photo, numerous times. NOT ONE PERSON ever noticed that it was supercharged. A few asked about the gear drive whine. If anyone mentioned the whine, I'd give a variety of answers. One (besides other's I've mentioned) was to point to the odometer, and say it really REALLY needed a new set of timing sprockets and chain.
The use of the sort of power available, even at part throttle at reasonable (?) speeds, was VERY hard on the exhaust valves. The heads were removed at around 8000 mile intervals, and a valve job done. On one such occasion I found a broken top ring. I had other bikes in the garage, so I did not have to ride this one all the time ...but, surely did love riding it. The intake valves, surprisingly, also had wear problems.
For motor oil I used Castrol R, 40 SAE, just because I liked the smell and had used it in my Norton Manx's ...and, truth is, it was, then, an "OK" lubricant.
The oiling system had been modified a lot, and pressure was also increased over stock. I don't remember the maximum, it was considerably higher than stock as I had modified the pickup and pump and the over-pressure valve (which sits above the crankshaft sprocket at the front of the engine).
Supercharger Boost, high: ~14 pounds at ~6300 rpm. It could go higher if rpm was increased. If the pressure relief valve was adjusted to stay closed, the boost might have been able to go to 20 psi...I was totally unwilling to try that. I once set the vane control for maximum output, and the power increase was not measured, but sure felt!
Boost, low: ~3 psi at about 3200 rpm. WOT. At various times I had as much as 5 psi or tad more, at lower rpm....depending on what I was playing with.
Boost calculations were normalized to 15 psi atmospheric, thus boost pressures noted are REAL, and above absolute atmospheric.
Air intake temperature was too damned high, so I did various things, was still high ...but not as bad. Gasoline was cheap, so I ran engine rich, which helps with cooling.
Top speed: unknown. I am sure it would hit redline in 4th with a 2.91 rear end.
Drag strip: never had it on one.
Wheelies: no problem.
Present location: I'd love to know!
How to identify from a stock /5 toaster if you see it? While many things may have been changed, perhaps removal of the speaker, some things would give it away instantly:Addendum....here I will add some things I did, or tried and rejected, at various times, etc.
I no longer have the blueprints, most sketches, nor photos of the drives, ETC. Most went with the new owner. The first flywheel drive was simply (well, more or less) a modified ring gear on the flywheel. The flywheel was lightened as much as possible, photos of similar lightening, but not with the special ring gear, are in an article on this website. The flywheel was lightened because the supercharger drive added so much reverse direction inertia, and without lightening, shifting would have been rather slowed, not to mention the back-torque wear possible. As it was, when the throttle was turned off, or backed up some, the supercharger inertia was quite noticeable, and my riding habits had to accommodate this...although I had ideas on how to reduce the effect, but did only a few things. Besides the supercharger inertia, which I had intended to help solve with a tiny little homemade clutch;...there was a problem that I had not thought of originally, that darn near got me and the bike into a lot of trouble. The inertia and the compression in the combustion chamber works on braking too! Thus, when backing off the throttle, it is like adding very sudden brake to the rear wheel from the engine and the blower. This could cause fun if the throttle was suddenly backed off, particularly at some decent rpm, and BAD if in a turn. The effect would be similar to someone using rear brake and then, in a panic, backing off the rear brake; or, hitting the rear brake in a turn. I had done some design work on paper, to try to use a one-way clutch on the supercharger drive, but never did much with the idea. I had, twice, modified the transmission for easier shifting (particularly in widening the slots and changing the side angle entry in the dog gears). Some of this was mentioned earlier in the article. I had failures in the early versions, I made some parts too thin.
The simplest possible gear fitment was done, by shimming the bottom of the supercharger, for both height and tilt, by thin brass stock, instead of wedges, in the very last version before I sold the bike. Due to fast wear on the drive, a quite light oil MIST spray was added to the breather method I described, made of sheet metal so the drive gears were always slightly lubricated. The underside of the engine was always a mess. The actual lubrication was improved by a single small ‘flag’ on the flywheel, that dipped into the small reservoir initially, but that was WAY too much oil, so I found out that just being near the oil was enough. It was quite simple, did not leak oil from spray either. The oil level was tricky, so I finally installed another baffle. I had no clutch problems.
This was my last extensively hopped-up motorcycle. All other motorcycles I owned, if modified, were only modestly changed, things like oversized alternators, dual-plugging, CR increased, muffler mods, etc. I did do a big modification job on my 1949 Ford and my 1968 Dodge Power Wagon (with a huge supercharged engine), but those are other stories. The 1949 Ford was my first supercharged engine, and there are several photos of the engine on this website (and, ME, at such a young age!). My first motorcycle, a 500cc BSA I modified some, for running on methanol. There is a photo of it on this website.
rev:
10/14/2012: Add QR code, add language button, update Google Ad-Sense code.
04/11/2013: Add addendum and do a preliminary go-through of the article, to clarify and add details.
04/16/2013: Update details....and more in October.
03/30/2016: Update meta codes, clarify some details, improve layout, found some old figures and edited prior guesses, etc. A bit more, 08/2016.
11/20/1016: Fix metas, scripts, layout, excessive html.
04/27/2018: Clean up article. Reduce excessive HTML even more; clean up layout. Improve commentary, including fixing errors, found such when looking at my old binder notes.
01/27/2023: Clean up. Clear up some contradictions, some order of mods I had put down wrongly, etc.
� Copyright 2023, R. Fleischer
Return to Technical Articles LIST Page
Last check/edit: Thursday, August 17, 2023