
|
|
Wheel spokes lacing & alignment of hub & rim
https://bmwmotorcycletech.info/section2A.htm
section 54, subsection 2A
� Copyright 2020, R. Fleischer
BMW rear rims (and some fronts) are NOT usually centered, with respect to the hubs. You may want to think of this as BMW rim centers are centered with respect to the bearings. This is usually of some interest to know if you are re-spoking, but is also not 100% true. The WIRE SPOKE wheels can have the offset adjusted, by how the spokes are installed. The offset amount is NOT the same for all models, nor same for front and rear.
Nerdy, but occasionally you really do need to know:
(1) There may be a difference (usually small) in the offset on the Snowflake and other cast wheels, even between similar looking front and similar looking rear wheels.
(2) For all wheels, spoked and cast, the rim width is also a factor.
This article deals with the WIRE SPOKED wheels; but there is information on this website about the rear cast wheels, and how there are some typically not-noticed differences between fitment, due to offset and casting knobs, between drum brake and disc brake rear wheels, even if they seem to look the same at first glance (especially if still mounted to the motorcycle). The more pertinent information is this:
A drum brake model rear drive fits with little effort, onto a disc brake model bike. Note that later drum brakes shoes are narrower. A very early snowflake disc brake rear wheel has casting nubs in the large dished right side, and those nubs must be ground off if you are fitting such a wheel to a rear drive that is of later construction. If you do not remove the large nubs, the wheel will freeze against the bolts holding the drive cover. Grind the nubs off, and smooth the area to avoid stress cracks. The OFFSET is slightly different, which you may or may not notice. Any problem is easily dealt with, in this regard, by a simple installation of a large washer on the left side of the wheel. A bit more, one paragraph about these wheels, is further down this article, beginning with ****.
Replacing a hub on a drum brake wheel? You may want to know this, in advance!
Wheel HUBS as supplied by the BMW parts department are NOT FINISHED. Their inside diameter is slightly smaller than it needs to be. This is done as the installation of the spokes & their tightening will distort the hub a small amount. When the wheel has its spokes properly installed/tightened, the inside diameter of the hub is to be axle-center mounted on a lathe & the diameter turned to 200 mm. BMW gives a +0.185 mm tolerance (7.874 + 0.007 inches). This corrects the spokes installation distortion effects. The MAXIMUM permitted brake surface run-out compared to the hub is 0.02 mm (0.0008"). It takes a very large size lathe. In some instances you may be able to do a spokes job yourself & not need the drum turned. If the run-out is excessive, you will have a pulsating brake.
BMW has gauges/tools available to measure (and allow you to set) the offset of the spoked wheels. You do have to use the tool, unless you have other means (and specific measurement values). This article will give you those values and also show you how to do the job without the tool!
The R50/5 to the R75/5 and the R60/6, had 1.85" width front wheels, and the offset was 10 mm; while the 1.85" width rear wheel had an offset of 6.5 mm and the 2.15" width rear wheel had a 6.5 to 7.0 mm offset. The rest of the models, at least into the /7 series, had front rims of 1.85" and the offset was 5.5 to 6 mm; rear rims were 2.15", offset 6.5 to 7 mm.
There is a bit more to all this for the EARLY /5 bikes. When BMW changed from the 1.85" rear rim width to the 2.15" rear rim width, some motorcycles would have rubbing between the tire and swing arm, and this would typically show up at speed, where the tire expansion (in WIDTH) caused the problem. BMW decided to OFFSET the rear hub, and this was done on the later /5 bikes, by aligning the spokes, so the hub was moved 1.5 mm to the LEFT.
BMW did the same thing to the R80ST, but the movement was 3.0 mm, and it was done only to the 2.5" width rims.
https://bmwmotorcycletech.info/wheel-offset.pdf Be sure to scan down that page, to see the sketch, not just the charted offsets. Obviously, you can either use the BMW tool for your model/year ...or ...make a tool, ...or not even use any tool but a vernier caliper or even something just to maintain straightness and proper offset.
****When BMW began installing the Snowflake wheels, the snowflake drum and disc brake models had wheels that were different from each other. Just one difference of several, was that the rear disc brake snowflake models had the 2.75" width rims, the drum brake rear wheel versions had 2.50" width rims. The snowflake wheels for the end of the seventies, may, at first glance, look identical to the ones from the early eighties, but there ARE differences. One important difference is that the dish side (right side) of the REAR wheel on the early Snowflakes, those of the seventies, have rather large casting nubs that will interfere with the later rear drive bolts. The offset is also SLIGHTLY different. For practical purposes, the nubs can be removed, and the wheels interchanged, possibly needing one added washer on the left side, outboard. I have done this quite a few times. If you grind/sand off the nubs, be sure what remains is smooth, so you don't leave stress areas.
If you think about all these things a bit, you will understand that the front and rear wheels tire area centerline (that is, the tires tracking) may also be offset, front to rear ...for any BMW motorcycle, and also remember that BMW rim centers are centered with respect to the bearings. This is USUALLY only important to know if you are re-spoking. Some are a bit different, but not by a lot.
Are you thinking about doing anything close to a total change of spokes and nipples yourself, instead of farming it out to such as Buchanan's? Then, you need more information, see below! You CAN do spoke work yourself. It will sound intimidating as you read it ....but once you read the procedure through, then start and follow directions, things become clear and understandable. The below articles, and my comments and the photo and the pdf wheel offset hyperlink well below, are all that you will probably need. I recommend use of the factory wheel alignment gauge tool, but it is NOT mandatory. It is helpful to read all the linked articles.
The late GS wheels have the spokes fastened to the rim OUTSIDE the tire area. They are a bit different, but the information in this article will help. The late ones are easier to work on!!
References:
http://agwalker.com/wheelbuilding.html
http://w6rec.com/ There is an article on spokes/re-spoking on that site.
https://bmwmotorcycletech.info/wheel-spokes.htm That is my article 54-2B.
https://bmwmotorcycletech.info/lacing-truing-spoked-wheels.pdf
Go about this work slowly, carefully. YOU CAN DO IT!
I strongly recommend you read this linked article ENTIRELY: https://bmwmotorcycletech.info/wheels.htm
Spokes CAN touch, but I usually manage to get them rather equal side-to-side, and not touching.
If you are replacing just a spoke or only a few, you simply remove the tire and tube (not so the GS with outside spokes), replace the spokes, tighten to a reasonable amount of torque and adjust so the spokes when struck by a plastic handle of a moderate size screwdrivers will have the same sound, and then check that the wheel is round and not wobbling, which is very easy to do, if a bit time-consuming to adjust to perfect.
There are TWO planes to check the wheel in. You do NOT have to have a jig. You can do it with the stock axle and a vice with wood placed in the jaws to protect the axle ends. Naturally a wheel truing stand is nicer ....PARTICULARLY if you are completely re-lacing a wheel.
When completely done, you grind down any sharp spokes proud of the nipples inside the rim ...leaving NOTHING proud of the rim nipple surface. Reinstall the rim rubber band (or other protective, non-adhesive bleeding material). When done, remount tube/tire, and then RECHECK the spokes ...a minor adjustment may be needed. The wheel MUST run true, spokes sound the same.
The Factory Manual for the old spoke wheels says the following things (for the illustrated REAR drum brake wheel, see below photo), which I have placed within quote marks:
"Position the rim in such a way that the stamp mark on the inside of the rim flange is on the brake drum side and the arrow is facing in the normal direction of rotation. The pressed-in nipple locating the holes must point exactly in the direction of the spokes inserted in the hub. The higher spoke must coincide with a higher locating hole in the rim and the lower spoke must line up with a correspondingly lower locating hole in the rim. The other spokes are inserted and fitted with nipples in the same way. Tighten the nipples to a uniform torque reading."
It is possible to use a torque wrench with a spoke wrench. A problem is if the spoke threads and nipple threads are such that the torque varies highly for the actual working torque. I do them all by hand, and looking for equal spoke sound by hitting each spoke with a plastic screwdriver handle. Once I get the wheel laced, and am starting to snug up the spokes, but not nearly to final tune, I am doing the tightening by sound by plastic tool hitting the spokes, a plastic handle of a medium-sized screwdriver works very well for this. This continues until the job is done. It takes a bit of experience to know just how high the pitch sound is supposed to be. The spokes, when struck by a plastic handle, must NOT sound dull.
BMW says to "Place rim and hub without knockout spindle in BMW jig No. 36 3 600". However this is nothing but a sort-of balancing stand.
BMW says "Adjust distance from rim to hub using a spoke fitting gauge positioned on the brake drum side. "
The BMW rim is not exactly centered on the center of the hub as has been described several times earlier in this article. Even the cast spoke wheels like the Snowflake wheels have an offset. Repeating, again!: BMW rim centers are centered with respect to the bearings. This is USUALLY only important to know if you are re-spoking.
Although I have used them, long ago, I don't own the factory wheel gauge tools.
I improvise on the brake drum models, front or rear.
On the disc front models, I equalize with shims on the workbench (wheel laying flat), and try to get the rim centered to start with.
Below is a photo showing the factory tool being used:
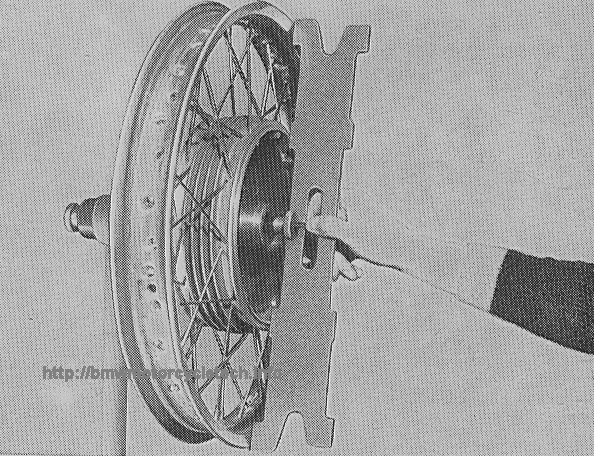
https://bmwmotorcycletech.info/wheel-offset.pdf. Note that offset is for drum brakes. Be sure to scan down that page, to see the sketch.
Note that you could do all this work without anything more than a vernier caliper or a flat surface to measure from! You do NOT need BMW's illustrated tool, although you could make one.DETAILS, Details, Details:
It will be assumed here that you probably have the wheel in front of you, the spokes have NOT been all removed yet, and you have either made a tool like the above one, or have done something that allows you to measure and set the wheel offset distance. I do recommend having your wheel checked, when you are done, at a friendly dealership that has the correct gauge, as no telling (??) if your wheels were OK to begin with. However, the sketch/chart has enough information for DIY. The dealership may NOT have the tool-gauges.
Look VERY carefully at your existing wheel. Notice the angle of the spokes as fastened to the rim, how the spokes cross over and go side to side, etc. If need be, take numerous close-up photos! I recommend photos and measurements. Your wheel may not be as delivered from the factory. Photos are available of correct spoke layouts.
Clean the wheel rim and hub and remove the spokes. You can always leave, temporarily, a few spokes in one section, that you can follow when replacing the spokes, then clean and replace those you had left. You may have to use bolt cutters near the hub. The old threaded end of the spokes (and nipples) can be made into spark plug shorting tools for synchronizing your carburetors. If your spokes and nipples are quite old, you probably should consider getting all new parts. BE SURE to get the correct parts. Typically there are 40 spokes & 40 nipples. See the referenced article https://bmwmotorcycletech.info/wheel-spokes.htm. If going to oversize items, be sure you install items that will properly fit.
If you intend to use stainless steel spokes & nipples, get the proper wrench for them (you need a spoke wrench in any case ...DO NOT use any other type of wrench. www.buchananspokes.net has 3.5 & 4.0 mm spokes & nipples to match them. You might have to ream the rim holes a wee bit. Buchanan's has spoke thread oil, or you can use a teeny bit of antiseize compound on the nipples/threads.
It is critical that the rim be VERY WELL cleaned! If the holes are cracked, it is time for a careful look-see and then consultation with a wheel specialist.
Front disc hubs in two pieces? You will have to bolt them together using washers in order to do lacing. Have them fairly tight.
Put the hub on your big workbench, left side UP (brake drum side is DOWN). Note the rim directional arrow near the valve stem area. Position the rim so that the stamp mark on the inside of the rim flange ...brake drum side ...arrow faces normal direction of travel. The rim direction and the brake drum direction must match.
The pressed-in nipple locating holes must point exactly in the direction of the spokes inserted. The higher spoke coincides with the higher locating rim hole, the lower with the lower. Each rim spoke hole has a crease mark ...which is to match the crease in the nipple. That is the means to 'lock' the spoke; and the locking procedure is a bit later in this procedure. Do 10 spokes, lower row of holes, upper hub side; all facing the same direction. Do one nipple at a time ...a few threads ...but same number. Now do 10 spokes into the upper row, upper hub side, and do the nipples the same.
With 20 now done on the left side, turn over the wheel assembly and do the right side 20 spokes. Always have the crease matching the corresponding crease.
You can now start, evenly, slowly, tensioning the nipples. Keep concentricity, do a few threads at a time on each spoke, all around. You can now mount the rim in a truing stand or via its bearings and axle into your wood jawed vice, etc.
HOWEVER, ....FIRST, ....with a small modest amount of tension on all spokes, ...you need to seat every spoke head in the hub. You do this with a hammer and a large flat punch ....a quite goodly whack on every single one, AND ONLY in the spoke direction. This will seat the spoke crease/locking rib into the hub crease. Slightly tighten any spokes being loosened by this process.Now you are ready to do truing, watching offset, wheel wobble, wheel run-out, etc.
Note, as I have mentioned many times in this article, that BMW rim centers are centered with respect to the bearings.
As I tighten up the spokes near to final value, I use a dial indicator to be sure the rim has no run-out wobble in either direction. You do NOT have to have a dial indicator. A pencil or other pointer, mounted in a way that the sharp tip is close to the rim side edge, and repeated at outer edge, is all that is needed, as you rotate the wheel on its axle. If you go slowly & carefully, you can get both types of run-out to less than 1/32" with just your eyeball.
When you are all done, consider setting the wheel aside, maybe first in the sun and then in a cool garage; and, recheck the tension by listening to the sound when a spoke is struck with the plastic hammer handle. Recheck run-outs the next day.
When stable and correct, you next must check all the spokes for any threads protruding into the inside of the nipple (into the tire tube area). GRIND ANY PROTRUSIONS OFF, and do it carefully, slowly, and make the end very smooth and flush!!
Install TWO layers of some sort of "rim tape", center well area only. Avoid tapes that will bleed adhesives. Cut the valve stem hole with a sharp knife or whatever. You could do a neat job with a ball peen hammer with the ball end in the valve hole pushing on the tape, then another hammer striking that hammer, to cut the tape. DO NOT use common duct tape for the rim tape, it makes a sticky mess eventually. Use RIM TAPE, or movie industry Gaffer's tape; OR, use specialty rim tapes made of materials other than the more common rubber types.
Congratulations!...you did it, and it will be a LOT easier if you do another, EH?
Too much for you?? Buchanan's will do it; so will Woodys Wheel Works, ETC.
Wheel weights: http://www.buchananspokes.com/categories/miscellaneous_tools.asp
Rev:
01/11/2012: Add considerable amount of information, as prior to this date, the article
was quite preliminary.
10/14/2012: Add QR code, add language button, update Google Ad-Sense code; edit article for
clarity and layout.
Sometime in 2013, remove language button due to scripting problems.
04/06/2013: Add hyperlink to pdf file on wheel offset.
08/20/2015: Change ID to section 2A from 2, as am adding a 2B today.
03/23/2016: Update metacodes; layout, fonts, colors, etc.
10/24/2016: Metas, scripts, layout, clarity of both section titles and content.
04/13/2018: Reduce excessive HTML, colors, fonts. Improve layout. Add 10pxl margins. Slight improvements in explanations.
� Copyright 2020, R. Fleischer
Return to Technical Articles LIST Page
Last check/edit: Monday, December 07, 2020