|
|
The ads above are Google-sponsored.
Clicking on them at every visit helps support this website!
Clicking on something INSIDE an advertisement helps even more!!
Luggage, Tank Bags, Windshields, Mirrors, Instruments, etc.
Locks & Keys (except fuel caps). Noisy fairing vibration
at the upper dash. Some of the locks/keys information
is also for K bikes. Maximum speedometer calibration errors.
>>>For information on fuel caps and their locks, see article 1B.<<<
� Copyright 2023, R. Fleischer
https://bmwmotorcycletech.info/locks-caps-etc.htm KEY LOCKS, late models, information on removing and replacing the locks: KEY LOCKS, all the rest:
75A
If the lock is frozen-up, due to below freezing weather, and you suspect moisture got into the lock, you can use common antifreeze, of the type used in water-cooled engines. I suggest using full strenght, undiluted. That will usually free up the lock very quickly. Use some heat if need be. If the problem will be repetitive, I'd just leave the antifreeze in the lock. Otherwise, I'd flush it out, and then use WD40 or similar, copiously. A week or three later, I'd suggest using a silicone fluid, copiously. I do NOT recommend graphite for key locks used on motorcycles. I suspect a locksmith might not like my suggestions.
1. Steering head locks (Airheads):
These are not easy to remove, if they were, there would not be much need for a steering head lock! To remove a steering head lock, remove the swinging plate by prying the pin out. The next step depends on whether or not you have a proper working key. If you do, insert it, and turn the key a bit towards the LEFT. The lock should then come out. If you have a broken key in the lock, and you have not been able to pry it out; OR, you do not have a key and do not wish to engage the services of a locksmith, then you must drill the lock. Drill the lock with a 10 mm drill, or start with a 3/8" drill, a/r ...be sure to use a powerful vacuum cleaner to suck out what shavings you can as you drill. Clean carefully to avoid metal getting into the lower steering bearing. Do best as you can with taking out old parts and cleaning. I usually advise that if you want a new lock, it is best changed when the steering head bearings are being serviced. To Install the NEW lock you MUST have the key installed, it all simply snaps in place. Replace the cover and pin.
2. http://w6rec.com/
A LOT of information and pictures of the keys. Use his SEARCH function for KEYS. There is also info on Krauser luggage. MORE on Krauser keys much later in this article.
More photos: www.motokeys.com same as: http://motokeys.ecrater.com/ Owned by Eric Johnson, a fellow Airhead rider.
Many other places have keys, but usually only a few original numbers, but keys can be duplicated.
A source for some numbered luggage keys: Larry Stonestreet, dba Stoner's Beemer Stash [email protected] or (951) 813-1704 8:00 a.m. to 6 p.m. PST.
https://www.motobins.co.uk/ keys
See below in this article, several places, for more key sources. Don't forget that BMW Dealerships also have Neiman steel key blanks available.
http://users.pandora.be/tups/index.htm Some locks reference materials
For Craven equipment: https://bmwmotorcycletech.info/references.htm under L for Luggage.
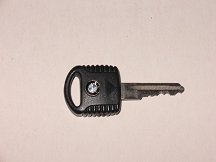
The two "keys" below are exclusive for the ignition/lights on /5 Airheads. There is no coding.
 |
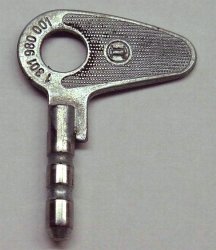 |
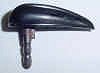
| /5 normal use key | /5 key-ring key. Still available; and, in Stainless Steel from Repro-works. |
3. Key blanks:
This section #3 applies to all the keys (Except the old cable lock and the flat latch luggage). Krauser keys are different on some versions; two I know of, but, see references later on this page regarding the flat latches on the luggage. See also above references in 2. See information on Krauser bags, later in this article.
Also ...see my https://bmwmotorcycletech.info/references.htm page; scan down to L for Luggage.
Here is a URL that shows how to make your own key! It is an abbreviated version of what used to be on that site, but the page URL was changed, and this is what is left. Still, it may be useful to you, and it specifically does cover motorcycle keys:
http://www.thisoldtractor.com/moto_guzzi_loopframe_keys_for_tool_boxes_and_fork_lock.html
Here is a website with some 'information', if you can understand it, on how the keys are cut, versus the coding numbers:
http://www.stephenbottcher.net/BMW/keys.htm
http://www.motorcyclekeys.com Generally, this is for the more conventional looking keys.
Original coded keys are orderable, already cut, from your dealer, for such as the ignition. You need the code that came with the keys with your new bike. These codes were usually on a flexible plastic tag that came with the original key.
To duplicate a key from an existing key, you need the correct blank, and you will need to find a locksmith willing to cut the key. Genuine BMW keys are steel, they are not nickel plated brass. You may well find that your BMW dealer will cut the keys. Many locksmiths will not cut steel keys.
When using BMW type numbers, do NOT use hyphens NOR blank spaces when entering BMW numbers into the various websites. Some websites will work ok with blank spaces though. The common Key Blanks from BMW are Neiman brand, and they are NOT plated brass. If you held the side of the round end against a grinding wheel, it would cut into steel, AND, the key is STRONGLY MAGNETIC. I don't care who says they are brass. They ARE NOT. AFAIK, NO type of brass is magnetic. |
51-25-1-243-275 folding key was replaced by 51-25-2-301-763 a long time ago, and both are NLA; but you MIGHT find some at an old dealership. You will possibly find it difficult to use some of the various dealer websites to find out if they have them.
Sometimes BMW supersedes a part number numerous times. I have even seen them go BACK to an earlier part number. There are also reproductions sometimes being made.
Folding keys come apart by pushing the "axle" or hinge pin out of the key head. This information can be helpful, because some otherwise-cooperative key cutters in your area may balk at copying your key just because the floppy head restricts it from fitting in the slots of their automatic machines.
|
Cloisonne insert roundel, folding type, |
|
Earlier folding type. NOTE the round hole and roundel is stamped into the plastic. NLA as blanks? |
|
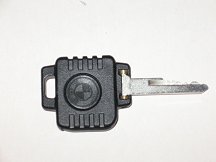
K-bike key with push-button lamp. Large. Folding. A blank of this type can be cut & will fit Airheads! Illuminated key blank 51-21-2-315-250 , as well as the illuminated coded key, 51-21-2-315-252, are no longer available. |
BMW genuine steel key blanks made by Neiman are by far the best. The following are other makes of 'usable' key blanks: ilco SR61N (brass, NOT STEEL like BMW keys); Euro style JMA-NE-7 (there is also a JMA NE-8 that is somewhat similar to the BMW 90� blank); B69F; Volvo V77; Volvo V07. ilco's V06 can be made to work. Other usable blanks are numbers RT15 as on Renault and Silca NE 5, Curtis MC44. UNCONFIRMED: |
Airhead key blanks & Classic K bike key blanks interchange, either type can be cut by a locksmith or your BMW dealer, & will work perfectly. On this large folding key, see photo to the left, the plastic body is more or less square, is thicker, the key ring hole is a somewhat flatter D, & the relatively large BMW roundel (not quite the size of a dime) is in black key plastic. This key is a PUSH Button type, that operates a tiny incandescent lamp, from an internal battery. This type was often seen seen on K bikes. This particular key can not (?) be used in the folded 90� position on pod instrument Airheads (not sure about R45/65/ST/GS ones though), as the pod will possibly contact the key plastic when the key is folded. |
There are 90 degree (solid, non-folding) keys also, that were furnished by BMW. There are many sources for BMW keys; first choice should be your independent BMW service center and/or your BMW motorcycle dealership. https://www.motobins.co.uk/ also has keys.
4. The BMW tour bags with the flat locks can be converted to the tubular style locks ...a riveting job (pun intended), but care must be taken to align the rear bag lock, to be sure it will actually latch onto the bag mount properly.
Saddle bags loose? Vibrate? Locks sloppy? Worried about losing a bag while traveling? ....read on:
Luggage problems are common. Once in a while, a rear flat style latch will get worn enough to break, leaving your bag all over the highway, and you may not notice the bag disappeared from the bike. FLAT latches means, here, the type that has a rather flat handle, and there is a small flip lever to allow the luggage-type-looking-key to be inserted. Those that venture off-road, in particular, should be conscious of this possibility. Some of us put Bungy-Buddies on the rear of our bags, and bungee one bag to the other (some do it to the rear, even tops, of the lids). The bungee(s) go between the two bags. Other folks use a variety of straps ....even ropes! ...between the bags ....or on individual bags around that bag's mounting frame. The standard bag frames have some round holes in them. Bag vibration wears the rear latch. Wear is worse if the bag is very heavily loaded. If the front of the bag fits too loosely, build up the frame tubing with a few layers of tape. Same can be done for the rear, for the flat latch. There are numerous types of metal frames to which you affix the bags. Some of these frames have a hole at the left and right top areas (where an angular flat brace is welded), and you will find that the standard black rubber timing plug will fit and help with vibration/looseness. There is a great tendency for folks to overload the bags, far beyond their rating, and that gives a lot of extra inertia over bumps, etc. That inertia can cause problems. It is possible for the bag frame to bend a bit in rough going, and with a worn rear latch, and a goodly bump, the bag can depart. I won't take the chance, and my saddlebags are always secured, either by straps or Bungee Buddies and bungee cords. I've never had a bag depart from one of my rides, and that includes some worn rear latches and some 'flying' over Alaskan frost-heaves. Extra weight in the bags tends to be hard on the bag frames, and they can crack, often near the front lower mounting. The worst of the bag frames is the simplest one with NO lower front mounting. I suggest beefing them up. I add gussets to all bag frames if they are not present.
NOTE! The TourBag and some Krauser's use the same BMW style FLAT latch at the REAR, with only the early BMW TourBag having flat latches of that SAME type on top for the lid. Keys, etc., are treated much earlier in this article.
The flat latches are replaceable by the later, better, tubular latches, although the TOP TWO flat ones don't fail all that often, like the rear (and vastly more important one) do. KEYING to match, is possible, as the tubular latches come without key locks, you purchase them separately, and with some clever playing, you can match your key. I had one bag that had the original flat top latches and one rear tubular. No one noticed the disparity. Roughly or vigorously snapping the latches closed (especially the rear centered flat latch) tends to wear the latch prongs ...which is where they break and let the bag go flying down the road. The tubular later latches are stronger in this respect.
I have done a few rear latch changes for myself ...and for customer's bikes ...which had the rear flat latch. I installed the tubular rear latch, and I have found that the tubular latches are not always a perfect fit to the original rivet holes. If you decide to replace your poor or bad rear flat latch with the tubular type, make sure your new latch matches the rivet holes when the latch is shut, fully clamped that is, on the frame ...and make it match, if that is needed. Otherwise what happens is that you rivet the new tubular latch to the existing holes, and the new tubular latch needs to be overly tightly forced to close all the way. I found this out on the first one I did, and had to drill out the rivets and move the hole centering a tiny amount. Bag keys are coded, and the flat latches have the same code on them someplace. Open the latch and the number may be stamped into the side, etc. The later tubular style lock (that tubular portion is the handle, so-to-speak) are better, and also use a standard-looking type of key, and not a stamped-out 'luggage' type key.
There is a rubber insert on the original latches, there is no part number. The rubber tends to deteriorate over the years, even get lost. The rubber part can help at a latch, but if the latch is worn considerably ...you can have a problem. But ...the rubber will tighten things up considerably, if you make the rubber part out of reasonably dense material. I use to use the rubber from common rubber mats as used on gym floors, using a very tough 'glue' ....the same glue as for engine labels (and I use it at fairing bellows on RT's too) which is 3M Super Weatherstrip Adhesive. Yellow Gorilla Snot is how we Wrenches slangly called that stuff. Black if you want it, is now available, not sure how commonly. Clean surfaces and apply EXACTLY per the tube. If the latch fingers are really well worn, they can bust, and you become a loser, in both meanings of that word. Use bungees or flat belt, etc.
As noted, the old flat tour bag latches (and rack clamping flat latch on some Krauser's) wear out, especially from 'snapping' the latches closed. IT IS possible to mix and match various flat latch parts ...and the secret to disassembly, when needed, is to drill out the rivets.
For old Krauser and Craven parts, etc, see under L for LUGGAGE, here:
https://bmwmotorcycletech.info/references.htm
Here is a small excerpt from that L area (this excerpt may not be up-to-date, so see the References article):
For OLD Krauser parts: Michael Krauser GmbH; 86415 Mering-kornblumenring 12 Tel 08233-1461 Fax 08233-1445
[email protected] (Michael Krauser GmbH). Krauser is now owned by Hepco and Becker and they still make the classic Krauser panniers. They now have Hepco Quick Release Locks. One CAN remove the Hepco badge and use a BMW badge. Krauser can still supply the old keys, particularly the S-150 that may be difficult to find. $$.
NOTE: S-342 key should be the same as #342 "old Royal Luggage key"....you can find on the Internet.
There is a How-To article, where someone replaces bad Krauser luggage locks with hardware store items, you will have to search for it: https://www.vintagebmw.org/. Key numbers apply to the BMW flat latches and one system of the Krauser top latches and Krauser BMW-style flat rear latch. SEE #5, just below!!
Here are three pannier lock cylinder videos, at least two are same, on how to remove/install the later type of key locks:
https://www.youtube.com/watch?v=D31uN7n9GP0
https://www.youtube.com/watch?v=BM_PmQUpceg
https://www.youtube.com/watch?v=mFoke2TS1O8
5. The cheap-looking 'luggage' style keys used on the Krauser top latches and the flat BMW style Krauser rear latch, and the BMW Tour Bag flat latches, top and rear, are special. Very difficult to get from a U.S. locksmith. These keys are made in TWO GENERAL styles, with the ground-down flat area on opposite sides being the major difference. Another differences between them MAY, in some instances, be the style and side with the groove. The locks themselves have a part number on them, and that number corresponds to the stamped number on the keys. There are TWO systems of key markings and locks markings for Krauser locks. The TOP locking latches may have a stamped number such as S150 or 505, etc., on the top. That number applies if the SECOND number does NOT appear. The second number on those top two Krauser locking latches is on the OUTside, the side FACING you as you look at the bag from the side. It is stamped, in very small letters. You may have to open the bag and latch and use a flashlight to see them. The stamped number is a similar number as with the BMW Tour Bags, below. One version of Krauser bags have a REAR latch that is the same as the BMW flat latch, on the Krauser it holds the bag to the bag frame. The numbers are as follows for the BMW tour bag latches:
On the BMW tour bags with the flat latches, the key number is found stamped someplace on the latch after opening the latch. That number could be something like 050; 051; 065, etc. SOME keys are still available by special order from your BMW dealer ...and some may well be still in dealer stock, you will have to contact a few different dealers, such as your local favorite dealer, and I can also recommend REPSYCLE and Bob's BMW. Try Stoner's Beemer Stash [email protected] 951-813-1704, 8a-6 p PST.
Here are friendly and helpful locksmiths, Trudy & Alex & their white dog Maggie:
They have quite a collection of the 3-digit coded keys for various BMW item locks, even have a ring of masters to attempt to make copies of any that they do not have a supply of. Lots of vintage keys, knowledge, etc. Key Kraft 1585 Church Street at 28th Street; San Francisco, CA 94131 (415) 285-0134 Open Monday through Friday 9:30 a.m. to 6 p.m.
Doing a search, you MAY find the S150 key shown as obsolete BMW number 46-54-1-237-764. You can ask old-time dealers for keys. Available from Krauser in Germany, $$$. See much earlier in this article or under L for luggage in my references article: https://bmwmotorcycletech.info/references.htm
BMW does not stock, nor have available, all the various old keys. Keys in BMW stock will likely not be made again for BMW. You may have to purchase new lock assemblies. Interestingly, during my obtaining information on some old superseded number keys, I found that MANY of these keys ARE AVAILABLE from dealerships, for special order; and, many old dealerships have assortments of keys. Get the lock number off your lock, or key, and see your dealership.
BMW has superseded the earliest part numbers a couple of times. ALL are listed below, as are a couple of photos of the types of keys.
NOTE!......AT LEAST FOR 42 AND 042, THE KEYS MAY NOT BE IDENTICAL. IT IS POSSIBLE THIS SITUATION EXTENSIVELY EXISTS, SO BE CAUTIOUS!
|
Key Number |
New number |
OLD flat style numbers |
|
39 |
039 |
unconfirmed as key 39: |
|
40 |
040 |
71-60-1-467-561 |
|
41 |
041 |
71-60-1-467-562 |
|
42 |
042 |
71-60-1-467-563 |
|
43 |
043 |
71-60-1-467-564 |
|
44 |
044 |
71-60-1-467-565 |
|
45 |
045 |
71-60-1-467-566 |
|
46 |
046 |
71-60-1-467-567 |
|
47 |
047 |
71-60-1-467-568 |
|
48 |
048 |
71-60-1-467-569 |
|
49 |
049 |
71-60-1-467-570 |
|
50 |
050 |
71-60-1-467-571 |
|
51 |
051 |
71-60-1-467-572 |
|
52 |
052 |
71-60-1-467-573 |
|
53 |
053 |
71-60-1-467-574 |
|
54 |
054 |
71-60-1-467-575 |
|
55 |
055 |
71-60-1-467-576 |
|
56 |
056 |
71-60-1-467-577 |
|
57 |
057 |
71-60-1-467-578 |
|
58 |
058 |
71-60-1-467-579 |
|
59 |
059 |
71-60-1-467-580 |
|
60 |
060 |
71-60-1-467-581 |
|
61 |
061 |
71-60-1-467-582 |
|
62 |
062 |
71-60-1-467-583 |
|
63 |
063 |
71-60-1-467-584 |
|
64 |
064 |
71-60-1-467-585 |
|
65 |
065 |
71-60-1-467-586 |
|
66 |
066 |
71-60-1-467-587 |
|
67 |
067 |
71-60-1-467-588 |
|
68 |
068 |
71-60-1-467-589 |
|
69 |
069 |
71-60-1-467-590 |
When searching on-line dealership fiche, best to NOT use hyphens in BMW part numbers!
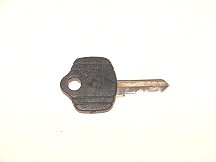
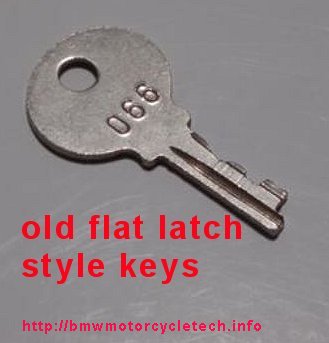
The photo of the key just below is to give you an idea of ONE style of the old flat latch keys. Versions have the groove moved, key looks 'reversed', ETC....but all have this GENERAL look to them.
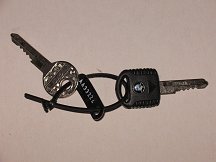
Below: Six KRAUSER type keys. These are marked Sudhaus. The S-150 is difficult to find, but see several places earlier in this article. Krauser has used a different key number to lock the bag, versus locking the bag to the frame.
I don't have a photo of the S342 (#342).

6. Truck bed liner paint, in rattle cans, works well on sanded luggage!
7. Gas Caps, problems, and including locks:
https://bmwmotorcycletech.info/fuel-caps-airheads-K.htm
8. Windshields; installing, etc. Noisy dash's/vibration ...etc:
Some windshields come already drilled, so the holes line up, such as Clearview brand. There are others which do not.
Very slippery fairing, that has less wind resistance than the stock BMW RS/RT: Hannigan STe.
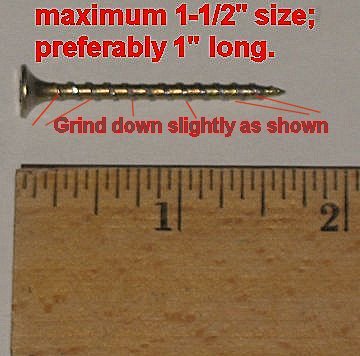
Pesky BMW riveting problem? ...the BMW rivet tool is NOT the simple and EASY way to go for those rivets you need to install. Below is a photo of a "home-made-tool" that I personally use. It is very simple & solves a real problem. It is shown here, and similarly in 2 other articles, because it is something to know about. On the FAIRED models, BMW uses a tubular (hollow) rivet, to fasten a black plastic trim piece (that may contain a clock and voltmeter) to the fairing. You need a tool to install ...or even to "tighten" ...these hollow rivets for various reasons, such as fairing repairs/installations, loose dash pieces that can cause difficult to find noises/squeaks. In particular, the installation of Parabellum windshields that use an additional black plastic cover piece that fastens to two centered BMW rivets.
The BMW hollow rivets need to be moderately tightly fastened to the fairing, but do not over-tighten. The problem is how to tighten them ...whether they are new ones, or just old loose ones. The secret fix is very simple! You obtain a drywall screw. Carefully grind (do not overheat the screw which is very tough unless overheated) the threaded area as in the photo, so that the threaded area will JUST smoothly enter the 'chuck' of a common pop-rivet installer hand lever tool, using the 3/16" pin diameter chuck of the hand tool. To use, insert the screw from underneath via fingers or forceps, use the pop-rivet tool on the outside. The reason to not have over a 1-1/2" screw is so it is easier to insert from underneath. If the outside of the rivet does not flatten properly (the inside will be cup-shaped), reverse for the final moderate tightening. Do all the rivets, there are eight of them. If installing a Parabellum windscreen, be sure the black plastic cover piece from Parabellum does NOT interfere with the edges of the voltmeter and clock, if it does, grind the Parabellum black plastic cover a bit ...otherwise you will go crazy trying to find and fix squeaks.
9. Tank bags: Some tank bags can restrict fuel cap venting. You will then find the engine acting up, even stumbling as if out of fuel (which it is), even with lots of fuel in the tank. Open the cap to see if power returns within 15 seconds.
10. STEM MIRRORS: Look carefully at these at your dealers, before buying. For same, L & R, 1985+ R80 cow bar euro mirrors. Big head mirrors 2 each 51-16-1-452-415, that is for the LEFT, and black in color, for the right use -416. These are fine with the S or other low bars, have longer stems, not quite as much rise, better for viewing to the rear; needing 2 each M8 wave washers 07-11-9-932-121; and 2 each Nylock nuts 17-12-9-964-675. Plastic caps (2) 46-51-1-234-785. These mirrors were used on the 1985 and later not-faired Euro R80 and R65 bikes, on the low bars. They are somewhat taller, and stick out more than the high bars ones. The high bars ones are the -417 and -418, see the next paragraph.
For large round plastic head mirrors, as from the 1985-1987 R80, they have LONG threaded stems for the RIGHT side, fitting the master cylinder mount. The LEFT side has a shorter thread to fit the clutch lever perch. These are nice, don't vibrate much, lighter than the metal types. 51-16-1-452-417 black, left. 51-16-1-452-418 black, right.
Early airheads can use 1998 R1200C mirrors.
For not bars mounting, use two each left side mirrors. Example would be for a low bars R90S and /7, use 2 each -415 mirrors. If high bars, use the -417.
The R80ST used M8 x 1.25 threades mirrors, and the right mirror stem was longer.
Take a look at these: LH: 51-16-1-236-023; RH is -024
INSTRUMENTS:
Including maximum speedometer errors.
Information on cleaning, lubricating, fixing slipping odometer gears, and adjusting the speedometer, will probably be found on the Airheads Club Website. The URL for the site is: https://www.airheads.org
An article on how to open and repair the Airheads electric clock is at:
http://www.flickr.com/photos/getproductions/sets/72157627860750305/
The article is also useful for working on the voltmeter and other instruments, as far as how to deal with the bezel/glass/crimping. When looking at that article, be sure to click on each picture separately, otherwise you will not see the comments.
BMW purposely calibrates its speedometers to never read slower than the actual speed the motorcycle is traveling at; taking into account tire variations, temperature, instrument changes with conditions, etc. BMW has a bulletin on this, #2756, dated 10-21-1996. The bulletin states that the MAXIMUM amount the speedometer will read fast is: 10% of true speed, PLUS 2.4 mph.
The colors on the face of the instruments vary with some years and models. BMW used white numbers for many years. 1977 models had red needles, ETC. For some of these instrument differences:
https://bmwmotorcycletech.info/models.htm.
More information on face and needle colors is in the chart area:
https://bmwmotorcycletech.info/ringgears.htm
� Copyright 2023, R. Fleischer
Return to Technical Articles LIST PageLast check/edit: Wednesday, June 14, 2023