
|
|
The ads above are Google-sponsored.
Clicking on them at every visit helps support this website!
Clicking on something inside an advertisement helps even more!
Thanks, also, for the donations! Donate
Starting & Starter Motor Problems
Operation. Overhaul. Fitment problems. Broken nose cones.
Substitutions, converting to/from ...Bosch...Valeo...Denso.
Starter relays, starter solenoids, notes, advice.
https://bmwmotorcycletech.info/boschvaleostarter.htm
article 16-A
For more information:
https://bmwmotorcycletech.info/startingprobs.htmSOME sources for starter motors:
http://www.euromotoelectrics.com Starters, alternators, plus all sorts of electrical parts for them and lots more .
https://beemershop.com Owned by Ted Porter, one of the very knowledgeable "Guru's".
http://rubberchickenracinggarage.com Owned by Tom Cutter, another of the very knowledgeable "Guru's".
https://www.discountstarterandalternator.com/c/powersports/motorcycle/ I have ONLY one good recommendation, BUT....no personal experience. Discount starters & alternators for BMW bikes ....in particular, K bikes? LOTS more stuff too.
The above listings are NOT the only sources for starters. Check with Bud Provin, for example.
Functioning of the starter circuits & associated parts:
The starter motor is powerful & electrically operated. The starter motor may have to provide upwards of 1/2 to 1 horsepower in quite mild temperatures with modest compression engines,...& supply much more power (especially initially) when the engine is cold. The starter motors in our Airheads, like most vehicle starters, are not very efficient motors. Quite a number of amperes might be needed under rather common ...and harsh ...conditions. Starter motors of any kind for our motorcycles are, at best, 60% efficient due to magnetic field losses, friction losses, etc. 745.7 watts is DEFINED as ONE horsepower. If the system is a nominal 12 volts during cranking (typical, with good battery, wires, and connections, as read at the starter terminals), then 745.7 divided by 12 equals 62 amperes. Due to the efficiency losses, & the need for many more amperes to BEGIN engine rotation and/or the larger electrical drain with a cold engine, it is NOT uncommon to require 150 amperes OR MORE from the battery. The current must pass through the large switch located in the starter solenoid unit.
The Valeo is more efficient than the stock Bosch installed in the earlier Airheads by BMW. The power rating of the most powerful of the three Bosch units used in the Airheads over the years was 0.7 KW. 0.7Kw is 700 watts; divided by 12 is 58 amperes. Not bad, eh? BUT, notice that the starter is rated at 320 amperes. That is the supposed maximum drain under a severe load. That is equivalent to 3,840 watts ....and is equivalent to a bit over FIVE horsepower. The battery, cold day, thick oil, worn starter, ETC., may need to provide a LOT of power, especially as it first tries to rotate! If the battery is marginal, or, something in the circuit is poor ....there may not be enough power to cause the starter motor to rotate the engine properly for starting ....possibly not rotate it at all. The aftermarket starters generally are better at providing the initial rotating TORQUE needed. Note that efficiency is not the same thing as actual torque output. The aftermarket starters provide a considerable increase in ACTUAL USABLE starting power.
There must be a means of switching on & off the large amount of electrical current to the starter. A heavy-duty solenoid-operated switch is physically located on the starter motor itself. It is a fairly large round cylinder with large electric terminals of the bolt/threads type (except for one small terminal, a male spade). This massive switch obtains +12 volts electrical power from the battery via a large diameter copper-conductors cable.
The starter motor metal body and internal circuitry is grounded (connected electrically) to the engine aluminum case by means of the contact of engine and starter metal. The metal transmission is bolted to the engine case. The battery -12 volts electrical connection is usually (some modify it) fastened to a hollow bolt at the rear right side of the transmission. That bolt secures the speedometer cable in place. That hollow bolt provides venting for the driveshaft & transmission. The bolt provides the place for grounding the large diameter black-colored battery negative (-12 volts) wire ...which is, due to metal to metal contacting of transmission & engine, connects to the starter motor body and starter solenoid switch body ....providing the -12 volts from the battery. Thus, the battery provides both + and - current to a COMPLETE CIRCUIT. As you learned in Basic Electricity, you must have a "complete circuit" for current to flow. Anything in this circuit that is not in good condition can be restrictive to electric current flow, and this includes a poor battery, poor solenoid switch internal contacts, poor starter motor internals, insufficiently tightened fittings, etc. Poor corroded connections are seen rather often at wire connections to the battery, particularly the + battery terminal. The large + wire from the battery is often seen a bit loose where it bolts to the starter solenoid. A battery is best tested using a Load Tester, such as sold by Harbor Freight Company. I can recommend their TWO meters version.
There is NO FUSE in the main starter power lead. That is common to most all vehicle's starter motor circuits.
The starter solenoid itself is activated by a modest current delivered from a small starter relay. That small starter relay is located along the Airhead top frame backbone. With the ignition key ON, and any KILL switch in the RUN position, pressing the starter button sends a small current through the starter relay coil, which causes the starter relay to close its contacts, which sends +12 volt power from the starter relay, via a thin BLACK wire, to the male SPADE terminal on the starter solenoid unit. The starter relay is, therefore, a small relay that sends electricity to another much larger relay, called the solenoid (solenoid relay). The electricity causes a substantial magnetic field in the solenoid coil. The physical center of the solenoid coil is hollow and contains a large round slug of steel that is moveable. The piece of steel has an insulated flat copper conductor piece at one end, which solidly ...and with some force, ...connects two large internal contacts electrically together, sending +12 to the starter motor innards.
Common tests for when the starter motor will not rotate, are to check the battery terminals (AT battery) voltage during cranking attempts; and, to listen for the small starter relay click noise when you push the starter button (assuming the bike is in neutral....or the clutch lever pulled back). If you do not hear the click, you know the problem is a dead battery or the starter relay or its socket connections, or other wiring or connections, etc. If you do hear the small relay click, but the big solenoid relay is not making a big click, then the starter relay contacts may need cleaning, or, there is a connection or internal problem at the solenoid. These are easy to test for with a test light or voltmeter, but there is also a way to see if the solenoid and starter do function, assuming the battery and large cable to the solenoid are OK. You simply pull off the thin black wire connection at the solenoid, and then jumper, a screwdriver will do, that small spade terminal to the battery connection at the solenoid. If the solenoid now works, and the starter now runs, you have found your problem. If the solenoid clicks loudly, but the starter does not rotate, the starter motor may be faulty, but a test at the starter terminal will tell the story.
Somewhat nerdy, and rather unknown by most:
BMW's electrical schematic diagrams will almost always show the starter motor as including the starter solenoid switch, and it also almost always shows that switch as TWO interconnected coils. Most folks miss seeing the twin coils, due to how that is displayed in the sketch. The "coil" in the solenoid switch is actually a paired coil, with two ends connected of each, so there are three connections. The moveable solenoid steel piece insulated end with the copper or brass contacts has a special switching function, besides just on-off to the starter motor. The reason is that the current, just described two paragraphs above, is INITIALLY applied to the section of the coil that draws a fairly large amount of current, and is called the 'Pull-in Coil'. This current causes a very substantial magnetic field to move the large steel slug with considerable force, which is needed. One end of the steel slug has that insulated contacting strip which is pushed towards large copper contacts & the high magnetic field causes the solenoid steel piece to strongly cause an electrical connection of the large electrical contacts. The large size battery cable circuit, connected at the solenoid, can now pass a very large flow of electricity into the starter motor. At the same time, the pull-in wiring inside the solenoid switch disconnects, as it is no longer needed and the disconnection ensures no excessive electrical heating by the pull-in coil current. The second coil of the twin coil is a STAY-IN coil that draws less current and will not overheat. Its purpose is to keep the solenoid piece pulled-in, and the massive switch in contacting (shorted) position; so long as your finger is still pressing the starter button. This method of using two co-located windings, interconnected, for a pull-in and stay-in function, is common to starter motor solenoids in all vehicles. There is a secondary function, which is to help avoid 'welding' or otherwise non-release of the solenoid when your finger is removed from the starter button. Allied to this function is another part of the design, discussed in the next paragraph.
The massive solenoid coil produces a reverse current (reverse emf, inductive kick-back, reverse voltage, and other names) which can cause arcing at its contacts...but also at the small starter relay contacts. Because of this being excessive in the later Airheads which used Valeo starters, BMW added a protective diode to the starter relay, and, in fact, also beefed-up the starter relay spring tension to ensure the starter relay would positively open once your finger was off the starter button. There was a Service Information Bulletin on this, without such a full explanation.
The /5 BMW Airheads, only, used a special type of starter relay. It has been the cause for some problems that SEEM to act like a poor battery. The starter may not turn, yet the battery voltage measures OK. The starter relay and sometimes the starter solenoid relay may make loud clattering noises, which is called 'the cricket problem'. There is an article on this website that describes the problem, offers a SIMPLE HOW-TO-AND-PERMANENT-FIX, and is HIGHLY recommended by me for ANY /5 bike: https://bmwmotorcycletech.info/slash5cricket.htm
Rare: The /5 can have another problem, a rare problem of 'no start' ...the starter relay does not work at all, yet all of the starter circuit seems to test OK. The problem can be an open alternator voltage regulator, or an open rotor. THAT can be confusing to you! It is not being discussed further in this article ...you won't get any or proper charging if either of those parts failures happen.
The starter motor rotating shaft can NOT be constantly coupled to the engine crankshaft, as once the engine is started, the engine would be running at a vastly higher rpm than the starter motor could withstand, and, would drain power. So, there must be a method of connecting and disconnecting the starter motor mechanically from the engine. A mechanical device called, generically, a 'Bendix' or Bendix drive, is located on the rear of the starter motor shaft. It begins to rotate with the starter motor. This device, which has a gear on the rear of it, via spinning forces, moves suddenly and very quickly rearward ....with quite considerable force. As it moves rearwards it engages its gear teeth into the engine flywheel teeth. The teeth of the Bendix drive, & on the flywheel gear, are of special shape, designed to enable quick meshing at very high levels of force. The flywheel is called a Clutch Carrier in 1981 and later models. The number of gear teeth of the flywheel (or clutch carrier) is much higher than the number of teeth on the Bendix gear, so the starter motor can run at high rpm which is needed to develop its needed horsepower, which is applied to rotate the engine. The toothed ring on the flywheel is called the ring gear. It is heat-shrunk or otherwise fastened securely onto the outer diameter of the flywheel (or clutch carrier). When the engine starts, and you release the starter button, the engine is rotating much faster than the starter motor did, and the Bendix Drive is sent back to its normal resting non-engaged position. Airheads, depending on year, have some sort of protection (good on /5, fair to poor on later) to keep you from engaging the starter after the engine is running.
Early Airheads were equipped with Bosch starter motors without speed reduction gears and they contained field coils. Field coil containing starter motors, when presented with an increasing starter motor load (such as from a cold engine) cause more electricity to flow as the load increases, causing more starter motor power to be developed. Late model Airheads had a Valeo brand of starter motor which has permanent magnets instead of field coils. The Valeo starter motor has a planetary type of reduction gear inside, which allows the starter to develop considerably higher rpm and hence higher power/torque. Valeo starters were installed on later motorcycles by BMW; all have 9 tooth Bendix Drive gears; but 8 tooth ones for retrofit to early model Airheads are available. Early Valeos were troublesome; the glued-magnets came loose and 'locked-up' the starter. See www.euromotoelectrics.com for fixes or updated new ones; or parts; or, see your favorite independent BMW repair shop.
Side note: The BMW Classic K bikes do not use a Bendix drive. They have a complicated mechanical one-way clutch. The early version of those one-way clutches were particularly troublesome, but some problems still existed with the improved versions. The labor involved in replacing the one-way clutch is VERY HIGH; and, the part is expensive. It is best to use only a premium FULL synthetic oil, such as Mobil-1, in a Classic K bike; which very much helps to avoid problems with this one-way clutch.
Types of Bosch starters, differences, flywheel teeth differences, etc.:
(and, a bit about the Valeo)
There are at least THREE types of Bosch starters used on the Airheads as original equipment. I say at least three, because there are some rare instances of other models used on foreign-shipped bikes.
The number of teeth on the starter's Bendix gear & the engine flywheel, are always, on early Airhead models, 8 teeth on the starter with 93 tooth flywheels. Thus, the gear ratio is 93/8, which is 11.625. There were TWO VERSIONS of the starter with 8 teeth on the Bendix drive. Up through 1974 the BOSCH model number was 0.001.157.007. It was rated 0.5 Kw and 290 A. The /6 bikes for 1975 & some 1976 used an 8 tooth starter, BOSCH model number 0.001.157.015 rated 0.6 Kw & 320 A. BMW phased-in the BOSCH 0.001.157.015 starter at different times depending on the motorcycle model, so it is possible for some 8 tooth starters to be on slightly later bikes ...so it is a good idea to count the number of teeth on the ring gear and starter to be sure you have the proper number on both. All 8 tooth starters are used ONLY with 93 tooth flywheels; and all 8 tooth starters are, for practical purposes, interchangeable with each other.
The number of teeth on SOME 1976, and all 1977 and later Airheads Bendix gears was 9, and the flywheel (clutch carrier from 1981) had 111. The ratio is 12.33. This later higher numerical ratio enables the '9 tooth' Bosch starter to develop a fractional amount more horsepower, mainly because it can rotate faster. ONLY the 111 tooth flywheel (or later clutch carrier) can be used. The stock Valeo starter, as equipped by BMW on later model Airheads, also uses this ratio, & contains a planetary gear set that enables the Valeo to internally, pre-planetary gear, spin even faster, developing a bit more power than even the last of the Bosch designs that BMW used. The starter is number 0.001.157.023, rated 0.7 Kw and 320 A. Note the increased power and SAME maximum rated amperes, compared to the last of the 8 teeth starters.
All the various Bosch starters are rated in Kw, which you can convert to horsepower if you'd like to, mathematically, and do notice the very high CURRENT ratings. Under some very cold engine and very cold oil situations, particularly with an engine with new piston rings, etc., the starter may draw a huge number of amperes when trying to rotate the engine, particularly when beginning to rotate.
Starting problems on BMW Airhead motorcycles can often be traced to a bad battery or its wires and their connections, but there are other possibilities (besides the /5 Cricket problem):
(Here is information on those things, and, some preliminary information on using a different starter)
1. Poor contacts inside the small starter relay located under the fuel tank. This can be sometimes be repaired by opening it and cleaning/burnishing the contacts. It is possible for you to hear this relay's faint click, and yet the contacts are not making electrical connection. Rarely, the relay has corrosion INSIDE its own base. That is more likely with the Airehead motorcycles having the brake master cylinder under the fuel tank.
Commonly, the plug-in type of starter relay has faint corrosion on its EXternal male prongs, & in its mating socket. Cleaning external connections will cure the no-start-no-click. A permanent fix is to join, very cleanly & neatly, & insulate afterwards, all the red wires (usually 3) at the socket. The reason joining the red wires works well is because there are two terminals on the relay for these wires, and their necessary jumpering occurs inside the relay, thus any problem with the EXTernal spade connections will make it seem like the relay is missing! Note that this type of plug-in relay prongs corrosion may be hidden to the eye. It is common to loose ALL electrical power to the bike due to this corrosion.
2. Poor solenoid (located on the starter motor) internal contacts. A replacement is best; but I will have more to say later in this article about how you might be able to repair one.
3. The starter itself may have worn brushes, worn bush/bearing, poor drive gear assembly, or an armature that needs undercutting at the commutator and truing on a armature lathe. It may also be heavily grunged-up with brush carbon, dirt, and filth.
4. Early Valeo starters had a nasty habit of the glued-in-place field magnets coming loose & jamming the starter. Some have rebuilt them using Saturn car starter parts. Better to change to a Bosch like the earlier Airheads had ...or, get an updated Valeo, or EnDuraLast, or Denso, etc. Be sure you read the rest of this article, where, near the end, photos show some things to know. Be sure your proposed starter motor has the correct number of drive teeth.
You can overhaul any Bosch or Valeo starter motor. http://www.euromotoelectrics.com has the parts, and vastly cheaper than from BMW (which does NOT sell all the parts anyway). You can discuss the various options, not all of which are shown here, with Ted Porter at his Beemershop. https://beemershop.com
5. You can replace the original Bosch Starter with a late model improved Valeo. You may have to do a SMALL amount of metal work (just simple filing), described later in this article. Be SURE to get the appropriate 8 or 9 tooth starter. Same, regarding metal work & 8 or 9 teeth if converting to the Denso ...or any other starter. I check for any metal interference even if I am just replacing with the original brand of starter, or even if I am just overhauling the original starter.
6. A more expensive solution is to install the modified Denso starter that is available from numerous sources. I am not convinced it is worth the cost. Distributed & Sold by Motorrad Elektrik, www.motoelekt.com; and possibly available from such as Ted Porter's BEEMERSHOP, etc. These are modified-nose versions of the DENSO-made starter used on Toyota's, etc. Possible interference problems with this starter, & need for some mild metal filing/grinding, is shown with photos, at the end of this article .....A MINOR possible problem.
7. https://bmwmotorcycletech.info/electricalhints.htm has further information on problems with the starter circuits. There is more information, such as for the /5 problems, also in that article. See also: https://bmwmotorcycletech.info/startingprobs.htm
Starter relays:
Airheads after 1984 use a starter relay with a diode inside. Some have substituted a 0-332-014-118 relay (03-32-014-118), & some have used a DF005 'Blazer' relay from AutoZone stores (which has two 87 terminals & no 87a terminal). The Bosch starter relay uses two #87 terminals, & may sub to Bosch 03 32 019 150 for 1977+ bikes. That is a common Bosch accessory use relay. Connector, if you need one, is 0 334 485 007, while the spring loaded terminals are 1 901 355 917. It is certainly possible to substitute almost any common 20 or 30 ampere 12 volt relay for the starter relay on Airheads, but there are some complications, such as with the /5; & with late models with 2 diodes in the relay, so ask on the Airheads List about this. Complications, if any, are easy to deal with, so don't be discouraged with my remarks here.
BMW has an SI on retrofitting the Valeo starter on 1985-1988 bikes that came with Bosch starters. BMW says that the original starter relay contacts are not up to the larger current draw of the Valeo solenoid coil. It is my belief that the original relay will usually be OK most of the time; however, you certainly do not want its contacts to stick together. If you want to install a relay with larger current & reverse voltage capacity, see this document, which I have here in pdf format for you: https://bmwmotorcycletech.info/Retrofitting Valeo Starter-2383.pdf. You can also install a common relay as in the prior paragraph. This is applicable to 1985-1988 models officially; so if you install a Valeo in earlier models, also pay attention! That SI does not have all the information ...but I do, here:
If the original starter relay is 61 31 1 244 019 (a BMW number, not Bosch number!), it contains a diode, and has other properties that BMW thinks do not match the Valeo starter, and the relay contacts might stick and the starter continue to run, a BAD situation.
BMW says that the proper relay is 61 36 1 391 397, which has a higher current carrying capacity, and a stronger spring to help the contacts open. If you have to replace the 61 36 1 244 019 relay (NO LONGER EVEN LISTED IN MOST FICHE), BMW will supply the 397 relay. It has the diode inside. Some have substituted generic 30 ampere relays. I have heard of sticking relay problems, but maybe only rarely, since I began working on Airheads! So, it is likely a rare event. It is my belief that if there is a problem with putting a Valeo into an Airhead that came with a Bosch, that the problem is much more likely to be only with 1985-1988 models; due to a change in the relay internals construction that is not mentioned by BMW. It is possible that lengthy starting can tend to overheat the relay contacts.
To avoid confusion, if you have a pre-1985 Airhead, the stock relays seem to hold up OK with the Valeo. I have measured the current draw of the Bosch & the Valeo solenoid coils under actual starter use; they are not excessive & are just about equal! The inductive kick-back voltage is also comparable. This solenoid coil current is the current that passes through the starter relay contacts. I would not be inclined to replace the early stock relay, although I might open it & burnish the contacts. It is my belief that the problem, if there really is one per BMW, it is confined to some of the 1985-1988 models, and is not clear why those.
Miscellaneous, Bosch & Valeo Starters:
If you decide to use a starter from a car, salvage yard, etc. ...make sure the starter has the correct direction of rotation, and will fit. If a Valeo, be sure the field magnets are of the secured type. I cannot recommend you go to a salvage yard, except in an emergency situation; or, if you are hardly able to pay the INexpensive price for a new Valeo starter from such as the company's I have previously mentioned.
The Airhead Bosch starter uses electro-magnets, not permanent magnets. I have been told that Bosch does make a permanent magnet starter, but I have never seen one in the Western Hemisphere; and, I don't have a part number for you.
The Bosch electromagnet starter is very old-fashioned technology, reasonably rugged, reliable, but less powerful than the "permanent magnet high rpm with planetary gears" type like the Valeo. A property of the Bosch field coil type is that as it 'sees' a heavier & heavier load (cold engine, thick oil, high compression engine, etc), it draws more & more current, producing more & more power. Still, the usable power from the Bosch starters under most conditions is less than the Valeo. I consider it a tossup as to which is better, considering all factors. The Valeo parts are less rugged, but that appears not to be any big factor, even over many miles, assuming the Valeo is the updated type with secured field magnets.
A few folks have asked if the Valeo permanent magnet type starter motor might loose some magnetism over time and usage. They have held up surprisingly well ....and I have had no reports of any loss of magnetism.
The Bosch starters use a bent metal plate mounted at the forward end, using one bolt to the timing chest wall. This supports the starter to the timing chest wall, needed with the heavy Bosch starter. When installing a Valeo in place of a Bosch, you do not use the the plate nor bolt. The Valeo installation is ~ 6 pounds lighter than the Bosch. Do not throw away that mounting plate; someone, or you, may eventually want it. When installing any starter be especially careful that the starter is properly & squarely mounted, you want to avoid breaking or otherwise cracking the starter nose casting during starter operation. Be sure the mounting cradle, nose area, etc., is clean of filth and there is no proud metal, etc. See later on that subject in this article! This caution on fitting includes the original starter ...or a brand-new one!
The magnet failures on the early Valeo's are well-known. Using epoxy to glue magnets may have its place in this world, but there were lots of failures, especially in Airheads where the starter is subject to so many repetitive heat-cool cycles from engine heat. I do not like even the idea of epoxies being subjected to constant wide temperature changes, their expansion-contraction rate is different than the surrounding metal. The starter in an Airhead does, remember, sit right on top of the engine, inside a cover! The constant heating/cooling cycles can crack or otherwise ruin the bond of the glued magnet. Valeo addressed this problem (in 2001) by changing the type of glue & reshaping the side of the magnet that fits against the starter shell. There also are some goodly magnetic forces 'pulling' on those magnets during starter operation. Late manufacture Valeo starters are adequate & seem reliable. There is a Valeo housing available with a modification to help keep the magnets from moving, spring-type separating pieces (clips). Valeo permanent magnet starters ...as well as permanent magnet starters from other manufacturer's, even Bosch (rare, never seen one), work OK in cars. The proper aftermarket Valeo's with the updated magnets, bonding, & clips, are available from www.euromotoelectrics.com and from such as Ted Porter's https://beemershop.com
Watch out for cheap/poor construction "Chinese" starters, being sold, unbranded, in place of a real Valeo. Rumors have circulated that Euromotoelectrics is selling them.
In the distant past I was outspoken in that I personally preferred the Bosch electromagnet type for our Airheads. However, I am open-minded on the latest Valeo starters ...and now think them OK .....so, if you are making a decision between overhauling your Bosch, or replacing it with a Valeo .....or; replacing a Valeo with a Bosch ....I no longer have any especially strong preferences for the Bosch over the Valeo (or the aftermarket Denso, for that matter), all things considered, including cost and fitment. Usually, overhauling an existing Bosch starter, assuming the armature is not going to have to be replaced, is going to be very much less costly than replacing it with a Valeo, ETC. The stock Bosch starters are adequate ....and almost any starter/alternator shop can overhaul one, if you do not want-to, yourself. Avoid cheap construction "Chinese" starters, being sold, UNbranded, in place of a real Valeo.
For parts for rebuilding for both Bosch and Valeo, see http://www.euromotoelectrics.com. They know the in's and out's of all of them, and have a stock of all the pertinent Bosch & Valeo parts; and has Valeo starters of the correct type in stock (inquire as to if they are genuine Valeo!!). Remember that there are both 8 & 9 tooth starters. Be sure you have the correct number of teeth on the starter ...and if you are breaking nose cones, check the fitment, see later in this article, and also count the flywheel teeth too ....just in case something got switched. You can also check with the Beemershop for new starters: https://beemershop.com
The Bosch is a common starter for many starter repair shops, easily worked on ...but some might not have the parts for the starter used in our Airheads. The same sort of comment could be made about the Valeo and Denso.
You may run into information leading you to think about using a Saturn car or some other automotive Valeo housing when rebuilding an original troublesome Valeo. Unless you are trying to save the absolute maximum amount of money, I recommend you get a new upgraded version Valeo, assuming you are going to use a Valeo anyway.
NOTE!.....it is possible to miss-fit a starter, even if there is no metal interference as shown in this article, later......and the nose cone MIGHT NOT break immediately, but later. That is rather common for the broken nose situations. Fit the starter very carefully...it can be tight, too.
Here is a link to an article on working on the Valeo starters: http://largiader.com/tech/valeo/. Use only the images and text for them. The article does not get into some deeper technical matters, but will be useful to you if you have not taken a Valeo apart before, & want to do maintenance to fix loose magnets, or replace worn planetary gears, clean/lubricate, etc.
Going from a Valeo to a Bosch and vice-versa:
Be sure you use the proper number of teeth on your starter motor, to match your flywheel (or clutch carrier)! If you decide to change a failed Valeo to a Bosch, know that brand new Bosch's are very pricey & probably not available. If you want a Bosch, and yours is not, you can try to find a cheap good used one, & rebuild it if needed. Generally you need only a set of brushes & bushings (bearings) & a solenoid assembly. If the Bendix drive is questionable, replace it. The solenoids can often be rebuilt, but I do NOT recommend it, although I have the information in this article. You may have to undercut the armature, farm this out or do it yourself, it is not difficult. You must obtain & use the forward bent metal plate when using the Bosch.
The 'Bendix' drive should be clean & lightly lubricated. Some use a silicone grease due to its general non-hardening & wide temperature range. I have mixed feelings about the use of silicone's on fast moving parts, & maybe a lightly laced moly grease is better ...I am NOT sure about this. Starter rebuilders may have ideas. I personally have used a faint coating of common wheel bearing grease, and that worked fine, as did a dry lube.
Overhaul information on the Bosch, including the solenoid assembly, is near the end of this article. There is also a section for overhauling the Valeo starter.
Warnings about fitment problems; breaking nose castings; etc.
Failure to properly fit any starter, squarely, solidly, and securely to the cradle in the motorcycle can lead to a broken starter nose.
The Bosch starters have a bent metal plate at the forward end, using one bolt to the timing chest wall. This supports the starter to the timing chest wall, needed with the heavy Bosch. The Bosch starter must have the forward plate affixed and tight to the bracket and engine.
Do NOT "assume" anything. Never install a starter motor, any brand, without carefully checking how well it fits into the engine case cradle. This caution even applies to reinstalling the original starter, and any replacement. At the end of this article is information on easy fixing of any metal interference problems. Some engine cases, especially early engine cases, may need some filing to ensure a proper fit. Further down this article are some of the interference problems found on starter fitment.
If the starter motor bearings (sleeve bushes) are poor, that can cause tilting of the armature when the Bendix has engaged the starter ring. This is not good for the starter nose, & not good for the starter Bendix drive, flywheel teeth, armature etc.
Other problems include a bad starter ring or fitment on the flywheel/clutch carrier (rare), & too tight a clearance between the Bendix gear and the ring gear.
If your engine kicks back (or, backfires with engine rotation backwards), that can be VERY hard on the starter, and the problem needs immediate attention.
When retrofitting a Valeo to a BMW Airhead that had come originally with a Bosch starter, there can be an metal interference problem, which can be very slight & hardly noticeable, ...to more moderate. The problem comes about because the starter nose machining is NOT EXACTLY the same between the Bosch & the Valeo starters. BMW was, perhaps, a bit more careful about machining the engine case when the Valeo was installed as the stock starter. It is my belief that when BMW shipped Valeo starters on the later Airheads, that the machining on their Valeo noses might also be very slightly different. I have not made enough measurements to prove this. READ THE COMMENTS IN THE BOX JUST BELOW:
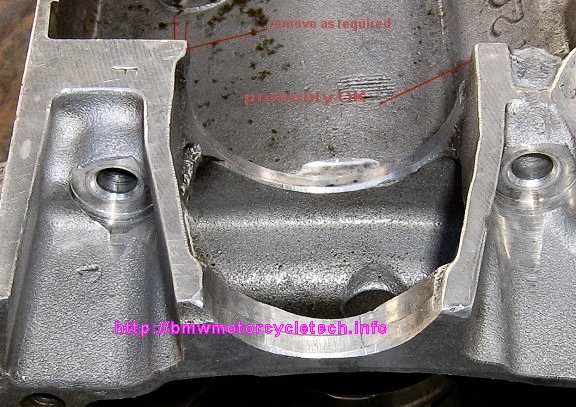
From: Tom Cutter <[email protected]> Hedz; Snowbum warns of some starter fitment issues. From Snowbum: I strongly suggest that ANY time you replace or even re-install any starter that you carefully check the fitment! There have been instances of a starter poorly fitted, & the nose broke! Remember, also, that the starter motor forces are quite large! There were instances of even the Bosch having problems with broken nose cones even in the seventies models. Best to check, find any interference ....and using a common file, or simple rotary grinder, fix ANY potential problem. Do this for any starter, even if overhauling and reinstalling your own original one! EMPHASIZING: My advice here is generic, & assumes you will check fitment of any & all starters, that includes the Bosch, the Valeo, and the Denso ....and no matter what had previously been fitted. This includes refitting the same starter! I think that anytime you remove & replace even the same starter that was in the bike, that you should check for the proper fitment. This is particularly so if the nose cones have been breaking. Look carefully at the area the aluminum nose of the old starter had recessed into, just forward of where the gear mates to the flywheel teeth. On some Airheads, BMW may not have cleaned up excessive metal over the last 1/2" or so of the round cavity, at the top inside edge. When you try to install the starter (probably this happens only with the Valeo, but I am NOT sure about that), you may find some combination of the following: The starter might not fit perfectly, may not want to go fully downwards at the nose area & the Valeo threaded bolt holes (or even Bosch unthreaded ones??) may not line-up perfectly. Inspect carefully, & use a half-moon fine file, or a small electric rotary tool of some sort, to make this inside area smooth at the top, with NO metal that is 'proud' (or of lesser diameter, causing a reduced diameter). You can feel this with a fingertip, and usually see it with your #1 eyeball. I have personally seen this and had to remove about .020" (+-), on both sides, at that top area. This is easy to do, & then the Valeo (Bosch?) should fit & mount correctly. Changing to a Valeo, from a Bosch? The Valeo, as opposed to the Bosch, has threaded holes. Use the bolts you had from the Bosch, sans nuts, from the rear. |
Note the excess material at the left, in the photo below. The excess area is pointed at by the red lines in this photo. Note the probably OK line at the right. Don't worry if you remove a bit too much material. DO NOT remove material at the bottom. Check how the nose fits, very carefully, at ALL POINTS. Use a dentists mirror & strong light. I also use feeler gauges. Be sure the cover/ribs do not press onto the starter.
The Denso fitment problems:
Check fitment everyplace! ...what is below may not be the only area for problems!
It was reported to me that the ""Denso"" aftermarket starter, such as sold by Motorrad Elektrik, etc, does not, or may not, fit perfectly. I obtained a photo. The installer noticed problems with metal interference:
1. Light interference with the solenoid to a rib on underside of the starter cavity cover (sorry, no photo on that).
2. Interference at the mounting ear on the back cover. In the photo, below, you can see that the ear has been ground down so as to give about 1-2 mm of clearance between the crankcase and the starter ear.
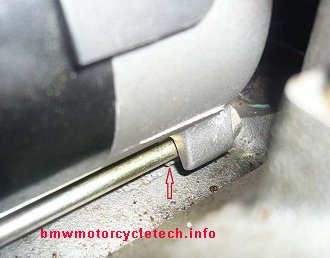
This may not be the only interference problem; CHECK CAREFULLY!
Overhauling the Bosch Starter Motor & Solenoid Switch:
Bosch starters are used in a wide variety of makes & models of vehicles. Sixties & seventies VW's, for one example, use similar starters to the ones in Airheads. They vary some, but are mostly the same. So, it is not difficult, even at some auto-parts stores, to get parts. I do, however, suggest you get parts from www.Euromotoelectrics.com or, Ted Porter, https://beemershop.com
Not shown or described anyplace that I know of, is how to overhaul a malfunctioning Bosch solenoid switch. Perhaps that is because most people will replace the solenoid. A malfunctioning solenoid that has an open winding (there are two windings) should be considered as not repairable. However, the problem is just about always poor contacts inside; although poor contacting at the brushes of the starter can seem like a bad solenoid. Easy to test for with a multimeter.
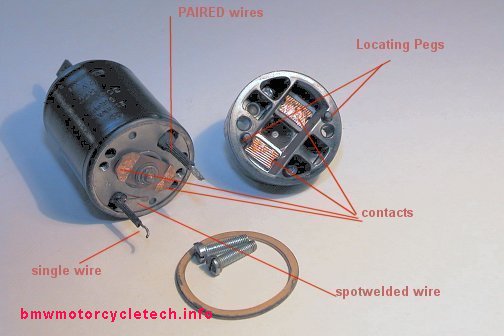
Below are photos of a Bosch solenoid unit as used on our Airheads. If the solenoid contacts are quite worn out, it is best to replace the assembly, although nerds like me have made new contacts & contact plate. Most of you will just replace a solenoid switch as a normal matter when overhauling a Bosch Starter. But, for those of you that wish to try to fix or improve such a switch, I include the details here. See the photo, below.
I have removed the terminal end cap. To do so, you need a large soldering iron with a big tip. Even a 35 watt iron with a big tip mass will work. It is the mass of the tip that is important. A very large soldering gun (perhaps the 275 watt size) might work OK.
You undo the 2 screws as shown; then put a slight to modest amount of pressure on the end cap (as if trying to remove it), whilst you heat the solder joints until they release. Go back & forth to the soldering places; until the cap comes off. Clean up the solder holes. It is VERY important not to mix up which wire goes to what terminal hole!!! ...so watch them as you remove the cap. DONT GOOF HERE!! The easiest way to avoid this is to mark the end cap and body before removal!
Inside you will see the flat switch contacts recessed in the cap you removed ....& the mating contacts held to the solenoid with a funny 'nut'. I usually don't bother disassembling further on the plunger side.
Clean the contacts in the cap & at the end of the plunger. You can use a very small rotary stainless steel or brass cone-shaped brush, that you can put in your drill press or electric drill. They remove very little material if used BRIEFLY and with not too much pressure; this takes only a few seconds at modest rpm. Other methods will also do, such as a flat end of a piece of doweling or other tool, covered in 220 grit sandpaper. Use what you want to, but do not make deep scratches ....you want a smooth clean surface of maximum contacting area. You MUST keep the contacts FLAT & square to the assembly, so maximum contact surface will be obtained.
There are 4 thin solid copper wires that have a thin enamel coating for insulation. The paired wires (push the insulation back a bit if you need to, to see it is a pair) go to the SPADE terminal that has a black wire to the starter relay. You've already marked the case and cap so you won't mix them up, right? There is one wire that is spot-welded to the metal end case; that's the ground wire for the HOLD-IN coil. The single wire next to it is the one that goes to the starter & one of the large solenoid switch contacts. You did note where the wires went when you removed the cap? If you goofed & did not mark the cap & body, the information here will guide you to the proper fitment of the wires before you re-solder.
When re-assembling, you need to be sure the solenoid contacting plate fits into its mating cap depressed area portion, & the wires go to the correct terminals! You can assemble the cambric ring & the wires to the cap, & lift the cap a wee bit, & rotate the tang at the far end of the solenoid, to line up the contacting plate with the cap cavity. Push against the tang end, holding the cap end, on your bench top, to be sure the contacting plate actually moves into the cavity for it. Assemble cap (align wires pegs) to the plunger side of the solenoid unit carefully, using #1 eyeball; test that the solenoid plunger mechanically works OK with your fingers, then screw the cap on with the two screws (locate the pegs!)...and THEN solder the terminals. Use ONLY a very hot large tip soldering iron. Use standard rosin core electronics solder. Be careful to assemble correctly!
Here is a test, but just for the solenoid assembly, not mounted to the starter.
1. You want to clamp the solenoid into your vise, without distorting the case. Make a clamp of wood for your bench vise. You can use wood as jaw pieces, or drill a very large hole in a piece of wood to ~match the case diameter of the solenoid assembly, then split it down the middle with a saw to make two curved pieces.
2. Connect the CASE to a battery - terminal. I usually just put a bare wire around the case, during the clamping.
3. Touch-connect terminal #50, the start terminal (male spade) to the battery + terminal. This will cause the assembly to be a fairly strong electromagnet, easily seen/tested. This tests the HOLD-IN coil.
4. New connections: Connect the battery + to terminal 50 which is the male spade terminal.
5. Momentarily connect the battery - to the terminal that normally goes to the starter motor. This connection will draw more current, than in #3, and a much stronger magnetic field.
6. Push/pull on the solenoid to see how the magnetism feels to you.
There is a test that could be done to determine that the Pull-In coil is not energized DURING the starter motor's actual turning. It is done by actual current testing, & isn't described here.
Another test is that you can use an ohmmeter instead of #1 to #6. Disconnect the battery. With unit NOT attached nor connected to the starter motor, use the ohmmeter section of your multimeter. There should be, between terminal 50 which is the male spade terminal, to the case, a moderately low ohms reading. If you measured between terminal 50, the male spade terminal, to the solenoid large terminal that goes to the starter motor, you should get a very low ohms reading.
The solenoid should be tested with it mounted & connected-up to the starter. Do the testing on the repair bench, before you install the starter into the engine block. You will need heavy gauge wires. Connect the + terminal of a battery to the battery large threaded terminal (#30) on the solenoid. Connect the - terminal of the battery to the starter body ...such as a nose mounting ear. If you get a small spark from this, you miss-wired the solenoid!
Hold the starter strongly ...it will tend to jump around as it starts! Using a jumper wire or screwdriver, etc, momentarily connect the SPADE terminal to the + battery connection at the solenoid (#30). The solenoid should clicking strongly & loudly & the starter should run.
REFERENCE video: https://www.youtube.com/watch?v=WocPZnnAiYo
Overhauling the Valeo:
I started to write up how to do an overhaul, but found a fairly decent article with photos is on Anton Largiader's website, so here is the direct URL: http://www.largiader.com/tech/valeo/
Valeo starters can be purchased from www.Euromotoelectrics.com. They have parts for Valeo, and Bosch, & many other things. I highly recommend them over Ace Houston Warehouse, which is mentioned in Anton's article as well as the one you are reading, well above this area. Another quite good source is: http://www.beemershop.com
Another recommendation, but no personal experience:
https://www.discountstarterandalternator.com/c/powersports/motorcycle/
They also have discounted alternators for BMW bikes....in particular, K bikes.
Revisions:
02/06/2004: Add link to /5 article; minor other clarifications.
05/30/2004: Add NOTE on the starter relay changes.
10/27/2005: Updated in numerous places.
04/22-2006: Add red note on Valeo installation needing special relay.
11/28/2006: Correct the URL spelling for euromotoelectrics.
11/29/2006: Change to 16-A, and do minor editing (16-B is being written).
04/28/2007: Fix actual hyperlink for euromotoelectrics, display had been OK, link NOT.
09/28-10/1/2009: Update hyperlinks, clarify some details that were unclear; re-arrange article a bit for additional clarity, add all the information on the Bosch Starter solenoid overhaul.
10/17/2009: Photo of the metal interference problem. Clarifications & editing throughout article.
11/23/2009: Reference to Anton's site for the Valeo overhaul, euromotoelectrics in that same area, etc.
04/25/2010: Add photo and information on the Denso problem.
05/24/2010: Fix typo regarding forward plate that IS used with Bosch, NOT Valeo. Clarify minor details.
05/12/2011: Fix typo where word alternator should be starter. Add dividing line at one place to clarify a new discussion section that was confusing. Fix a couple of mis-spellings. Remove hyperlink to 'thisoldtractor" site (that has removed the starter motor overhaul information).
08/04/2011: Fix note, DF005 relay now confirmed as substitute.
03/18/2012: Clarifications.
11/14/2012: Clean up article, separate sections needing such, add some minor details, fix whole article so will display a bit better on Chrome and Firefox, and on somewhat smaller screens.
08/11/2014: MINOR changes.
09/12/2014: Cleanup.
02/16/2015: Extend, somewhat, the warnings.
04/04/2015: Add information/section "How the starter circuits and associated parts really function:". This is the same section I expanded-upon, located in article startingprobs.htm. Expand testing. Fix wrong description on wire connections inside the solenoid assembly.
07/21/2015: Re-work section on starter/flywheel teeth vs model #, for more clarity. Cautions added 11/15/2015.
01/14/2015: Clarity. Metacodes. Left justify. Narrowing.
03/14/2016: Update again, due to problems with displaying differently, weird colors, etc., on some browsers.
05/14/2016: Fix typos/errors in paragraphs on watts versus horsepower and current drain.
06/28/2016: Re-write a few areas, to ensure there is no mistaken conclusions about how the starting systems work. Add note about Cricket relay problem.
06/01/2017: Reduce font changes and eliminate almost all colors.
11/03/2017: Rework entire article. Scattered information was consolidated. HTML, colors, fonts, clarity.
12/07/2017: Go through entire article. Reduce excessive html. Reduce excessive use of fonts and colors, add 10pxl margins.
04/26/2018: Expand /5 starter problems explanation slightly.
08/16/2019: Clean up a bit.
04/11/2020: Add Tom Cutter's input, and move and edit my comments, adding more, all to the box (table) area.
08/09/2020: Minor cleanup.
04/11/2021: Add a few words about the -019 starter relay no longer even listed in most fiche.
� copyright 2021, R. Fleischer
Last check/edit: Monday, August 07, 2023