
|
|
BMW Airhead Motorcycles.....
Carburetors: how to properly synchronize them (and, why).
The Whole Story ....(?)
© Copyright 2020, R. Fleischer
https://bmwmotorcycletech.info/synchcarbs.htm
7A
Read this article completely through, slowly & carefully, at least twice, before you attempt anything. This article is purposely long, to, hopefully, inform you of every possible detail.
Preliminary information section:
|
In November of 1971 BMW first recommended OPENING the throttle SLIGHTLY during very cold weather starts. BMW did not specify manipulating the throttle slightly back and forth, rather, the implication was to just open it a bit. It is well known that manipulating the throttle, not just opening it, can be a necessity depending on the motorcycle, temperature (does NOT have to be very cold), & how the carburetors are adjusted. The throttle may have to be rotated some, back and forth a bit, during starting, even if the Choke (Enrichener) is well turned-on. BMW has dropped the recommendation of slightly opening the throttle....they should not have...IMO. |
DO NOT lubricate the throttle cables. Only cables from 1978 & later were, at one time, thought to have an inner lining that self-lubricates, wearing very slowly over large mileage. However, it appears there is some controversy over this & that lined cables were phased-in immediately after the /5 models. Earlier cables (such as the original /5 types) could be lubricated, but have likely already been replaced from wear and age. All throttle & clutch cables that have been replaced with BMW cables are DO NOT LUBRICATE lined-types. Throttle cables should normally be replaced at reasonable intervals, perhaps 80,000 miles or on-condition. If you lubricate the lined-type BMW cables, the liner may swell, and even gather dirt, and, likely eventually making friction much worse. Lubrication of the cable innards is generally a last-ditch effort, when you do not have new cables at hand. It is UNCLEAR if the inner lining will be OK & NOT swell if you lubricate with silicone oil. NEVER use WD40! Another thing NOT to generally lubricate is the T adaptor for the throttle cables; that adaptor is only used with those Airheads that have ONE cable at the throttle itself. While I advise to not lubricate that T adaptor (its piston, etc), it can be done with dry spray moly, or other DRY spray.... such as the chain lubrication types available at most bicycle shops (several brands). Dry spray lubricants are also available at HomeDepot, Lowe's, etc. Dow M-88 was the old 'paint it on' moly type, that had a quick evaporating solvent base.
Replace carburetor cables if the internal steel strands are fraying or the outer sheath is seriously bent (both typically happens first at the left carburetor due to pressure from one's hand when checking the oil dipstick). Replace if the throttle feels draggy or catchy/grumbly (if it isn't because of badly worn gears at the throttle assembly at the handlebars). Some recently shipped BMW cables are lousily-made at the ends ...although this is mostly seen with clutch cables. If you have such clutch cables, fix the ends! Also fix the handlebar clutch lever (usually needs a pivot plastic bushing) for help with cable interference. Cables MUST operate smoothly at the barrel ends and into what the barrel fits into! If you have a throttle assembly with a single cable at the handlebars, then under the fuel tank is that mentioned cylindrical adaptor. Be sure all is OK there ...including good rubber boots. As noted in the prior paragraph, if you lubricate the T adaptor innards (that under tank cylinder unit that combines the cables) use only something like a drying to powder/coating dry lubricant. The T-adaptor adjustment should be such that the top cable has only a small amount of free play, about 1/8" of the outer jacket, and some free play is still there, during moving the bars from stop to stop.
Lubrication of the small cable barrels AT the carburetors should be by MOS2 (Moly) grease or moly oil as a second choice or as an undercoat for the grease. A big reason for cable problems is failure to lubricate the cable barrels at the carbs; I do it after EVERY wash job, after drying. If these barrels are not able to easily rotate, they put a fair amount of sharp-bending-side-force on the steel strands ...weakening them, ...and soon they snap, one by one. Do a bit of hand-work if needed on the barrels, to be sure they smoothly rotate.
The clutch cable condition is exceptionally important, due to the heavy pressures/forces on it. Be sure the clutch lever pivot (lightly pressed into the clutch lever itself) is not excessively worn ....if worn, the clutch lever can angularly move in a direction that allows the steel cable strands to rub on part of the clutch lever, and strands will eventually break. The pivot is a plastic sleeve that is easily removed and replaced, but may need SLIGHT enlarging for the steel pin to fit it properly (it must be able to rotate)...but, minimum free play with good rotation is the goal. Be sure the metal cable barrel is lubricated and rotates easily, if not, do some hand filing. SAME for the barrel of the clutch cable and lever, located at the backside of the transmission. I OFTEN find the transmission clutch LEVER "half-round" in need of very light filing.... LUBE IT too. There is only ONE cable tie used with the clutch cable.
If someone has the BAD habit of bending the throttle cable at the left carburetor while removing & replacing the oil level dipstick, the throttle cable may fail, sometimes rather quickly. After JUST ONE steel strand breaks, the rest fail in as little as 200 miles. A bend at the outer jacket at the carburetor can cause friction. Keep in mind that worn cables, friction, etc., means more throttle effort for your right hand, & it means MORE WEAR ON THE SOMEWHAT SOFT THROTTLE GEARS.
Do NOT install carburetor cables with lots of ties, nor sharp curves. The cables must be free to move about, particularly as you steer the motorcycle. There is only ONE cable tie used with the clutch cable.
A few hints/comments:
(1) Once in awhile one sees/hears about an Airhead with Bing CV carburetors that will seemingly adjust just fine with the vacuum gauge method ...for idle mixture, idle rpm & off-idle for the cables ...& yet will not idle smoothly. Sometimes the owner ...and even a shop technician ...will go crazy trying to find the reason, & check ignition points (if present), ignition timing, valve clearance, compression pressure, spark plugs & their caps, cables, coils, etc. Nothing is found wrong, yet the poor idle persists. The problem is then thought to be inside the carburetors (which it is!) ...but, what? It is likely the butterfly, ...improperly installed. See photos in my two CV carburetor articles for the butterfly installation. THIS IS CRITICAL! I have even seen a brand-new carburetor with butterfly installed backwards! It is a total waste of your time to synchronize your carburetors if you do not KNOW that the butterflies are properly installed. It is easy to see visually, with the plastic intake tube removed.
(2) It's CRITICAL that the enrichener parts not be mixed up left/right, & are installed correctly. Some enricheners were shipped by Bing with WRONG markings, especially the depressed dot (or, punch-prick) is what is meant here.
(3) Very early enricheners (/5) MAY be assembled differently, regarding the O-ring and enrichener cover, so see the R75/5 article; which also gets into other problems with these early CV's.
https://bmwmotorcycletech.info/earlybingR75CV.htm
(4) See these two linked articles for photos and information on all the CV carbs:
https://bmwmotorcycletech.info/bingcv.htm
https://bmwmotorcycletech.info/bingcv-2.htm
WHY synchronize carburetors?
What's the big deal? Why so many opinions & methods? Why are some books like Clymers & Haynes so misleading (or just plain WRONG). Why use Snowbum's advice & not theirs? (I can't give you a reason on the last part, except maybe to listen to your elders who have lots of experience).
Your BMW boxer engine has two "almost opposed" pistons going in & out of the cylinders at the same time, same direction, same amount. While the engine would seem to be perfectly balanced mechanically, that is NOT so. The cylinders are NOT exactly opposite each other, one is BEHIND the other due to the rods being side by side, producing what is called 'a rocking couple', which is a twisting cyclical vibration. The crankshaft has balancing weights on it, & they are not perfect at balancing the crankshaft at all rpm, nor at all parts of any piston stroke. Parts may not be perfectly balanced with regards to weight & reciprocating offset mass. That will cause some vibration, usually showing up in a narrow rpm band. Imbalance in the clutch assembly is another cause for vibration. Many a clutch assembly is also not assembled correctly per factory marks, or marks are lost. BTW.....the BMW clutch assembly markings are factory placed at 120°, which is NOT the marking method as for many other mechanical balance situations (or, perhaps called Witness Marks, which are all lined-up). Actual internal friction & combustion pressures between cylinders may vary, & there are many other variables, such as small ignition timing differences, differences in valve settings & valve seating areas & camshaft lobes; engine wear, and a variety of tolerances on these and other things ...etc.
As the timing chain stretches (actually the wear on the crankshaft sprocket & guide/tensioner are the most common wear items (much less the chain itself), this affects cam timing & ignition. While the stock ignition timing is easily adjusted, it does not do so for both cylinders in a perfect way. There is jerky timing chain operation, particularly as the noted parts wear, causing irregular timing between cylinders, & in the same cylinder too. This is quite easy to see when you check the ignition timing & ignition advance at the 'flywheel', with a stroboscopic light. In addition, as the the chain & its tensioner/guides wear, the camshaft will lag, with respect to the crankshaft, causing some power and performance loss, and some additional possible variations in cylinder operation.
External to the engine core are variations in the carburetors & the cables, etc. operating those carburetors. Most of these variations can be adjusted to be near perfect.
Because of all these ...& other factors, ...the BMW boxer Airhead engine can be rather sensitive to carburetor adjustments. This is particularly so for the 1980's & later models that were factory tuned to run leaner & have lighter flywheel-clutch assemblies (the flywheel from 1981 is called a Clutch Carrier, but it still IS a flywheel).
An imbalance in synchronization of the cables & carburetors, together with effects & differences described above; and, even such as diaphragm differences in the carburetors (I could make a long list of things having various effects), will cause engine roughness or vibration, sometimes in a narrow band & sometimes at two different, usually narrow, bands of rpm. Imbalance in the cables & idle mixtures/idle rpm between cylinders will typically result in slight rocking or stumbling as one comes off the idle stops, particularly if doing so gently. Occasionally things are worse if one of the imbalance points for the various items discussed happens to be at the natural balance (not exactly true, but good enough for here) frequency of the crankshaft assembly. That tends to be approximately 3900-4400 rpm, with many centered around 4250 rpm.
If the pressure in a combustion chamber/cylinder is different in the left cylinder, compared to the right cylinder; the engine will rock back & forth, sometimes very little, sometimes more. As rpm is raised, the rocking becomes a faster pulsing. Further increase in rpm & it becomes a vibration or tingling in the bars. It is entirely possible ...& quite common ...for combustion pressures to be closely the same at some particular rpm & throttle setting & not be the same at other throttle settings, including idle.
Properly synchronizing the carburetors, assuming all else is reasonably OK, will give smoother throttle operation, particularly noticeable at the just-off-idle area, & will also reduce higher rpm vibration. Just-off-idle is important, because on gentle take-offs that is the point that even slight engine stumbling would be exceptionally annoying. If the carburetors are not in good condition & properly adjusted & synchronized, the engine may well have very poor throttle feel, the engine might stumble, it might even backfire, it might use an excessive amount of fuel, & it might well cause a lot of 'funny vibrations'. Commonly seen is unstable idle; and, in particular, a large increase in idle rpm after full warm-up. Sometimes seen is an engine that is difficult to start, or perhaps acts very lean, etc. If the idle mixture is improperly set, it is not unusual to see red exhaust pipes near the heads.
| If you do not have the rest of your engine properly adjusted, such as ignition timing & valve clearances; if you have problems with ignition wiring or coils or points or condenser or spark plugs or spark plug caps; if the floats & diaphragms, passageways, jets, & jet needle (in particular) are not in good condition; ...then you are totally wasting your time playing with carburetor synchronization. The carburetors are the last ...LAST!! ...items to adjust (exception is preliminary settings if the carburetors have been overhauled, or engine worked on extensively etc)! You must NOT dynamically adjust your carburetors until the ignition & valves are known to be set properly, the floats are known good, float adjustment is proper ...including that the fuel level in the bowls is known to be correct. Diaphragms must be known good. There must be no vacuum leaks at the throttle shafts nor air leaks at the enrichener cover on the Bing CV carburetors. The butterflies in the CV carbs & the enrichener parts absolutely must be properly assembled. The CV carb butterflies can be installed backwards, & that will cause you endless problems with idle adjustments. Some enrichener parts are/were WRONGLY marked by Bing. YES, ....that little punch prick on the shaft has been known to be miss-marked. Do NOT depend on prior shop or owner work! |
You should have a relatively clean air cleaner (you do not need a totally clean air cleaner) & no vacuum leaks at the carburetor-to-head rubber hose adapters (are the clamps tight?). Test them for leaks ...it is simple and easy ...just spray that hose junctions area with any common spray cleaner, such as brake parts cleaner.... engine on and idling, >>>no change in RPM is good. If your cables are worn enough, or kinked, or routed wrongly, your carburetors will not stay in synchronization. If the throttle at the bars has badly worn teeth at its barrel & cam, those should be replaced, as they will cause stiff irregular throttle action. Once the throttle gear & associated cam gear (that has the chain thing) are worn enough, the teeth will strip ...you won't like that. Those parts also need to be lubricated & operating smoothly. Those parts on earlier models have been updated, & you should consult my other articles for the details; or, a good parts person at a BMW dealership or Independent Servicer.
I have seen a large number of Airheads that do not have sufficient free-play in the throttle cables (sometimes also choke cables and enrichener cables and even clutch cable). If the needed throttle free-play is not present, moving the bars may change the RPM and the synchronization will vary considerably. The engine is likely to drift higher in rpm as it warms up ....(however, that is often a symptom of other problems, including idle mixture adjustments and/or a sticky automatic advance). Rider's tend to ignore throttle cables until one breaks. It is important that SOME free play be in BOTH throttle cable outer jackets as seen at the carburetors, with the throttle at the bars fully turned off, but your hand NOT on it ...that is, NOT rotating the throttle further off than its spring-loaded off point. The throttle return springs are located AT the carburetors. Conversely, excessive and unequal free play in the cables, depending on rider technique, can result in jerky operation at low rpm. If there is enough excessive free-play, the outer throttle outer jacket can ride-up onto the carburetor threaded adapter, causing various problems. 1/8" of cable sheath free-play at the carburetor is plenty enough, assuming proper cable routing.
It is beyond the scope of this article ...which is already lengthy ...to tell you how to check, fix, adjust, & generally be sure everything is correct before you attempt carburetor synchronization. This article tells you a few things to watch out for, but primarily it tells you HOW to do the synchronization using simple tools, & how to do the job quickly & accurately. ANYone can do it! You do NOT need to have some sort of vast experience!
What tools do you need? ....and some early information on synch/adjustment methods:
You will need a flat blade screwdriver to check the tightness of the rubber hose clamps; to adjust the idle mixture screws & idle stop (RPM) screws; &, perhaps remove a screw plug from a vacuum port, which may not be a screw, could be a push-on hose. You might not even have vacuum ports on earliest Airheads.
If using the Shorting Method (my Method #2), then this screwdriver should NOT be too short in length & it MUST HAVE a plastic electrically insulated handle. The metal portion of the screwdriver MUST NOT extend to the end of the hand-area, where you could possibly come in contact with it. If you are deaf, and thus cannot hear the engine, you probably will not want to use the shorting method. If you have a dual-plugging installation, you can still use the shorting method, as I explain in this article, with a bit more care involved to avoid getting an electric shock.
You will need a wrench to fit the cable length adjustment locking nuts. Some folks have wrenches they like better than the BMW one (I am in that category). You need a short wrench that fits, so as to avoid rounding the edges of the carburetor cable adjustor lock nuts, which are not hardened. My favorite wrench is a common thin flat open end type, which I heated red hot so it can be bent a modest amount.
You usually will be doing ONE of the TWO methods (#1, or #2) JUST BELOW! ...or, you certainly CAN use a combination of both methods. Some folks do Method #1, quickly, then take a ride, & then finish up with Method #2. You can certainly do the entire synchronizing with either, or a combination. Method #2 gives the BEST final synchronization.
If the carburetors were taken apart for an overhaul, & all the adjustments are now WAY off, then you can start with the factory recommended settings. Once the carburetors ARE synchronized, future adjustments can be done quickly; as only very small adjustments will be made.
Method #1: This method uses some sort of vacuum sensing gauge or gauge set. This can be a water, oil, colored alcohol, or mercury manometer (Sticks or Stix, etc.); a Walus differential gauge; or an electronic vacuum differential instrument (TwinMax, etc.). In my opinion, one of the best carburetor vacuum type synchronizers was the Harmonizer, by Grok; although VERY sensitive....perhaps excessively sensitive. I believe it is better & more useful than the TwinMax. The adjustment method is similar to that outlined in Method #2.
The Harmonizer is back in production via the KatDash folks who bought the rights:
http://katdash.com/harmonizer/
|
Carburetor Synchronizer (Grok's Harmonizer). GROK was Mark Von Striver. He designed, built, and sold what is POSSIBLY THE BEST synchronizer available; ....but the original version was very sensitive. He died in April 2016. A few units were still available that were made before his death, via his daughter. The Katdash folks purchased the rights, and enough parts for several hundred Harmonizers.....and when those are gone, they will be building an updated version: http://katdash.com/harmonizer/. With the Harmonizer back in production, I have updated this boxed area several times. Snowbum uses his own favorite synchronizer, the Walus Engineering dual-differential gauge, that has not been available for many years. Occasionally one comes up for sale, on such as Ebay. Snowbum nearly always uses the shorting of spark plugs method, but usually uses the Walus on dual-plugged Airheads. YOU may want to try different methods. The shorting-of-spark-plugs method really is the most accurate, however, and DOES NOT require any fancy instrument. If you are looking for a synchronizer instrument, and don't wish to use the shorting method (which I highly recommend), or simply like the ease of use, and the extra information available from the Harmonizer......then ....consider the Harmonizer. There are other synchronizers on the market. Find one you like, and use it!...or, learn the shorting method ...it works very well! I DO recommend the Harmonizer. |
If your carburetors do not have vacuum ports, these ports can usually be added. Some synch tools don't work well on the BMW carburetors, or are too slow in use, etc. The Unisyn comes to mind here. It is usable, if you are very careful. I don't like using them on Airheads. I am not all that happy either, with mercury tube or colored alcohol tubes type of synchronizers.
Early CV carburetors that did have vacuum ports (not all did) had the ports sticking out from the carburetor horizontally. All later models had ports, & they stick downwards from the underside. These later ones may have soft black rubber hoses that lead to the Pulse Air system in the air filter box. The carburetor vacuum ports have internal screw threads, easily seen after the hose is pulled off, and the thread is not a common type. You do not have to install a screw (nor washer), unless you are removing the vacuum hose permanently for some reason, but the ports should not be left open to the outside air.
A popular modification is to remove the rubber hose sections & block their air cleaner area, when removing the Pulse-Air system. I have mixed feelings on that, & there is no harm done by leaving the vacuum hoses connected to each other, using the air cleaner area small T-fitting already there, & plugging the rear facing part of that T. That means no vacuum port screws to lose. Disregard folks that tell you that this makes the carburetor action smoother, or that it messes up carburetion. It does neither. There is an extensive article on this website that fully describes the Pulse-Air system, how to remove or plug it, & further has information on the tank fumes system & the fuel cutoff system used on the last Airheads: https://bmwmotorcycletech.info/pulseair.htm
Method #2: This method uses spark plug shorting tools. This Method is more accurate than any other. It is also much cheaper! You will need tools I will call shorting adapters, which consist of one or two plastic handled (for electrical insulation) screwdriver(s), of nearly any reasonable type; can be flat blade, phillips, etc. You will also need to fashion or purchase some sort of an adaptor that allows you to SECURELY extend the electrical contact inside the spark plug cap, to the spark plug threaded top. Securely means that engine vibration will NOT cause a disconnect, because such could damage the ignition.
Don't use short screwdriver(s), they may be too short for safety. I use 8 or even 12 inch ones. Do not use wood handled types, there is a chance you could get an electrical shock. DO NOT use a screwdriver whose metal shank comes completely to the hand-end plastic, where you could touch the metal.
What you are going to do, whether you select my Method #1 or my Method #2; is to first set cable free play. Then you will run the engine at idle and adjust the idle mixtures. Next you will go back and forth between idle rpm and idle mixture adjustments, until no improvement can be made, and you end up at the appropriate idle RPM. For vacuum gauges, you simply balance the readings, and the final adjustment is that you adjust the cable lengths for balance at what is called 'off idle', which means about 1300 to 1500 RPM. For Method #2, you LISTEN to the engine sound as you alternatively short circuit the spark plugs (a shorted plug will not fire the fuel-air mixture in its cylinder).
For either Method: The final adjustment is to the cables at off-idle (above idle a small amount, I like 1300 to 1500 rpm).
While you can pay attention to the tachometer, primarily you should listen to the sound of the engine while you run the engine with both spark plugs operating. Then listen again with you shorting out first one spark plug (assuming standard two plugs engine), then the other, doing only one plug shorting at a time, & listening to the engine during these shorting's. You are, in effect, shutting down one cylinder, then allowing it to operate while you shut down the other cylinder, and repeating. You will be doing the adjustments fairly quickly, using a screwdriver to electrically short your spark plug ADAPTER to the engine metal. The engine must be warmed up a bit, even a garage type 3 minute warmup for the INITIAL adjustments. Then, thoroughly warmed-up, you do the final adjustments (a 10 mile ride will do). The final adjustments take only a minute or three at the very most, so you don't need a fan. ....BUT....if you wished, for any garage-type adjustment, or any extended garage adjustments work, yes, you could consider using a big fan, to prevent engine overheating. This is especially so if you are doing the shorting method for your very first time which will usually take considerably longer.
The fan idea (and most of the procedure) also applies to using Method #1, the vacuum method. While the complete synchronizing can be done with the fan, in your garage, the best final adjustments are done immediately after a 10 mile+ ride.
Your EARS & BRAIN will tell you all you need to know. Your first time at this might take 10 minutes of playing until you get the idea. Then, you can do it all much more quickly ...REALLY!!
You need adapters that absolutely, positively, without question!, allow the existing spark plug caps to securely connect to these adapters & the adapters to then connect securely to the spark plug top threads. These adapters should be such that there is no chance of a spark plug or cap dis-connection ...from engine vibration, your playing....etc. This means that whatever adapters you make/use, these adapters must not come loose. If they come loose you could injure the coils in points models; or, coils and/or Hall device or module in the 1981 & later models.
Doing synchronization is actually very simple, and it takes vastly longer to read about it in this article, than to do it!
|
Disregard ANYTHING you read in ANY book or on the internet, or ANYPLACE ELSE ...that says ...to pull the spark plug caps off your engine to 'listen-to' the engine. That method is "USUALLY" SAFE FOR ONLY early models (pre-1970) which use a magneto & THAT STILL HAVE their safety spark gaps built into the magneto (& such gaps have to be in good condition). You can ruin or damage coils & electronics by failing to heed my advice here. Certainly there is a shock hazard too.
DO CARBURETORS SYNCH WORK MY WAY!... |
IF you chose Method #1 meter or gauge, you don't short the plugs, nor do you need any connection adapters. Some folks do the final adjustment with the shorting adapters after preliminary meter/gauge usage. In SOME instances that is a NECESSITY ...see the Hints section at the end of this article. YOUR choice.
The shorting method IS MORE ACCURATE because it takes into account ACTUAL differences, not just vacuum differences, between the cylinders, and carburetors, etc. It eliminates errors in butterflies and other things. It is dependent only on your being reasonably careful & methodical. Of course, this negates that nice feeling some folks seem to get by purchasing pricey test gear.
I do, and teach, idle MIXTURE adjustments by EAR. You should NOT try to adjust idle MIXTURES with shorting of the spark plugs, NOR, by gauges. All will be explained in this article. Beginning from excessively too far CCW, idle mixture adjustments have a small effect on idle RPM, until you screw the control in too far, then idle RPM drops off fast and the engine stumbles. The correct idle mixture adjustment is done by listening to the engine for peak RPM (and then usually backing off the adjustment ~1/8th turn). There is one other adjustment done at idle RPM, and that is the adjustment for final hot engine RPM. That adjustment can have a substantial effect on the idle MIXTURE adjustment. So, the adjustments interact, and you will be going back and forth, in order to end up with the final adjustments. The goal is always the same, proper RPM (I suggest 1025 rpm) for final idle, and the idle mixture at ~1/8th turn CCW from the peak (peak is where additional screwing in (CW) will cause a RPM DEcrease). YOU MUST have throttle cable free-play when doing idle adjustments!
The final results should be such that the idle mixtures can not be improved, the idle RPM is what you want, and there is no stumbling upon slight throttle increase, nor unequal vacuum or unequal sound between shorted cylinders, if the spark plug adapters are alternately shorted.
The shorting adapters:
You could probably dream-up quite a few types of spark plug shorting tools, perhaps some version that are especially good for your particular style of synching the carbs. There are photos of various types a bit farther down in this article you are reading to give you some ideas.
One popular type is a piece of spoke (threaded end) from a wheel, & a spark plug screw-on barrel fitting. I have also used threaded spoke fittings at the spark plug top threads. Standard BMW wheel spokes have the correct thread, so a spoke fitting can be used; or, the spark plug screw-barrel, which has the same thread. You may decide on other methods for dual-plugged bikes. Just be sure they are secure when in use. I will explain all this better in the next several paragraphs.
As I noted, you need something that fits securely at the spark plug top THREADED POST ...and ALSO inside the spark plug cap. The first thing that comes to mind is likely one of the removable small threaded barrels that many (NOT ALL) spark plugs come with, & that you have probably discarded. Those do have the correct thread. Some used to be made of BRASS, & those are preferred, as you can solder to them. Most are now some sort of UNsolderable, but crimpable, aluminum alloy. You can probably find some for free at a nearby auto repair place. However, a spoke nipple, from spokes type wheel rims, will do very nicely, especially with its longer threaded area.
Into the spark plug CAP, you insert some sort of properly fitting threaded rod as described just above, but in more depth a bit later. If using one of the barrels of aluminum alloy for the spark plug threads, and not a piece of spoke, you can perhaps crimp a piece of 14 gauge house wiring solid copper inner conductor into it, leaving several threads so the barrel can screw onto the spark plug. I made one of these up using, instead of rod or house wire, a few inch piece of old ignition wire, attached the adapter wire at the spark plug cap end by using the metal part from the top of an old spark plug; simply using a small hammer or vise to crush the old spark plug & remove the top innards. I had to fiddle with the wire to make it fit tightly enough into the spark plug cap (that the ignition wire fits into). I don't recommend that method. I don't bother carrying it, it looks unprofessional ...although I admit to keeping a couple of especially crude looking ones in my Walus gauge box (yes, I often use such a vacuum gauge AND the shorting method). A very nice adaptor can be made with spoke material, see below ....and it is, or can be, more secure! I explain why it is a bit more secure.
The spark plug threads are 4 mm x 0.7 mm pitch. You can, perhaps, find LONG screws or other threaded material at hardware stores, & nuts, if you wish to make your own version of these shorting adaptors from such items.
The BMW spokes on old wheels have the correct thread, 4 mm x 0.7 mm thread pitch. If you have a wheel rebuilding store near you, obtain what you want from them, they are always throwing away old spokes and spoke nipples. Just be sure the items have the same thread size and thread pitch, as the top threads on your spark plugs.
Best is to use the nipple, or get a spark plug screw top barrel. Cut the spoke to 2 or 3 inches in length; one end of which is the original spoke threaded end. Put a TINY SHARP NOTCH ON ONE SIDE (tiny so as to keep strength) of the non-threaded spoke end. This notch needs to be close to the end (look into the spark plug electric cap for why and where the notch should go, you will see the spark plug cap's electrical connection has a thin stiff wire across it); then the spoke notch can be lined-up with, and engage with the stiff tiny wire inside the spark plug cap ...where the spark plugs threads used to push into. Explaining this another way: the BMW or proper NGK spark plug caps have an internal cross-wire to 'grip' spark plug threads. The idea for the notch is to keep the adaptor from jiggling off the spark plug cap during your synchronization efforts. You can avoid filing a notch, and then having to align the wire in the cap to the notch, by using a threaded spark plug top barrel, and clamping it at one end to the NON-threaded end of your piece of spoke ....then the threaded end of that spoke pushes right into the proper place in the spark plug cap. That can work very well. Your choice.
If you have a dual-plugged bike (two spark plugs per cylinder), you make two spoke adapters for the top plugs just as you would for a one spark plug per cylinder bike...but you also make an ignition wire type adaptor for each of the bottom spark plugs; perhaps with a longer extension, perhaps bent so the wire or spoke comes close to the one on the top spark plug. You now have two places per cylinder to do the shorting...arrange these to be fairly close to each other ...maybe an inch or so ....so you can use a single screwdriver just like you would do single plug bike shorting. Many ways to do this, including insulated parts in an insulated switching box with old-fashioned knife switches. Some bikes, depending on tuning, etc., will allow you to continuously short both bottom plugs to the cylinder head fins (a jumper wire with alligator clips will do, for each cylinder), when doing synchronization by shorting each top plug only individually/separately. On other bikes, this constant shorting of the bottom plugs reduces the idle speed too much ...and you have to remove the short from the bottom plugs for final adjustments. Others will use vacuum methods, instead of shorting methods (for dual plugged Airheads). Do not mistake the meanings here, you will not be connecting the top and bottom plugs on any one cylinder to each other, except to enable the screwdriver connection to a cylinder fin at the same time....and this is only for when the constant shorting of the lower spark plugs (on both cylinders) results in a too slow idle, usually meaning engine shuts off.
Be creative ...design your own adapters/system of doing the shorting's. Be sure all is secure in use!! Secure means that they are not going to fall apart, from engine vibration or just bumping a wire with the screwdriver, etc.
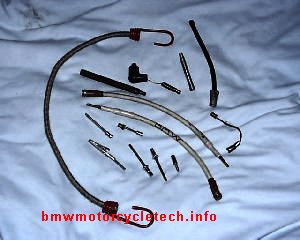
PHOTOS, BELOW: Most of my assortment of spark plug shorting & adapting tools. These include the spoke & spoke nipple type. I have used all of these at one time or another, sometimes improvising on the spot at TechDays, etc. The bungee cord (I used two of them) is here as I used the bungee to hold the bottom spark plug wire adaptors close to the upper plug shorting point ....see text (yes, you'd then need TWO bungees). ....that was my simple method for dual-plugged bikes.
Sources of various styles of adapters:
http://www.northwoodsairheads.com/
Tom Cutter at his http://rubberchickenracinggarage.com makes and stocks these adaptor tools:
Rubber Chicken Racing Garage; 1360 Colony Way; Yardley, PA 19067. 215-321-7944 shop 215-321-7954 fax
[email protected]
https://www.euromotoelectrics.com/product-p/carbsynctool.htm
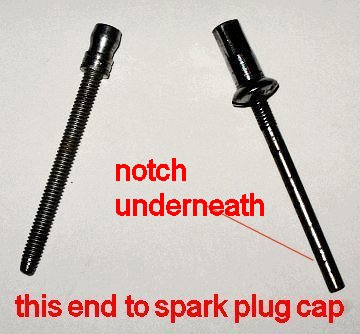
The RIGHT photo shows TWO of MY favorite shorting tools (I have 4 each of these two styles). These are what I use most of the time (either or both types). You could make your own adapters using the threaded material of the left one in that photo (a spark plug screw top barrel), with a piece of common spoke nipple, etc. The right one is of spoke material and spoke tightener.
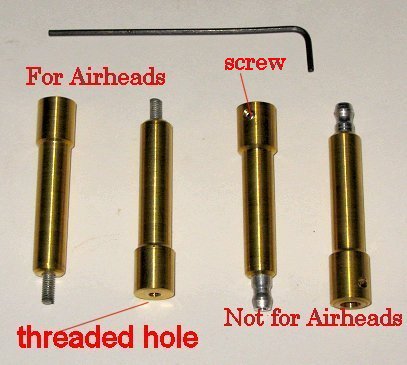
Below are four more spark plug adapters. Two types. Only the left two with the male and female threads would normally be used on our Airheads, because the Airheads use spark plugs withOUT permanent barrels:
How carburetors work (simplified explanation).
Vacuum-synchronization methods (this is not generally used with the above shorting tools, but can be).
R90S with Dell's?.....There is an article on this website on the Dell'Orto carburetors, with a great many diagrams/sketches and detailed explanations of carburetor operation: https://bmwmotorcycletech.info/dell.htm
Even if using shorting methods, read this:
A carburetor operates, as opposed to a fuel injector, by having an internal necked-down area through which the incoming air passes. The incoming air is speeded-up by the squeezing effect of that neck. Jakob Bernouli's theorem said that there is a DEcrease in pressure as velocity increases. The decreased pressure, or 'vacuum', happens in the squeezed-down area, which is called a Venturi, and it allows fuel to rise up in an opening/port/pipe ("sucked up") that has access to the fuel bowl. The combination of the fluid gasoline & air rushing by the pipe or port opening .....turns into spray, hopefully well atomized into a gaseous mixture with the incoming air, but is more likely to have superfine microscopic droplets.
There are two main places in the Bing CV carburetor where fuel is sucked-up due to the vacuum (lowered pressure area). One is the central main and secondary jet/needle assembly; another via a removable "idle jet", which feeds fuel to one or more idle port holes located in the bottom throat area of the carburetor. (I am avoiding here going into information that the enrichener on the CV carbs works, crudely, in a similar sucking-up manner). The idle ports are always in the base of the carburetor throat on Airheads.
On the pure slide (there is no butterfly valve on them) Bing carburetors, the slide is mechanically coupled to the throttle, and the slide height is adjustable by a screw when the throttle is turned off, so the slide is just the right amount above the idle port and at the same time allows some air for the venturi operation. Adjustment of the slide height adjusts the idle RPM and has an effect on the idle mixture too. FYI, the pure slide carburetors use idle passageways AIR adjustment, while in the CV carburetor the idle passageways adjustment controls liquid fuel.
In the Bing CV carburetor, the slide is not connected directly to the throttle, but there is a butterfly that is, and the butterfly near-closure point, at the bottom, where the idle fuel port(s) are located, is adjustable for the idle RPM. The velocity of the air coming across those idle ports (which supply liquid fuel) is high when the butterfly valve is nearly totally closed at idle.
For both types of carburetors, slide only and CV, the throttle cable has its own adjustment, which is used to set the engine for equality between the cylinders when the throttle is SLIGHTLY opened ("slightly turned on").
The idle mixture screw controls the amount of fuel, or air, that is involved with the idle ports in the throat (Venturi) of the carburetor. On the Bing CV carburetor, rotating the mixture control CW leans the idle mixture. On the pure slide carburetors, rotating the control CCW leans the idle mixture. Leaning the mixture has a much bigger effect on idle than too rich, so we always adjust carburetors from a starting position of way too rich, a secondary reason is that proper idle mixture is best set just a wee bit richer than the point where any further leaner rotation of the adjustment causes a noticeable RPM drop. That very slightly richer setting gives better RPM control for the engine between cool/cold and fully warmed-up. Otherwise, you would see a large RPM increase as the engine warmed up. Please re-read this paragraph several times.
The piston coming inwards (away from the cylinder head) in our Airheads on the INTAKE stroke (when the exhaust valve is closed, intake valve open); creates a partial vacuum in the cylinder, with reference to outside air. When the butterfly valve (or 'slide' in pure slide carburetors) in a carburetor is closed, or nearly so (neither can be 100.000% closed as the engine needs some air to run), fuel & in some instances fuel/air mixture, is sucked out of the idle port(s) (holes) in the bottom of the carburetor body throat. As the butterfly or slide is opened more, by you rotating the throttle open (on the CV carbs, the butterfly is directly throttle controlled, but the slide is controlled by vacuum passageways inside the carburetor), the idle ports stop functioning, depending on throttle opening amount, due to lowered vacuum at the idle ports ....& now fuel comes spraying out of the central jet area.
The vacuum tube (often called a vacuum port) for a vacuum gauge (also used for the Pulse Air system on the later models) is simply a small pipe leading into the carburetor, ending up at a very small hole/passageway into the venturi area. The vacuum port pipe has that small diameter pipe pressed into it, which is blocked off by a plug, screw, or connected to the other carburetor & a system for operating a smog device setup (called Pulse Air on later models with rectangular air cleaners).
It is possible to sample vacuum after the carburetor, the readings will be different with throttle opening, but it can be done, by a probe into the large diameter rubber hose, for instance. Sometimes both methods are in use when analyzing engine performance. I suggest that method not be done by the average person, as readings and use is different from that noted in this article. The common method is to sample the vacuum at the carburetor throat as I described. This is officially called Venturi Vacuum. If the vacuum was sampled AFTER the carburetor, it is called, confusingly, Throttle Plate Vacuum.
If the vacuum produced by the engine cylinder piston movement was a near perfect vacuum, the maximum vacuum that could be produced, in theory, is approximately 30 inches of mercury vacuum at sea level, where 30 inches of mercury is the standard accepted atmospheric pressure, but in practice it varies a bit with weather conditions. 30" of mercury is ~15 pounds per square inch. As altitude increases, the air pressure around us generally goes down ~1 inch of mercury or half a pound per square inch, per thousand feet. Some atmospheric effects can make small changes that are up or down with increasing altitude, but the over-all trend is down with increase in altitude. Thus, at higher altitudes, there is less air pressure, which means more fuel tries to go through the carburetor per weight of air, & the mixture thus gets richer. Richer means more fuel per air amount. The CV ("constant velocity) carburetors tend to compensate somewhat for rising altitude because the slide is vacuum controlled. On a practical basis, the engine cylinder vacuum is not going to be a perfect vacuum, but is going to be a few inches of mercury less. As the throttle is opened suddenly & most especially with a directly operated mechanical slide (not a CV carburetor); the vacuum on the engine side of the carburetor greatly and suddenly decreases (until engine rpm rises considerably from where it was when the throttle was suddenly opened). The vacuum decrease may be such that the mixture leans considerably, and the engine stumbles, so other features in the carburetor are needed to compensate; popular methods include a tiny pump of some sort built into the carburetor, and for the CV carburetors, the slide cannot move up due to lack of vacuum on the diaphragm at that moment. If the throttle is suddenly closed from a high RPM, there is then a very high vacuum at the carburetor output area, & the venturi has a fair amount as well, as the passageway is very small due to the closed throttle, air velocity being high. Suddenly closing a throttle on a carburetor, especially the slide only type, can cause a maximum-possible-air/fuel-flow through the idle ports. But, on most carburetors (without automatic enrichening devices) if the throttle is OPENED suddenly, with generally low RPM, the idle ports might not be able to supply sufficient fuel, and the engine can stumble, as noted. You are probably confused by this paragraph.
Due to the above described effects, it is far more sensitive and thus much better, to adjust a carburetor's throttle cable sheath, which is the effective cable length; not very far above idle; & conversely it is poorer, usually much so, to try to do any cable synchronization at quite high rpm, as some suggest. Re-said, you do not want to adjust the cable synchronization too close to idle rpm nor too high. I suggest you DISREGARD any books or literature, that say to set the throttle synchronization at, perhaps, 4000 rpm, for example. The best rpm to synchronize the CABLES, after you do ALL the other adjustments FIRST is ~1300-1800 rpm, which is ABOVE idle RPM (which I suggest be at 1025 RPM). 1500 is a good figure for throttle cable adjustments. The BMW carburetors cable synchronization is done by adjusting the cable sheaths mounts & this is ALWAYS adjusted LAST. During the earlier synchronization process, these throttle cables MUST have some SLACK at throttle-off position! There MUST be some slack left AFTER you are done with all synchronization. Usually it is left at ~1/8" or slightly less. Lift up gently on the throttle cable sheath at each carburetor, separately, to see what I am talking about ....the free lifting is easily seen, after which more lifting will start pulling the cable innards to move the carburetor internals.
Manometers, or any type of gauge or electronic methods:
These either use the vacuum in each carburetor venturi (separate meters, gauges, or sticks); or, read the difference between the carburetor venturis. Either method can work fine, but differential methods are usually more sensitive, as they use electronics that can amplify results, & thereby are more accurate. There are non-electronic meters that are quite sensitive, and are of the differential type. The Walus gauge is like that. I use mine a lot. It is my method of choice, in particular, for dual-plugged engines.
No vacuum method can be as good as my shorting method, which takes into account actual engine cylinder and most carburetor differences. With my shorting method there is no need to purchase a vacuum synchronizer, vacuum gauge, manometer, etc. Using shorting methods is nothing new, it has been published for many years, not only by me, but by various groups/clubs, etc. ...especially in Europe ...but my information is specific.
MANY vacuum measuring devices need and thus incorporate, a SNUBBER, for dampening the otherwise jerky readings. It is a very tiny restrictive hole or a porous material ...or other method that produces a small hole effect. Otherwise, the device's indication might pulsate rapidly or be much too sensitive & thereby be hard to read/average, as carburetor vacuum flow is actually a series of pulses.
Before you can do synchronization, be sure of the following details.
Always be sure that the barrel fitting at the end of the cables, where they fit into the lever arms at the Bing CV type carburetors, have a bit of lubricant, heavy oil is OK; especially good is light moly grease on top of moly oil. I use moly oil and grease because it gets into the barrel area better and is long-lasting. These barrel ends must be very free to rotate. Failure to have smoothly rotating barrels is a cause of frayed & broken cables & lousy synchronization. Be sure no strands of the inner cable are broken, this is most often seen at the left carburetor due to the owner not being careful when checking the oil dipstick, and bends the sheath, increasing friction, causing cable wear.
If your throttle unit at the bars is rough or grumbly feeling in its action, or the cables are improperly routed (and tying them down with extra tie-wraps is NOT a good idea), etc. ...you are going to have problems.
There MUST be SOME free play in the outer jacket of all throttle cables, throttle at the bars being off (hands off the throttle); and about 3/16" is about correct to start with. If you have a throttle lock of any sort, it should be OFF. SLIGHTLY LIFT the outer cable sheath on the throttles at the carburetors, and you MUST have some free play. Up to 1/8" of free outer sheath play is reasonable when you are all done with cable synchronization (which is the LAST adjustment to do).
BMW throttle cables are NOT to be lubricated. Genuine BMW cables are internally LINED with a Nylon-like substance. Original types, if any still exist, pre-1978, and certainly original /5 era types that are NOT lined, CAN be lubricated as a last resort before replacement. Cables DO wear out & should be replaced when they are acting up, getting stiff, etc.
There is a rather substantial problem from folks bending the throttle cable on the left carburetor while checking the oil dipstick. A bent cable will increase friction, and eventually there will be a broken strand at the carburetor lever area, leading to total failure ...I have seen this within a few hundred miles of the first strand breaking. A different cable problem that happens (but rarely), is when a tip disconnects from the cable due to faulty manufacture, or, excessive pulling due to friction, bending, etc., in the lever area. Nearly always this is at an especially high force area, the clutch cable at the handlebars lever (and, wear at the lever pivot, improper crimping of the cable end, poor rotation of the barrel....).
Preliminary eyeball mechanical synchronization done? If your carburetors have been properly synchronized previously, & you have not messed with adjustments in a major way, you probably do not need to do this step, unless you want to be SURE. I ALWAYS do eyeball checks.
BMW Airheads have TWO types of throttle cable designs, one design has a single throttle cable at the handlebars; the other design has TWO cables at the bars throttle. The single type is more stable & usually less affected by turning the bars. The single cable type uses a round T junction tubular part located under the fuel tank. That T-junction has one adjustment; for top cable length, for SOME free-play of that single TOP cable. The T junction unit is NOT to be adjusted for carburetor cables free-play. You only need to adjust that top cable adjustor so that there is a SMALL amount of free play in the upper cable AND making sure that moving the handlebars from side to side does not eliminate every bit of free play in the top cable. Do not have the free play at the top cable excessive, or the sheath end could come out of the associated fitting. For the two-cable version, the adjustments are only at the carburetor end of the cables. When you are all done, it should be possible to rotate the handlebars throttle from the point the carburetors are fully mechanically at off/idle; and, at the other end of throttle rotation, the carburetors are opened to the maximum possible point (carburetor throttle levers on their associated mechanical stops). If not enough rotation exists, check the free play of cables at the carburetors AND the T barrel adjustment. Check the enrichener cables (later models have those AND T barrels) for full and proper range of motion.
Before you do actual carburetor synchronization adjustments at the carburetors:
(1) Have you checked valve clearances? Ignition points gap (if points type)? Ignition timing? Carburetor-to-head hoses tight and no leaks as checked by spraying with a volatile solvent, at idle? Have your various tools, adaptors, gauges, whatever, at the ready? Anything else?
(2) Have you removed the large top screw at the throttle assembly, & made sure the match-up marks align, & that the cam/gear assembly is greased? If you have done this within the last 10Kmi, or two years, you can probably bypass this step. There is some discussion, further down about these parts.
(3) Checked to be sure the upper throttle cable(s) have a small amount of free play? Be sure this is true. You can not properly synchronize the carburetors unless the throttle cable(s) at the handlebars AND carburetors have some free play. The SINGLE cable model free play can be checked by pulling on the cable sheath as it enters the throttle assembly. About 3/32" is about right, throughout handlebar left-right movement. DO NOT try to rotate the throttle further off for this, it needs only to be in its natural off position (any friction device turned OFF). If the free play is excessive, throttle feel will not only be sloppy off-idle, but you might not be able to reach full throttle, no matter how far you twist the grip; and, as noted previously, the cable sheath end could come out.
(4) Resaid differently: The free play adjustment is in more than one place, depending on your model and year. The single throttle cable models have an upper cable, and its free play adjusted at the nose of the T adaptor under the tank as I have noted. There is supposed to be a rubber weatherproofing cover there. Models with the single upper cable also have the lower two cables adjustable at the carburetors. If the motorcycle has TWO cables to the throttle grip area, the free play adjustment IS ONLY AT THE CARBS via the throttle sheath adjustment. The models with the T adaptor adjustment seldom need the top cable to be adjusted.
If throttle internals at the handlebars are not properly assembled (there are synchronizing mechanical marks to line up internally ...you can see that with the one large screw removed and cover off), you will be unable to get full or proper throttle operation. Rotation will be limited. In working with the cables & carburetors, lubricating & proper re-assembly of the throttle parts at the bars is to be done before adjusting carburetor synchronization ...unless known to be already OK.
NERDY: The throttle CAM (the part the chain fits-to inside the throttle assembly) is not the same for 32 mm & 40 mm carburetors.
WHY the complicated throttle assembly for the throttle cables? Cam? Chain? Gears?
The BMW throttle design gives a very smooth straight-pull on the cable(s) at the throttle. The cam design gives a SLOWER proportional carburetor throttle effect at low settings, & as the throttle is opened, the effect increases, non-linearly, ...a very nice design, due to the CAM shape. The cam at the throttle is customized by BMW for exactly the "correct feel". All of these things make for a throttle that is not just smooth, but has progressive effect, allowing for much more accuracy for small throttle movements at idle & just above. You can also take this to mean much less engine jerkiness from trying to control small throttle movements. It is too bad that this sort of design, magnified some, is not used more. This is particularly so with many fuel injection systems which tend to be "abrupt".
If you have a R75/5, these were shipped with the earliest design of Bing's CV carburetors. These have the throttle return springs WRAPPED AROUND the throttle cable sheaths at the carburetors. This results in a rather stiff throttle action has also too much return spring force...and extra, unwanted, friction. First you should check the cables for stiff operation for any reason. If the cables are OK you may want to modify the spring setup. Simply reducing the spring force will help some, but if you go too far, the throttles won't return fully. You may want to fashion your own conversion, & looking at later carburetors will give you ideas. If you change to later carburetors, the problem is solved easily, if often expensively. The R75/7 carburetors are good for the /5, and do not exhibit several problems the original carburetors have. There is an article specifically dealing with R75/5 carburetors on this website, that goes into those carburetors, and their problems, and possible fixes, in great depth:
https://bmwmotorcycletech.info/earlybingR75CV.htm
Just what to do to those original R75/5 carburetors to reduce throttle force has stumped more than a few owners, since the tops of the /5 CV carbs are not all that easy to figure out how to add the later style of spring (look at the lever, and its length, too), which reduces hand force at the bars considerably. Here is a method you might like: Add a large washer at each carburetor in the threaded area of the throttle fastening to the carburetor. This is a bit tricky to do neatly, & one of these days I will do another /5 & post a photo here. You drill a tiny hole in that washer; the spring upper mount then becomes the washer, using the later type of spring. Take a look at a later carburetor that has the spring connected to the carburetor body. Look closely at the levers on the later carburetors shaft. If you have ORIGINAL /5 (AS SHIPPED BRAND NEW ONLY) throttle cables, replace them with later nylon lined types.
Except for the /5 models in UNmodified condition, lighter CV carburetor springs are available ....they are not the same for 32 and 40 mm carburetors. Check with your dealership; or, Ted Porter's Beemershop in California. There is a type 606 spring for the 32 mm carburetors that have 3 digit model numbers; a type 908 for the earlier 2 digit 32 mm types, & a type 312 for the 40 mm carbs. These will give lighter feeling to the throttle, yet are still adequate to return the throttle to idle. The throttle assembly might last longer too. These are NOT for the UNmodified /5 carburetors.
PRELIMINARY "EYEBALL" CABLE SYNCHRONIZATION:
This could be called STATIC synchronization; that is, the motor is OFF.
If the carburetor adjustments were all changed radically, perhaps you overhauled the carburetors, changed cables, whatever; you SHOULD DO A PRELIMINARY CABLE SYNCHRONIZATION by eyeball. If this is done accurately enough, it is usually good enough to allow you to go riding to warm up the engine ....until you can synchronize the carburetors properly with tools or instruments. Set the CV idle mixture screw about 1/2 to 1 full turn further OUTWARDS (CCW) from the recommended number of turns....because you want to be sure you start the motor-running synchronization from extra richness (CV).
If you have not done serious work such as a carburetor overhaul; perhaps you have done nothing; or, perhaps you have changed a float or adjusted the fuel level, ETC....then you should STILL check the below TWO items, but not touch the idle stop nor idle mixture screws:
1. If you have a SINGLE CABLE at the throttle at the handlebars, be sure any throttle friction screw is turned off and then adjust that cable at the under tank T connector, so the sheath has a small amount of free play, perhaps 3/32", throttle off, and hand off the throttle (DO NOT rotate it backwards to the mechanical stop). Simply pull on the cable sheath at the throttle assembly to see what the free play is. If two cables at the handlebars, disregard this item 1; but ensure you have free play in the cables AT the carburetors.
2. If you have a throttle friction stop of some sort, be sure it is turned off. Adjust the throttle cables length adjustments at the carburetors for a preliminary adjustment. This should be so using the handlebar throttle it just begins to lift both carburetors throttle levers (or slide on slide only carburetors) at the exact same time as you barely increase the handlebars throttle from idle position a very small amount. Leave the cables with not quite 1/8" of slack in their outer cable sheath at throttle off, hand off the throttle. You will need to play with the idea, as it is not the same view to you from the seat, left and right carburetors. Some may use a throttle lock for ease of doing this.
3. The choke (enrichener) cables need to have a rather short amount of free-play. If the slack is too much, you will not be able to get full choke off and full choke on; the levers at the carburetors won't travel far enough. They, too, need balancing, but that is done simply and only by eyeball-looking-at-carburetor-choke-lever-lift for being at same time, and amount. This should have been looked at in the very early PRELIMINARY work. Re-check NOW, for full choke off, and full choke on. Adjust if required. Early models have the choke lever located on the clamshell air cleaner cover. Later models have the choke lever located on the left handlebar. If excessive free play is seen at the left handlebar choke lever, and you have single cable and T adapter for the Enrichener, then adjust the T cylinder. Be sure that with the choke/Enrichener lever OFF (horizontal on clam shell models), the lever at the carburetor itself is touching its mechanical stop. Try to have THAT proper, as well as the choke lever being able to fully open that carburetor lever to its maximum choke point (the mechanical stop is, again, part of the carburetor body)
READY?? >>>>Proceed as follows:
Make sure the two carburetors have close to the same amount of idle stop adjustment. Try 1-1/2 CW turns on the adjustment to the throttle lever screw, from the point the lever will not go further off. If idle RPM was reasonable before, then do not touch these at this time. The slide only carburetors are a bit different, use the same idea.
If you played with the idle mixture adjustment, set it per whatever book you have, as far as turns outward from a GENTLE inward stop. This will be 1/2 to 1-1/2 turns PER THE BOOK, so check for YOUR carburetor; the BING book or other literature. THEN ADD 1/2 to 1 turn more. You are doing that to be VERY sure you are not starting from it being too far inwards, which WILL confuse you trying to properly adjust it after engine startup.
Recheck: For a CV carburetor, make sure the choke (enrichener) cables (and T connector if you have it) are adjusted for full off with their levers on the carburetor stops, and also able to reach the full-on mechanical carburetor stops, at the same time as you fully engage the enrichener lever at the bars, the lever is usually marked CHOKE. The enrichener T unit under the fuel tank has an adjustment to take up excessive slack for the choke cables, a quite small amount of slack is proper, & turning the bars back and forth should not change the slack enough to remove it all.
For those NOT having the T units under the tank, you have TWO long throttle cables, which go directly from carburetors to throttle at the bars. With the throttle OFF, hand NOT rotating the throttle backwards or forwards from idle resting position, there MUST BE approximately the same amount of slack in the outer jacket at the carbs (lift the outer jacket slightly to see this). Near but not over 1/8" is correct. My suggestion: 3/16".
The choke cable(s) need a smaller amount of slack, and if an upper, and lowers, have NOT OVER 1/8" for all three, with the choke lever on the handlebars at full off. Once properly set, the choke cables will remain in adjustment for very long periods of time. I usually adjust for 3/16".
Assuming that you have some throttle outer cable slack at the carburetors & at the bars cable too if you have just one, now you are ready to get your tools, fan, whatever, all laid out, ready for your return. I said RETURN, because you should go for a ride ...that is, if you are doing a complete, rather than eyeball adjustment of the cables (which you may have already just done). If gross changes in adjustments were made, due to, perhaps, carburetor overhaul, you can start engine, and make quickie adjustments before your ride. I purposely had you adjust the idle mixture screw on the CV carburetors at further outwards than finally required.
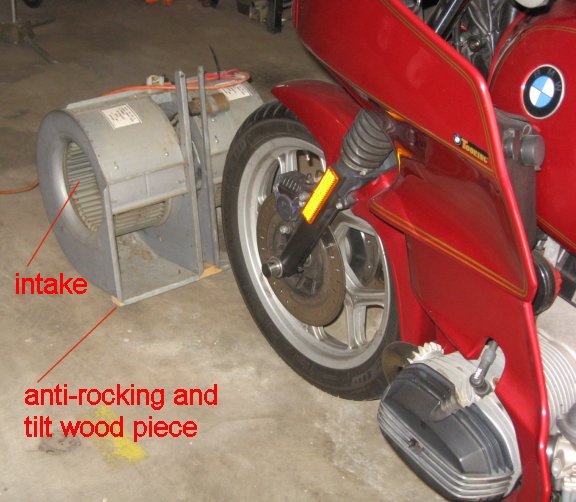
HINT: AFTER your warm-up ride, if you take more than 5 minutes to do the adjustments, a goodly sized cooling fan is needed, or, you need to ride a couple of miles again. Here is a way to get an excellent and powerful fan, for basically nothing! The air flow from this fan will be correct, much better in output and rotation of the air flow than a big blade type fan; and, thus, much more efficient than a such a common household round fan. You do not absolutely need this fan, but it sure is nice!
Go to one or more local heating contractors, & find a cooperative one ("sure, you can have an old squirrel cage heater motor, for free"). Heating/cooling contractors are always removing old home heaters & replacing them. Most of these heaters contain a perfectly good motor, of the type that has shafts running out both ends of the motor, & the shafts have mounted to them squirrel-cage type fans. You want the type with a squirrel cage at both ends, so as to cool both BMW Airhead cylinders and both exhaust headers. There is a surrounding metal shrouding that you want too (or, most of it). Most of these motors are heavy duty capacitor-start types, with plug tap selections for speeds. Adapt a power cord & maybe add a simple wood piece to keep your new fan from rolling about on your garage floor & to aim the fan slightly upward, and ....you have a dual output high volume cooling fan with a straight flow direction. You may want to put some screening or even chicken wire over the intake ends to prevent things in your shop, like rags, or your dog/cat, from getting into the fan intakes. There is no screening in the fan assembly in the photo below. The lowest speed setting is usually the correct one. You will find this fan also very nice to use after a ride to cool the engine (and exhaust pipes!) rapidly ....for other work.
Go for a 10 mile or longer ride. 1 or 2 miles is NOT enough! A garage quickie warm-up is not adequate for the full procedure. If you are forced to warm the bike up in the garage, best the entire engine and that means its case too, should be warmed, & you must use that dual squirrel-cage fan, otherwise the cylinder heads and cylinders will definitely overheat. Warmup at about 1400 rpm is fine. A ride is better! If using the fan, it needs to be in front of the front wheel, blowing air towards the motorcycle with a small angle from the floor. Don't use the fan from behind the rear wheel (you'd think I wouldn't have to say that, eh?).
Immediately upon your return, or otherwise fully warmed-up, put the bike on its center stand, best to not put it on the side-stand first, so as to avoid any fuel imbalances in the carburetor float bowls, although that will equalize by itself once on the center-stand and running for a couple of minutes. Leave the engine running or restart it when you begin the procedure. Position the fan, turn it on, it should be in front of the front wheel, blowing over the cylinders. Have the fan outlets tilted slightly upward for that, if need-be.
Do not overcool the cylinders & carburetors. If you are experienced, you will be quick about doing synchronization, and likely NOT need a fan.
You are going to do a dynamic synchronization. Once the carburetors are fully & properly adjusted, future synchronizations are going to be far easier with far less effort, & take very little time; and no fan needed! NOTE that the idle rpm adjustments, & to some reasonable extent the idle mixture adjustments, tend to be rather stable over a long period of time & mileage, & in the future, while you may occasionally have to make an adjustment, usually you will be adjusting only SLIGHTLY the cable lengths ...and even then, usually only one; less often will you be adjusting idle mixtures & idle stops, and then only SLIGHTLY. With good cables & the rest of the items previously mentioned all in good condition, doing a quick synchronization at 5000 mile intervals is all that is typically needed.
It is normal for an Airhead to idle more slowly if the engine is not fully warmed up. It will also idle slower if you ride to a considerably higher elevation. Adjustment to help compensate can be done as you do your dynamic synchronization. That is an advanced thing to do. I describe it in 1B. NERDY:, below.
DYNAMIC SYNCHRONIZATION:
Because several methods could be used, & because you might have slide-only carburetors (that means NON-CV, even though CV carburetors DO have slides), I will describe the BASIC SIMPLE method first, because it is common to all. I will assume a vacuum operated meter or gauge or manometer, and NOT the spark plug shorting method.
1A. Adjust the idle stop screws for a balanced gauge/etc. readings. If the rpm is too high, set each idle stop screw (CV) a wee bit less; or a wee bit more if idle is too low, and then go back & adjust one of them for balance. For slide-only carburetors with the slide adjustment on the side of the carburetor, adjust that. You want to end up with a balanced indication on your test device, & a rpm of about 1025. If your tach is reasonably accurate, you may use it. NOTE that excessively slow idle rpm will result in poor oiling of the timing chain & timing sprockets, & higher sensitivity to miss-adjustments, these are reasons I recommend you use 1025 RPM.
1B. NERDY (this is ADVANCED technique!): You could, you do not have to, select idle rpm & idle mixture final settings somewhat dependent on where you intend to ride, & where the adjustment is being done in the first place. This is because if the idle mixture was perfectly set at any particular altitude, the idle rpm tends to decrease with increasing altitude. Thus, if riding exclusively at sea level to perhaps about 3000 feet or so, I will target 1025 rpm. If doing the synchronization at a higher altitude ...say 5000 feet or higher (and especially if on a quite warm day) ... then I would set the idle for maybe 900 rpm, so the idle rpm will not increase too much when going down in altitude. Once you get a bit experienced at this, you will realize that the idle mixtures are also changing with altitude, & you can make a quite small change to them. Those adjusting at high altitudes might want to make the idle mixture screw a WEE bit RICHER; sea level adjustment folks use a WEE bit leaner. The Bing CV carbs idle mixture screws are turned inwards for leaner, & the slide carburetors idle mixture screws are turned outwards for leaner. We are talking about 1/4th turn maximum difference here! If you are a beginner at adjusting carburetors, I suggest you IGNORE this section 1B. My normal procedure is to have you set the idle very SLIGHTLY rich, typically 1/8th turn from optimum. Please don't do this nerdy stuff until you have a fair amount of experience.
2. Assuming here that you did NOT do 1B, and have completed 1A:
Now that you have the proper idle rpm, & balanced on the meter/gauge/whatever, you need to adjust the idle mixture. You WILL need to blip the throttle now & then to clear the engine of any fuel loading-up, just prior to ANY adjustments, idle, mixture, cables. After blipping, allow a few seconds for engine stabilization. Start with ONE carburetor. The idle mixture screw is adjusted BY EAR, & adjusted very slowly, perhaps initially a 1/4th turn over 5 seconds. As you approach the sweet spot, adjust more slowly, until the engine sounds the smoothest, & the idle speed the highest. This will be at the point that any further adjustment causes the engine to slow or stumble. Then, back off the adjustment, that is, adjust RICHER ...by 1/8th turn. This will be explained further.
IMPORTANT! You may have to start with the idle mixture screw outwards considerably more than you started with, as you may not know what the last person set the screw at, ....and/or... the factory or other manual initial adjustment recommendation could be too far in to begin with. Thus, I recommended, earlier, that you start ~2+ full turns outward from a gentle seating, thus you won't mistake the proper setting from starting too far inwards to begin with (trying to move it even further in, & NOT finding the correct adjustment). I seldom ever use the recommended initial idle screw adjustment. I just use approximately 2 turns outwards to begin with, unless I've done previous synch jobs on this bike, and the carbies have not been played with or taken apart this time. I suggest you practice, the first time, with adjusting the mixture screw 2+ turns outwards to start with; then you will easily see what proper adjustment means, as you screw it inwards. When the screw is out too far, the engine sounds labored, and a bit slow; as you turn it in, the rpm rises and the engine smooths out, and a small amount more inwards and the RPM drops rapidly. You want the adjustment a modest amount before the fall off, slightly more outwards than peak for a CV. I use 1/8th ....to 1/4th turn at the very most.
This all takes so many words for me to explain! The actual complete synchronization work takes just a FEW minutes!
With the idle mixture done on one carburetor, then do same to the other carburetor. After adjusting the second carburetor if there was any idle RPM change, go back & readjust BOTH idle rpm (throttle or slide stop adjustment) AND its balance. You probably will start by making the same small idle RPM adjustment to both carburetors; that is, the same screw amount, but not always. You may well have to repeat the process of idle mixture adjustment & idle stop screws several times because they interact. The interaction is not only between idle stop rpm adjustment and idle mixture adjustment on ONE carburetor, but adjusting one carburetor will cause the other to need a slight adjustment. What you want to end up with is the idle mixture screw in the best position for smoothness & highest idle rpm (and 1/8th turn rich), & a balanced indication on your meter ...and the proper rpm. Blip the throttle occasionally, be sure the engine settles down before doing another small adjustment and gauge reading. Once you have the optimum point on both carbs, you will be done with the idle mixture and idle stops (rpm) adjustment.
You will find, on the Bing CV carburetors especially, that the idle mixture screw is very sensitive in the INwards direction, particularly when you are close to the correct adjustment, as just a bit more inwards, and the engine RPM falls noticeably and the engine stumbles some. Going outwardly on the idle mixture screw (from peak RPM point), you will find it far less sensitive. Remember what I said about where to leave the idle mixture screw setting. NOTE: Make all idle mixture adjustment changes SLOWLY.
You want to end up with the idle mixtures correct and slightly rich (CCW on the CV), the idle rpm correct, the idle balance indication on your gauge(s) correct. Do NOT make the mistake of starting this procedure with the CV idle mixture screw too far inwards, & then rotating it farther inwards. It is always better to start with it too far outwards. Once done correctly, you need make only QUITE SMALL changes in the future (LESS THAN 1/4th a turn each way, to find the proper position). NOTE! ....there MUST BE throttle cable sheath slack at both carburetor throttle cable sheaths when all done!
YOU ARE NOW DONE WITH THE IDLE ADJUSTMENTS! Future adjustments will be very quick.
3. Adjusting the cable lengths (this is the final adjustment):
This is BEST done at a modestly low rpm, an rpm above the idle rpm, but not too far above. The farther above the idle rpm, the less sensitive this adjustments becomes ...& the harder it is to then get it correct for the more critical area, ....the 'just-off-idle' transition position. Because of this, I recommend 1300-1800 rpm. You can lock the throttle if you have a friction screw or something else at the bars; or, just hold the throttle while looking closely at the carburetor throttle linkage, use a rubber band, whatever.
What you will do is to rotate the throttle for any specific rpm in the range of 1300-1800 (whatever rpm you select in that range), hold/fix the throttle, & then look at your balancing device. If not at balance, lightly lift slightly EITHER of the cable sheaths, and find out WHICH cable needs to be tightened at the carburetor; or, which loosened. Then change the adjustment of THE ONE ONLY selected throttle cable & then try again. Some gauges will tell you which cable. You can also tighten one and loosen the other. You want to end up with a balanced readout, AND ALSO, a small amount of cable slack at throttle OFF on BOTH carburetors (carburetor levers must be on stops at the carburetors)...3/32" slack is fine. Now you know why I wanted you to start with some cable slack ....and end with some. NOTE that you do not want too much throttle cable slack, because if the throttle sheath can be moved (by your fingers) too much, it is possible for it to come out of the receptacle at the carburetor, and hang up on the edge. That's why I said not over 1/8" or so ...for safety against it coming out too far.
NOTE, this is somewhat of a repeat from the PRELIMINARY area: The choke (enrichener) cables also need to have a rather short amount of free-play too. For the same reasons, PLUS, if the slack is too much, you will not be able to get full choke off and full choke on (the levers at the carburetors won't travel far enough). They, too, need balancing, but that is done by eyeball-looking-at lever lift at same time. The engine does not need to be running. NO adjustments should be made for carburetor idle, idle mixture, or throttle cables, if you did not first check the enrichener levers at the carburetors and they were on their off mechanical stops there. NOTE ALSO that the enrichener cover has 4 small screws, and they have a tendency to back off some. If they back off too much, the gasket under that cover may 'suck in'. Fix that problem if it occurs! Some put a TINY drop of low strength Loctite on the 4 screws threads.
Raise the rpm a fair amount & see if the balance still holds relatively well. If it does not, you might have a diaphragm or leak problem.
Blipping the throttle upwards; or, suddenly and quickly moving the throttle to OFF from perhaps 4000 rpm ....both situations ....you may see largish unequal vacuum changes. Some of that is due to unequal springs on top of the CV slides (if your model has springs), or differences in diaphragms ....etc. All Airheads will have SOME such vacuum changes ....less is better .... & unless horrible ...you are advised to leave things alone. An Airhead expert may be able to tell you more, from the gauges changes when blipping upwards, to blipping downwards.
Assuming you have done the synchronization well, you should now have a bike that starts well, warms up to a stable idle fairly fast, & has good throttle feel 'coming off idle', idle rpm change is not overly excessive during warmup....ETC.
The shorting-of-spark-plugs method (the BEST method, IMO):
You simply will be modifying the previous methods, and you won't be using gauges; you WILL be using the simple shorting device tools you made or purchased.
1. Got the two screwdrivers with the plastic insulated handles ready? The wrench for the throttle cable nut? Dual squirrel cage fan? Screwdrivers to adjust the carbs and short out the spark plugs? Shorting devices?
2. In your garage for the preliminary procedure (do NOT go for a ride with adapters in place!...gads, do I have to say that or that the garage doors should be open?). If not in the garage, or outside where convenient, do so after you put the bike on the center-stand following your 10 mile+ warmup ride.
With engine off and ignition off, pull the spark plug caps off. Install your spark plugs/caps shorting devices. Be sure it is all secure; it is critical that the spark plug shorting adaptors can not fall off the spark plugs, the cap fly off, etc. Having the system become an open-circuit with the engine running will damage the ignition.
3. You now re-start the engine. Use the fan if you need to (you need to if your adjustment period goes beyond a few minutes).
4. Instead of a meter or other device showing you the cylinder balancing, you simply will short one spark plug adapter bare wire to a nearby fin; then remove that screwdriver induced short, & short the other spark plug adapter wire ...back & forth. You are shorting out the spark on one cylinder at a time. Use two screwdrivers or one, your choice.
5. First, you will do the IDLE. You will, with one insulated screwdriver, short out any one cylinder for ~3 actual seconds; then remove that screwdriver short and move the screwdriver to the other cylinder to short out the other cylinder. You will make the same as earlier described adjustment of the idle stops for rpm & balance ...balance here being the SAME SOUND & RPM from one cylinder & the other cylinder, when either is shorted. Adjust the idle stops for the same sound/RPM. Do not try for normal RPM except when both cylinders ARE operating.
You also make the same IDLE MIXTURE adjustment as previously described as in the gauge method. This is done with NO shorting of the plugs. Blip the throttle now & then to clear the engine, then wait a few seconds for the engine to settle down. As earlier described, it is, on a CV carburetor, screwing the idle mixture screw inwards slowly until the engine smoothness peaks rpm, then backing off the screw about 1/8th turn.
You will do the same back & forth idle stops & idle mixtures, until it is all OK & no further improvement can be made, and you end up with proper rpm (I prefer 1025) & proper balance at idle rpm, throttle off. Be sure you have some slack in the throttle cables, throttle off (and hands off throttle, and NO throttle lock or friction device in use).
6. With the idle adjustments done; you now synchronize the cables. This is a bit different in a couple of ways. There are TWO cable synchronizations to watch for. First one is a coarse adjustment. Both are done at the same 1300-1800 rpm (YOU pick the rpm you like, but I recommend ~1500).
Short the plugs as before, left, then right, then left ...listening to the engine. Each time one plug is shorted, listen. As with the idle adjustments, both plugs are NEVER shorted at the same time (one plug per cylinder meant here, not a dual-plugged bike). Allow about 3 or 4 seconds of shorting time for EACH plug. Adjust one, or both cable lengths, as required for balance ...the same sound. Remember not to run out of cable adjustment ...cables must have slack at throttle OFF when you are all done. Remember to clear the engine if it needs it.
The final adjustment is the same, short the plugs as just done, left, then right, then left, listening to the engine, BUT....this time allowing only ~1 second of shorting time. You might need a tiny cable adjustment.
In most all of the shorting method work, you are NOT looking at the tach, you are LISTENING to the engine. Look at the tach to be sure the ending idle rpm is correct. I also look at the rpm during CABLE adjustment, to be sure both are at approximately the same rpm. When you are all done, the engine will idle at ~1025, smoothly, and a tiny increase in the throttle will cause a SMOOOTH pickup of RPM ...no shaking, no stumbling. If you also had vacuum devices connected, the balance between the cylinders will be good at IDLE RPM AND HIGHER.
The shorting method should result in a VERY smooth engine. You are invited to try it and using gauges too, even at the same time if you want to, and see how you like the methods, or combined methods.
Dual plugging conversions:
If you want to use the shorting method, it is sometimes better to short out BOTH plugs on one side at the same time, and then alternate to the other side, similarly both shorted out .....back and forth. This can be thought of as mechanically fun & games unless you make a special switch or device to do this....but, it can be done simply! I have made an extra long and stiff shorting wire setup to allow it to be done with a single screwdriver in each hand. I short BOTH plugs on one cylinder, to a fin grounding, at the same time. However....This method, on some dual-plugged motorcycles, may reduce the rpm so far that the engine stops, which you do not want.
The fix for that problem is to short out both cylinder's bottom plugs, leaving them both fully shorted-out during the idle adjustment portion of the procedure, which usually works OK, & is my recommended method if you have engine stalling problems if shorting both spark plugs on one cylinder. If you use this method, you need two extra shorting adapters, and two each short jumper wires with alligator clips on each of the 4 wire ends. You clip the alligators to a fin and to the adapter ....and, of course, the spark plug wire still fits onto the adapter.
There is sometimes confusion on how the coils are to be wired/connected, on a dual-plug installation. The proper connections for a dual-plug installation is for one sparkplug of each cylinder to be fired by just one of the dual-output coils. Of somewhat lesser importance, do it so the top plugs are fired by one coil, the bottom plugs by another coil. Avoid using one twin-tower coil to only fire one cylinder, and the other twin-tower coil firing the other cylinder ....multiple reasons, but the ignition result is poorer.
Most folks probably do synchronization of the dual-plugged engines with vacuum methods; but, see hints above; and the below items.
Hints for all types of Airheads carburetors, and all types of synchronization methods:
(some, not all, of this section is a repetition, or modified repetition, of something very early in the article)
Irregular idle rpm & strange symptoms at idle & off-idle, are often due to a poor idle mixture adjustment and/or bad idle jet rubber O-ring or idle mixture rubber O-ring. This can also happen on CV carburetors without springs above the slides, the purpose of which is to ensure positive seating of the slide at the bottom at idle, & to smoothly return the slide downwards.
If you have an R75/5 (with original early number carburetors, ending in model /3 and /4, or, gads, /1 and /2, rare, those) that is particularly difficult to start or has very irregular idling & everything else checks out fine, be sure to check the slides to be sure they are fully bottoming & not hung up slightly. This can happen with other airheads, but that is much less likely. The earliest R75/5 carburetors had many problems & there is a completely separate article on this website for those, although synchronization methods use the same procedures: https://bmwmotorcycletech.info/earlybingR75CV.htm
BMW-sold special springs can be added to dome-type carbs: see the two Bing CV articles on this website. Adding these fine wire springs (two styles) above the carburetor slides will change the abruptness feel of the carburetors, besides encouraging the slides to fully bottom, to fix idle inconsistencies.
Be SURE there is throttle cable sheath slack at the carbs at throttle off.
It's CRITICAL that the enrichener parts not be mixed up left/right, & are installed correctly. It is also very important that the butterfly valves on the CV carbs be installed correctly. Some enricheners were shipped by Bing with WRONG markings. See my two BING CV carburetor articles for more information than you can believe ....and with photos:
https://bmwmotorcycletech.info/bingcv.htm
https://bmwmotorcycletech.info/bingcv-2.htm
On the /5 models, and possibly a bit later, the intake plastic tubes have slots at the carburetor end, & can drip breather condensate oil on your foot. A few had the slots too deep, & the following does not work, but for most, putting the adjustable band clamp at the carburetor INlet at the TOP will stop the oil dripping. I make it a habit to put the band clamp adjustor at the top, even on the 1995 production Airhead carburetors.
Revisions:
04/22/2003: Add .htm title; clarifications.
07/31/2003: Add note at top area on lubing cables; minor editing for clarity in the entire body of article, add dual plug info.
09/21/2003: start a new section..wee hints; go over entire article and clarify details here and there.
09/26/2003: Add picture of spark plug adapter tools.
03/08/2004: Add hint 2.
10/03/2004: Syntax and grammar; updated information on dual plugging & synchronization, and revised the Hints section, adding more information.
03/27/2005: Add 5.
11/03/2006: Update entire article for emphasis and clarity.
07/06/2011: Clarify idle mixture and rpm compensation methods.
11/14/2011: Slight clarifications in dual-plugging comments.
11/15/2011: Wee bit more clarification.
04/27/2012: Edit for clarity.
08/08/2012: Expand and update cable maintenance and replacement section.
10/14/2012: Add QR code, add language button, update Google Ad-Sense code
12/13/2012: Go over article, make minor improvements in clarity.
In 2013, remove language button javascript code, it was causing some browsers to have problems.
06/01/2014: Recheck article.
08/03/2014: minor changes for clarity, section separation.
08/25/2015: Cleanup.
09/14/2015: Make slight changes to recommendations for synch tools.
10/04/2015: Clarify vacuum and shorting methods, add link for shorting tools.
12/06/2015: Clean up article, moving things to left and shortening right side. Meta-codes work. Some clarifications.
12/17/2015: Meta-codes. Clean up article and left justify for smaller screens.
04/01/2016: Update metacodes, layout, redundancies, colors, fonts, clarifications.
04/25/2016: Add note re: Grok's death; add new photo of solid brass spark plug adapters.
09/13/2016: Update Grok family information.
12/01/2016: Updated for clarity and explanations. Go over metas and scripts. Fix layout. Add more photos. Simplify HTML.
12/03/2016: Fix background color yellow that took over several paragraphs, when viewed on Chrome.
04/29/2017: Add photo of squirrel cage fan, and modify comments for it.
05/01/2018: Reduce HTML, colors, fonts. Improve explanations & layout; move 2 sections. Clean up tables &colors. Add notations to one photos.
12/08/2018: Code cleanup. Shorten and simplify some areas, but also did some expansion of some descriptions. Clarify.
02/14/2020: Minor updating on lubricating recommendations, and comments about the Grok unit.
03/07/2020: Update for the now-available-again Harmonizer.
03/09/2020: Update on Harmonizer.
11/16/2020: Improve clarity in a few areas.
11/19/2020: Fix bingcv.htm hyperlink, two places.
11/27/2020: Add to sync tools.
© Copyright 2020, R. Fleischer
Return to Technical Articles LIST Page
Last check/edit: Thursday, September 28, 2023