
|
|
For BMW Airhead Motorcycles
Setting Valves.
Alignment of the rocker arms, rocker arms end clearance, etc.
Simplified details & procedure>>>....and also full details & procedures.
Finding OT on compression stroke.
What happens when a valve comes apart and tries to destroy the engine,
what to not do.
© Copyright 2023, R. Fleischer
https://bmwmotorcycletech.info/setvalves.htm
40
Please read this article: https://bmwmotorcycletech.info/valves.htm
One of the earliest service jobs a new Airhead owner will do is check & adjust the cylinder head intake & exhaust valve clearances. At the same time the owner might well check & possibly adjust the rocker arms end play. The cylinder head (2 nuts) and rocker arm nuts (4) need the rare torquing too....yes....once the break-in period is completed (perhaps 5000 miles), the 6 nuts need be loosened SLIGHTLY, then re-torqued, ONLY RARELY. DO NOT torque over 25 ftlbs on a known good torque wrench! This article begins with some background and technical discussion. This is followed by the actual procedure in a simplified version; and, then I include a full version. At the end of this article are photos of what happens when a valve comes apart, which, while rare, can happen from a variety of problems ....including wrong valve clearances, excessive valve plastic deformation, insufficient fuel octane, wrong ignition timing, overly lean mixtures, etc. For further information on the valve gear, read: https://bmwmotorcycletech.info/break-in.htm Background & Basic Tech discussion: The Airheads have ...to some extent, assuming proper alignment ...rocker arm tips that are offset where the rocker arm tips contact the stem of the valve. The rocker arm tips, being offset as they 'wipe' the valve tip, tend to rotate the valve, adding life to the valve and valve seat. The offset force wears the valve guides unevenly. That offset force also tends to cause uneven wear (egg-shaped) on the older plain bushing insert type of rockers used on the /5. For the /5, rocker arms can be swapped in certain positions in your bike, in a specific order, for longer bushing life. This website has information on how to move the /5 bushed rockers to other positions, to gain more life before the need to re-bush. see: https://bmwmotorcycletech.info/headassy.htm which has a lot of
information on the heads. A careful look at the valve gear will show that as the rocker arm rotates on its shaft to actuate the valve, forces will try to move the rocker up and down on its rocker shaft. Any excessive up and down end play on the rocker, which lines up against the rocker blocks (and shims on 1985+ versions or converted earlier models) will or can, create considerable noise. Much of any valve gear noise (especially on the RS and RT, where the fairings amplify the sound) is from end play movement, and not, as often thought, from excessive valve clearance. In addition (this is little known), as the valve seat-to-valve contact area increases (the width of the seating increases) with mileage (or from a poor valve job), valve noise will increase, sometimes considerably. Please read: https://bmwmotorcycletech.info/quietingpads.htm Some people, shops, companies, do 'valve jobs' using one-piece exhaust valves, which is not a good idea, in my opinion. That is because valve keepers on those valves are usually modified so the valves will not rotate. That is a bad idea. See my valves article for all the finer details: https://bmwmotorcycletech.info/valves.htm If the rocker arm does not contact the older style rocker blocks quite squarely there is excessive noise, plus the noise from end play, especially if end play is excessive. It is possible for these things to happen more easily on the /5 and /6 to about 1975; as the blocks were not well fixed in position. Even more noise appears as the rocker bearing (especially the /5 which uses bushings) wears. Enough miles with truly excessive end play, and you may find the later type of rocker needle bearings coming apart. There were also some faulty needle bearings installed at one time in the past, the ends are rolled-over to contain the needles and that was improperly done. Be sure to see the head assembly article. The /5 bikes and a few into 1974 (/6) had bushings, and they will wear in an oval shape, making for a type of noise that is not totally eliminated by any adjustment; but you can swap rockers in a specific sequence as noted, which can considerably quiet them and add to their life. Misalignment of the blocks affects oil flow, in that it opens up a vee-shaped escape path for the oil at top and bottom, ....plus any excessive end play ....will result in a fair amount of noise as mentioned, and this end play can vary with engine heating during warm-up, where one cylinder may be noisier than another; and that can even reverse as warm-up proceeds! Expanding on the differences in the rocker's assembly: The tips of the rockers usually can be seen to be heat treated by their colorization appearance. The heat treatment is usually fairly deep, and contrary to BMW School teaching, the rocker tips often can be lightly resurfaced if need-be. I have ground them to a mirror finish and re-heated treated the tips, oil quenched, although I advise against amateurs grinding and re-heat-treating. From 1985+ the support blocks fit a bit differently, with a male round shape fitting directly into the head, no button, and indexes very well indeed. There is a plastic thrust bearing piece at the top of the rocker, and end float is adjusted by shims. Retrofittable to 1976+. Many of the parts used in various years of /5 and up to 1984, are interchangeable in some way. The 1985+ valve gear can be fitted to later than the earliest versions (which could be done if one really wanted-to); but I fail to see any great need to do that. I believe the late 1970's to 1984 are better, with the rocker arms having more bearing contact area (the rocker arms are a bit wider), and adjustment for end play is easier than using shims (you don't need shims at all). The 1976+ pushrods are better than earlier pushrods, will also result in quieter operation. If you are converting, I'd suggest late 1976 to 1984 parts; unless you insist on the least possible noise, then use 1985+ parts. Adjustment of the end play by the movement of the rocker blocks (lots of adjustment is available on the /5, still usually some small amount even to 1984, after which it is done by shims): The rocker arm must be able to move (rotate in its normal movement direction) full range without any binding, yet have minimal up and down play. Saying this another way, it is possible on /5 and /6 machines, especially up to 1975 (and slightly on /7 and into 1984), to adjust the rocker blocks by squeezing them towards each other for near zero end-play (just oil film movement being possible from fingers pressure up and down on the rocker arms). That is the best adjustment. You do not want to bend anything, just set the endplay, so be careful. Do that oil film movement check with the flywheel (or clutch carrier) at the OT mark, AND, on the COMPRESSION stroke of the particular cylinder! Regarding the /5 & very early /6 motorcycles whose rocker arms have bushings, not needle bearings, & wear on the bushings is oblong: It is possible & easy to overdo the adjustment for minimum end play.
This means having the end-play clearance too tight. The result is that there is enough rocker end binding, for the valve lifting rocker-arms rotation to hold the valve open, almost defeating a tired old valve spring. The resultant snap sound when the valve does close is somewhat like a loud clatter. You do not want the end play that tight. It is necessary to test-move the rocker up and down but over a wide arc, to check for any binding. That testing should INCLUDE a rather full ROTATION of the rocker arm. To do that test you must back off the valve adjuster (loosen its locknut first) relatively fully in order to be able to move the rocker arm in that large arc of rotation; this is to be done each time you adjust the end play (which is quite seldom). Do this at the OT mark on the flywheel, on the compression stroke for that particular cylinder. You must be on the compression stroke for that cylinder! All valve gear adjustments are made at the OT mark on the flywheel (called Clutch carrier since 1981); but, again, the piston for that cylinder must be on the compression stroke. How do you check for end play? From 1985 BMW revised the rockers (narrower) & their mounts, & incorporated shims & plastic inserts into the ends, the shims are available in five sizes. I'm not a great fan of plastic inserts. I am also not a fan of the narrower rocker arms, & thusly the shorter bearing to bearing distance. Depending on your year bike, to convert to the 1985 & later version can be very pricey for brand new parts. But, they do work OK, and ARE quieter. The BMW bulletin on this is from May 1986, 11-032-86 (2208), which also covers in depth the 1985 R80 rocker arm assembly changes ...which I suggest not be done unless you have a big wallet or access to used but good parts at a cheap price ...even then, think it over ...see earlier comments about my preferences for the late 1976-1984 setup. Do you really want to spend the money and time to 'quieten' the valve tapping noises? Are you aware that converting may have only a minor effect on noise, where the noise is seat width, etc? Here are the part numbers for the shims used on 1985+ valve gear: The rocker arm assemblies are lubricated from small amounts of oil coming from the engine's pressurized oil gallery. The oil pressure is applied to tiny holes at the two top cylinder studs area, in the engine case. Four studs per cylinder hold the head/cylinders to the engine case. The oiling holes cannot be seen unless the cylinders are removed, and even then you must look carefully, especially if the studs are in place. The oil travels outwards along the top studs, to the heads. The rocker shafts must be installed such that the oil under pressure gets into the valve gear properly. Oil must get inside the rocker bearings. Oil leaks out at the small clearance of rocker block junction to the rockers. The oil in the area is in liquid, fumes, & mist form, from the thrashing & movement of the parts. Some oily fumes and splash helps lubricate the valve guides. The oil needs a way to return to the engine oil pan, and it does so by flowing down the pushrod tube holes onto the cam followers (lifters), and then onto the cam lobes, and then downward to the engine oil pan. The oil lubricates the cam lobes too. Over-all, as noted, the oil amount is small, but adequate. If the rocker shaft is not installed properly (on some models), you will not get proper oiling. Follow my advice here: For the more nerdy: A bit more on end play...and a few other things: The early models such as the /5 and somewhat the /6, were the ones that had so much slop available at the rocker mounts/blocks, that the C-clamp method, described below, was more needed ...although many of us used small brass or small dead blow hammers, very lightly, with the rocker nuts backed off slightly. Haynes manuals, and I think Clymers manuals too, shows a jig, similar to the #200 BMW tool, that can be built ....but is not very useful. It is useful, primarily, IMO!, for setting the assembly to parallel, and for that you do NOT need that jig, nor anything else. As was noted well above, from the 1974/1975 model year, BMW machined a step into the rocker end block/head junction area, and the blocks are thus supposed to be precisely machined such that no adjustment is possible. That is not so, particularly in the earlier versions; but actually extending into 1984. Use only quite light pressure when aligning rocker blocks ...where that is possible and needed. The /5 and /6 are very adjustable ...providing they are stock. Many folks have upgraded to some extent or other. Even as late as most 1984 models I have found them to be slightly adjustable, in fact the adjustability is plenty good enough! When setting-up the early valve gear, be sure to look at everything during the alignment ...do not pay total attention to end play. Do check that the rocker tip is offset at the valve stem, that the rocker rotates without binding or excessive friction over its full rotational range (adjustment very considerably backed-off). Check that the rocker ends are flat to the rocker blocks. Check the movement of the pushrods during engine rotation for any contacting in the head holes because if the head gasket is installed the wrong way, the pushrods can foul on the head gasket. I do end play adjustment with the associated two nuts SLIGHTLY loosened, and the pushrod adjustment VERY loosened. Up into 1984, you can try slight squeezing to set end play, ...light pressure on any C-clamps! ...no pressure on the rocker shafts, only the blocks! You need a spacer for that purpose, more on that later. Some folks have very strong fingers ...so ...pressuring the rocker blocks strongly with fingers during tightening of the nuts is OK, as is using a large C-clamp with very light pressure with common sockets. Select the sockets to not bear on the rocker shaft, but only on the rocker blocks. Do not use hardly any force with a C-clamp. The two nuts that hold the rocker to the head must be loosened slightly to allow the rocker blocks to move that very tiny amount that might be possible. Yes, I have seen someone try to adjust end play with the rocker nuts fully torqued. I will get into the C-clamp method in two places, so read this entire article. If you have a C-clamp with a jaw opening that is big enough, you can use some sockets in your socket collection, one on top, one on the bottom, with the C-clamp. Be sure that the sockets do not rest on the round tiny bit of the rocker shaft that projects out of the rocker blocks. Using sockets is somewhat awkward, they tend to fall on the floor, you seem to need a third hand, etc ...but it is doable, all by yourself. I don't bother, in my shop, using sockets for this: NOTE again, that clamps are not used with 1985+ valve gear. For rocker-arm adjustment, simply loosen the 2 rocker block nuts about 3/4 turn each, affix the C-Clamp and washers or sockets (or affix them first), and make an estimated end play squeeze (not much!), and then torque the nuts a bit ...then recheck end play with the C-clamp pressure released. If correct, torque the nuts to the normal 25 footpounds. Recheck the rocker end play visually for the oil film movement only. Do not back the nuts off too much. If nuts squeak on tightening, loosen them considerably and oil the threads, then immediately re-torque. The 4 stud nuts are normally torqued with oily threads. How often is end play adjustment needed? ...see next paragraph. Usually, the rocker end play (and head nut torque, 25 ftlb, staged) is checked at the very first valve adjustment after a top end job. A recheck is then done at perhaps 500 or 600 miles, then at maybe 2000 to 5000 depending on how the valve clearance is holding up. After 5,000 or 10,000 miles, the end play and the 6 nuts are seldom touched. Now and then, maybe every 20K+ or so, at the OT mark, for compression stroke for that cylinder, loosen the pushrod adjustors a bit. You usually don't need to loosen them if there is some clearance at the valve-tip-to-rocker arm; as normal valve clearance settings are usually enough to allow your fingers to move the rocker arm up and down with moderate fingers pressure. The only movement should be the oil film at the places the rocker-arm joins the end blocks. If excessive, you can loosen the two nuts (not much is needed) for that rocker, and use a C clamp and the washers to very lightly squeeze the end rocker block mounts together. Then tighten the nuts (25 ftlbs). With the C clamp removed you now recheck the end clearance. You can tighten the nuts with the clamp still in place. Final check is to rotate the rocker over just about its entire range of movement, and make sure there are no tight places. To do that, you need the pushrod adjustors backed-off very considerably ...many turns. You might consider doing that right at the beginning, but it is not needed normally, because once it is checked for the entire range of movement, that will not change enough to be concerned with, if you have not loosened the nuts or reset the end play otherwise. In other words, once you set the end play and checked the full rotation, and do the oil film movement check, all with fully torque'd nuts....there is no need to do more than check or set valve clearances, for rather a lot of miles. If you ever have a rocker off, inspect its bearings carefully at both ends. If you ever see one or more needle bearings laying loose inside the valve cover area, you should inspect the rocker arm bearings. Setting the valve clearance should always be done with modest thumb pressure on the adjustor when measuring with the feeler gauge at the junction of the rocker arm tip and the valve tip. The cylinder must be on compression stroke and with OT showing in the timing window. More on that later. For pre-1985, I use a 6" C-clamp and the thick washers. It's easier than an 8" C-clamp and sockets. See photo below. Obtain two appropriately sized and thickness washers from the hardware store. They MUST be thick enough so no pressure will be on the shafts from the C-clamp. Grind two flats, opposite each other. Place one washer over the rocker shaft at top, the other similarly at bottom. The C-clamp will then bear on these washers and not the shafts, because the C-clamping will be on the rocker blocks. Use only quite light clamp pressure. Very little C-clamp pressure is needed to move the rocker blocks inwards towards each other, and a tiny amount can be a big change. The two blocks' nuts need only be backed off a bit, maybe 1/2 to 3/4 turn, as previously noted. As you back off the nut, they usually suddenly loosen quickly. Sometimes there is a bit more springiness to the nut. Below is a photo of two very slightly different versions of these washers I have made, they need not be precise, but should be relatively flat. The washers, or sockets if you are using sockets, must not be in contact with the small curved in portion, and the washers must be thick enough, and perhaps ground at one point underneath to avoid that rounded bit mentioned. These were made from washers of 1-5/16" diameter, 1/8" thickness, center hole ~0.640. Across the flats they are about 1", or tad under 1.0". In the 1985 and later valve gear setup, the rocker end blocks are fitted rather precisely, and you should not try to squeeze the blocks together. The 1985+ models are to be measured and shimmed for end play adjustment. See the chart for the shims tht are available. Miscl. notes: There were two generations of /5 rocker blocks: split and non-split. The earliest were the non-split type and were essentially the same as the /2 design. The blocks were a press-fit onto the shafts, and the end-play could be adjusted by using the C-clamp and socket method, with a bit more pressure from the C-clamp method. The later split types reduced cost in manufacturing, and allowed some hand adjustment without a C-clamp, although light use of the C-Clamp is better for those without a lot of finger/hand strength. The Matra #200 tool was discontinued by BMW in 1973, and it's use was not recommended, as evidenced by a 1974 factory service bulletin to that effect. The tool would make the two rocker shafts parallel to one another, which you will be doing by the clamp or finger methods anyway. I do not recommend using nor making the /5 valve gear alignment tool shown in some BMW literature, and also shown in some Haynes and Clymer's literature. BMW's later design better-located the rocker so that the rocker tip always contacted the valve tip off-center, and the pushrod was located as high in the pushrod tube as possible while keeping it centered in the tube. An often hidden cause of noise is the pushrod hitting the head near the head gasket joint. Later modifications to the valve gear, like the stepped blocks, were done to make it harder to inadvertently miss-align things. If you are setting up a pre-1985 airhead, setting up the pushrods, rocker block, rocker tip alignments, and rocker end-play, you can do it all manually, with just barely loosened rocker block nuts ...so the blocks can be moved slightly. The movement is hardly noticeable, except for the oil film rocker end play test. The very earliest rocker gear (/5 as example) can be moved all over the place, and one must pay attention to rocker tips, and squareness to the blocks, etc. I sometimes use a very large slip-jointed pliers-wrench (Channel-Locks) in doing the pre-1985 end play adjustment, after I hand-align closely. I also might use either that wrench or a C-clamp (and sockets or specially hand-ground washers), all as previously described, for the end-blocks. Depends on what I have easily available at the time. Do keep in mind that from 1975 to 1984, the amount of available movement of the rocker blocks can be quite modest, ...but is plenty enough! BMW made changes now and then in the valve gear, and the final important change was in August 1984, for the 1985 model year, when the narrower rockers & the use of shims and plastic insert were incorporated. Thus one might see the "1985" design valve gear on some Airheads manufactured in 1984 (besides any that have been converted/updated). I believe the narrower rockers were a slightly poor idea, as there is less distance between bearings, and the needle cages should be pressed in deeper, to accommodate this addition of the plastic and shim setup. I don't like the later valve gear quite as well as the earlier gear (I prefer the gear of the early 1980's) ...but there is no question that the late gear is quieter. Sometimes, even on 1985+, one still hears some valve noise that changes both louder and/or quieter, as the engine warms up. That was, pre-1985, often either the valve seat width or not quite square rocker blocks, possibly a few other things. If you have had the heads milled, and have insufficient adjustment, see the note in this article: Pushrods: Around 1977 BMW changed the pushrods to a multi-part design, incorporating an aluminum alloy center section that expanded closer to the rate the cylinders expanded. Their lowered weight also helped offset the mass of the larger intake valves for the 1977 US R100S and R100RS models, and the reduced diameter reduced any likelihood of the pushrod hitting the inside of the head. The pushrods were not, however, re-designed again for the Nikasil cylinders, probably the factory found out that the 1977 re-design was adequate. The tappets and rockers were also changed. One could now use a bit closer valve clearances, & noise was supposedly reduced some ...especially cold to hot. Pushrod tube collars became non-moveable, supposedly ...and questionably ...in 1981 ...so that was no longer the method of tightening the pushrod tube rubbers for elimination of leakage. That fact is not shown in some Haynes and Clymers. There have been reports of the collars being brazed in position on the pushrod tubes far earlier than 1981. I believe the collars should generally be left alone. If you insist on playing with the collars, there is information on this website. If you take the rockers apart; there are more than one style; you can loose needle bearings onto the floor or you can have worn bushings on the early models that should be checked. Really badly worn bushings can be felt, usually, by twisting the rocker with your hands, back and forth, easiest to do with the valve adjustment quite loose. Very early /5 used waverly washers (as self-adjusting shims) at the rockers. Best to remove and install the later flat thin washer. The later valve covers are handed. Marked L and R, on top, near the spark plug. Installing them wrongly will have the valve cover fins not properly parallel. Simplified valve adjustment: Valve clearances are adjusted with engine cool, meaning baby bottle temperature or less. There are 4 studs that hold the cylinders with heads to the engine case, with 4 nuts (the rocker arm nuts do double duty) that need to be torqued properly. If you intend to torque them, do it with the engine cool, and the threads oiled ...otherwise you run extra risk of pulling the threads out of the engine case. The other two nuts hold the head to the cylinder, but are also torqued to the same 25 ftlbs. To do a valve clearance adjustment, you'll need an old baking tray or catch pan and newspapers, bike tool kit, accurate torque wrench with socket to fit the nuts (needed only if at this valve adjustment you intend on setting the torque on the studs and head ...not required often). Typical intervals for valve clearance checking, and possibly adjustment are at initial engine build or top end rebuilding; then at maybe 100 miles or as late as 600 miles (or both); then, if the valves were relatively stable, maybe at 2000 miles, then, depending on how stable, every 5000 miles. Check the head nuts (6) torque after you check the valve clearances and write the as-found VALVE clearances on a chart ...which may come in handy. The 6 nuts should have their torque checked at initial rebuilding (of course!), then at each of the next few valve checks. Usually by 5000 miles or so, the torque remains stable, and then maybe you can check nut torque at every 20,000. Nut torques are done one at a time. First loosen ~1/4th turn, then retightening to 25 FootPounds. If they squeak, loosen a few turns, oil the threads, and then replace immediately. You may need to check end play...I always do, and rocker rotation too, if I loosen the two rocker nuts. If setting end play: Those having bikes from ~1985 will never use a C-clamp, as those ...or early ones converted to use the 1985+ parts; have the end play of the rockers set by shims and the rocker blocks are not adjustable, being set in place by precisely milled steps. Keep in mind that any of the models before the 1985+ version might be adjustable, and the stock /5 and /6 certainly are. Your tools should include feeler gauges, you might want to have the go, no-go type, your choice. In depth valve adjustment: Do NOT do any top end adjustments with the heads hot...they must be at ~room temperature. At every valve adjustment time, before doing anything such as checking head nut torque (if being done), etc., during the procedure, on compression stroke, at OT, measure and write down what you find as the clearance at the valve tips, keeping a record, to enable you to follow trends over time. Always check clearance with your thumb applying a bit of pressure onto the adjuster. The clearance is measured by using feeler gauges, and a smooth easy pull, not grabby feeling, but you cannot use a .001" thicker. Rocker shaft end-play: If you have to, now is the time to set the end play and THEN check for smooth full rotation of the rocker arm, which requires backing off the adjustor quite far. Remember that the heads are normally tightened in a cross pattern, and in stages of increased torque ...such as 11, 18, 25 ftlbs, and if more than two rocker nuts are loosened you should do that. I normally do just one rocker at a time ...so no need to loosen more than 2 nuts. Some folks loosen only one end and use a light hit from a brass (or other dead blow type) hammer on the rocker block or onto a non-shaft-touching socket, to close up end play, keeping it square. That works out OK sometimes, once things are rather close to being correct. I recommend you do not do it that way. You do not want to eliminate too much end play, or the rocker will not be easy to rotate over a wide range (which, to test this, as I noted, requires loosening the pushrod adjusters quite a large amount). HINT: There are two nuts, one at 12:00 and one at 6:00, holding the cylinder head to the cylinder ...those should be left at full 25 footpounds of torque, whilst doing the rocker end play checking. I have never found a problem doing it that way, and the advantage is keeping the cylinder head tight to the cylinder. This is in disagreement with factory recommendations. I loosen (1/2 to 3/4 turn) only the two nuts on one rocker, and do that one rocker at a time ...retorquing to 25 footpounds before doing the other rocker. Never torque the 4 bolts with the engine warm/hot ...only cool. What is the proper end play? Is it important? With the valve tip clearance adjustment very loose, perhaps nearly fully, grab the rocker and try to move it up and down, and then try again with a slight twisting motion. You will need a moderate amount of fingers force here. What you are looking for is no appreciable up and down; just visibly seeing the oil film move at the junction of the rocker and rocker block & probably see the shim move very slightly. If the rocker also moves freely and fully in the normal valve actuation direction through the full possible range of turning motion possible; and yet only an oil film movement at best is seen up and down, you likely have the proper end play. It will not tighten up as the engine warms up. The side (angular) twist is a quickie check to see if the bearings (bushes on early models) are OK. The full rotation is to check for tight spots in the rocker rotation...if too tight, the valve noise is snappy and excessive, and can damage things. Assuming you need rocker end play adjustment and have the type of valve gear without adjustable shims (if shimmed type ...this procedure needs modification, of course, and you will need shims): I prefer to use a couple of my special washers, but you can also use 3/8 or 1/2 drive sockets from your toolbox, carefully selected for size such that they fit over, not touching/grabbing, the rocker shafts ...and are thus touching only on the rocker blocks themselves. Be sure that the sockets, which have a relief inside, are NOT touching. You could modify your sockets by squaring the ends on a lathe, etc. I use a C-clamp or huge slip joint pliers, to put a little bit of pressure on those sockets or washers ...not very much! Squarely. You are slightly squeezing the two end blocks together ...you are not to squeeze on the round shafts!! Do not use force wrongly. Do not try to bend things! Light force only. Not too much more than just strong fingers could do ...in fact, that may be enough! If you are wary, or have no large C-clamp and appropriate sockets or washers, use a dead blow hammer ...lightly! ...on the blocks. Then tighten the rocker end block nuts some ...moderately is fine. Recheck that the rocker will move without friction or grabbing in its normal direction of movement, fully! Torque back and forth evenly to the normal 25 ftlb torque value, and recheck for smoothness and end clearance again. The rocker must have minimal end play, yet no friction for the full range of motion possible when it will be opening and closing the valve. This is why the check is done with the adjuster very loose, almost completely loose to its limits. There should be no change when the C clamp is removed (assuming nuts are reasonably tight). With the end clearance either adjusted or was found to be OK, and all nuts at 25 foot-pounds, you are now ready to adjust the valve clearance. Except for the first few thousand miles, re-torquing is not necessary very often, certainly not at each 5000 mile valve adjustment check after the valves settle-in. If you are re-torquing the entire head, re-torque all six nuts evenly, in a cross pattern. Use an accurate torque wrench. Loosen one at a time, 1/4th turn first, if you need to. Squeaks?....unfasten nut, oil, torque. ***Some literature has early Airheads head and rocker block nuts set to "29-31ftlbs". I highly suggest you use 25 ftlbs. If any of the 4 rocker arm block nuts squeak, remove just that one, oil the threads, and retorque. Repeat for any other squeaker. Remember there are 6 nuts, 4 at rocker blocks, one near spark plug, one below. It is a good idea to recheck the end clearance. Next, set the valve clearance, if it needs it. I do not oil the 12:00 and 6:00 threads, but have no objection to them being faintly oily. Of several methods of obtaining OT & setting the valves, my preferred method follows; plus various hints: I have the bike on the center-stand, then I jack up the rear frame cross piece just enough to get the rear tire just barely off the ground. Instead of using a jack I sometimes just put my right knee under the muffler, facing from the left side ...although I have used my specially modified jack: https://bmwmotorcycletech.info/hydraulicjack.htm at the rear crossover frame tube. The timing hole rubber plug should have been removed. It is located near the oil level dipstick. Remove the valve covers slowly, to avoid ripping the 'they last forever' stock gasket. Some of you may have the aftermarket soft silicone gaskets, some swear by them for sealing irregularities or oil leaks from warpage. I won't use them. Note that you should never use a gasket sealant or have oil on the stock gasket outer surface, in fact you want it wiped clean with a cloth when replacing the valve covers, as oil, especially petroleum oil, can carbonize and act like glue, and the gasket can come apart on the next cover removal unless you are very careful. If the gasket is new and from BMW and has one shiny side (it goes towards the head), that is a heat sensitive coating that bonds the gasket, eventually, to the head. If there is no such, then I slightly oil just the head side of that stock gasket, whether new or used. I believe that helps, over time, to stick the gasket to the head; which is what I want. If you wanted to use a very thin layer of a mild gasket adhesive on the head side, I am OK with that. With a new gasket, I have all surfaces dead clean and dry, and clean them with a quick evaporating solvent. If no heat sensitive coating, what you do is your choice, but I do suggest a thinly applied adhesive sealant on the HEAD SIDE of the gasket (clean off every trace of excess, after gasket is pressed into position. NON-permanent Permatex Form-A-Gasket is a good one. Once the gasket is firmly attached, you are much less likely to tear it when removing the valve cover in the future. The gasket may well last for many years! I am not convinced that all "BMW" valve cover gaskets come with a heat-activated side. Gasket torn areas usually happen because someone removed the valve cover too quickly, and fail to grab the gasket as it is partially pulling away because the valve cover pulled the gasket in one area during removal. If you are careful you may never have to replace a valve cover gasket. Always pull the valve cover off slowly and smoothly, using a putty knife for pressuring if the gasket from pulling away, or to otherwise protect it. If you have a valve cover gasket removed and you are re-using it (perfectly acceptable if in good condition), coat the head side with dino oil or, using a fingertip, using a very thin layer of a mild sealant before assembling. For a new gasket, clean and dry the head and valve cover surfaces; & unless you are sure that the head side has a heat-activating glue, use oil on that side (only), or, as noted, a mild gasket sealant (that side only). I recommend you do not use RTV type sealants, in favor of something like Permatex NON-hardening Form-A-Gasket or equivalent. No beads, just quite thin wiping with a fingertip. That Permatex product is totally unaffected by engine oil. I seldom have to use a sealant. It is true that if the head is slightly warped at the valve cover surface, that the sealant may eliminate slight leaks. Don't lose the large flat washer under the center acorn nut (later models may have a waverly there), nor the waverly washer under each of the two 10 mm nuts, backside on each cover. The center and side studs are easy to strip out, so do not over-tighten the acorn nut, it needs only moderate hand-feel torque; and, do not overtorque the 10 mm side nuts, each has a waverly washer. If you have pulled threads on the center stud, it is fixable with a Helicoil, using a drill and tap guide for squareness, and, be sure to check the length of your stud, see next paragraph. You can see, from viewing near the spark plug, if the center stud is, or is not, engaging every one of the female head threads to the spark plug side. If not, consider purchasing the slightly longer valve cover head stud BMW offers. That longer center stud is 70 mm instead of 65 mm, and is installed with Red (strongest) Loctite on the end going into the head. Install so that it is flush, or very slightly protruding on the spark plug side. Wipe off excess Loctite. M8 x 70 mm stud: 07129908142. Put the transmission into top gear (4th or 5th, depending if a 4 speed or 5 speed transmission), and rotate the rear wheel in the normal direction, using the backlash ...in other words, jerk the rear wheel, as needed, back and forth, always trying to move the engine in normal direction, until the left intake valve, which is the left rear valve stem, is coming outwards ...that means that valve is closing. Continue small jerks, still only in the forward direction, until the flywheel mark OT is in the timing hole window. If you go past OT a bit, reverse the rear wheel movement. At OT, take left side valve clearance measurements (thumb pressure on the rocker adjustment area to take up any clearances), write down the as-found clearances for Intake and Exhause valves on paper for future reference. Use the feeler gauge at the valve tip-to-rocker-tip; whilst, as previously noted, placing a bit of thumb pressure on the adjustment end of the rocker (to take up oil film, etc., play). All work is done ON THAT CYLINDER...and, with THAT cylinder, at OT, compression stroke. Depending on mileage from new valve job or since last adjustment, I might torque the heads to 25 foot pounds, or I might set the rockers end play. I am not a believer in doing those things very often. I will try to move the rockers up and down, see if just the oil film is moving, and no more. I might look at the rocker-to-valve end contact, see if it is off center as it is supposed to be. If I want to be really thorough, I will check end play, rocker twist play, rocker tip on the valve tip, pushrod clearance, and rocker rotation through the full range (adjustor way backed off), pushrod fit, etc. If you have never done this before, look into the two pushrod holes in the head ...if you see any head gasket sticking into the holes, then someone put the head gasket on backwards, and that allows the pushrod to contact the gasket, and a bit of gasket-to-pushrod wear. You can then rotate the left cylinder push rods, they should rotate smoothly, and have absolutely no tightening and loosening or other funny feeling as they are rotated. This is a very rough check for them not being badly bent. The only true check is to remove them and roll them on a flat piece of glass or a surface plate. They do not usually bend unless you have considerably exceeded redline rpm, or from some top end malfunction. As soon as you are completely finished with the left head, you can install the gasket if it was removed (NO sealant on outer gasket surface!) ...and cover and hardware. However ...be sure you have read all the rest of this article before you start the work on either head. Then come back here. Your next step will be to, again, rotate the engine in the forward direction, slowly, just as you did before, but this time ONLY until the OT mark comes up ONLY once more, that is, the very next time. Rotating to the very next OT mark will put the RIGHT side cylinder at OT on ITS compression stroke. That is, it will be in exactly ONE rotation of the engine crankshaft/flywheel. DO NOT rotate it past that point; a wee bit if you over-shot is OK, just back the engine a bit to OT. On all models, broken-in and stable, except the R45 and R65, I usually set the clearances to about .0045" intake, .0085" exhaust, with thumb pressure on adjustor end to take up oil film slack. I go for an easy smooth fit for the .10 mm and .20 mm metric feelers, same for .004" and .008" feelers. I set R65 & R45 models looser, .006" intake and .010" exhaust. There is nothing wrong with using .006 and .010 on all models, and a case can be made for some slight benefits, at the expense of a small amount of noise and potential wear. Be very sure you are not only at OT, but are at OT on the compression stroke for that cylinder you are working on. I always start with the left cylinder. For a fresh valve job; and/or anytime the head had been off and a new head gasket installed ...during initial miles, ...or for those having valves that are closing up fast (perhaps faster than .002" per 5000 miles on a well broken-in engine), you could consider using intake .006" and exhaust .010" even on the larger engines, even a bit wider if on a R45 or R65 (the R45 & R65 are not very prone to fast closure). No hard and fast rule here. You do not want all the clearance ever taken up during riding, as that can cause serious mechanical problems. It is the exhaust valve that tends to close up, and once either of the valves has closed up some, the engine may be hard to start. There is an article on this website on the valve and seat problems:
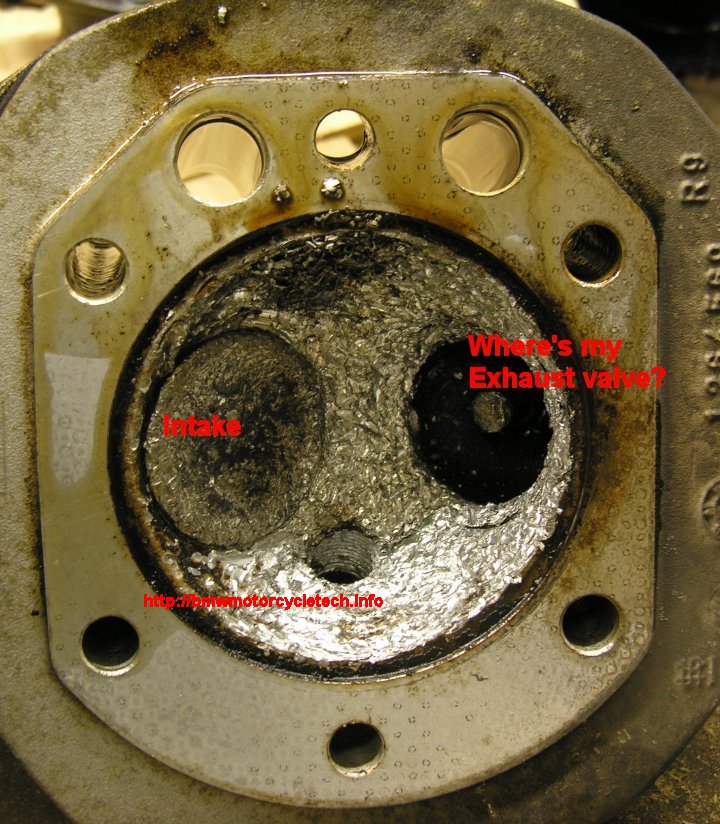
https://bmwmotorcycletech.info/valves.htm. If the valve seats were replaced, keep a close eye on the valve clearances, check them more often, for as long as 5000 miles, as there have been instances of the seats moving; particularly if not installed 100% perfectly, a somewhat tricky job on a BMW Airhead. What about an Airhead where the valve clearance is constantly changing ...getting noticeably tighter at each valve clearance check? ...and I mean more than 0.002 or 0.003" each and every time you check at 5000 mile intervals ...>>>and what if you have much worse than that ...as much in less than 1000 miles? Once the clearance adjustment is fairly well used up (do not go too far with that!), you are going to want a valve job, rather than a blown up engine. This using-up-of-adjustment is not a definite exact criteria, exhaust valves have gone into pistons well before that point. This sentence probably applies more to the original valve seats from 1980/1981 through 1984. I can only suggest that you think strongly about a top end job when nearing 3/4 of the adjustment being gone, and probably before. No guarantees. Scan down for the photos, then come back to here. Hints: Measure valve clearances by using one thumb on the adjustor end of the rocker arm ...with some moderate thumb pressure to take up oil clearance, etc. Try to slide a feeler gauge, relatively squarely, with very little force, between rocker arm tip and the end of the valve stem. You need two wrenches to adjust the valves. I prefer a box end wrench for the locknut, and a open end wrench for the adjustor. The box end wrench is used to loosen the locknut very slightly. The open end wrench is used to adjust the special cupped adjustor. Tightening the locknut tends to rotate the adjustor, hence the use of two wrenches and a bit of care ...you'll get the hang of this very quickly. Do not over-tighten the adjustor and nut ...quite snug is fine. If anal, you can measure the torque ...12 foot pounds; do not exceed 15 foot pounds or bad things will happen. Usually the bad thing is stripped male threads, not too serious, as you just replace the adjustor, if you can easily get it out after stripping the threads. The adjustment does need to be tight ...just not overly! Assuming you have now finished with the left cylinder, you can wipe any oil off the cover side of the gasket, and wipe any oil off the cover mating surface too (and any oil that might drip, located inside the cover), and reinstall the cover (do not over-torque the 3 cover nuts). You may then proceed to the right side cylinder as follows: Using the rear wheel again, bump the engine forward for one ...just one! ...360 degree ENGINE revolution. The idea is that you are going just one revolution to go to the OT mark again. If you rotated two turns, instead of one, the valve will be tight, because you are not on OT mark for the compression stroke for the right side cylinder. If you watch, back and forth during this bumping, you would see the right cylinder head intake valve (that's the one closest to the carburetor) come outward, just like you did on the left side. As the bumping continues, the valve will come outwards, and stop, and a bit more bumping will bring the OT mark into the timing window. You have rotated the engine 360°. Now you can do the right side cylinder adjustments, etc., in the same way as you did the left side, because you are at OT on the compression stroke of the right side. Unless the intake valve has closed up (unusual!), you can feel the rocker clearance to the valve tip, and your fingers can rotate the pushrod. Some folks will remove spark plugs before rotating the engine. As an old-time wrench, I am against that, in the off chance that a bit of carbon from unscrewing the spark plug gets into a valve seat, thereby upsetting the valve clearance measurement & adjustment. I am also against it because it unnecessarily wears the spark plug hole threads. Some folks rotate the engine by first disconnecting all wires to the battery negative post (-), and then removing the front cover, and then putting the transmission into Neutral, and then they rotate the alternator rotor center allen bolt. I have even seen front covers machined for a hole and rubber timing plug so the battery need not be disconnected. I dislike those methods. I do not like the alternator bolt tightened beyond the modest pressure needed in originally putting the rotor on the crankshaft, & excessive torque may happen if you try to rotate the engine that way. If you do it, you should remove the spark plugs. Other folks might tell you to rotate the engine by whatever means, usually the rear wheel, and have a finger over the spark plug hole, wait until you get some pressure from the compressed air, then rotate further to OT. Again, I don't do it that way, but it will work OK. For bikes with kickstarters, you could put the transmission in neutral and just use the clutch lever at the bars to move the kickstarter into an initial engagement about 1/3 down. That avoids 'catching' the transmission internal gear teeth edge. You could then use the kickstarter with your hand, to bump the engine rotation. That negates lifting the rear tire off the ground. There is a goodly tendency to over-rotate the engine, and it is harder for most to control the engine rotation precisely. Some may tell you of other ways of finding OT ...without even removing the rubber timing plug next to the oil dip-stick. Yes, can be done, but I believe it best you do not use other methods. Yes, the BMW camshaft has slow rise ramps. Yes, OT is not critical. Do it my way ...and you should have no problems! Remember, that one of the reasons I write these articles in a specific manner is to KEEP YOU OUT OF TROUBLE! When replacing the later style valve covers, they are marked L and R, on top, next to the spark plug area. Do not put them on the wrong side of the bike, nor upside down. Two reasons, varying by time and production and old-wives tales ...one was lining up the fins, the other for mechanical interference. HINT! Many folks have problems placing the small 10 mm hex nuts onto the two valve cover studs, especially the front one on the right cylinder head. Try a magnetized screwdriver to hold the nut flat and squarely onto the stud threaded end, and use a fingertip to rotate the nut. I am not a big fan of machining for allen cap screws, but if you want to do this, I am OK with it ...but the heads must come off. Here are two photos of the type of things that could happen when an exhaust valve comes apart and tries to destroy the engine. While a valve can fail, that is rare, unless the valve is being overheated by lean mixtures or the early eighties valve seat problems. If you are beginning to get near running out of valve clearance adjustment, that is a real warning signal to you! There are other reasons a valve can fail. Even with the best parts, heavy engine lugging can cause such a disaster. Rarely a valve seat that was improperly installed will come loose, causing problems. Usually the situation is that valves are seen to be closing up considerably at each 5,000 mile or lower interval check. DO NOT let this go too far, or you can have a very serious and costly problem. There is no hard and fast rule, but if you are using up a fair amount of available adjustment, it is time to get the top end redone. You have been warned!
The 1970 to 1973 Airheads had bushings inside the rocker arms. Some 1974 (/6) had these too. They tend to be noisier. The 1974-5 had the first of the needle bearing versions; the next version lasted from 1976 to 1984, then in 1985 came the shimmed type; which had narrower rocker arms to compensate for the shim and plastic inserts. The 1974-1975 rocker blocks had a flat bottom support, sitting on a round support in the head. These worked well, but were not well indexed to the head. It is questionable that the rocker tips were always heat treated, or if so, properly. Tips can be resurfaced. The 1976-1984 rockers had a cutout, or a 'step' in the underside of the rocker blocks, that mated to a machined button with matching 'step' in the head, and these index to each other quite well. There is little movement possible; but ....through 1984, ....there is enough movement possible to enable some adjustment of end play, and this is explained later herein.
It is possible to move a rocker arm with angular wear/play to another cylinder/place; but you must do it properly (simple to do though) ...the information (and lots more) is detailed on this website in the following article:
https://bmwmotorcycletech.info/headassy.htm
First have the timing mark at OT on the compression stroke of the particular cylinder you are working on. In that position, the rocker tip should have some free play between it and the valve tip. The rocker arm end play measurement is specified to be done with feeler gauges on the versions from 1985. For all prior versions, when pushing/pulling the rocker up and down with your fingers, you should only see the oil film move (at the junction of the rocker and rocker block). I previously said you should check for any binding or excessive friction over a wide rotation ...for which you must have the adjuster rather fully backed off. Although a version of this up-down feel can be done on 1985+ rockers, those are not usually checked that way (some of us old-pro's 'have the feeling'). From 1985, end play is usually done by actual measurement, but the oil film check is applicable if you want to. 0.001-0.003" is an acceptable range if you are measuring 1985+ style valve gear; even earlier gear, but I strongly recomment pre-1985 gear be done by the oil film movement! I check the end play at every valve adjustment, but only quite rarely do I check the full rotation end play, as end play hardly changes over huge mileages. Do not use clamps, etc., on the 1985+ valve gear.
11-33-1-337-720
0.20 mm
11-33-1-337-719
0.25 mm
11-33-1-337-718
0.30 mm
11-33-1-337-721
0.35 mm
11-33-1-338-190
0.50 mm
BMW marked the rocker shafts. There may be a different metal color..., round-in-diameter, ... in the middle of the round area of one end of any rocker shaft. There may also be a punch prick on that end, which might be offset from center. In every case, in every instance, install the rocker shaft so any of those existing markings are on top (up), and if a punch prick is found and offset, that prick is to be facing away from the engine. If you do it my way here, you will have no problems with the rocker shaft being in the correct position on any model and year of Airhead.
Later versions of the rocker shafts have one angular drilling, and can be fitted with the mark facing the engine or facing the valve cover. A shaft inspection will show this. Some folks rotate the offset marked shafts 180° to allow them to have additional life, I do not. Do not do anything other than my prior paragraph advice ...unless you inspect the parts, understand what you see ...and, are sure about your oiling! I recommend you always follow my advice in the previous paragraph, and, thusly, you will always avoid 'no oiling' problems. Wear is so low that you won't hardly gain anything by rotating offset marked shafts anyway.
I use 2 special washers I made-up. Photo is down a few paragraphs. Obtain two thick metal washers and grind the washers, see photo. The washers are to easily fit over the round rocker shaft, yet are thick enough to be slightly proud of the rocker shaft ...thus the C-clamp can be a smaller one, 6" rated size, instead of the somewhat uncommonly available 8" opening type of C-clamp. With my washers method there is NO need for sockets as spacers. Using the noted type of washers, the 6" size C-clamp will not press on the shaft. I have a photo a bit further down in this article of my own thick washers. You will find this washer idea to work considerably easier for you than 'sockets'.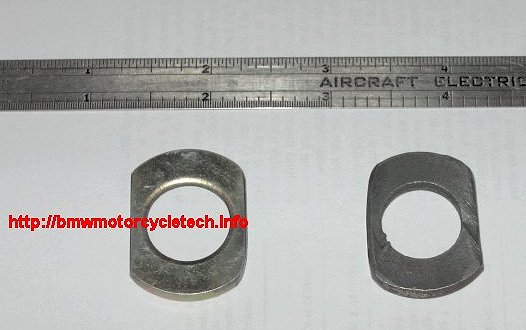
https://bmwmotorcycletech.info/valves.htm
If the head gasket is not installed properly, the pushrods can rub on that gasket, and can even create a lot of valve noise. If the head gasket is installed wrong, the interference with the pushrods can be seen with a flashlight with the valve cover removed.
Some of you may need a pair of sockets or the thick & modified washers I have described earlier in this article ...to fit properly over the rocker boss ends, that is, they are going to be used as spacers if using the C-clamp method, so the proper size fits over the end of the rocker shaft, but does not grip it, and certainly is not so large as to not fit squarely on the rocker block end. The washers or sockets must also not be in contact with the small curved in portion, and the washers must be thick enough, and perhaps ground at one point underneath to avoid that rounded bit mentioned.
Do not make any actual adjustments, including not backing off nor adjusting nut torque, until you measure and write down the clearance you measure at the valve tip. Keep a record; enabling you to follow trends over time. You should check the end play before finalizing ...even before doing ...a valve adjustment. All this amounts to is to have some valve tip clearance, and you will then push/lift, push/down, the rocker and look at the oil film where the rocker meets the rocker block. The cylinder's piston must be at TDC (OT mark on flywheel or clutch carrier) on that cylinder's "compression" stroke. On the original /5 and early /6 valve gear, the rocker blocks are quite free to move around until the nuts are torqued down. The rocker blocks can move around a small amount on some later models, but not on the ones from ~1985.
The normal operation of the rocker is an angular thrust that produces side forces, hence the rocker can move up and down with considerable force because some end-play is required, even though it is very small. Excessive end play causes wear, and is THE usual prime cause of noise. If the play was quite excessive, especially on the /5 motorcycles, you will have faster wear on the /5 bush style rocker bearings. The valves will not be as stable in operation. The valves are nearly always, on any model Airhead, noisy with even a wee bit of excessive play. The vast majority of 'noisy valves' is rocker arm end play that is excessive; and it is worse if the rocker blocks are not being touched very squarely by the rocker arm ends. BMW made a lot of changes over the years to quiet the valves. Valves on the faired models sound far noisier. On very early models, the valve gear can be moved all-about. This is particularly so on the /5 and earliest /6. Additionally, if the rocker blocks are not square to the rocker ends, you can have a lot of noise and the angular problem will cause oil to leak out too fast at that gap.
First loosen the two nuts ...probably about 1/2 turn to 3/4 turn, for only one rocker assembly shaft/blocks.
Do not forget; you are starting with the left cylinder on its compression stroke and the OT mark showing. Both conditions must exist. Be sure you are on the compression stroke. The intake valve stem will be outwards the full amount, showing that the intake valve is closed. If you are confused, rotate the engine and watch the valves as you rotate and OT appears in the timing window.

01/20/2008: Revised to stand-alone article. Some items previously in this article were moved to sub-sections of article 60, & others were expanded upon & left in this article.
05/12/2009: MAJOR revision, much of which was in accordance to the above date of 01/20/2008, was done many months ago & was never uploaded by mistake!
06/10/2009: Review for clarity.
07/10/2012: Add information on size and use of the washers, C-clamp, etc., in more depth.
10/01/2012: Add QR code; add language button; update Google Ad-sense code. Shorten article considerably by removing a lot (not all!) redundancies.
11/22/2012: Add photos of what happens when the head of an exhaust valve departs.
08/21/2013: Go over article and clarify some details.
08/26/2013: Clarify one nut at a time in Simplified procedure.
03/27/2016: Update metacodes. Revise article for clarity and layout.
11/12/2016: Metacodes, scripts, HTML, cleanup, clarity of explanations.
09/12/2017: Reduce fonts, reduce colors, major cleanup. Some minor clarifications.
04/20/2018: More cleanup. Add 10pxl margins. Layout done nicer. Clarifications.
04/24/2019: Noticed that one photo was missing. Determined it was due to my recent small change in the name of the photo (done to fix some percent 20 and extra space problems for many folks). Fix the problem, by hyperlinking properly to the new-name photo, as original was purposely deleted.
© Copyright 2023, R. Fleischer
Return to Technical Articles LIST Page
Last check/edit: Saturday, August 19, 2023