
|
|
The ads above are Google-sponsored;
clicking on them at every visit helps support this website!
Clicking on something inside an advertisement helps even more!!
Thank you also, for the donations! Donating, and website information.
EARLY R75/5 BING CV CARBURETORS
Generally applicable: Bing CV carburetor, 64/32/1; 64/32/2; 64/32/3; 64/32/4; 64/32/9; 64/32/10;
some information covers later CV carburetors
.... problems........ including idle.
https://bmwmotorcycletech.info/earlybingR75CV.htm
6
© Copyright 2021, R. Fleischer
INTRODUCTION:
This article deals with problems with the earliest versions of Bing CV carburetors, as used on the R75/5. This includes getting the bike to start and to idle correctly. Some of the information is applicable to later carburetors. While it may, at first glance, appear that the information in the article below does not apply to the later carburetors except for information as to how the /9 & /10 (and later) carburetors are different from these /1, /2, /3 and /4, that is not so. The information in this article should be read by anyone that also works on later model CV carbs ....as some things are good to know ....such as about the springs that might be added, changes in parts, etc.
A basic mini-overhaul can often be done with the carburetors in place on the engine. This may be enough. Three articles, the one you are reading, and https://bmwmotorcycletech.info/bingcv.htm (which is article 3A), and https://bmwmotorcycletech.info/bingcv-2.htm (which is article 3B) should be read and used with this one. These articles are specific to fully inform you what you need to know, as an Airhead owner/rider/maintainer, about your Bing CV carburetors.
Before working on the R75/5 carburetors to cure what might seem to be carburetor problems, such as with high or irregular idle rpm or inability to properly adjust the carburetors, it is important that the engine valves be set correctly, & the ignition timing be correct. Be sure, by actual testing by a volatile spray such as brake cleaner, that there are no vacuum leaks at the throttle shafts, hoses between carburetor & cylinder head. There must not be any idle rpm change from use of such a spray. Never work on carburetors unless you are sure all else is OK!
I normally advise setting the Bing CV carburetors for an idle rpm of 1000 +-50 on a fully warmed-up (from a ride) on any Airhead. My advice is to not go below 900 RPM for idle, for better stability (and, timing compartment oiling).
The maximum available ignition advance, the F dot on the flywheel, may occur at as low as ~1800 or as much as ~3500, depending on which ATU is installed, and the ATU wear, because the ATU's up to 1978 will all physically fit......and, ,,,,someone might have even modified an earlier ATU with later springs, etc. DO NOT be overly concerned about this. While there is a chart on this website that identifies/describes the characteristic of the ATU by its stamped BOSCH part number, you can pretty-much disregard that, in favor of an actual RPM versus F dot and S mark. The earliest ATU (/5 era) started to advance as low as 800 rpm, and stopped advancing at ~2000 RPM. The slow idle timing mark, that is, the "S" mark, should appear in the timing window if the engine is at or a bit below 800 RPM on these earliest /5 motorcycles. You may have to slow the engine to below 800 rpm during checking of the slow idle timing (which is not critical, just in the window is OK). That can be done by adjusting the carburetors or slipping the clutch while in a gear. Note that you may already have a modified advance unit. If you have the earliest type of ATU, and raise the rpm until the F dot is at the center, and then check at slow idle, and the timing turns out to be approximately 2000 for F dot and 800 for S mark, I suggest you change the springs to the slightly stiffer type; if NLA, then lighten the bob-weights. If the springs are sacked-out, and there is some noticeable looseness on them, engine off, then fix that, otherwise the idle will be a bit irregular. Read the next paragraph.
Unless you plan to run 91 or higher octane fuel (USA type octane), I recommend you change the ATU springs to the later slightly stiffer type, that require ~3,000 RPM for maximum advance. If you have 91+ octane available, you can consider using the early 2000 RPM advance version. However, that earliest version allows some small ignition advance from ~800 rpm. Since, in my opinion, the idle rpm should be within the range of ~900-1050, in order to get the early carburetors to work properly (and get proper oiling to the timing chest parts inside the engine) that means some advance will be had even at 900 to 1050 RPM idle on those earliest ATU's unless you change the springs. You can have a buddy use your timing light as you slow the engine below 800 RPM by dragging the clutch, transmission in some gear, brakes on, while he checks the timing marks. That complicates things, & is further complicated if any version of the advance springs have stretched-out some. If stretched, the ATU will be unstable at low rpm, because that allows slop in the advance weights (easily seen/felt, engine off), that is, the springs are too stretched to allow the weights to fully return at engine off. The difference in acceleration/performance is very small between the "2000" RPM springs and the "3000" RPM springs, so I think it best to use the 3000 RPM springs, no matter the gasoline, ...unless you are doing serious modifications of the engine for higher performance, such as a change in camshaft and/or lightening the flywheel, etc. Even then, you may want to think about it. Models with the 3000 RPM springs do not begin to advance at 800 RPM, as did the original early /5 ATU's. The 3000 RPM springs make the ATU start to advance around 1500 +- RPM, and finish advancing at ~3,000 RPM. If you don't wish to change springs, but do want higher fully-advanced RPM, which often allows use of less than premium grade of gasoline, you can remove metal from the advance weights; don't do that with sacked-out loose springs. "Hopped-up" engines or those using lousy gasoline's, and still getting pinging with 3000 RPM full advance, might want to increase the RPM for full advance to as much as 3600 RPM, by shaving the weights metal some; unless you find proper springs for that.
As many of you know, if you have followed the Airheads List for a long time, I wrenched during 2001 on a very early (12/1970) SWB R75/5 with the original carburetors, that had not been nicely overhauled in the recent past by Bing themselves. Bing miss-drilled two holes, & generally made a mess. Even when originally delivered brand-new, these early carburetors had some badly made (& badly designed) parts, besides the problems with them being an early design that was not well sorted-out. This was not the first time I had 'played' with the R75/5 CV carbs ...I'd a lot of experience with them, back as far as the early seventies when the /5 was still being sold new by dealers and I was the Chief Tech and head of the shop at a dealership, and traveling in the West as a troubleshooter for BMW. But, this particular set of carbs was a real mess. I ended up trying just about everything; including all I had learned 30 years previously ....and more!
Because this bike belonged to a friend, I spent a lot of time on the bike, doing many things ....especially working on those carburetors. I used it as a test-bed, with owner's permission, to try anything I wanted to, to fix those carburetors; even though he was willing to purchase brand-new R75/7 carburetors. The R75/5 carbs were the early type, (model ending in /3 and /4) with poor enrichener design, leaky domes, bad slides, poorly designed idle passageways (at butterfly closing position) ...and more!
One of the annoying things about this /5 that I strove to fix was a goodly tendency for wandering idle & also sometimes having to use the choke to start the engine when the engine was already hot from riding. Sometimes with these ornery carburetors the engine would start when quite cold without using the enricheners. Trying to get a solid & stable idling adjustment on these very early CV carburetors is often...but not always... difficult. Most folks give up, install later carburetors, perhaps from a R75/7, not a bad idea actually, if obtained reasonably priced. Almost any of the later Bing 32 mm CV carburetors will fit and can be jetted to work OK on the /5 bikes; although the throttle cable fitment may have to be modified. I recommend not using the flat top carburetors. While, as noted, the owner was willing to purchase /7 carburetors, I wanted to keep the bike as stock as possible ...so I decided to see how frustrated I could get! I am ornery, dogged, & nerdy (among my better attributes), & my goal was to make these carburetors perform much better; but, perhaps, not as good as the later models. My goals were accomplished. Along the way I learned a few things that 'we' did not know back when these bikes were new, or nearly so. It is now my belief that nearly anyone can get the /3 and /4 CV carburetors to work reasonably well, and is one of the reasons for this article.
These early model Bing 64/32/3 and 64/32/4 carburetors were a bit crude. The idle passageways in the carburetor were a somewhat poorly-designed simple single-stage type, somewhat abrupt in operation as the throttle is barely opened from idle stops. That is the primary reason that the butterfly's had to be installed extra carefully. Even on much later models, the positioning of the butterfly can be critical. Wrongly installed butterflies will never allow proper adjustment and operation. The butterflies were almost imperceptibly changed in later models, at the lower edge where the idle port in the bottom of the carburetor body exists. Of course, the butterfly in any of the CV carbs must be installed correct side rearwards.
On these early /5 CV carbs, Bing put some idle holes in a slightly wrong place. The choke (enrichener) was cruder in its internal design than later models. The choke (enrichener) was nearly, in effect, a one-stage type, and it was poorly sealed as it had no gasket. Carefully re-working the sealing surfaces worked fine, but I liked to install the later gasket anyway. Early versions of the enrichener had the shaft O-ring on the outside, the early cover had a place for it there.
O-ring sealing was not as extensive; even missing on the central jet. The original early diaphragms were thinner, replacements are thicker. There were no vacuum take-off ports (Bing does make a kit, and you can drill the carburetors and install their kit, or make your own). Unfortunately, Bing's drilling on my set, because they had previously overhauled these carburetors, was messy and badly done.
Some materials in these oldest Bing CV carburetors were not conducive to smooth & consistent operation ...the slide guide pilot was steel, later models are brass & hard chrome plated, as just one example.
Originally the 2nd needle position was used, & the needle jet was a quite rich type. The slide itself was the earliest, and primitive.
There were a number of bulletins (Service Information ...or SI) issued by BMW on these early troublesome carburetors. The stamped number on the especially troublesome carburetors is 64/32/3 and 64/32/4; I won't get into the /1 and /2, as they are awful, and you are unlikely to ever see any, although this article is applicable to them.
WHEN READING THIS ARTICLE KEEP IN MIND THAT YOUR CARBURETORS MAY HAVE BEEN CHANGED OR MODIFIED!
Specifics:
Beginning with engine number 2 972 061 for the R75/5, the carburetor construction was changed. The slide guide pilot, formerly steel, was now brass, & hard chrome plated. The diaphragms were increased to .016" thickness. Never an official reason at first ...,but not difficult to figure out why the changes.
After serial 2 977 320, the carburetor model number was changed and it ended in /9 and /10. YES, the carburetor number remained the same /3 and /4 early-on, even with the first changes! But, along the way to the /9 and /10, were more changes.
The earliest BMW bulletin has a lot of information regarding measuring the slide needle below the slide (1.555" means third notch); information on slotting the air-tubes; ....AND.....about keeping cylinder timing variation to under 1 degree. Yeah, riiiight! ....this meant playing with the cam nose end ....dangerous even for experienced wrenches ...although BMW also said to stone the automatic advance cam so timing did not vary between cylinders by more than 1°. This is laughable, as cam tip run-out is typically more; and wear in the chain compartment negates it all; & ...BMW never mentioned the brass hammer hit on the camshaft nose; ...so....careful here folks! Not going to get into all this right here. I am sure most of you know that a little timing chain (well, timing sprockets and tensioner) wear makes this even more laughable.
Another bulletin came out dealing with the diaphragm installation & evenly tightening the diaphragm screws. Included in this bulletin were adjustments such as float levels (.767-.787 inch of fuel) ...tuning, etc. Some of this stuff is interesting to folks like me ...and some, like the needle & fuel measurement, are hardly found anyplace else except in old files like mine.
There were also some little known internal changes in carburetor bores, passageways, etc.
The early R75/5 carburetors were still having problems, even after factory bulletins and things done prior to dealer delivery, plus dealer work.
Bing did all sorts of things not commonly known. Bing sealed the mixture tube, finally by an O-ring; the idle nozzle was changed, bypass bore size changed, they even changed the float needle spring, made some changes in passageway sizes, & there was a change in the ventilation of the "starter cup" from outside to inside, as they put it ...or; mixture bore in the rotary valve. Bing changed the enrichener outer cover, dealing with the previous outside O-ring the enrichener shaft went through. Are you confused yet?
It was at this later time, well into many changes by Bing, that the enrichener was modified & it now had 3 different sizes of fuel feed bores.
It was in November of 1971 that BMW first ...and almost lastly ....ever recommended opening the throttle (some, but not otherwise stated) during cold engine starts. We all know, or should, that this can be a necessity depending on the bike, temperature (does not have to be really very cold), & how the carburetors are adjusted. That is still true for later models, but BMW has dropped the recommendation of opening the throttle any. Shame! |
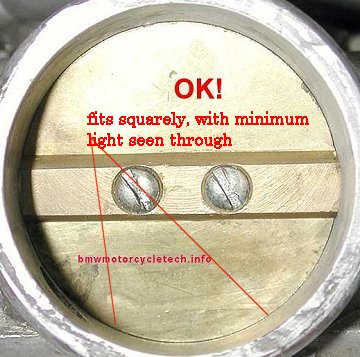
Problems folks usually have with the /3 & /4 carburetors include a slow return to idle, poor throttle feel & performance, surging in the mid-range, & an irregular idle. In some cases, the idle stop screw setting will allow the butterfly to close quite far, & as it does so almost completely, the idle speed goes mysteriously UP. If you have one of the particularly bad carburetors, you may have a problem getting that cylinder to idle slow enough! I won't get into just why, as it is not important here. Be sure that if the butterfly's were removed, no matter by who, & that includes Bing!, that they are installed correctly! They must be oriented correctly, not reversed, and they must fit the carburetor bore properly, particularly at the bottom. Later in this article are photos of the butterfly done correctly, and incorrectly.
The need for critical adjustment of idle mixture, idle speed, & interaction of those; and, the effect of not quite perfect cable synchronization, is pronounced on these early carburetors, as are altitude effects on idle speed. Everything has to be just right for anything even approaching a decent synchronization & stable operation. Even then, they are not as nice as the later models, & perhaps cannot be made quite so, but they can be made to be quite acceptable. Many have no problems!!, even with large mileages on them!! ...and that is partially due to inconsistencies of the manufacturing.
This is not a "how to overhaul a Bing CV" article. A true overhaul is not just a simple cleaning; but, includes full cleaning & new float, float needle, slide needle, slide needle jet, diaphragm, & probably shaft O-ring & other O-rings (some carburetors, the very earliest R75/5, had some O-rings missing, compared to the later carburetors, even with the same model number). I will assume that your carburetors are basically in good condition, parts-wise, including NON-leaking dome inserts!! I will also assume you know about spraying brake cleaner on the rubber hose adaptors ends to the cylinder heads to see if they are leaking (the idle speed changes); & know how to adjust carburetors. If not, read my other two major carburetor articles and my synchcarbs article:
https://bmwmotorcycletech.info/bingcv.htm
https://bmwmotorcycletech.info/bingcv-2.htm
https://bmwmotorcycletech.info/synchcarbs.htm
BMW (via Bing) made a number of modifications to these R75/5 carburetors; or, dealers or the distributor did, & those modified carburetors are supposed to be stamped with a letter C on the knock-out plug on the dome cover. UNfortunately, many were not stamped; and, there is a small c and a capital C version of modifications, confusing things further. Later carburetors had a gasket at the enrichener cover plate. Not exactly at the same time, Bing changed the enrichener shaft & cover assembly, and put the rubber O-ring inside. When BMW modified existing carburetors, they changed the dome cover, slide assembly, & the enricheners, & the enricheners are handed (left, right). If you have dome insert carburetors, seal the dome, as I have described in my articles.
Note that Bing's own carburetor manual is not correct on some details, such as the enrichener area parts.
If you cannot get your /3 & /4 carburetors to work reasonably correctly after some decent attempts, which I describe in this article, perhaps you should plant flowers in them. Most that have followed my advice and suggestions in this article in the below section, What to do...Specific Details, have ended up with good operating carburetors.
Do keep in mind that other engine problems, particularly overly tight valve clearances & ignition problems, can make you think that you have carburetor problems. It is a really good Rule of Thumb to never work on carbs, unless the ignition & valve clearances are checked first.
BMW & Bing finally gave up modifying the earliest carburetor bodies. Later model carburetors worked much better; they incorporated some of the things Bing & BMW recommended for the original carburetors, plus passageways changes, & much more. The final modifications & production changes on the R75/5 carburetors led to the first carburetors that generally worked quite well & were repeatable in operation, having model numbers 64/32/9 & 64/32/10. From that point on, carburetor improvements were small changes from time to time. The /9 & /10 carburetors had the mixture adjustments sealed via O-rings, a different idle speed nozzle entirely, the internal bypass bore was enlarged & its placement altered, the float needle spring was changed, the diaphragm limited in movement, the corner cavity in the bowl for starting was ventilated to the outside, the enrichener went from one stage to two stages to a modified three stages, etc. The slide itself was changed ...and only slightly later models had materials changes, and just a bit later models once again used a slightly different slide.
If you have these /3 and /4 carburetors, be advised that you might have any combination ...or none ...of any of the early changes, whether or not the dome is marked with a "c" or "C". Carburetors sent for overhaul to Bing might even have strange combinations. It is possible for a dome to be fitted that is not what it is marked, or the modified carburetor body, etc., is not what the mark is supposed to mean!!
What to do...Specific Details: First, of course, is to determine if you really do have carburetor problems! Assuming you do have carburetor problems, not fixed by checking valve clearances, points, timing, vacuum leaks at the intake ports or carburetor shafts, and not fixed with fresh diaphragms, fresh floats, central jet assembly cleaning ....& a quite close look-see at the butterfly fit and bottom shape, & you have looked quite carefully at the enrichener, etc.....: 1. It is very important that the slide tube (the round tube at the top of the slide) be polished to a fairly high degree, for approximately 1-1/2 inches down from the top. I begin by using ~600 grit Silicon Carbide paper, with kerosene, finishing with finer and finer grades. If the tube is not too bad, then I start with about a 1000 grit. 1200 grit is barely OK, 1500 or 1600 is better, ending with crocus cloth is not going overboard here. The dome bushing area where this tube moves up and down in, must also be smooth. BMW specifies a .07 mm (.003") clearance. I do not bother to measure this, but I do use a dowel, and, note again, 600 or 1000 and up silicon carbide paper, to polish the dome recess that the tube rides into. Take your sweet time, do not do a quickie job here. Install the slide & recess clean & dry. Just because you think the slide & dome move smoothly together, does not mean that they do this when vacuum is present ...so, do that polishing. Be sure the dome fits squarely to the body. In some instances of excessive wear, maybe not in some others!, it will be very helpful to add the large soft coil spring above the diaphragm, as used on many later model carburetors. This is because in some instances (you can see this happening by looking into the carburetor from its rear facing air intake side, sometimes ....at other times the engine must be running) the slide simply sticks too much and won't go fully to the bottom idle stop position. Fix that by doing polishing and then installing springs 13-11-1-335-324 above the slides. Just below is more about the springs, and this was for much later carburetors, but does apply here: Tom Cutter said that this spring modification, installing a longer & softer spring on the slide, will smooth the idle transition at the 1/8th to 1/2 throttle movement. The shorter, earlier spring, used on the 40 mm Bing CV carbs, was 13-11-1-335-324. Tom installs the longer softer spring 13-11-1-338-134, as used on the 1988-1995 R100 models using the 32 mm carbs (these springs, per Tom, are used on the Euro R100GS 40 mm carbs). I have my own input on this. Some folks prefer the more abrupt throttle action produced by the stiffer spring, which is about 115 mm long & has about 30 coils. The softer springs are about 120 mm long & have about 20 coils. Certainly for the R75 early carburetors, having a spring there when idle and off-idle is having stability problems, can be helpful. The spring helps ensure the slide goes down fully. BUT, that is not the only or part-only solution, and it may not be needed, so see this entire article before you order/try springs! If you install springs, be sure they fit properly, not hanging up, #1 eyeball is good enough here! 2. It is important that the slide body be smooth, & that the edges of the slide not be too sharp, rather that they are smooth. I use 600 grit for that, finish with 1200. I do this as the final item before cleaning the slide assembly and reinstalling it. 3. Set the needle to the 3rd notch from the top. If you have set the needle correctly, there will be a needle exposure of about 1.556" from the bottom of the slide, center area, to the needle tip. This is a great way to know you are on the 3rd. notch. In fact, no matter what carburetor or needle position, I recommend the measurement. Write it down on your bike's specification or service records sheet (you do have one?). 4. The chokes (enrichener) on these early carburetors have what amounts to nearly a single stage, so when synchronizing the enrichener cables, when choke lever is off, ensure that the carburetor levers are on the stops, & ensure that a very small choke lever movement will start both carburetor levers moving at the same time. Ideally the choke lever will put the enrichener levers at the off mechanical stops when the choke lever is off, & at full-on stops when the choke lever is at maximum. You may find that you cannot get this as close as you might like. Modifications could be done, but are not recommended unless you have insufficient cold weather choke available, hardly a problem with these large enrichener passageway carburetors. Allowing a minimum of cable free play, perhaps 1 mm, usually enables a good adjustment. 5. The latest procedure for setting float levels, on all Bing CV carburetors, is to raise the float with a finger, very gently, & adjust the float bridge tab so that the gas just stops flowing when the top of the floats are parallel with the bottom of the carburetor body. Using the sprung type of needle, and slop in the float holding pin, it is likely better to raise the float until the gas stops, then very slowly lower the float until gas flow just begins; use that point as the parallel check. I do it that way for ALL Bing CV carburetors, all years, all models! What is not widely known is that if you have the bike on the center stand, bowls in place with a good gasket, & fill the bowls from the petcock, shut off the fuel at the petcocks, & then quickly remove the bowl ...you can measure the fuel depth in the float bowl decently enough. Optimum from the center bottom middle depression area of the bowl, to the fuel level, is 19 to 20 mm. This is for the stock one piece floats! This should tend to agree with your finger method; and, notice that it agrees with the 0.767" to 0.787" that I showed very early in this article. Float level affects richeness/leanness. 6. If using the "shorting of spark plugs method" in adjusting the carburetors, that is not done when adjusting the idle mixture screw. Clymers, etc. is wrong! No adjustments can be made, other than initial crude eye-ball mechanical ones, until the bike has been ridden at least 10 miles!!! That is true for all Airheads, but especially critical on these /3 & /4 model carbs ....& even somewhat the /9 & /10. 7. The idle mixture must be readjusted any time the idle stop screws adjustments are changed. The idle mixtures & idle stop screws interact with each other, less & less so as you approach the ideal adjustment for all, and this is slightly more touchy on these old carburetors than the later carburetors. 8. If you happen to be overhauling the carburetors, lap the top of the carburetor body itself on a surface plate, piece of glass, etc., with upside-down 220 grit sandpaper, figure eights with equal pressure, moving your hand to various positions all around, to flatten the top of the carburetor body. You can finish with a finer grit. This will reduce any gasoline stains & seal the diaphragm better. Sand just enough to clean the full surface nicely. If you have the ORIGINAL, as shipped, /3 and /4 carburetors, diaphragms, purchase and install new ones, they are thicker. 9. One special modification is possible. I suggest not doing this unless you have done everything else first, and know that your valves adjustments are correct, ignition timing correct, & that the problem is in the carburetors, with idle irregularities ...& you have installed the coiled springs I mentioned earlier: a. Remove the slide. If the diaphragm & needle are still attached, be especially careful when doing this modification. Under no circumstances must the diaphragm be injured, nor the needle bent. b. Obtain two common round-headed [not tapered under the head] screws, 4-40 thread, 1/4" long (under head to end). Steel is best, although brass or plated brass is usable. The head on the screw should be about .078" thick ...although this is not critical, nor is the width of the head. Metric near equivalents are OK, in which case you will have to change the drill sizes and tap thread sizes noted here. c. Look at the bottom of the slide. You will see two equal raised areas, that the slide bottoms on, when the slide is fully down. Very carefully, with a sharp center-punch, put a punch prick at the center, radially & across, one of those flat areas. Do not injure the diaphragm, needle, nor nick the slide, etc. Drill, straight & squarely, a hole at that punch prick, using a #43 drill, depth to roughly 1/2". d. Drill the same hole again, but this time use a #31 drill; drill to only about 1/16" inch in depth. e. Tap the hole using a 4-40 tap. Be sure to do this straight & squarely. f. Clean out the swarf; install the screw without Loctite; be sure the screw will screw down fully. Remove the screw, use a tiny drop of Loctite Red (#271) on the screw threads & re-install. Tighten the screw flush with the slide bottom. Be sure it is flush, & both carburetors identical. g. Reassemble the carbs, resynchronize the choke cables, synchronize the throttle cables as best you can by eyeball for equal pull off the idle stops, leaving some slack roughly equal in each outer sheath. h. Go for a 10 mile minimum ride. Recheck the idle mixture & idle speed, adjust as required, then repeat the cable adjustment by the normal sync method. i. If your cables are quite worn, you will never get a good, repeatable, synchronization. Earliest original cables for the /5 motorcycles were not internally lined and thus can be lubricated, all later cables must not be lubricated. ADDENDUM: 1. If you have problems starting the bike (especially when cold), consistently hard starting, or maybe one carburetor is acting up, that cylinder not firing until throttle is opened ...and particularly if you have irregular idle: Check to see if the butterflies were properly installed. Be sure they were installed correctly! I always do this check as one of the first things, problems or not. If not Installed correctly: 2. If you have a R75/5 that is particularly difficult to start when cold, & everything else checks out fine, including the tiny jet in the corner of the float bowl is not clogged and the tiny diameter pipe coming downwards into that corner jet area is not split or otherwise damaged ....then ....be sure to check the slides to be sure they are bottoming fully, & not hung up slightly, as it may be that the slides are not returning fully. Fix that by installing springs 13-11-1-338-134 which are for 32 mm carburetors. I suggest you first polish the slide and carburetor interior area, and, consider adding the screws mentioned above. The number for springs for 40 mm carburetors for other models of Airheads is 13-11-1-335-324. BE SURE that the enrichener dome cover is sealing well to the body ...any leaks means troubles with starting, and the running range can also have problems. Later carbs had a gasket at that cover, which, if the screws loosened (common occurrence) would let the gasket suck inwards some, causing problems. A gasket can be added, but you can also check the cover and body flatness and use a teeny bit of sealant. 3. Choke cables: The earliest /5 carburetors not only had the return springs wrapped around the throttle cables at the carburetors, but they had a different setup on the choke (enrichener) cables. Earliest carburetors (before /9 & /10) had stranded-wire choke cables, & an internal return spring. Operation could be iffy. Cables 12-23-1-252-826. The /9 & /10 carbs changed to solid cables. You can convert, using 13-11-9-057-338 clamp screws. A full conversion could also consist of using (for both carbs): Final words:
I have used 20-21 mm sometimes. Those values are not necessarily for much later carburetors!
Loosen the screw whose bracket keeps the shaft in place. Loosen the butterfly screws slightly. This is usually not a problem even if peened, as you can usually loosen them a tiny amount; .... if not, ...grind, replace, peen, or, when tightening, use Loctite BLUE, and be sure the butterfly will completely seal to the carb bottom ...before final tightening. If the butterflies are reversed, you will never get proper operation. Note that the edge of the butterfly has an angle, if the butterfly is installed reversed, it will look like the photograph on the left here. When installing the butterfly, screws still a bit loose, lightly finger-press the butterfly closed while you have the idle stop screws backed off so butterfly can be fully closed; then, tighten the screws. I use one tiny droplet of Loctite blue on each screw's threads, during screw installation.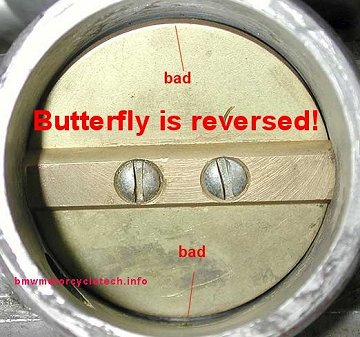
2 each clamping screws 13-11-9-057-338
2 each lower fitting 13-23-1-256-295
2 each upper fitting 13-23-1-256-019
4 each nuts 07-11-9-057-338
© Copyright 2021, R. Fleischer
Return to Technical Articles List Page
Last check/edit: Wednesday, August 16, 2023