
|
|
Pistons. Swapping heads. Cylinders.
Piston rings, pins, clips, keepers,
de-carboning; honing, ETC.
BMW Airhead Motorcycles
� Copyright 2020, R. Fleischer
https://bmwmotorcycletech.info/pistons.htm
Article 60, sub-section 4
Be sure to read these articles (don't forget!):
https://bmwmotorcycletech.info/cylinders.htm
https://bmwmotorcycletech.info/break-in.htm
De-carboning:
De-carboning is done for various reasons, but especially to keep compression ratio from increasing, & for keeping hot-spots out of the cylinder head. De-carboning of the top end, heads, pistons, etc. on a BMW Airhead Motorcycle is best done with the pistons & rings removed & separated from each other, & the head disassembled. I suggest that you do NOT take the top end down too far just to de-carbon it. I suggest you leave the rings on the piston. Leave the valves and springs in the head. Removing the head & cylinder enables the head to be soaked in something like Gunk (brand) Hydroseal (up to a week!); or Simple Green (50%, overnight). If you use Simple Green, be sure to totally immerse the piston, or head, etc. Agitate and brush the parts occasionally, then re-submerge them.
It is easy to break the very brittle piston rings. It is also easy to install them upside down, etc. That is why I recommend not removing the rings from the piston. The piston (with rings still in the piston grooves) can be removed from its rod and soaked, rotating the rings now & then when brushing and soaking. Removing the piston pin rearwards, after removing the rear piston pin clip, is usually fairly easy; If need be, heat the piston with a hair-dryer to expand the aluminum (much faster expansion than the steel pin). There are both inside & outside piston clips in use. For 1978, BMW changed the piston pin clip to the better EXternal type on the R80 models, and phased that in on the R100 models; BE SURE you install them correctly, so read break-in.
Do not scratch the pin bore area in the slightest. If need-be, use a draw-bar method if the pin is too tight even with the piston quite hot. Do not let the rod fall & nick the crankcase. Do not mess up the piston circlip if you intend to reuse it. I replace them every time. When removing or installing clips, do not do more than just the needed amount of pressure & movement. Be absolutely certain that a clip is fully in the groove! There is a correct, & incorrect, inwards side to some clips; wrist pin circlips may have a sharp side and a rounded side; if so, the rounded side goes inwards.
HINT: Some will leave pistons/rings/rod-to-crank all intact, just removing head & cylinder, & use a heavily soaked rag on the piston, with the liquid being Simple Green, perhaps with a plastic food bag over it, to avoid it drying out. This works sort-of-OK ...if you do some cleaning & brushing with fresh Simple Green during the process. Some people have made a shaped pan like a cut-off cocoon to soak the piston in Gunk's Hydroseal for days at a time, but the motorcycle must be tilted considerably towards that cylinder for this to be practical, & allow the piston to be immersed.
DO NOT glass-bead-blast the heads, nor cylinders, nor pistons. The hard media will get into everything, & even after very careful cleaning some is left, even into the metal surfaces and eventually these tiny particles may get into all sorts of other areas, like bearings, and upper end areas ....where they will cause accelerated wear. Besides those problems, blasting pistons with glass beads can easily be overdone, can cause wear just from the blasting, let alone the residues that did not wash/brush out. DO NOT use such blasting media. Walnut shells can be used. Use of soda or CO2 blasting or straight hi pressure vapor, is OK ...but the soda method requires an exceptionally good cleaning afterwards ...and the stuff gets into everything in the vicinity. A technique known as Vapor Blasting, which actually uses an abrasive media, seems much safer than using common sand or glass bead blasting.
Swapping heads, cylinders, pistons:
Many questions have arisen on swapping cylinder heads, cylinders & pistons between the various models of Airheads. I am not going to discuss every possibility. If your question is not answered HERE, ask on the Airheads LIST.
1. In 1976 BMW changed the crankcase to accommodate 99 mm diameter base cylinders, previously cylinders were 97 mm. Thus later cylinders don't generally fit earlier cases; but either case or cylinder can be machined so cylinders will fit. Some early 99 mm base cylinders were made without grooves for the large O-ring, all later ones had the very large O-ring, having a machined groove for it on the cylinder base. It is possible to install Nikasil cylinders on some pre-1981 engines. You have to trim a small amount of material at the bottom of the cylinder, inboard of the O-ring groove. You need the cylinder in a lathe to do this. This needs explanation, as there are two styles of Nikasil cylinders. The first versions, used between 1981 and 1984, were the same as the earlier cylinders, that is, they do not have a small step above the O-ring groove, & fit the earlier cases directly with no problems (assuming 1976 or later engine case). Later than 1984 cylinders do not directly fit the pre-1981 cases. You have to machine-off the step so they will fit. You could use them without the O-ring, but the O-rings can help eliminate chances of any oil leaks/weeps.
2. You can fit Nikasil cylinders pistons from a R80 onto a R75/7. The squish band is different on R80 pistons, but the clearance is OK.
3. 1000 cc cylinders won't fit R90S heads. There is a head gasket difference with the R100 & all the smaller displacement sizes. You could use R100 heads and cylinders and pistons.
4. Problems are with the R100 engines with high compression pistons. The high compression heads & pistons were on U.S. 77-78-79 models of the R100. See 8., below.
5. It is possible to combine European high compression ratio pistons & heads & Nikasil cylinders.
6. Almost always, using larger displacement on an engine that came with smaller displacement, will result in more vibration ...or power pulse feeling. Beware of trying to fit larger cylinders from the R75/5 into a R60/5 or R50/5, because the camshafts are very different, and can cause problems, although the camshafts can be changed to the R75/5 type, etc.
7. Do not mess up the piston clip if you intend to reuse it ....I do not, I replace the clips every time. When removing or installing clips, do not do more than just the amount of pressure & prying movement needed. For wrist pin circlips having a sharp side & a rounded side the rounded side goes inwards. Old style pistons with internal pin clips interchange with later external clip types. Airhead pistons up through early 1977 used a thin circular inside wire piston pin clip. The later 1977 & perhaps some very early 1978 had a thicker version of that clip. The piston pin clip on most 1978 and later had the exterior type. To remove the inside type of piston pin clips, use a hardened tip sharp tool with an L shaped tip. Insert the L shaped tip into the tiny recess, getting the tool behind the clip; move it towards the center of the grooved hole, so as to remove it. To remove the outside type of clip, use a conventional circlip pliers. Do not mess up the groove. The slightest burr on the groove must be fixed, otherwise the pin will not fit smoothly.
8. High compression pistons may have problems with the head. Later pistons had the dome extending to the edge; later 1970's types with the squish band were designed to work with a matching cylinder head, & might have to be machined. This might occur with some modification you are attempting, such as later pistons fitting 1977 heads. The squish pistons used on such as the 1977 R100RS are hard to find and were used only in that year and model. The original 'squish' pistons are no longer available. If you have a 1977 R100 & need pistons, you could consider using the 9.5:1 1978 pistons with the outside circlip. One can modify the head & cylinder (deck height change, about 0.050") and thereby get your own squish pistons in practical use. The 1978+ had a different shape for the pistons ...at the edge as an example. Perhaps some pre-emissions 1978 pistons will work, but you would have to order them & look at them.
9. You can not trust the latest parts information at the dealerships.
10. Some pistons were manufactured with the VORN and arrow stamped wrongly ...that is, in the reversed position! Be sure you have the piston installed in the correct direction!
Piston ring rotation; orientation; cylinder crosshatch:
Piston rings do rotate. They are designed to rotate; only a few engine types do not have rotating rings. Those non-rotating ring engines are mostly the 2-stroke type with ports on the cylinder walls, that you would not want the ring ends to grab onto or be opposite. There are some 4 stroke exceptions. The roundness of the cylinder has an effect, and there are some smaller effects. The cylinder wall cross-hatch pattern that is done by the factory (or knowledgeable machine shop) is very specifically designed to cause ring rotation during break-in. When boring or otherwise renewing a cylinder when real honing is being done, the crosshatch has to be done correctly. The proper cross-hatch is done with a specific angle, best done on an automatic machine, and if done correctly it will hold a miniscule amount of oil during break-in, and cause proper ring rotation at that time.
https://bmwmotorcycletech.info/cylinders.htm gets into this more deeply.
Rings should be installed initially at ~120 degrees from each other if you removed the piston assembly from the cylinder. I disagree with those that say it does not matter if the rings are lined up any which way. Rings do move but mostly with fresh crosshatched bores and initial few miles of break-in. Afterwards, they tend to be more stable; however, they can move (rotate) again; and likely will, some, particularly on the Nikasil cylinders. You should not put the oil ring end gap at the bottom. The reason is an accumulation of oil ...particularly when the motorcycles is on the side-stand, but this advice applies to both left and right cylinders.
Genuine BMW rings may have a top & bottom, and may have their tops marked, sometimes very faintly. Due to wear patterns, besides ring design, always return the rings to the same top/bottom orientation. Do not install a ring upside down from a specified orientation in the first place. BMW piston rings, if marked, are usually marked TOP near the ring gap. Don't assume that pistons, such as new ones from a dealer, have the rings installed correctly. The older style of oil rings may or may not be marked TOP. Failure to observe the orientation of the ring will result in high oil usage. If you install the ring upside down, which is very easy to do, your cylinder will burn oil.
There has been considerable confusion over how to install the rings. On the pre-Nikasil (usually that means pre-1981) Airhead motorcycles, the oil ring scrapes the cylinder as the piston moves inwards, and there is a taper on them, and the wider part faces the crankcase. There is a spring (1981+) behind the oil ring, and the ring is not top/bottom oriented. The middle ring is oriented. All rings before 1981 have a proper orientation ('top', or up, meaning towards the head).
The Top Ring, also called the Compression Ring, means the ring closest to the top of the piston. Use a magnifying glass. The inner portion of the ring has a tapered edge that faces the head (or top of the piston), that is, outwards.
The 2nd ring (ring in middle) may have a notched outer edge. The notch faces the engine case. On the 1981+ style 2nd ring, that ring, if marked, is marked for the top, the bevel does face the crankcase.
From the earliest /5 to about 1980, the bevel of the OIL ring was towards the valve cover. Old style OIL rings have a taper on one edge, it is sometimes not easy to see. If you have that type of ring, that taper goes outwards; that is, towards the piston top. The wider rim of ring skirt was towards the crankcase ...that is, the wider part of the taper was towards the crankcase. This has caused confusion with the U channel ring. There are two chamfers on that ring. The chamfer on the edge faces the top of the piston. The chamber on the inside of the U faces the engine. From 1981, a new, symmetrical design was used, there is no up, no down ...for the oil ring, that is, ...and there is a radial spring; Nikasil cylinder motorcycle oil rings will have a spring expander behind it. Early oil rings had a sub-groove, to allow gases to force the ring against the sleeve.Pay attention from which groove the rings came, and don't break them, they are very brittle. Removing the rings is a job to be done very carefully, avoiding over-expanding the ring diameter, use the least possible amount. Because rings are so very brittle, slipping them off a piston has caused folks some problems. Use a few very thin feeler gauges to help ease them off. Do not put much pressure on the rings, or they will break. Because of these regards, I sometimes advise folks that are not installing new rings, to leave the existing rings where they are, on the piston. You can clean the piston and rings that way, with manual rotation of the rings, during the cleaning process.
You can install the piston from the top or bottom (with rings installed onto the piston first, of course), but the working area and cylinder bottom bevel can work against you if you try to install from the bottom ...you do NOT want to fracture a ring!
Lots more, later in this article!
ASSEMBLY NOTES:
Very lightly, oil the piston & rings when re-assembling; this is not the place to use lots of oil. A bit of oil on your hands is all that is needed.Here is the proper orientation of the ring end gaps, based on the common analog clock, as you face that side of the engine:
LEFT SIDE: outer, compression ring: 4:30
2nd ring: 10:30
innermost (oil ring): 1:30
RIGHT SIDE: outer, compression ring: 7:30
2nd ring: 1:30
innermost (oil ring): 10:30
BMW Airhead pistons have a front/rear and you can cause serious problems if you do not assemble the piston to the rod such as the small stamped arrow located on the top of the piston near the center, is pointing forward. There will be the word VORN (German for FRONT) next to the arrow. It may be covered with carbon. If using aftermarket pistons, they may not be marked, and the valve cutouts will usually give you the correct installation, just from inspecting the cutout sizes, the intake being bigger. There have been a few instances where the VORN and indicating arrow have been reversed. DO check your pistons ....the intake valve cutout is larger, and faces the rear; the exhaust valve is smaller, and faces the front.
DO NOT put the pistons that were in your left side, into the right side, & vice-versa. Pistons operate such that one side of the piston gets much more pressure (thrust effects) than the other, so wear patterns must be maintained, as well as shape.
Most Airheads specifications are for a maximum cylinder ovality of ~0.0004" and a maximum cylinder taper of 0.0008". The piston clearance is typically 0.001" on the smaller bores, to 0.002" for R100 engines. The Nikasil/Galnikal cylinders use a piston clearance of approximately 0.0015".
The factory specified ring end gaps prior to Nikasil/Galnikal, were top ring at 0.012-0.020". Nikasil/Galnikal use about 0.020" for the top and second ring; and 0.013" approximately for the scraper ring. These values I give here are in brief, the factory manuals give the exact gaps for each ring for all the various models. What do I do, myself? I don't go by the factory books, nor Haynes, nor Clymers, etc. I fit rings for end gaps that are about 0.0035" per inch of cylinder bore. DO NOT make the mistake of fitting rings with too little end gap! NOTE: Various 'books' (including BMW's own literature) have somewhat conflicting information on ring end-gaps. It is my belief that most of BMW's literature has the minimum specification for end gaps too small. I prefer somewhat wider end-gaps. I usually use around 0.020-0.024" (.5-.6 mm) for all three rings on well used bores. I prefer the top ring to have very slightly more gap, and each ring below, a bit more. This is NOT universally true, so see BMW's own information too. UNDERSTAND what you are doing! Whether or not to change rings on an engine that is apart, yet is not an oil burner, is a good question. This is particularly so on the Nikasil cylinders. I would let them go until quite wide and engines actually showing signs of real oil burning. Why do I prefer narrower ring end gaps in increasing values, from top to bottom? It is because of the normal gas escaping down the piston, ring by ring. The effective pressure decreases with distance from the top ring gap. If done in the reverse, the sealing may be poor.
Note that BMW rings as supplied may have larger end gaps than the manual states; and are usually OK. I would not be inclined to try to install rings with the minimum the factory specifies ...somewhat more end gap is actually preferable on our Airheads. One can use oversize rings to fit worn bores on the pre-Nikasil cylinders and then adjust the ring gap by filing the ring ends, squarely please! This may not be perfection, but in practical usage it works fine, but do this only on the first oversize (0.25mm). Do not do that with the Nikasil/Galnikal cylinders. Rings for Nikasil and Galnikal are not made the same way nor are they the same material as for the old steel cylinders. Pistons are the same for Nikasil and steel bore cylinders. NOTE AGAIN: The rings are not the same material and design.
The information in the following scans from Clymers are for your general information. I strongly suggest you read the small print on these scans, slowly, carefully.
There are plenty of styles of rings on the market.
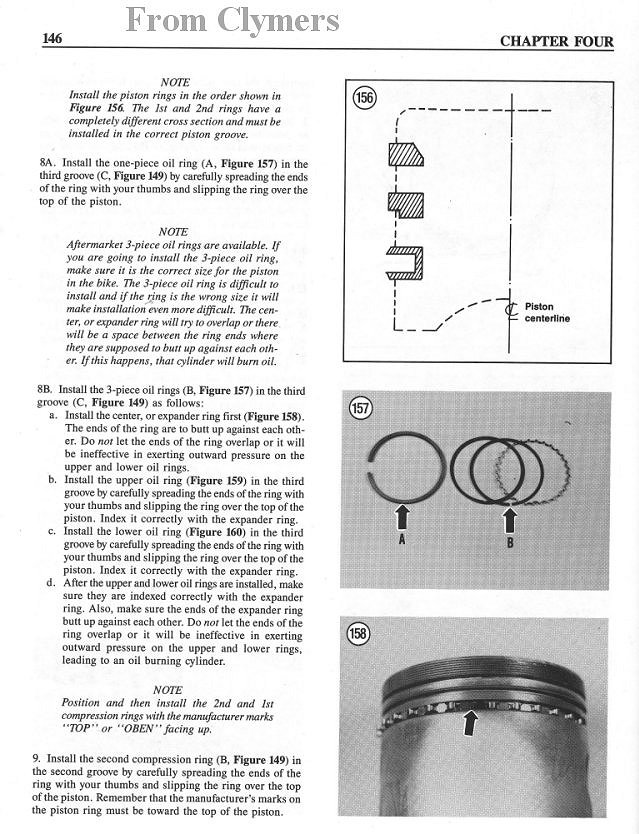
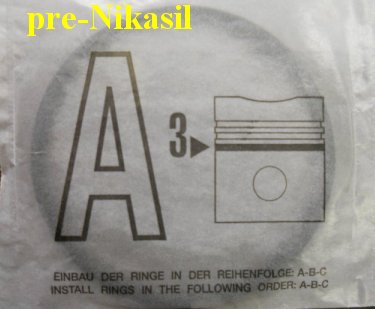
Below is information on Pre-Nikasil piston and rings. The Nikasil rings have a spring expander, and the two bevels are opposed. Photos and text in photos show order of installation:
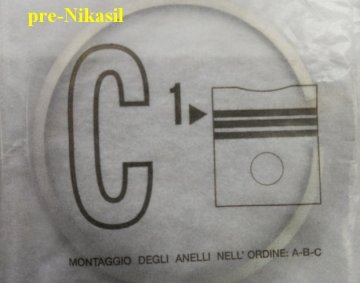
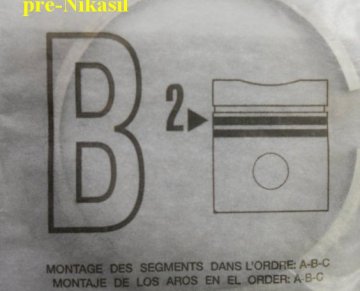
Below are two additional photos, note the type of ring construction on this particular set of rings. Note carefully the bevels on the oil control ring, and think about what would happen if the ring was installed upside-down:
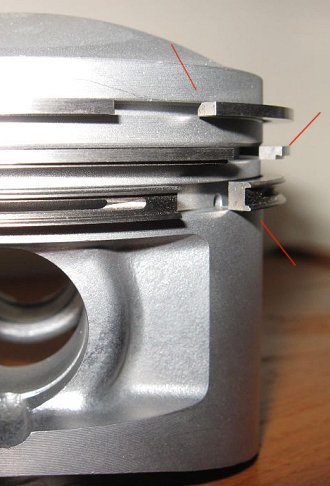
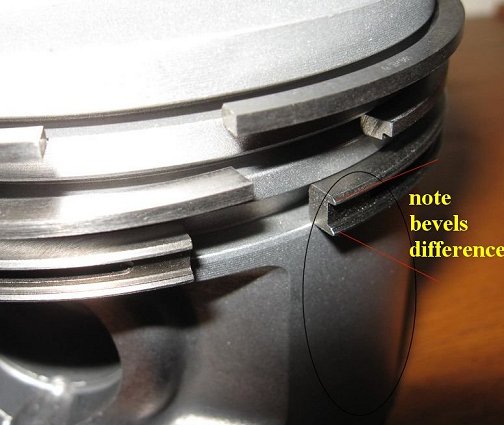
FI, /2 era cylinders are not made the same way as the /5 (through all except the Nikasil/Galnikal and later). The /5 and later, prior to Nikasil/Galnikal, had cast-in steel liners. Compare the ring bevels below, with the two photos just above.
Note how the oil ring bevels are different on this type of oil ring, from the Clymers manual sketch type of symmetrical ring.
NOTE that some types of rings use a ring-expander behind the oil ring. Nikasil rings for example.
Oversize pistons from BMW are NOT available for the 1981+ cylinders. Selected graded
pistons to fit the bore are available. Aftermarket pistons are available.
The following information on aftermarket pistons is believed accurate, but has not been checked in great detail by me:
San Jose BMW (CC products) sold some pistons for a "1050 cc kit" that gives 1038 cc. These pistons were forged types, by Venolia. The diameter was 3.810" (96.774 mm). Alloy 2618, a low silicon, was used. This means these pistons expand at a goodly rate when they got hot, so additional piston clearance is needed. Try 0.0035" minimum. Alloy 4032 would wear better, and expand less, but 2618 is stronger. If a crack occurs in 2618, the crack may well find an area of lower stress and stop ...not so the 4032, so 2618 is a good choice for piston material, and also holds its shape better under high stress use.
If you are going to use aftermarket pistons, ASK about proper clearance specifications. This is a good idea for ring gaps too.
Mahle makes a big bore kit using 97 mm pistons, giving 1043 cc.
Pistons are purposely tapered to be bigger at the skirt end, so be careful when measuring them.
Visit the following website for interesting articles to read, complete with photos/sketches:
http://www.jepistons.com/TechCorner/Index.aspx
Note: Venolia Pistons is closed
You can also check with German websites, etc. ....pistons/cylinders/rings are available from Europe that are not available in the USA.
Pistons, rings, and cylinders are to be installed "very lightly oiled". This means the faintest amount of oil that can be used as an oily film, it does NOT mean squirting with an oil can! A few drops, ON YOUR FINGERS/HANDS, then spread with those fingers/hands on the cylinder walls and the pistons and rings. I use a straight mineral oil, not a multigrade; but you can use, if you wish, a multigrade semi-synthetic if that happens to be your regular engine oil. No full synthetic oils.
If a groove that the piston rings fits into is heavily worn, the ring will rock excessively to break rings and pistons. Pistons DO wear out.
MISCL: You do absolutely have to use an expensive micrometer to measure cylinder taper. You might not even bother to measure the taper on a Nikasil cylinder. I always measure. But, for those wanting a method without needing the inside micrometer, I offer this method: Install a piston ring, squarely to the bore (use a piston, if you need to, to get square orientation), it need not be an original ring off your piston, just one that fits. Use your feeler gauges to measure the ring end gap, and do this at a point just inboard a bit from the top of the cylinder ridge wear area. Write down the feeler gauge thickness. Redo the measurement near the bottom. For each measurement, divide by pi. Compare them. Simple, wasn't it! Piston clearances generally, unless there is damage, don't go much over a few thousandths ...certainly not the 4.5 specification limit. It is perfectly OK to use next oversize rings, adjusting the end gaps, when you have a bike with a good bore. If you do this, we shall assume the bore has low taper, but the rings are perhaps on the edge of high specifications or bit over. You can purchase an oversize set of rings and adjust the end gaps to specifications, but when doing this, use the smallest measured part of the bore ...usually near bottom, where the diameter of the bore in the lowest area that the rings normally contact, is the smallest ...adjust the new oversize ring gaps for that diameter. I don't usually bother replacing rings if the end gaps are just a bit larger than maximum specifications. Cylinder base shim/gasket/compression plates: see
https://bmwmotorcycletech.info/cylinders.htm that treats this subject in depth. Rev: � Copyright 2020, R. Fleischer
Return to Technical Articles LIST Page
See break-in for more assembly and disassembly information!
released 01/26/2008
01/11/2009: Updated, mainly to clarify some details, such as piston pin clips.
06/15/2009: Clarified a few details.
08/29/2011: Clarified ring orientation, as folks were NOT reading all the information.
08/31/2011: More ring clarifications, photos.
09/05/2012: Add QR code; add language button; change Google ad code, minor other.
06/13/2013: Clarify details on mixing up pistons, cylinders & heads. Go through whole article with minor clarifications, clean up sections.
09/28/2014: With the changes made to my cylinders article, I updated the pistons article.
10/06/2014: Add admonition to read the cylinders article.
03/14/2016: Update metacodes, clarify details, change fonts/colors/etc. Fix layout. Fix for smaller devices.
10/05/2016: Update metas, scripts, layout; modest clarifications about interchanging pistons/cylinders/heads.
11/30/2017: Clarify minor details on ring installation.
03/28/2018: Overhaul article. Reduce excessive html, colors, fonts. Improve layout. Improve explanation in #8. Check hyperlinks and remove one dead one. Other more minor fixes.
Last check/edit: Friday, December 18, 2020