
|
|
Airhead Wheel Bearing Clinic,
BMWMOA National Rally, July 2005
This article includes a critique of the BMWMOA-ON magazine articles of 2004 on wheel bearing service.
© copyright 2020, R. Fleischer
https://bmwmotorcycletech.info/wheel-bearing-clinic.htm
Article 54-Section 9
I have other articles that explain the rest of what you might need to know.
In order to properly work on the wheels, read ALL of these below articles:
https://bmwmotorcycletech.info/section4.htm (Wheel Bearings; preload & servicing)
https://bmwmotorcycletech.info/section6.htm (Tubes versus Tubeless, in great depth)
The purpose of this article is to clear up typos and possible misunderstandings, ...as well as to offer some of the information that I personally delivered verbally, that was NOT in our booklet hand-out, and to offer constructive criticism for Gary's BMWMOA articles, which were VERY WELL DONE and should be KEPT by all Airheads as reference material.
NOTE! The booklet hand-out is out of print, will not be printed again, as the original Printer lost all of the information, all the text, all the photos, etc., and Gary had not made a backup copy. Snowbum retained a few copies, and, together with his notes, has given everything to Scot Marburger to go over and decide if he wants to make a completely new booklet or digital media presentation, etc.
[email protected] [email protected] http://www.gunsmoke.com
Part 1, below, is an update for the Tapered Wheel Bearing Seminar booklet/hand-out, Airheads from 1974 to 1985 (much is applicable to the /5 series).
Part 2, below, is a critique of the 4 part series on Airhead wheel bearings, etc., servicing, as published in BMWMOA News in 2004, specifically May, July, September, November.
I was involved with all of the above. For the Seminar at Spokane, WA, I was the co-leader/host (with Gary L. Smith). For Part 2, I was an advisor to Gary L. Smith.
Part 1:
FIRST ....the boring corrections to the booklet/handout, some of which are very nit-picking, ...... then some additions.
1. My name is missssspelled on the cover of the booklet/hand-out, it is FLEISCHER.
2. The Booklet actually covers late 1969 when the /5 was introduced, through 1984, as in 1985 the ball bearing wheels were introduced. Very specific information on only the /5 is not really included, but since the hubs are so very similar to the /6, I consider the wider range of years is appropriate for the subtitle. It should be noted that the even prior BMW series, usually lumped under the banner of "/2"; some of which were certainly not really /2 models, have similar wheel construction. Information that is useful, that I mostly agree with, can be found on Duane Ausherman's website, which tends to cover the /2, /3, /5, and some /6 & /7 and later bikes: http://W6REC.com
3. page 2, B., first paragraph: "space" should be 'spacer'.
4. page 3: top paragraph: "tighten properly" probably would be better to say "about 20 foot pounds is plenty, 25 is OK though".
Same paragraph, second to last sentence: "tight fit pressure" should be "medium light fit pressure pressure as it may tighten slightly when reinstalled".
D, second paragraph: Change "machined spacer" to "machined 1.5" outside diameter spacer".
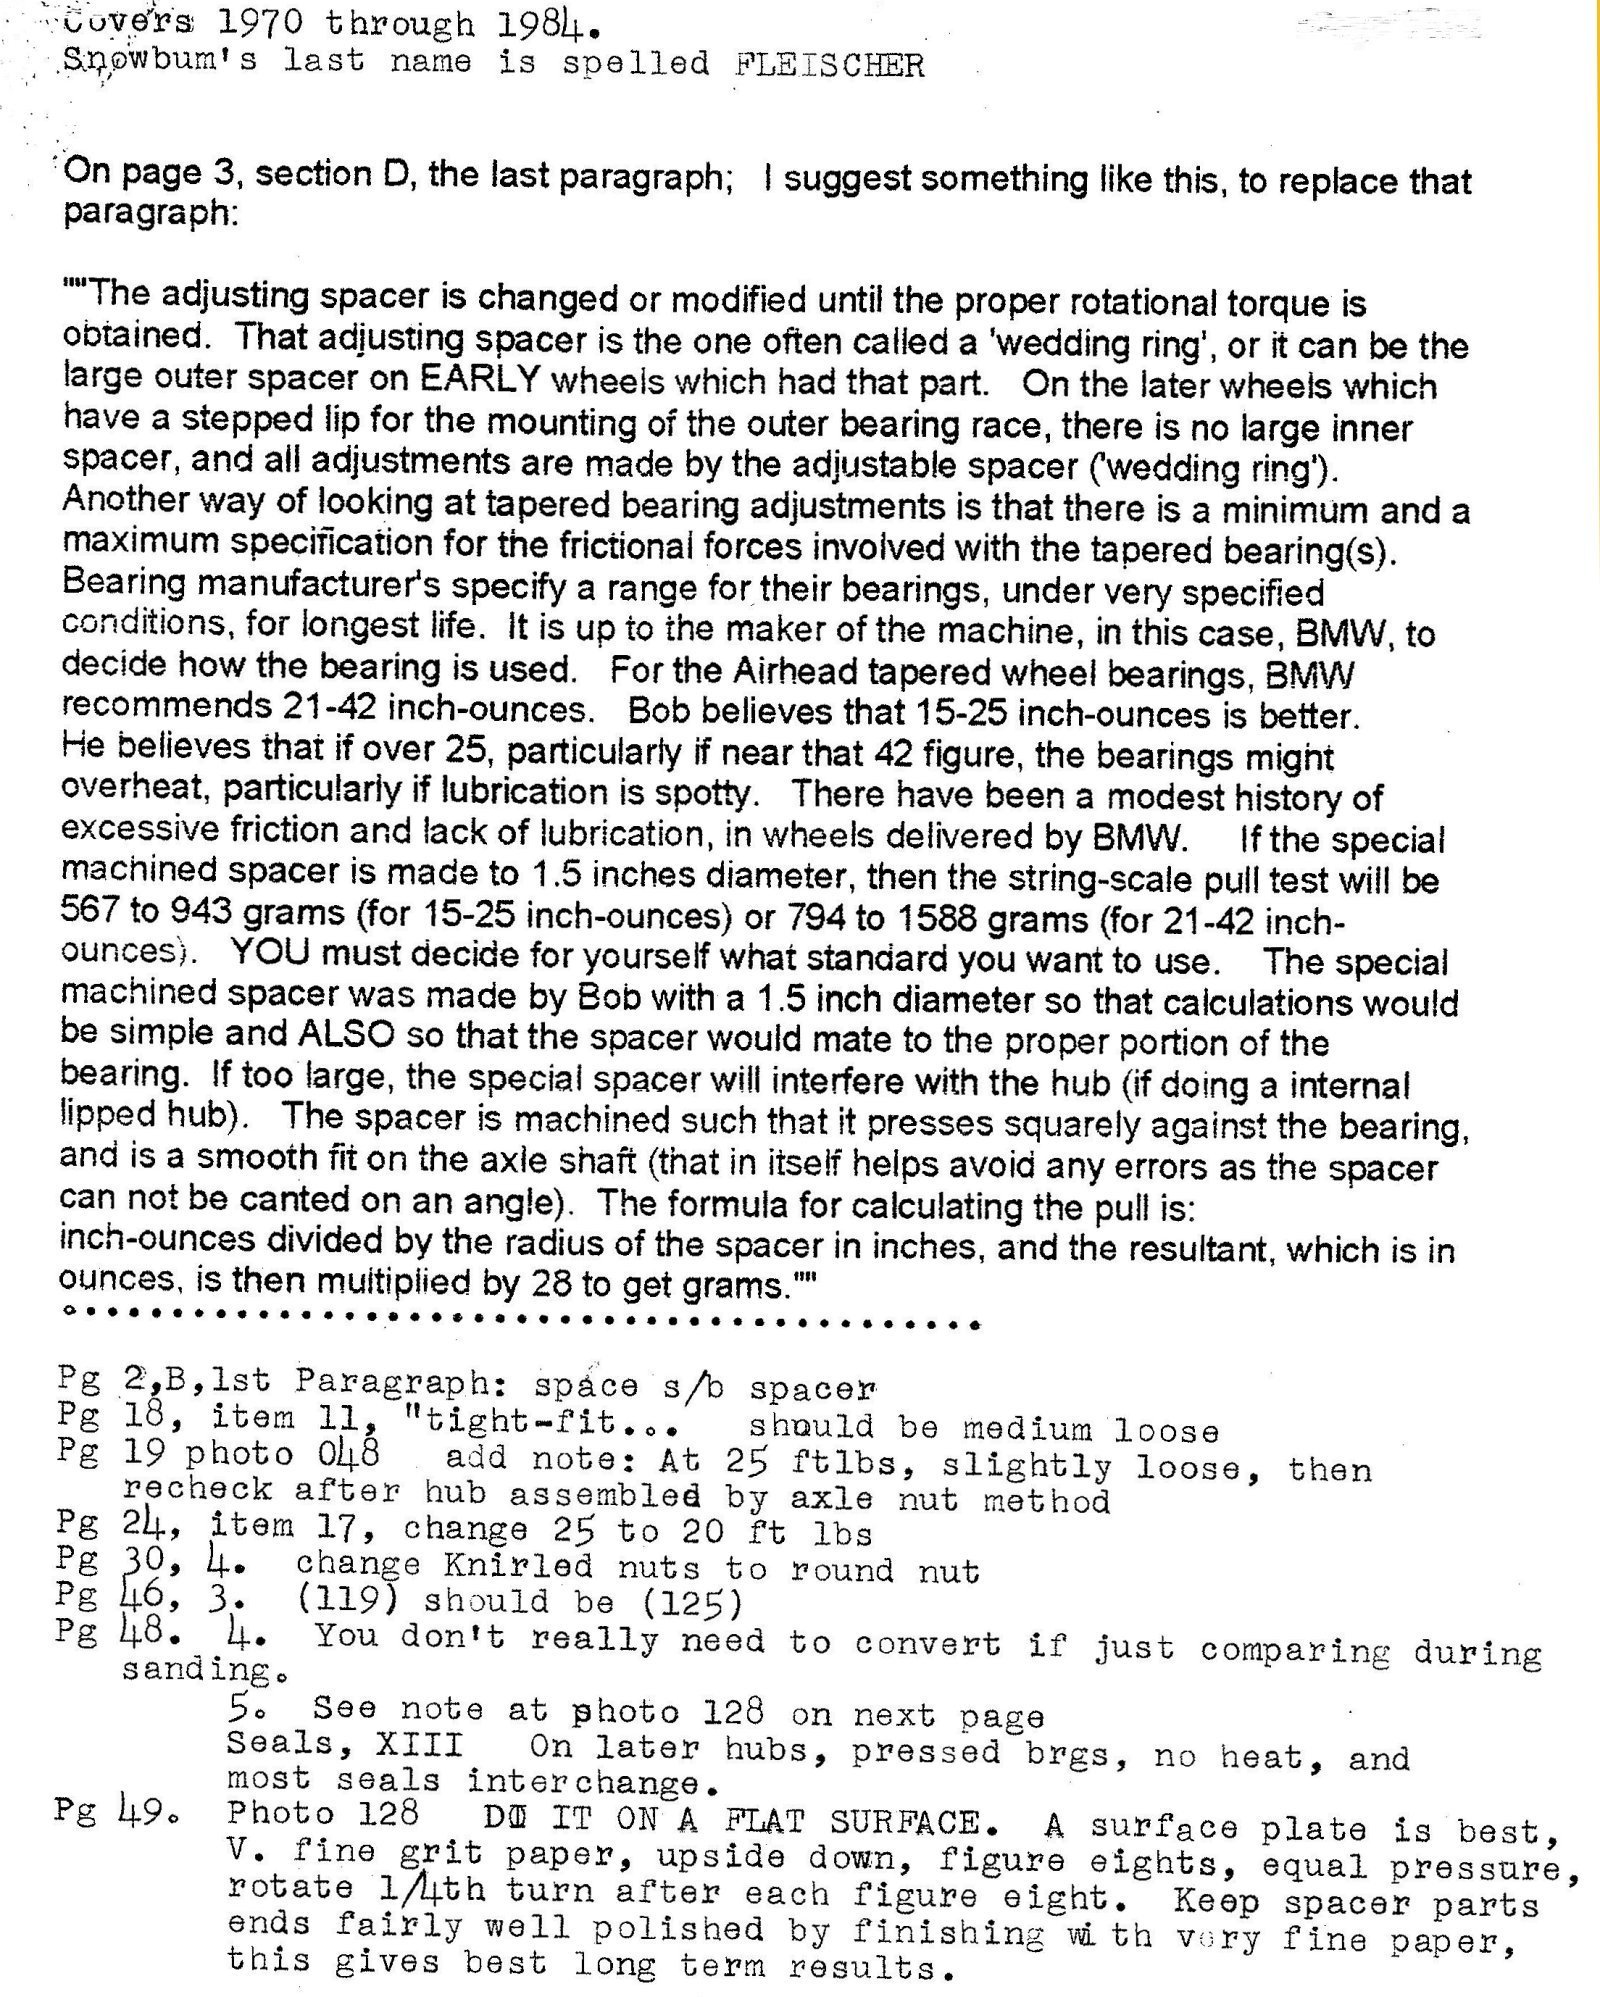
Last paragraph: Scratch it all out, and use the following for that paragraph: "Bob (Snowbum) suggests the adjusting spacer should be changed or modified until a reading of 15 to 25 inch-ounces (or 567-943 grams) is made on the 1.5" O.D. machined spacer. BMW recommends 21-42 inch-ounces, which is 794-1588 grams. YOU must decide what value range you will accept. Bob believes BMW's figures, especially near that 42 inch-ounce high end, are too tight, and could cause bearing life to be shortened. Bob usually tries for roughly 800 grams. For calculation purposes, 16 ounces is 454 grams, 1 ounce is 28 grams. The formula is: inch-ounces divided by the radius of the machined spacer equals ounces. If you multiply those ounces by 28, the figure is converted to grams. NOTE that 'preload' is measured with cleaned and OILED bearings, NO seals, and you have to re-clean and then grease them when the preload is done. The seal and grease are variables, so if you decide to do preload "testing", to see if in the ballpark, WITH 'as-found' grease and seals, be cautious, as those will tend to RAISE, not lower, the readings, so you do not want readings below specification during this sort of a test.
5. page 18: This is a subjective 'feel' test, and the reference is to photo #048. I like to use the machined-spacer and string gauge method for a final check, with the hub assembled and axle in place and axle fully tightened.
6. page 30: In item D. change .."...rotor is..."... to: ...."....rotor style wheel is...." in item 4., change "Knirled Nuts" to "Round Nut".
7. page 32, item 5, change "pinwrenches" in the LAST sentence, to the singular: "pinwrench"
8. page 34, the last paragraph under item 12 has a misspelling: change "rubble" to "rubber"
9. page 40, item 10, "axel" should be "axle"
10. page 46, item 3, "(119)" should be "(125)"
11. page 48: Item 4 is possibly confusing. You do NOT really have to do any converting, you are, after all, just comparing one reading to another reading on the same micrometer.
On item 5, place a note: "see picture #128".
12. On page 49, add some sort of note to picture 128, something like this: "Do NOT sand the surface of the part with the method illustrated. Use the part on a piece of very fine grit sandpaper or silicon carbide paper, upside down on a surface plate, which can be a real machinists type of surface plate, or a piece of plate glass, etc., doing figure eights with smooth moderately light downward pressure, squarely as you can, and rotating 1/4th turn after each 'eight'. OR, do it on an oilstone. Holding as shown will put an angle on the part which you do NOT want to do. Experience has shown that somewhat polished ends on all spacer parts make for more predictable and repeatable preload. Do NOT fail to clean the part of gritty particles.
13. I prepared an update sheet much later on. It expands on page 3, section D, last paragraph, and some other things. I have made a scan of that sheet, which was included with the last of the original booklets that I supplied to folks in late June, early July, of 2017. Here is a link to that scan:
Wheel bearing booklet update
General notes, print and save for your booklet:
1. If replacing bearings on any pre-1985 airhead, it is accepted good practice to have things clean enough to eat off of, and no residues or grunge, NO protruding metal marks from ham-fistedly-used tools, etc., so that the parts all go back together completely and fully. On the pressed-in-place hubs, the outer bearing race MUST fit FULLY BOTTOMED into a CLEAN-to-the- very-corner-edges cavity. On the heated assemblies, the outer races and inner spacer (especially the large diameter one) MUST be assembled tightly, to avoid any even slight clearance between these two races and inner spacer. That is why the tighten axle assembly method is used. A 0.001" error will make for a noticeable change in preload; and it is possible for the preload to change after assembly, so you do NOT want that happening, so assemble per instructions.
2. The wheel bearings are a common generic number 30203, you may see letters on them, and/or a prefix. You might see something like: FAG30203A.M.P. Many variations. FYI, these are also used at the swing arms.
3. The spacers I call "top-hat" types, since that is very common and very descriptive, can be installed in the wheel as installed on your airhead, so the HAT is on the outside or inside of the pressed-in-place wheel seal. Very early models will probably have them OUTside. These external-to-the-hub spacers do nothing special (they are certainly NOT part of the preload control); but, take up room to allow the wheel to fit between the fork lowers, or rear swing arms, and a major purpose of them is to ensure a good weather sealing for the bearing, in combination with the seal. I prefer top-hat spacers on the INside, which means that you have to install them (OIL them for ease in pushing into the seal material) them into the wheel seal BEFORE the seal is installed into the wheel cavity. That way you do not 'lose them' when the axle is removed. The seal and spacer are installed together, usually just using a proper size socket (not quite full diameter as the seal outer). One uncommonly known reason is that some seals have the outer lip angled OUTward, and could be slightly distorted if the hat was against it, but might be spaced away too. The seals are the only protection for the bearing from water damage.
4. The Booklet does not give any of the history, background, and how the environment, mileage, and exactly how lack of grease or old hardened grease, or other things, affect the bearings. Nor does the Booklet explain that the original design was way over-kill, as BMW INTENDED for their pre-Airhead bikes to handle the high sideways forces from sidecar use. Many of these things were explained, verbally, at the Seminar ....in the History, Advantages, Design, Environmental Effects, Safety, Economics, Car Wand Washers ....etc. ...part of the beginning of the Seminar.
NOTE ....BMW sometimes ships even brand-new wheels IMPROPERLY greased & IMPROPERLY preloaded. NEVER 'assume'. Some Dealerships have been guilty of not servicing brand new wheels before sale/delivery/installation of the wheel to the customer. This has been noted more than a few times for the 19" recalled wheels.
5. There was a goodly amount of discussion at the Seminar about the design. The original design of the early wheel hubs enabled crude, no special tools methods of servicing; that is, no 'pullers', etc., were needed. I explained in some depth that the early wheels had removable small and large spacers, that the large one set the distance between OUTER bearing races, and the smaller inner one was associated with the wedding band spacer that set the INNER bearing spacing. Thus, on the early hubs, there were TWO methods of setting spacing (preload), and the large diameter spacer inside the hub CAN be end-sanded slightly if required, in a situation wherein you do not have the required wedding-ring, or sanding the wedding-ring would be the wrong direction. Sanding the wedding ring LESSENS the preload, and sanding the outer large tube spacer INCREASES the preload.
6. If you remove an inner bearing (that means the part with the rollers) for normal service work, be sure to mark it with an engraving tool, mark them L for Left, R for Right. That is because you do NOT want to mix up the bearings. Mark it on an end face.
7. There is a modification for the early heated-type Airhead hubs. It is easy to do on any grinding wheel. Afterwards, there is no need to heat the hubs again for normal cleaning & lubrication. Very worthwhile. This involves grinding the inner small diameter spacer tube 'flanges/fins' just enough plus a bit more, so that inner spacer tube will remove from the left side without removing the left outer bearing race (this is for the future). Greasing of the inner, right side, still captive bearing, can still be done by properly using Ed Korns round tool with the zerk fitting on one end. I do it with a long thin spout on my grease gun.
8. Some more verbal things from the Seminar:
a. Shallow steel inserts, versus deep steel inserts on cast wheels.
b. Single sided rear ends, that is, Monolever and Paralever, eliminated the tapered wheel bearing servicing entirely, in favor of the INternal large bearing inside the rear drive ...with their own set of problems over many miles.
c. The R65LS front wheel introduced the 'Sealed Ball Bearing" design in 1981, far before the 1985 introduction on the larger engine models. That R65LS had an odd-size, it was 17 x 40 x 12, BMW # 36-31-1-242-854.
d. 1970 & later heated-hubs bearing assemblies are disassembled & assembled to the wheel, from the LEFT.
e. FRONT all-aluminum hubs are heated for outer race removal.
f. SOME very early /5 wheels had bores on the RIGHT side that were smaller, and used a smaller grease seal, and the top hat spacer remains captive.
g. A FEW early cast wheels WERE all-aluminum, that is, there was NO cast-in steel insert (where the outer race is pressed-in as on later models). MOST cast wheels have cast-in steel inserts. Those few early wheels had to be heated. Don't be confused here, "steel insert" as used here is NOT the outer race, but a cast-into-the hub part. Sometime during 1978 production of the snowflake wheels, BMW changed to cast-in steel inserts. The FRONT wheel had the cast-into-the-wheel steel insert, the REAR DISC brake wheel ALSO did; thus those two have outer races that are PRESSED-OUT and PRESSED-IN. The 1978 REAR DRUM snowflake wheel had to be HEATED, there was no cast-in steel insert, and another Identification that might be helpful besides #1 eyeball; there are FIVE bolts on those! Heating does not injure wheels that normally use room temperature pressing (there is no purpose in heating them, of course), but heat is MANDATORY on wheels requiring it (all aluminum, no steel insert cast into the wheel). 1979 to 1984 wheels were all the pressed-type, for these outer races. A magnet can be used, sometimes, if not touching the outer bearing race. You can refer to AIRMAIL of August 1978 and June 2001.
h. The 17 mm front axle came in 1975. Earlier wheels can be converted, & the larger axle does not bend easily under hard usage.
i. Do not reverse a dual front disc wheel, or you may have brake-pads break-in to do again; and may also have to adjust the ATE swinging calipers, if you have that types. By conventional practice, the brake carrier NUTS are on the LEFT side of the motorcycle front wheel for a disc brake wheel.
NOTE: Some have been confused by 'left' and 'right'. On ALL vehicles, left & right means as you sit normally on/in the vehicle, unless associated notations specifically say something else.
j. NEVER EVER rest a disc brake wheel on its disc when working on tire changes, etc. You may permanently bend the disc/carrier & then having lousy surging brakes.
k. 19" FRONT snowflake wheels were recalled if the casting is stamp-marked BEFORE 1982.
https://bmwmotorcycletech.info/19inchrecall.htm
l. The wedding band spacers, officially called spacer shims, are approximately 1/4 inch wide for 17 mm axles, and approximately 3/8 inch wide for the earlier 14 mm axles. You do NOT need a big bunch of these, maybe none, think about using Duane Ausherman's convenient shim kit to allow fewer wedding rings owned.
UPDATE: Duane sold the dies, etc., so see my comments in this website regarding where to purchase the shims: https://bmwmotorcycletech.info/section4.htm
m. Ed Korn's greasing tool can be used, with some care in inserting (to several slight depth changes during use). Years ago, there was another type of greasing tool made by Chuck Walus, it was described on pages 23 and 24 of the June 1978 issue of BMW Owners News. You can also use a common cone-type of bearing greaser, for the bearings once OUT of the hubs, they are not expensive at your favorite autoparts store ....although hand greasing is OK, if you are thorough. Re-greasing cleans the old often contaminated and hardened grease out, & puts new fresh soft grease into the bearing. Don't be afraid to use lots of grease.
n. I use two special spacers during my preload work on wheels. The machined steel spacers that I personally made for 1979-1984 RS and RT models were 1.5" diameter; 0.668" +.002, -.000 center bore. Of the two spacers, one was 2-1/8" to 2-1/4 inches long (unimportant, just in that range); the other was 2-3/4 to 3 inches long. One could also use 2.0 inch diameter material (or, any other diameter that FIT properly), then you must use the formula to calculate the proper ounces or grams for YOUR spacer diameter. The ENDS must be flat and square to the bore, which is why they were made on a lathe; AND, they MUST fit the bearing and not press on the hub. If you have some made, determine the length YOU need first, and have your cleaned and lubed axle handy to check for a smooth slip fit. Some folks reading this may wonder about the use of the common 'pipe' as spacers in part of the procedures in the booklet, especially for the heated hubs assemblies. That has been found to work OK if machined square as described and CENTERED in use. Not as nice as these special steel spacers I made up, which give much more repeatable results. If using common pipe material, have the ends squared & smooth, done on a lathe. It is quite important that the spacers you make up, fit very squarely and centered to the wheel bearings. Pipe inside diameters don't allow that as the I.D. is too large, so the pipe must be placed by careful eyeball or measurement to be centered. I suggest you do not use pipe. The two machined spacers allowed servicing the preload on the front AND rear snowflake wheels, which is why I selected the particular lengths. Check before having them made, so YOUR bike has the proper length spacers.
Part 2:
1. May 2004, article on "R90/6 Front Wheel Hubs"; this was PART 1 of the 4 Part series of articles. This article has a lot of pertinence to all the airhead pre-1985 wheels. Page 26, top illustration, the upper parts are for the 14 mm axle, lower parts for 17 mm axle. Page 28, photo #14: 1970-1977 spoke wheel, rear, left; 1970-1977 spoke wheel, drum, front, left, and 1974-1977 all spoke, disc, front, left AND right. 2. I make no comments on the July 2004 MOA-ON issue, which had Part 2. 3. September 2004, was Part 3. The first page, 28, has a photo of Ed Korn's greasing tool, one of my types of steel spacers, etc. This article has a hub machined out of a snowflake, showing the simple string pull-scale test, and shows some information on the older hub style parts, etc. Photo #44 was updated in photo 17 of Part 4....the seal and spacers, not shown, must be in place. In all these 4 articles, much is seen in the Seminar Booklet, and vice-versa. 4. Final Part 4 is in the November 2004 issue. This is the Summary article. There is also a chart for many of the wedding band spacers and part numbers. In item 7, it is NOT SO that the wheel seals need to be out for the Shake Test; nor do you want the axle nut loosened. Some of this item 7, which is lengthy, needs modification or interpretation, but when doing the job you will see what I mean, nothing serious. I thought about re-writing it, and then decided it was not at all needed. Addendum: String scales are not common hardware store items (but, you can ask). I have some precision types in my shop, but those are hardly needed for this purpose (I do have two of the inexpensive 8014-MA, below). At the Seminar, I had purchased with my own funds, about a dozen of two types, to pass out to 'door prize winners', all made by Ohaus, one was type 8004-MA, which is a rectangular type, has an adjustable zero, and reads in both grams and ounces. They also have a round type available as part 8014-MA. These are fairly cheap items. EITHER one is QUITE adequate for the preload purpose. I purchased them from Sargent-Welch, off the Internet:
https://www.sargentwelch.com/store/
Sargent Welch WLS3774-F, Ohaus 8014-MA, dial type; Sargent Welch WLS3678-DD, Ohas 8004-MA, rectangular type. Further information (and photos) in my wheel bearing article on this website:
https://bmwmotorcycletech.info/section4.htm Read the article on wheel bearings: http://w6rec.com/
This part applies to the articles in MOA-ON in 2004:
Revisions:
01/23/2010: Minor cleanup.
05/22/2010: Clean up some more.
04/19/2011: Add Addendum #2
10/15/2012: Add QR code, add language button, update Google Ad-Sense code
04/15/2013: Go through and clarify a few minor details, edit to read easier.
08/14/2015: Change name of article as the ++ ending was confusing some browsers, upload with new name and URL.
04/28/2016: Update metacodes; layout, add dating script, check tracking script, fix horizontal lines, etc.
01/14/2017: Update metacode, scripts, minor layout and fonts changes, slight improvements in clarity.
07/08/2017: Add scan to website, and add link to it, of the wheel bearing booklet update.
06/01/2018: Update slightly for clarity. Cleanup.
© Copyright 2020, R. Fleischer
Return to Technical Articles LIST Page
Return to HomePage
Last check/edit:
Saturday, December 19, 2020