
|
|
Petcocks, fuel filters, fuel tanks,
fuel flow amounts, re-fueling, tank cleaning.
Clam-shell models choke lever operation, etc.
https://bmwmotorcycletech.info/fuelfltrs&petcocks.htm
1A
© Copyright 2021, R. Fleischer
PETCOCKS:
Petcocks fasten to the tank by both right hand and left hand threads. As you rotate the large "nut" CW (facing from below), that tightens the nut to the tank while at the same time it brings up the petcock. The petcock large nut has to be FIRST engaged the proper amount onto the petcock BEFORE screwing it upwards to begin to engage the proper amount of tank threads. If you have never done this before you will have to fiddle with this until you get the right amount of petcock and nut threads assembled ...to start ...and finish...the petcock-to-tank fastening process. Once you learn, it is easy. You want approximately the same number of threads engaged on both the petcock and the tank after fully tightening.
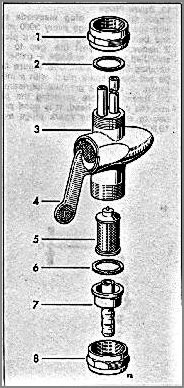
BMW has used five types of petcocks over the Airhead production years. All except the /5 bullet types (also called by brand name, Everbest) are easily re-buildable. Usually this means that you unscrew some knurled or slot "nut" at the handle area (after removing a black trim cup, if it is there on your version), and you can replace a gasket that might be bad, or clean and very-faintly-lightly silicon grease the moving parts. You then have a much smoother operating petcock. On some there are one or two dimpled discs, which can be repaired with a shaped punch, lightly hit, for a better detent action; I usually don't bother. These discs have a locating tab. They can confuse, so take notice of how they were assembled as you take things apart. You can figure it out, if you forgot to take notice.
Our petcocks have a Reserve function. Except for the bullet type, photo below, the handle long portion upwards towards the tank is the reserve position and horizontal (either way) is always off, and the German "AUF" printed on the body/cap means on, not off, and the handle lever downwards means on for the main part of the tank.
/5 Bullet Style Everbest Petcocks were different in how the handle indicated fuel flow, & the rotating handle affecting gas flow from was in the opposite way from standard world-wide piping flow. The petcock end of the handle usually has a small arrow to indicate flow. Standard world-wide industrial and home piping flow indication by a valve lever is that the lever handle points to the tank or to the outlet, for flow, or, said another way, the handle finger portion points to the pipe flow direction. Here is a sketch of the original slash-5 bullet petcock.
So there is no misunderstanding, on the Everbest bullet style petcock, the Main tank is in use when the handle is AFT. The Reserve is in use (such position, like all the various tank petcocks, will also drain the main portion of the tank before the reserve is drained) when the handle is FORWARD. When the handle is DOWN the fuel is OFF.
Note that a DUAL output is available for these petcocks, it is a separate piece, and fastens to the bottom, as does the single output.
HINT! On the motorcycles with the above petcock and the clam-shell choke lever/cables, the choke cable tends to rub the underside of the petcock bullet area. The cable has been known to wear through the petcock! I suggest you add a piece of hose over the cable where it might rub the petcock.
Repairs:
These early /5 petcocks, on the engine side of the handle, look something like a very large tapered round bullet. They are snapped together, and it is difficult to take them apart without breaking them, but this often can be done successfully if you go about it correctly. They have an easily removable nipple at the bottom, inside of which is a small fuel screen. See the photo, above. Because they are the Classic /5 petcocks, you may want to try to overhaul one, although brand-new ones are again available. Repairing one is a bit time consuming; but, if successful, you can retain the classic look of your /5. While I personally would not bother try to fix an early bullet style petcock, Purists think differently and may well want the motorcycle to be absolutely original in appearance, using their original part, so trying to rebuild a bullet-style Everbest may be worth a try.
NOTE! I admit to being surprised to find out that these were being made again, and you can ask such as Vetch, see www.benchmarkworks.com or see http://boxer2valve.com. Just search the sites for Everbest.
Some have been able to force-twist the /5 Everbest petcock apart for repairs. If that fails, you can do de-crimping. You may want to read all the articles I link to. I have had problems with links to sites showing how to overhaul the Everbest. The links change, making them worthless. I check all these links now and then. I thought it best to copy and display Vech's information, below.
I copied the following from Buchanan's site, who had copied it from Vetch. The author, as noted, is Craig Vechorik, AKA VECH. Craig Vechorik's website is http://benchmarkworks.com, where he has decent information on how to rebuild one. The problem is finding the article. Vetch's website is generally not set-up for internal hyperlinks nor listings of such that are easy to get ton (this may have changed). Try: http://www.benchmarkworks.com/articles/howto/petcock.html If it works, you may want to read it. Read what I have copied from Buchanan's site, below:
Rebuilding Everbest petcocks, Craig Vechorik:
Everbest petcocks (used up to the /5) ARE rebuildable, I do it all the time. Buy a roll of 1/8 sheet cork at an auto parts store. You must trim at the body a bit with a knife, to cut away a bit of the crimp they put in the edge of the hole that the plug of the valve fits into. Then put the handle in a vise, and pull and twist the body, CAREFULLY, so you don't break the handle off, and you will pull the plug of the valve, and the retaining washer ( which the crimp in the body holds) out. Clean out the body with a round plumbers wire brush. Sand the plug LIGHTLY with 600 sandpaper. Then you cut out a piece from the cork sheet that measures 1 29/32" x 1 1/6". Make sure that your cut piece is square and accurate. Grease up one side with wheel bearing grease, and roll it into a more or less cylinder, and shove it, (with the open seam to the side of the body) into the body. Be sure to get it all the way in, and square. Then grease up the plug and press it in. It will take a good bit of force, and I do it with the aid of a vise. When you get it all the way in, take a small screwdriver, and a light hammer, and crimp the body just a bit, to hold the retaining washer in. Then turn the petcock to the on position. (it will take a good deal of force at first, 'cause it WILL be tight.) and find a drill bit that will fit down inside the brass supply tubes, and CAREFULLY drill the cork out of the OPEN hole and the hole on the output side too. Blow out the crumbs of cork with compressed air, and turn the petcock to the reserve position, and do it again. After you put it back in use, if you ever take it off, do not allow it to ever dry out. Put the petcock in a jar of gasoline, with a tight lid.
You have nothing much to lose if that method does not work, as you can always substitute a later petcock, so here is another way to go about it, which involves making it easier to disassemble, if the above method won't work OK:
The early /5-style of petcock is press-assembled, and staked. To disassemble it with this method, you must trim away the body slightly, of the crimp area. Do NOT remove excessive material in that trimming. THEN put the HANDLE of the petcock in a soft jawed vise, and pull and twist the body, and it will come apart. You will need some 1/8" thick cork to finish the overhaul job. See also link for rebuild parts. Most auto-parts stores have some cork.
You could use a piece of gasket material, etc. You will have to cut the cork to fit, and then SILICONE grease it, roll it sort of cylindrical, insert it into the body...seam towards side...install squarely. Grease the removed plug part and install it...it will take considerable pressure to do this. Now you need to crimp the area so it cannot come apart on its own. After that is done, turn the handle (fair amount of force probably needed) to ON position. Drill down the main tube through the cork, and the outlet too. Blow out the cork dust. Repeat for
the reserve position tube and outlet. Clean out, and reinstall.
There is also an article on the various petcocks, including the Everbest, on Duane Ausherman's website:
http://www.w6rec.com/
Here is a link to place that has a parts kit to rebuild the Everbest petcock: http://www.cycleworks.net/
Here is a link to a guy with an Ebay store. He can, I think, service yours; or, he has cork gaskets, etc:
http://stores.ebay.com/Isettas-R-Us-Inc?_trksid=p2047675.l2563
The petcock "service" may not be listed, you will have to contact him.
Here is a link to Bing Agency's petcock page, useful for the photos, a bit of information, etc. BMW dealership prices may be LESS.
http://www.bingcarburetor.com/petcocks.html You may want to refer to the photos, etc.
ALL the petcock styles except the bullet nose /5 type are fairly easy to take apart, clean, and repair...typically this is done because they have begun to either leak or are stiff operating.
Petcocks using cork inside for the active element can often be reclaimed to good operating condition after being dry for years by simply soaking in very hot, even near boiling water. I like to use a faint coating of silicone grease or spray silicone on them, but you can try and see if either will work for you.
NOTE: The original "straight" type petcock used early-on after the bullet petcock is no longer available from BMW dealerships. Check for availability of that type:
https://www.motobins.co.uk/
You will probably find them available in the USA at various independent repair places.
There are two types of GERMA petcocks, and a couple of other types (Karcoma) too. Some versions have in-tank screens. For the IN-TANK tall screen type, a separate sealing washer, of a cambric material, was originally used at the screen bottom where it fits into the top of the petcock and it is best to replace that old-style screen with the later bonded-metal-washer style screen that BMW offers. NO separate cambric washer is then used; and, you usually can eliminate having an aftermarket EXternal filter too. The reason you want to replace the early style screen is that the early screen CAN let debris through where the screen meets the petcock base ...., and re-forming the roundness of the screen where it fits into the petcock was typically necessary whenever the screen was removed. The new bonded washer screen also has a bit finer mesh, for better filtering. Stated differently, you had to 'form' the lower end of the screen into a proper round shape, then insert the screen a bit into the cambric washer, then assemble, making sure the screen still fit into the recess in the petcock top area, and then attach to the tank. It was a bit of fun to do this perfectly. That type petcock MAY have a spacer, usually white, near the top, inside the screen, not a critical item if missing. The problem with those early screens is that folks simply did not pay attention to assembling the screen, washer, and petcock upper cavity, and the screen then was far less efficient and would and did let junk get into carburetor. Even near perfectly formed, these old style in-tank filter screens allow more filth to enter the carburetor, and it can be a wee bit larger particles too. I've even found screens inside the tank, loose. If you purchase a new-style in-tank screen, you will now, or should! ...get one with the washer being metal and permanently bonded to the screen. NO special sealing washer is needed, that is, you do NOT reuse the old cambric washer, you throw it away or put it into wherever you keep strange parts. You do NOT USE IT AT ALL with the new bonded washer tall screens. There is a large section, much later in this article, about fuel filter details.
The new style screen with bonded washer is 16-12-2-307-112. Don't use the hyphens for on-line fiche. This is the Karcoma filter, sometimes applied to the Germa too.
Have clean surfaces and a good grunt on that large outside nut ....with equal threads being engaged when fully tightened. This applies to all the BMW Airheads petcocks when installing them to the fuel tank.
Most other petcocks have the screen inside the outlet, so remove the outlet part to see and clean the screen. These petcocks have the outlet straight down, and have a separate smaller nut at that outlet, so as to remove the outlet stub and get to that filter. That does NOT mean that all straight down outlets have screens. Easy to find out, simply remove the hose, and unscrew the lower nut, see if a filter there ...or a place for one, the previous owner could have left it out. The outlet, when the removable type, is called a tap spigot, or??, and they are available, or were, in both metal and plastic. Guess which one does not like to be bent sideways when removing a hose? Any spigot may have a groove in the part that fits up to the petcock, hidden by the nut ...that groove is where the filter screen fits, some types of filter screens had to be hand-formed to fit just right, others had stiff end structures.
I cannot emphasize enough that YOU SHOULD ADD a reasonable size of aftermarket filter between any petcock and the carburetor for all the early style screens. More later in this article.
TWO types of petcocks do not have an outlet screen filter, these have non-removable horizontal fuel outlets so there are NO nuts on the outlets, the outlet spigot is part of the casting. One of these will look similar to the late version but the threaded ring, which is still cross-slotted, has NO outer edge knurling, HAS a radial slot and has the internal operating 'gasket', with the ports to allow the fuel flow, made of CORK. Change that to rubber part #16-12-1-235-551
. The cork can swell and make the petcock stiff to operate, and it can also shrink, and cause leaking. GENERALLY that cork to rubber change is for the USA and Canada shipped models R60/6 through R100S. There are sub-variations of these petcocks, in how the outer ring appears, tightened for pressure, or not, etc. The last version of these had outer edge knurling and had the rubber part and a rather stiff coil spring, and seals better. These horizontal outlet late-style petcocks are HANDED ...there is a left hand side & a right hand side. This information is hardly noted anyplace but here by me, as is why TWO right sides are used on some bikes ...In mid-1980's & later, BMW added a tank fumes solenoid valve & a fuel flow solenoid valve. These are located inside the cover that fits over the starter motor. There are holes in that cover for hoses, etc. Because of this arrangement, BMW used TWO EACH "Right Hand Side"petcocks. If you remove some or all of these solenoid parts, you MAY want to purchase a LEFT hand side petcock (for the left side, of course!), which COMES with the newer bonded filter screen. If you install all petcocks so their OUTLETS point REARWARDS (that means one Left and one Right petcock), then the curve of the fuel hose will be nicer, shorter, & the hose last longer. Note again ...this requires one RIGHT type & one LEFT type.The various inlet and/or outlet screens should be cleaned with your yearly tank cleaning. There is no need to disassemble the petcock internals until action is overly-stiff ....THEN, except for that cork mentioned well above to be changed to rubber, there is usually nothing to do but disassemble, clean, and apply silicone grease very thinly, and reassemble. Obviously you do not want so much grease that you plug the disc holes. You also need the grease on the handle inside flat area and the face of the 4 hole rubber washer...do this very sparingly. Silicone grease may be called Dielectric Grease at your AutoParts store ....and it has many uses on your motorcycle. The petcocks will remain very easy to use for a very long time after you clean & very sparingly lubricate them.
Except for the early /5 'bullet' style petcock, the other types of petcocks are easily taken apart. Sometimes, on the later, non-Germa ones, it is a bit of fun to re-assemble.
HINT: One needs a good grunt to push the threaded nut & handle assembly back into the body to get its threads started properly. Some folks think this is easier by using a bench vise (carefully, don't over-squeeze!) on the NUT portion, & pushing the petcock portion, ...SQUARELY!! ...to the nut. NUT here means the knurled or slot part (possibly under a black plastic cover, which pries off).
For the petcocks with or without a black plastic cover around the lever area, slowly remove the black cover. Pry evenly, all around, a bit here, a bit there. You can use a small piece of wood or plastic, or ? to avoid marring. You might want to put the whole petcock in moderately hot water, and use a wood or plastic tool. The water will soften the black plastic cover, expand it a bit, and make it easier to remove....and the plastic/wood tool is less likely to gouge or mar the material. There have been instances of loose caps, where someone has glued it to the petcock, just be aware of this, as it may take more work to get the cap off, which is needed to remove the handle and innards. Underneath the plastic cap you will probably find a sort of knurled edge that must be gripped in order to unscrew the metal cap plug from the body. I made a special tool for this about 30 years ago, can't find it to show you a photo, but you CAN grip the edge lightly in a vice & then rotate the rest of the petcock around it. It is better if you had some ROUND JAWS, perhaps from a good drill chuck, or a lathe chuck. The black outer cap hides your messiness, but why not do the job carefully & not mar the metal? My present method is to use two pieces of BRASS or ALUMINUM, which are soft, and works well with the petcock knurling, in the vice jaws. It can be done so marring the knurled 'nut' does not occur.
If you have a petcock that has not been serviced in a very long time, and perhaps has been exposed to moisture or near the seacoast, & the knurled ring nut will not remove, or not hardly easily, then I suggest you heat the petcock to near water boiling temperature, and then remove it from any heat source, & place the entire petcock into a container that has a reasonable amount of very thin but warmed penetrating oil. You want the penetrating oil to get into every part of the petcock. Work the lever a bit, then let it sit for a day, then work the lever again. I do this every day for about a WEEK. After that, I can usually remove the knurled nut in my vice, using brass or aluminum protective jaw facings.
Some versions use a 'nut' with slots, and you can improvise for that. I made a tool.
Pay attention to any indexing disc(s) inside & how arranged. Which side fits the other side, where & how the tabs fit, which disc goes back first, when re-asssembling.
I usually find the rubber disc, on those petcocks using one, simply in need of a cleaning (with the rest of the petcock), & I re-use them, with a VERY FAINT smear of common dielectric grease (a silicone grease) on the rubber & all the moving parts. There isn't anything in any of 'the books' about overhauling them, AFAIK. Occasionally the dimple that locates the position has worn, I normally just forget about it, I can tell when the handle is fore, aft, up, or down! ...I don't need a click/feel to tell me! BUT ...you CAN fix worn dimples with an appropriately shaped punch. When re-assembling, push the body onto the 'nut', not the other way around! ...as the spring is very stiff. I do it with the 'nut' again clamped in the brass or aluminum protected vice jaws, ....otherwise you will need leather gloves or your fingers will not like the knurling. Before assembling, be sure you have lubricated the handle, flat rubber disc, spring, and inside the metal cap; all with silicone grease. Be careful to not over-grease, and not to cross-thread, as assembling. If you do it all as I say, you may go MANY years before having to repeat the cleaning/lubing.
Always service the fuel tank and petcocks by REMOVING the petcocks from the tank. You NEED to see what grunge is there, thoroughly clean the tank, etc.
If your tank is empty, you can unscrew the large nut that holds the petcock to the tank with a large adjustable jaw wrench, or wrench from your BMW tool kit. They can be quite tight. As you face the petcock from the side of the motorcycle, and the wrench is, more or less, outwards towards you, push the wrench to the left to loosen.
As explained earlier in this article, that large nut tightens the petcock to the tank and at the same time it also has a reverse thread on the petcock, so the tank and petcock tighten together properly. When assembling to the tank, you start with the nut in an estimated position on the petcock. The idea is to end with ~ equal amounts of tank & petcock threads being engaged. DO NOT GOOF! ...you MUST have approximately equal threads engaged. If you engage only 1 or 1-1/2 threads or so, you will damage the threads in the final tightening.
Now and then I hear about someone with the wrong idea on how a petcock works. As a general rule for all plumbing and piping, flow occurs when the handle is in the direction of the pipe, NOT when at 90° to the pipe. However, BMW has its own methods, again, different, but only in SOME respects. Your petcock MIGHT NOT be marked ON, OFF, RES (reserve). It MIGHT be marked AUF and ZU. AUF does NOT mean OFF! AUF here means MAIN (Primary) tank portion is ON! This is not as laughable as you may think! ZU means OFF (closed). When the handle lever is downward, the main tank is being used, when upward you are using the main tank and reserve, & when horizontal you stop the fuel from flowing. HORIZONTAL IS OFF!
Some Clymers books are wrong on the position of the handle for the choke (enrichener) on the clambshell air cleaner models, that means pre-1981. The correct information is that when the clamshell handle is horizontal, the choke is off. When the handle is downwards from horizontal, the handle points in the direction of extra fuel richness, towards the carburetor. Clymers had this backwards! Clymers wrong information has obviously caused problems with starting and running!!
There are two tiny diameter plastic or metal pipes "straws" of UNEQUAL length going upwards from the petcock into the tank. Once in awhile these are replaced due to cracking on the plastic ones or they are broken, etc. The TALL one is for the regular main (primary) tank outlet, this is not the RES (reserve) outlet. The short one is just tall enough to keep bottom rust, water & other bad stuff from getting into the petcock on the RES position. SOME have shortened it, by half is OK, it is NOT OK to remove it entirely.... you will hardly gain much additional usable fuel ...at best maybe 10 ounces ...& you may get rust and other nasty stuff into the petcock & the carburetor.
When the petcock is turned to the off, horizontal position, both tiny pipes are closed off from gas flow. When the petcock is in the main tank ON position, fuel flows from the tank into the tall pipe until no fuel is above the tall pipe level. Once the fuel in the tank (on THAT side for two petcocks tanks) is at or below the tall pipe level, you get no more fuel from that petcock. Putting the handle on RES will start drawing from the reserve portion of THAT side of the tank. Thus if you wanted to, you could run on one petcock, main, until the motor runs that side dry on the main, then turn the other petcock to main position, and then use RES (reserve) positions. Up to you how you use the petcocks. If you have a one petcock model, you have less options.
I recommend using both petcock's ON, for 800 & 1000 cc models, but particularly if riding at quite high speeds or constant heavy throttle.
If you have a hotted-up motor or 800 cc or 1000 cc engine, hotted-up or not.... & a single petcock tank, I suggest you enlarge the hole through the petcock, for additional needed fuel flow at wide-open or heavy throttle. Do that to the straws too. Here is more information:
For a modified engine (enlarged, or otherwise horsepower is increased), if you have a single outlet port fuel tank, you probably should change to a dual-port type tank; or, modify the petcock on the single outlet tank. The stock single petcock will not flow enough fuel at extended heavy or W.O.T., particularly on an R100 engine. Careful drilling & modification of the petcock will work well. You CAN retain the in-tank thin tubes leading upwards from the petcock, by drilling them out a SMALL AMOUNT. The area of the inside diameter of the fuel pipes and effective petcock round passageway is a square function, pi x radius squared, just like you learned in school as a youngster. This means that a tiny increase in inside diameter means a lot more flow. For just the two pipes any increase in inside diameter often is not easy and you may wish to remove them, drill the petcock larger, all the way through, & fit larger inside and outside diameter tubes to the petcock. I have had good luck with carefully reaming/drilling the existing stock straws, as I have long drills, in very small graduated sizes. Again: a small change in inside diameter is a large change in flow. You can measure the improvement at the carburetor (bowl off, measure cc per minute or shorter period). The fuel flow is also controlled by the size of the opening in the carburetor where the float needle seals, but that is not a factor, it is large enough. The hose sizes are NO factor, and also the fuel filters, if clean (and not water contaminated), are no factor. Using a one-petcock fuel tank, modifying is almost a must for a R90 or R100 engine, and not modifying is marginal for WOT even for the R80 engine size. A few hundred cc per minute per carb, measuring with both carbs float bowls off, is a good idea. If you have to on a very hopped-up motor, drill out other items, including filters, T adapters, etc. Remember: a quite small change in inside diameter makes for a rather large change in flow. The most restrictive item is almost always the petcock and its fuel straws. If you carefully use a sharp and ;pmg drill bit, you can enlarge the inside of the straws, right into the petcock, & this really does work well. You need enlarge only a small amount. More on this, somewhat below.
The actual length of the stock petcock 'straws' themselves is not the same in all models. The dimensions I show here are proud of the surface the straw is pressed into and will work fine on all tanks. The straws can be metal or plastic. If yours are cracked, you can usually use tiny diameter copper tubing available at hobby shops. If you need to, sand the end area diameter of the metal tubing you purchased, and slightly chamfer the down side very end ...both for ease in assembly and proper fit. Consider using a SHORT straw of 0.935" (23.75 mm); and 3.27" (83 mm) for the TALL straw.
Some have wanted to shorten or eliminate the short straw. Yes, you can shorten the short straw and gain a rather small amount of usable fuel. My advice is to not eliminate that short straw, certainly leave at least 3/8" proud of the metal. You will need to add a small amount to these various lengths for the straw itself, as they are pressed-into the petcock. There is nothing critical about the final length of the straws, except that the short straw should be sticking up into the fuel enough to prevent most of the detritus from going into the fuel filters you added below the petcock, and certainly not allowing such into the carburetors.
FUEL CAPACITY and more about FUEL FLOW:
For tank capacity, see your owners book. Understand that the usable amount of fuel is less than the rated capacity. Few of you fill the fuel tank to the very brim, where no more can be added. That would be a bad idea anyway; the tank can be overly pressured from sitting in the sun, and a few have collapsed from extremely cold weather with a faulty cap, etc. Usable fuel capacity is not what is in the books & this particularly so on the later tanks with the fuel restrictor metal flap in the tank filler area. If you do a quite careful look-see at the BMW literature (and, do your own measurements!), you will see that BMW implies a 1 liter difference from 1988 onwards on the same model bike tanks. It is not easy to figure this out as you don't know, unless you have done measurements, etc., that the tanks are identical except for a small change in the internal pipes and that those later tanks all have the filler flap. The actual amount of reduced fuel when using the flap as originally intended and with autoshutoff fuel dispensers, is more than 1 liter. It really is worthwhile to remove that flap! When BMW publishes a fuel tank capacity, it is the capacity of the tank as if you were able to completely fill it (which you can NOT, unless modified, on the later flapper-equipped tanks). For modifications to caps and tank necks, see my article on them: https://bmwmotorcycletech.info/fuel-caps-airheads-K.htm
Removing the fuel filler flap: https://bmwmotorcycletech.info/pulseair.htm
The two sides of most of the TWO petcock tanks do NOT hold exactly the same amount of fuel for main nor reserve positions. These are NOT big differences. For the reserve section, I have seen differences of 5 to 8 miles, sometimes nearly twice that. I have not made quantity measurements on but a few tanks. You will hardly gain much by shortening or removing the petcock short straws. I am OK with a slight shortening, only, of the short straws, especially if you have aftermarket filters below the petcocks.
For high speeds I suggest BOTH petcocks be turned on, if two are available. This helps with possible fuel flow including flow problems due to bubbles, etc. This is especially so for the R100 engines. I've already mentioned petcock modifications. For an extreme case example, if you were running at wide-open throttle doing a high speed run, and managed to get to the rated 124 mph that some Airheads are rated for, you might need a gallon of fuel in 7 minutes (a bit less on a quite hotted-up motor). You can measure the maximum possible fuel flow into the carburetors (have fire extinguisher available!) in the following way, & measure the real world situation, including restriction effects of the petcocks, filters, float needles and seats, etc. The following test includes the flow through any external aftermarket fuel filters AND the carburetor internal fuel valve, which is operated by the fuel level and the float... so it is a good test:
For accurate results use TWO containers & do both carburetors at the same time. HAVE A FIRE EXTINGUISHER AVAILABLE! Put a quart container, such as glass measuring containers from the kitchen, under each carburetor,& remove the carburetor bowls. Turn on both petcocks; see if you can get 8 ounces of fuel into each container in 1 minute or less. That is approximately the minimum required. Yes, a cup a minute, or, nearly 1/4th liter. Most will measure one carburetor at a time, but due to variances in crossover pipes, and other things, I suggest measuring BOTH at the same time. I suggest that you have a MINIMUM of 8 ounces per minute per carburetor, both petcocks ON if you have two. 350 cc is acceptable for most bikes. If you are not getting that much, check all filters, etc.
If you have a single outlet port fuel tank, you probably should change to a dual-port type or modify the petcock on the single outlet tank. The stock single petcock will not flow enough fuel at extended W.O.T. even on a stock engine. Careful drilling & modification of the petcock will work well. It takes very little increase in the diameter of the petcock straws & petcock passageways to rather greatly increase the fuel flow amount.
It is not uncommon to hear complaints of an Airhead acting like it is running out of fuel .....especially if starting out from a well-filled tank, & you are at even moderate speed out on the highway. Usually this is a tank venting problem or, a problem with the fuel cap. Especially on caps that say SHED on the bottom. They can be modified easily.
See
https://bmwmotorcycletech.info/fuel-caps-airheads-K.htm
Refueling, Tank Rotting, Tank Cleaning:
If the tank is not cleaned regularly, perhaps yearly, especially if you don't fill up after every ride, or live in a high humidity area, the tank may accumulate a fair amount of water, which will rot out your tank bottom. Some very tiny amount of that water comes from the fuel itself. Most comes from inside-the-tank-walls condensation as fuel & tank cools after you park the bike. This is particularly true in high humidity areas, where you can see dew on the tank, seat, etc., in the morning. It is very important to clean the fuel tank of any water as it WILL rust out at the bottom and repairs can run from mild to a new tank. The 'red' internal coating on these tanks is now quite old, & typically has some deterioration, so heed my words about cleaning the tank & filling up after your ride (or just before its ending), if possible.
I strongly suggest you clean the tank, totally, yearly. Clean the filters at the petcocks regularly; replace aftermarket pleated paper filters when flow lessens noticeably; or, on a schedule or, best, upon a fuel flow test. If a fuel tank is very old, grungy, full of sediments, etc., I recommend using a high pressure car wash wand, with soap, on the tank insides, then wash the tank & dry it. THEN treat with phosphoric acid mixture (or the tank relined, which is a HUGE labor-intensive chore).
It is helpful to fully refuel before the bike sits overnight. That helps with dew/moisture
otherwise condensing inside the tank on the walls that would not be covered by fuel. The water will condense onto the walls as globules, fall to the bottom and cause metal tanks to rust or rot out ...yes, rot, even on aluminum tanks. NOTE that 100% filling to the brim is NOT generally a good idea....due to pressure effects from temperature changes, particularly if the tank is in the sun. Think about your usage, and your filling.
There is a great deal of information on tank cleaning, phosphoric acid treatment to prevent rusting, ETC., located in TWO places on this website: Articles 9D and 73.
FILTERS:
Many folks add an additional aftermarket filter below the stock petcock. I recommend that you DO; but the recommendation is stronger for the early type of larger mesh screens (and, in-tank screens without the bonded washer). Sintered metal types are OK, as are treated pleated paper types. Metal screen types do very little good, as your petcock already has a screen. This also applies to very fine screens, which do only very slightly more cleaning ....and can be restrictive and clog easily, strangely? ... which is NOT good. The latest version of the bonded-washer internal tank filters from BMW are better.
I prefer the treated-pleated-paper type of aftermarket filters. Some prefer the take-apart and cleanable anodized metal bodied internal sintered element types, most of the larger ones are OK. There are small plastic covered filters with sintered elements and these also work well, these are throw-away items, as are the common paper filter types. Most are OK in the medium to larger sizes. I like the larger Napa 7-02323 pleated paper filter. It is, however, plastic-bodied. The Fram G4164 will also work OK, & both of these are about the right size. Be careful with the plastic filters so as to not crack the throats. The FRAM is not made as nicely as the Napa filter, the Fram has less pleats, not well supported internally. Napa has a 7-02357 that is smaller, POSSIBLY 'adequate' for dual petcock use, but I recommend the larger 7-02323. Really teensy-tiny small plastic filters with the pleated paper elements or sintered elements are not good, and can have problems, not the least of which is inadequate fuel flow, but they are usable for low flow use with Luftmeister side-tanks. When mounting plastic-bodied filters below the main tank petcocks, have them mostly if not entirely vertical, so that vibration does not weaken the junction of the plastic spigots to the filter body; and, the filtering is better too. Simply insert into the line from the petcock going downwards. I recommend the stock fuel line routing ....but if converting a later model Airhead from electric solenoids (underside of the starter cover and mounted to it) to no solenoids, then I recommend you change the LEFT petcock to the REAL left type, so the hose goes backwards, before downwards ....all just like the earlier, pre-solenoids bikes.
The Napa 7-02323 & FRAM G4164 are similar, although not so in quality, & are actually replacements for early Volkswagen filters, VW ZVW262101 ....but are also used on many small garden engines, etc. A.C. GF453 will work, but it really is too large, its diameter is nearly 2"; over-all length almost 5", and its stubs are single step with 1/4" bump. I recommend against this item & its size unless you have to use it, or have a badly deteriorating tank.
Many plastic bodied filters have a nice feature: The input and output stubs are dual-diameter stepped, so the filters will fit whatever hose you are using. Do install them vertically if you can.
The 7-02323 is very similar to the slightly cheaper Napa 3011. The 7-02323 is part of the Napa Marine line of products, and has MORE pleats, and somewhat better made. The 3011 has less pleats. Either will work OK.
Some filters have arrows pointing in the direction of fuel flow; more often filters do NOT have markings for flow direction. The input end, which goes towards your fuel tank petcock, should be the end that fills the OUTER area of the filter. The output end is the connection to the filter element INsides. This is not critical on most types of filters, although most that are even slightly critical are marked. However, installing the filters in the direction I have noted will give longer filter life, sometimes substantially longer.
Napa, and see napaonline.com, has changed its numbering system slightly. If trying to see a photo or? of the Napa filters, if their search engine does not display 7-02323, try entering it as 702323 ....and it may come up as SME-702323 or even SME702323. Same for the 702357. Don't know about the 3011.
Other filter numbers that seem fine are: Baldwin BF-989; Wicks 33-027; Those two are METAL filter bodies; there is also the Wixom 33011.
All fuel filters work best vertically, but most are OK horizontally but have much less hose & vibration strain on their plastic if used vertically; besides using more of the filtering element when vertical. Do not fail to replace filters now & then & do not fail to clean the tank regularly & clean the petcock screen filters now & then. Remember that later versions of the petcocks have in-tank filters, and some have small filter screens in the outlets. If your tank is fairly clean inside, you may get 20K miles on aftermarket filters before they need replacement or cleaned, if that is possible on your types. The clear plastic ones, depending on make & model, sometimes can visually show you if they are getting clogged, by looking at the paper pleats & sediment. DO NOT DEPEND ON A VISUAL INSPECTION.
Aftermarket external filters can be a big help because it takes hardly anything as thick as a human hair in the carburetor to cause problems.
If fuel flow decreases enough, your engine will run lean & potentially hot, might stumble some, & a lean running engine can be harmful to your bank account! That is one of the reasons I prefer you NOT use the tiniest of these filters, and why I advise you to clean the cleanable filters, otherwise to replace them as required ....that means a FLOW TEST.
I DO advise modifying the petcock on single petcock tanks, if used with modified engines, or, any over 600 cc. Modifying the petcocks even on dual-petcock models is something to think about.
If you install aftermarket filters (and I highly recommend you DO, as commented upon!) ...carry some short piece of hose, clamps, or whatever YOU need, to enable you to remove a filter if it should crack & leak, or, you have some other problem. PLEASE be careful to do a neat filter installation; think about the long term. You do not want a faulty installation allowing gasoline leaks. Whether you use aftermarket filters or not, consider what might happen, 300 miles from nowhere, if you have a leak in a rubber hose ...or a filter leaks, breaks, whatever. Carry a piece of hose, perhaps a clamp, perhaps a way to plug one side if you have a dual petcock tank.
Fuel hoses:
Sometimes you can pull the hose off with your hands without excessive force, but often they stick tightly. Using excessive force can cause problems. The official BMW hose, whether, in some cases, the old silver braided stuff ...or the newer black metric gas line ...is LESS in OUTSIDE diameter than SAE American fuel line. The BMW hose, being smaller, fits better at the limited space fuel hose cross area of the airbox (on models having that). The BMW hose inside diameter is metric size, and fits a wee bit better onto spigots, pipe, etc. All fuel hose of any type, but especially some types, tend to stick to the petcock outlet nipples (or, carburetor fuel intake pipe) while making a good fluid seal. No hose clamp is needed, except with SOME FEW aftermarket in-line filters ends. Do NOT use ANYTHING but hoses rated for GAS/FUEL!
Some folks use pliers on the hose near the petcock and then give a strong pull. That tends to tighten the hose as it stretches the rubber or plastic hose. The rubber is usually reinforced with fibers ....and pulling on it is just like the old Chinese finger-pull torture toy. That's also true to some extent for plastic hose, which is typically not reinforced, but also can stretch and tighten. You can crack or break the plastic inlets and outlets, and it is not good for the metal outlets either. It is particularly bad at the carburetor intake fuel pipe, you can damage the fuel sealing. Better to use a very broad flat tool of some sort; and push the hose at its end, in the removal direction, while pulling only moderately on the hose. If replacing the hose, you can cut it off with a very sharp knife.
I became anal about all this once and made a simple U-shaped tool to remove hoses. I made another one of a very large washer, simply slit a section out of it ...and, speaking of that idea ...you MAY want to put a large diameter washer, known as a 'fender washer', onto the petcock outlet nipple before pushing the hose onto it. That way, when removing the hose, you push on the washer while gently pulling on the hose ...and the hose almost always easily comes off ....no Chinese finger toy problem! While I personally have not seen this, at least one person reported that using a metal washer of the large Fender Washer type could possibly, via vibration, wear on the softer metal (or plastic) of the petcock outlet. Thus, the suggestion now is that you obtain a fiber or nylon or other plastic type of thick and large diameter washer, for installation onto the petcock spigot.
BMW does not use fuel line clamps on Airheads.
Fuel hose in-depth details and recommendations has been moved to item #11 in:
https://bmwmotorcycletech.info/fuelmiscl.htm
Perhaps once every few years you should flush the bowl jets, pipe, etc., with a strong cleaner, like Berryman B-12 CARBURETOR AND CHOKE spray, using the wand. Don't leave Berryman B-12 in the passageways for long periods of time; a few minutes is fine. THEN re-spray the passageways with a mild cleaner, even brake cleaner is OK. Since a really thorough job means you must remove the jets and idle mixture adjustors, you can consider leaving this spray cleaning for when doing a bit more, some leave it until carburetor overhaul time, which I strongly advise against.
Failure to at least empty the float bowl every year or so can let 'stuff' get into the idle pilot jet, which has an exceedingly small hole; and, sediments of various types, plus water, can mix & plug the tiny corner well bottom jet. Then the enrichener (on the CV carbs) won't work properly. The bike may be very difficult to start. A bad bowl gasket, especially at the CV enrichener down pipe area, can also make your enrichener (choke) operate poorly. The enrichener cover (4 small screws) on the side of the CV carburetors have a tendency to loosen, and then the gasket gets sucked inwards, and you will have problems from that too. The enrichener on the /5 motorcycles may have the rubber O-ring in the outside recess, not inside.
The central jet assembly in the CV carburetors has a tendency to collect black grunge; and it WILL cause mid-range and higher problems. Remove the entire assembly & clean it now & then. Be careful upon reassembly not to overtighten, ...nor tighten the assembly against the slide needle tip! The upper-most small part (called an atomizer) fits properly only in one direction!
GAS CAPS: venting, various failures, locks and keys, etc:
See article 1B:
https://bmwmotorcycletech.info/fuel-caps-airheads-K.htm
13-11-1-336-900 METAL fuel T fitting....now 13-11-1-254-083
Revisions:
10/05/2003: Incorporate all previous changes & updates on the petcocks & cap removal methods.
03/30/2004: Spelling typos, emphasis.
03/31/2004: Add Fram filter number, minor clarifications, eliminate some redundancy.
04/04/2004: Add overhauling Everbest information.
07/01/2004: Slight updates, some clarifications.
08/26/2004: Venting, modifications, tanks, seats.
09/07/2004: Add tank capacity.
09/12/2004: Updated, added links.
10/01/2004: Fix waste...waist typographical error.
10/29/2004: Update numbers, clarify caps and keys details.
03/05/2005: Revised extensively for better order, as things had been overly-repeated & much of the text was choppy. Added some comments on filters and the gas caps.
11/09/2005: Red note on Napa filters numbers.
03/23/2006: More information on the Napa filters.
04/18/2006: Revised, for clarity, information on the gas caps; minor in other areas.
11/07/2006: Clarifications and emphasis.
11/21/2006: Add roundels information.
02/01/2007: Remove Roundel information, as it will be updated and expanded in article 68.
07/28/2008: Revise much strictly for clarity. Also add not on Anton's article in OTL.
02/01/2010: Add photos of gas cap drilling for venting, re-arrange article some, and add hyperlink.
11/17/2010: Add information on petcock straws.
06/01/2011: Clean up article, mostly for clarity reasons.
06/04/2011: Add /5 petcock sketch.
04/03/2012: Small updates, including adding Anton's article as a link.
04/04/2012: Clarify & emphasize details on cap drilling types, methods and why/what.
07/21/2012: Add a bit of information on my testing of fuel hoses, and my recommendation of Tygon F-4040A.
08/28/2012: Add to the petcock overhaul section. Add QR code. Change Google ad & meta coding.
11/14/2012: Totally revise, clarify, eliminate duplications, expand some areas.
12/01/2012: Add DIRECT link to Vetch's article.
04/15/2013: Add part numbers and information on screw cap trim ring and gasket.
08/26/2013: Add info from Tom on drilling SHED cap.
08/06/2014: Add information from BMW bulletin on the cap drilling.
09/02/2014: Remove seat-tanks fitments to another article; remove fuel hose info (see 12A).
12/10/2014: Combine statement from mod4performance, edit & include with the petcock flow info.
07/15/2015: Clean up article some, eliminate SOME redundancies, clarify a few details.
11/28/2015: Shift things around in the article, particularly to try to have all the Everbest petcock info in one section. Fix meta-codes. Copy Buchanan's version of Craig Vechorik's Everbest information, as links are becoming more unreliable. Add Vech's website link. Change font size larger for most of the article. Condense the site more to the left side, with more blank space on the right.
03/04/2016: Finish meta-code changes and minor justify to left changes, br and br / changes.
06/27/2016: Update scripts, metacodes, clean up some.
07/31/2017: Clarifications on using washers on the petcock spigots for easy hose removal.
02/25/2018: Total revision of article. Reduce html, colors, fonts. Improve explanations. Add 10pxl margins. Links. Layout improved.
04/02/2020: Minor updates
06/15/2021: Add references to 9D and 73
© Copyright 2021, R. Fleischer
Return to Technical Articles LIST Page
Last check/edit: Tuesday, June 15, 2021