
|
|
BIG alternators for BMW Airhead Motorcycles
https://bmwmotorcycletech.info/reallybigalt.htm
15-D
© Copyright 2020, R. Fleischer
The Omega (Emerald Island) and EnDuraLast (Euromotoelectrics) alternators provide increased output, and may have other attributes that could be helpful, such as usable output at lower rpm. They are covered in their own articles on this site. Refer to Article 15-A and 15-C for information on the Omega and EnDuraLast aftermarket alternators (testing results, etc!) ...and a discussion of the capability of the stock Bosch alternators. One of the Emerald Island alternators is rated at 600 watts!
Reference and for comparison purposes:
https://bmwmotorcycletech.info/AftrMrktAlt.htm
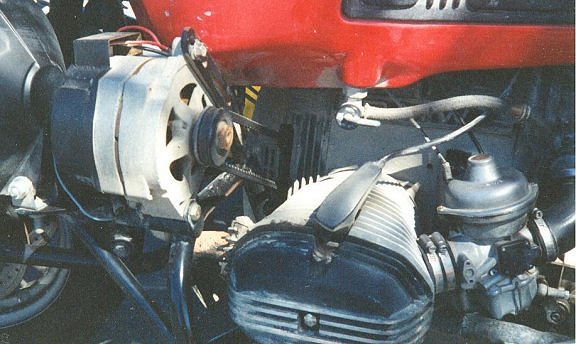
The following article covers just a few installations of some truly powerful alternators as installed on BMW Airhead Motorcycles (and on /2 era BMW motorcycles).
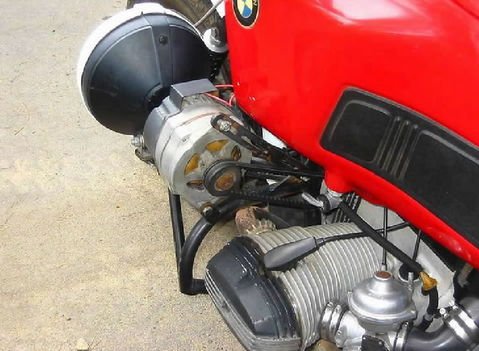
There have been installations that attach the alternator to the crash bars. Generally speaking, that does not work out well over time, unless the crash bars are modified to be beefy and substantially supported.
I have done alternator conversions myself. The small Japanese alternators are my favorite; and for VERY large alternators, I liked the larger more pancake type of Chrysler alternators. Many recent cars, particularly large American cars, have very large alternators. New cars now appearing have stop-start technology. These cars engines automatically shut off at stop lights, then, you press the accelerator, and the engine is started. Some of these engines can have very beefy alternators, or, combination starter-alternator units. I have not yet had my paws on some of the larger combo starter-alternators, but they may be adaptable to Airheads, so the stock starter motor would not be needed? The result might be a more powerful alternator, a substantially powerful starter section in it, and room for, ...shall I say it? ...other nice things could be installed ...in prior areas of the motorcycle, either alternator or starter, depending on the conversion. ....maybe a supercharger or turbocharger? I can envision a perfect place for a turbocharger, where the original starter was, but further forward.
What about installing an oversize alternator (other than the Omega or EnDuraLast)?
There are multiple ways of doing these types of DIY conversions; here are the basics on how I have done several; R60/2; R75/5, R90/6, etc.:
1. Disconnect battery. Remove fuel tank. Unplug voltage regulator. Remove the front cover, so you can see the stock alternator.
2. Remove the stator housing and stator. Using appropriate HARDENED threaded tool (not a jaw puller!!), remove the rotor. You will need a rotor, unless you are an excellent machinist at turning precise tapers on a lathe. Sell your rotor if in good condition, and get one that needs rewinding, as you will need the taper portion (at least).
3. Remove the diode board (and diode board mounts if the removable type).
4. Modify the rotor so it has a V-belt PULLEY attached to it. You can use a toothed belt also. Be careful not to damage the crankshaft and rotor tapers. The only thing you really need is that taper, and a pulley affixed VERY squarely and sturdily to it. I like the rotor pulley to be LARGER in diameter than the new alternator's pulley, so that the engine will run the alternator at a bit faster than engine rpm. The pulley/rotor-taper modification MUST be done with strength, neatly and very squarely, & I did all of mine on a jig on a drill press or in a lathe or in my mill. You will have a choice on what type of pulley, and how closely towards the crankshaft it is mounted. Look carefully at the engine case and cover, to see where you will make the belt opening. Decide on the dimensions. Think about it all before committing yourself. Take a look at older Mazda cars power steering pump pulleys in a wrecking yard; think about drilling and tapping holes in the rotor, etc. Think a lot!
5. Select the proper alternator. This is actually part of the above step 4. Try to find an alternator that mounts nicely (and strongly!) to your engine and to whatever mount(s) you make for it. The alternator can pull a lot of engine power, and the inertia of the rotating alternator parts (including belt, pulley, etc) can be very high when you shift the transmission and let out the clutch, so things must not vibrate nor bend, etc. I suggest a small diameter alternator, with built-in or built-on cooling fan(s), but do consider the direction of mounting and the direction the alternator fan blows the air in relationship to the direction of your motorcycle's engine rotation!! You want the oncoming air to work WITH the alternator's fan(s), and many alternators can only be run in one direction.
6. Use a large battery if possible. It will better absorb the alternator capability. For a sidecar rig, a car battery in the trunk of the sidecar is ideal. Some might want to retain the bike battery too, just for starting; and use the sidecar mounted battery for camping lights, etc. For a sidecar rig mounted battery, try to place the battery behind the sidecar seat and to the far side away, all of which is an ADVANTAGE for handling. Keep in mind that a large alternator can easily cook a small motorcycle battery, especially if that battery is run down much at all. There is a limit to the current flow a small battery can handle short term and long term. The commonly available 28 or 30 ampere-hour flooded motorcycle batteries will usually work OK, however, although longevity may be shorter. Do not overlook the battery size. Use of a very high charging rate lithium battery may be a possibility too....but the ampere hours of storage is typically low. A substantial sized AGM/VRLA battery may be your best choice, over-all.
7. Use a self-contained alternator, of the one terminal type (one additional smaller terminal to drive the dash GEN lamp is fine). Use heavy gauge wires to the battery and do have a good ground.
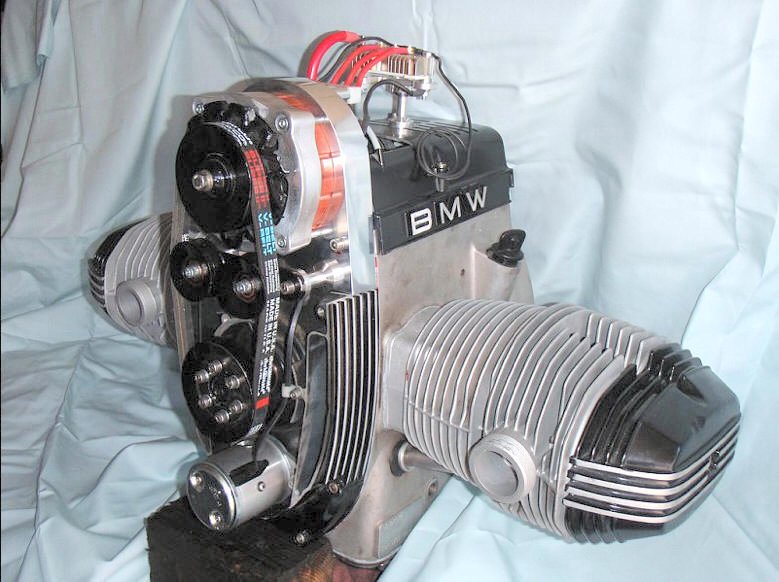
For those of you that want something special:
This type of installation, if you were to make it yourself, would require some machinist talents, some design talents, and plenty of time! This is the Australian-made conversion (now available in the USA). 800 watts is claimed. Try Advrider.com, they had these in a thread a while back. Here is a link to possibly the only place in the USA for these:
https://gregsgssite.shutterfly.com/1593. That page has actual installation photos, etc. Compare to the Omega or Emerald Island 600 watt alternator in my other article:
https://bmwmotorcycletech.info/AftrMrktAlt.htm
Also compare to the stock Bosch: https://bmwmotorcycletech.info/altcapability.htm
Rev:
05/22/2010: Clean up article.
08/31/2010: Add more photos, permission from Albert Lindberg. Also add more commentary, edit information #2, 3, 4, 5, 6, 7.
01/07/2011: Add photo of Greg's 800 watt alternator conversion.
10/13/2012: Add QR code, add language button, update Google Ad-Sense code.
07/26/2013: Fix error on pulley size in step 4.
04/27/2013: Clean up article a bit, add more info on the 800 watt Aussie conversion, including the link.
03/18/2016: Metacodes, left justification, layout, etc.
10/15/2016: Metas, scripts, H.L., html cleanup, photo borders.
04/03/2018: Remove Swedish alternator conversion photos and text, was just too messy & should not have been in this article. Remove one other conversion that wasn't good enough to be here. Go through article, reduce HTML, colors, fonts, cleanup.
© Copyright 2018, R. Fleischer
Return to Technical Articles LIST Page
Last check/edit: Friday, August 18, 2023