
|
|
The ads above are Google-sponsored.
Clicking on them at every visit helps support this website!
Clicking on something inside an article helps even more!
History of this website and how I run it....and, donating.
Fuel system in your Airhead BMW Motorcycle.
Tank cleaning & protection methods. Premium vs. regular. Fuel additives.
Fitting other tanks...seats & fitment with various tanks. Pesky
rusted/frozen screws on seat hinges. Throttle & choke cables.
FUEL HOSES. Tank sealants & liners.
© Copyright 2023, R. Fleischer
https://bmwmotorcycletech.info/fuelmiscl.htm
9D
>>>Refer to article #1A, #1B, & #75 for more information.
>>>An article that describes Lead Substitutes, in depth:
https://bmwmotorcycletech.info/valves.htm
1. An extensive article on Dell'Orto's, covering all their carburetors: https://bmwmotorcycletech.info/dell.htm. It explains in great detail not just how the Dell'Orto works, but is applicable in general to all carburetors ....& MIGHT be worthwhile for you to peruse, even if you don't have one of these carburetors, which was used only on the R90S Airheads.
2A. If you have a high compression ratio Airhead (modified later type; or, 1979 & earlier type with stock compression ratio), & you use high octane fuel, be advised that when fueling up at a service station, it is considerably better NOT to fuel up at the type of 'pump' that has only ONE nozzle/hose. Your fuel may be diluted by a modest quantity of lower octane fuel remaining from the last user...from the internal valve, pump, etc....through the hose, etc....somewhat depending on the type of equipment in use. The dispensing companies don't offer this information easily, & 1/4 gallon or more is VERY common. This is not a terribly important thing, but, good to know if you have a choice.
2B. There is an old controversy about possible increases in combustion chamber temperatures, etc., when using premium gasoline's in lower compression BMW airhead engines, where higher octane is supposedly not needed. Gasoline burns at about the same rate under "normal" conditions, that is, not detonating. The output (BTU) per gallon of Premium gasoline is potentially ....or even likely...to be a small amount LOWER than for Regular. THE ENERGY CONTENT OF FUEL ALSO VARIES WITH THE SEASONAL CHANGES OF THE FUEL. I think it is likely that SOME premium gasoline's WILL give LOWER gas mileage than a regular gasoline will.....assuming the engine ran properly on Regular grade gasoline. Winter grade of road gasoline's tend to have rather volatile things like butane or propane in them to make it easier for engines to start. In the USA, so-called oxygenates, such as alcohol, are added to most fuels. These various additions GENERALLY cause 5%-8% POORER gas mileage. They are not good for your engine, carburetors, hoses, etc. All the oxygenates tend to cause the engine to run leaner with stock jetting in use. Some Airheads, typically 80's and later models, are already running on the lean side of best power mixture...& more leaning will cause stumbling, etc. Thus, if you increase jetting, you get a double whammy on your gasoline usage.
3. There are a number of types of aftermarket fuel filters on the market, metal ones, cleanable element ones, various sizes, colors, etc. I prefer the impregnated paper type, NAPA #7-02323. That number may have to be entered at the store or on-line as 702323. There is a much more complete article on this website on the fuel filters, petcocks, etc: https://bmwmotorcycletech.info/fuelfltrs&petcocks.htm. Due to the age of our Airheads, I am a firm believer in using aftermarket paper filters BELOW the petcocks, mounted vertically, & maintaining clean petcock mesh screens. Tank debris is a prime cause for a gasoline soaked foot (besides old worn float needles or bad float). In addition, particles of various things manage to get through the tank petcock mesh screens....which are designed to trap bigger particles. I clean the petcocks thoroughly every year, by removal (at simple tank cleaning time), blowing them out with compressed air. If the handles are starting to get stiff ...usually that means at the every several years point ...I do a more thorough job....and I disassemble the petcocks & service them. Almost never do I need any parts, other than a very faint smear of silicone grease. Failure to do regular tank cleaning is likely to eventually result in a rotted tank bottom (from moisture condensation, rusting, etc.)... AND a lot of filth getting into your carburetors, or at least fuel screen(s).
Fuel hose, in depth, is covered at 11, well below.
4. http://www.chm.bris.ac.uk/motm/leadtet/leadh.htm has some interesting information on lead & MTBE for gasoline. There are other websites that have considerable technical information on fuels, additives, etc.
There is a fair amount of information scattered throughout the following article of mine, that covers leaded fuels and valves and valve seat problems:
https://bmwmotorcycletech.info/valves.htm
5. Questions often arise as to whether or not the screen, petcock, lines, filter(s), etc., are flowing enough fuel. This is not difficult to calculate if you figure the worst case, such as 20 mpg at wide-open throttle. But, here is a guideline of mine, that is perfectly adequate, & you don't have to play with mathematics:
If you have a small displacement airhead, such as a R65, you need 3/4th cupful of fuel flowing from EACH carburetor, in ~ one minute or less, separately measured but both at the same time, bowls removed, common household cup measurer underneath each carburetor. For the larger displacement Airheads, a cup & a half or more is good, one cup 'adequate for most purposes'. For my own bikes, I wanted a minimum of 8 ounces of flow in 1 to 2 minutes, 2 being better.
Fuel flow problems such as stumbling after a bit of cruising....can be caused by fuel cap or other tank venting problems, not just clogged fuel screens and filters, etc. The fuel caps of ~ 1978 into 1979 were particularly susceptible to vent clogging. The best way to test for a fuel tank cap venting problem is to fill the tank to the normal full level. This makes the effect happen much earlier in your test ride. Go for a ride, at speed if you can. When the motorcycle starts stumbling, open the fuel cap while riding, and continue onwards...and if the stumbling stops, and continues to not stumble, then you have a venting problem.
6. Tank cleaning, coating, etc.: See https://bmwmotorcycletech.info/chemicalsetc.htm and https://bmwmotorcycletech.info/references.htm
To clean a fuel tank, you must remove it. I clean the petcocks/screens at my once yearly tank cleaning time, & I may take them apart for a more thorough cleaning & silicone grease lubrication of the parts ...but that usually happens only every 5 years or so. There are several methods for cleaning the fuel tank. You might want to use the high pressure wand at the local car wash, using soaping mode, then rinse there or rinse at home. Dish detergent or laundry detergent is OK. Stronger is TSP, mix it with water of course! RINSE THOROUGHLY!
If the tank cleaning is done because the gasoline, maybe some moisture, whatever, has been in the tank & dried (mostly) from very long term storage, & probably looks like syrup (or??) ...then the tank should first be cleaned by adding a fair amount of some moderately strong cleaner like Simple Green. Use a 50-50 mixture & let it sit overnight. Then go about cleaning the inside with a pressure wand of soapy water, then clean water, from the nearest car wash place. If all the crud does not come out, you can either repeat the process, or start with petroleum type solvent chemicals. Lacquer thinner is a good first choice, followed by increasingly stronger solvents if needed. I use a siphon type gun with a gallon jug with hole in top cap for the siphon hose, & my air compressor. The jug contains a strong detergent & water, and sometimes I had a solvent. The stronger the solvent, the more likely spillage will damage the paint on the outside of the tank, so take your time and be careful.
NOTE! One of the BIG reasons to clean an Airhead steel tank (up to every year in some areas) is due to condensed moisture, which becomes water droplets at the bottom of the tank & could, and likely will, eventually rot out your steel tank. If you live in an area where dew condenses on things, or your area has high humidity, this is exceptionally important. I live in a very dry area, yet I still clean & then thoroughly dry my tanks every year. I usually do the job during my Pre-Winter preparations for storage. I have never had any of my own motorcycles' tanks leak at the bottom.
If you are reading this & have a fuel-injection bike with the submerged fuel pump, like a K bike, be very cautious about using harsh chemicals.
Aluminum tanks can have problems from condensed moisture!
The rest of this section deals with relatively normal cleaning for Airhead steel tanks:
CLEANING: Remove the tank, petcocks intact. Mix two tablespoons of common dish detergent (works better than "soap", particularly the no phosphates soaps) in enough warm water to fill your tank at least 1/3 full (both sides of the tank). Don't fill the tank to the brim, you want plenty of room for shake/sloshing. Shake the tank thoroughly. NOW remove the petcocks, and flush the tank strongly with your outside-the-house hose (nozzle set for a somewhat narrowed but strong stream). This can loosen & lift some old deteriorating red lining if vigorous enough, I don't find that a problem. Wash out the tank thoroughly. For the petcocks you removed, flush them in all handle positions. DO NOT re-install them now. If this mild cleaning does not do a good cleaning job, you will have to use my other suggestions. I assume here that the mild cleaning HAS done the job....or; you have done the more powerful solvents type cleaning, and have finished-up with the milder detergent and water cleaning. Once the tank is thoroughly cleaned properly, the yearly or bi-yearly cleaning with detergent and water will usually be adequate.
The next step I recommend is to treat the insides bottom area with phosphoric acid mixture (hardware store screen door & other metals etching solution). DO NOT use anything except phosphoric acid mixture. Vinegar is NOT strong enough nor protective enough for this purpose. You will need cork or rubber stoppers to plug the petcock holes, & hardware stores also sell those. This job can be done with the inside of the tank still water-wet, but do flush it of any detergent or solvent mixtures. DO NOT leave solvent mixtures in the tank, do the detergent and water cleaning just prior to the next steps. You do NOT have to dry the tank.
I have tried several of these common low percentage phosphoric acid etching liquids from hardware stores, they all seem OK. Low percentage phosphoric acid converts any remaining rust, even deep into the seams type of rusting. Any bare steel areas, or rusting areas, will usually have a gray-colored look to them after you treat the tank. That gray color indicates converted rust, and is a protective layer, although moderately soft. It will take at least several hours of contact with the etching solution to do a good job. I do it overnight, and leaving the mixture in contact with the inside of the tank for hours will NOT injure the tank. I then clean the tank with mild detergent and water mixture, shake all the water out of the tank I can via the outlets, and then immediately start the drying process, see below. I do that over my house heater outlets. In many instances, the acid can be reused if you save it.
If you have never heard of phosphoric acid etching solution, perhaps you have heard of the jellied form called Naval Jelly.
I am anal about this yearly tank cleaning, and treatment when needed, because fixing rotting rusting-out bottom leaks and then repainting a tank is COSTLY & if you do it yourself it is a huge amount of labor. I put the washed & cleaned tank over one of my house heater's floor outlets for a week or so, outlets downwards, cap off or open. It does not smell if cleaned properly first. Usually you do not need to do the phosphoric acid treatment every year, as that is not necessary if you take care of your tank, even in climate conditions where dew would form overnight, where you should clean the tank yearly. I have some more hints further down.
Rust-forming water accumulation is greatly reduced by refilling the tank before parking your cooling Airhead overnight, where dew could collect inside the tank, more if it is not fairly full. The dew collects, runs to the bottom in droplets; then you have water in the very bottom; & with oxygen that gets in the fuel, etc., rust begins at the slightest microscopic place the tank, especially the bottom, is not protected.
Be sure to have filters below the petcock outlet (use ones allowing adequate+ fuel flow) & clean the petcock screens yearly. Be sure you have the latest screen type in-tank filter screen, if your petcock takes that tall type. The latest version, which is easier to use AND filters much better, has a bonded metal washer.
There are numerous tank coatings one can apply to the tanks and these take vastly more labor to use, compared to phosphoric acid solution. I don't like Kreem, Caswell's is OK, as is POR15. I have had good results using the vastly simpler techniques I describe above, even on tanks that have the red interior lining flaking off. The biggest problem, by far with fuel tanks, is not that some red lining is peeling off from the tank walls ...rather, it is deterioration at the tank bottom and bottom seams. It is water that is the worst offender.
Sometimes one of the coatings like POR15 is needed. Be sure to prepare the tank properly ...do not skimp on labor ...you will likely need to spend much more time on preparation than the manufacturer of the coating says you will, or, that you initially think you will need.
It is possible to use other products & methods to clean or treat the tank insides. You can also use the reverse-plating method using sodium carbonate & water to fill the tank (obviously, first close off the petcock outlets), then fit a big cork (or?) to the top opening, with a piece of iron, rebar, etc., going through the cork & into the solution ...but it does NOT touch the metal tank. Use a low voltage DC power source to remove the rust. You can finish by using a zinc rod (maybe an old carburetor bowl or pieces of one), & reversing the power leads. You will actually zinc plate the inside of the tank, which is a very good protector against rust. I suggest you look up this type of cleaning & plating via an Internet search. Don't use the phosphoric acid method if you plan to do this electric AND zinc plating method.
SOME folks will purchase a small plastic bottle of gas or fuel-line treatment ...the type that is for preventing water from freezing in the fuel system of cars. This stuff is usually a very dry alcohol. Some will clean their tanks with that stuff, using it as a solvent to wash the insides ...and to pick up any water ...and they then drain it from the petcock area. This does work fairly well (for a cleaning) ...and no other solvents nor detergent/water nor acid treatment is done. If you are a regular tank cleaner type of person this may work fairly well, although I am not so sure that it would not be a bit harsh on the tank liner. But, I have some customers who have been doing it for many years without major flaking. I'm not convinced it is a universal answer.
The method I used every few years on my own tanks (do see my red box HINTS area, below) is to remove the petcocks, thoroughly clean the insides with a medium strong detergent solution, preferably one that is not phosphate-free, then flush it really well. I then install corks into the outlets, and put in a quart or so (pint each side of tank) of common aluminum screen door, or galvanized flashing, etc., etching product, various names. The package must say that the product contains phosphoric acid. I let it sit from mid-morning to late afternoon, or overnight. I may slosh it around a bit a couple of times, if I think the walls, etc., need treatment. I then remove the acid mixture & put it back in the plastic container for another use (two or three times seems possible, depending on the amount of rust in the tank), I flush the tank with water containing a bit of common dish or other detergent, then dry it as noted earlier (over the house vent outlet, right side up, with the air going into the petcock holes). Takes a day or three. The phosphoric acid mixture will convert rusty surfaces, generally to a gray color. That colored layer, thin & moderately soft as it is, is protective against further rusting. It works particularly well at the tank bottom and seams where the serious rusting begins. Yearly, clean the tank, but there is usually no need to repeat the phosphoric acid, or not for a long time, typically several years. This stuff is not a sealant/protectant like POR15, but it works well, & is hugely & vastly easier to do. Try not to scratch the insides of the tank with hose nozzles, etc.
| HINTS: This is an edited version of what I posted to the Airheads List, on 06/15/2021: Although the detergent and water mixture cleaned most tanks quite well (there were some that required strong solvents, from years of not being used and the fuel having been left in them), and the fumes were hardly noticeable over the house heater outlets after the water and detergent washing, this was not convenient for those who did not want to use or not have such heater outlets; and, wanted something much quieter than using a vacuum cleaner. Hence I made a simple crude stand, and it worked so well that we made a couple of these, and used them in my shop. I made the simple stands of some scrap 2 x 4 lumber. I mounted an electric muffin fan in the middle area, that had an upside down plastic funnel mounted to the fan, with the funnel spout shortened and pointed upwards. The fan was mounted so the air output was upwards. The fan outside dimensions were probably 4 x 4 inches or maybe a bit larger. The idea was for the fan to blow air upwards into the tank filling area, and petcocks were, obviously, removed, and the ports upwards. Old pieces of carpet were glued to the top of the 2 x 4 pieces for the tank to rest on. One could use old shop towels, etc. When I described this, years and years ago, someone E'd me that they had made theirs with one of the very small fans from a trashed computer, and it worked fine. NOTE that the phosphoric acid (screen door or other metal etching solution from hardware stores) method is for steel tanks, and is not for sealing holes, cracks, etc., in the tank. What it does is stop the rusting which is caused by water condensing in the tank bottom. The rusting stops because existing rust, and any bare steel, gets the protective coating caused by the acid. I think I made the first one in the eighties. |
7. Alcohol in fuels (gasohol, etc.):
A lot has been said about gasoline that contains ethanol. Yes, it is bad for hoses & other parts including plastic types of gas tanks. BMW has had bulletins about the dangers & problems of using gasohol, especially if over 10% alcohol. We can't get away from ethanol in our
road gasoline in the USA, in practical riding. Below is a link to an article, for boaters with fiberglass tanks. It explains a lot, if you read it thoroughly. I could cite many articles about problems from alcohol-laced fuels. Just be aware, that even if you have a steel tank, the lining may be damaged over time, & alcohol-laced fuels are likely to deteriorate much faster & attract condensation of water easier, all of which rots the steel tank bottoms. In addition, alcohol causes carbureted engines to run leaner, unless you change carburetor jetting. Ethanol-laced fuels give poorer fuel mileage, poorer yet if jetting is compensated for. Common old style rubber fuel lines used on Airheads deteriorate faster. Same for lines on the injected K bikes. Here is the article about boat fiberglass tanks:
http://www.boatus.com/seaworthy/fueltest.asp. The bottom-line is to especially try to totally avoid alcohol-laced fuels if you have a fiberglass tank; and, to either use a totally alcohol-proof fuel line/hose; or, change the hoses every couple of years.
8. Fuels, in general:
Summer & Winter road gasoline fuels vary in volatility & therefore in ease of starting, & the energy content and gas mileage can vary as much as 7%. A gram of lead as TEL will raise the (R+M)/2 value of octane by about 6 numbers. Pure hydrocarbon gasoline, not the type with any alcohol in it, can only hold about 0.15 teaspoon of water 'dissolved' in each gallon. In other words, water hardly dissolves in pure gasoline. But, if the gasoline has about 10% by volume of Ethanol, a very common additive amount used for oxygenation purposes, then that fuel can now hold about 4.0 teaspoons per gallon (assuming very dry gasoline & ethanol to begin with). Problems occur if just a bit more water is introduced, even by overnight condensation, over time. The gasoline, water, & alcohol can and will separate, & water & alcohol sinks to the bottom of the tank ...which is bad for steel
or fiberglass/plastic tanks, & might be hard on the engine if it gets into the engine. The fuel characteristics also change even if that does not happen! RON specification, in layperson's terminology, is the specification most concerned with low & moderate power usage; & for potential for engine run-on, also called dieseling. MON specification, again in layperson's terminology, is the specification most concerned with high power operation (Knocking). (R+M)/2, which is what is displayed on American pumps, is a compromise specification.
Rule of thumb:
RON is USUALLY 8 to 10 higher than MON.
USA sold fuel that is marked on the fuel dispenser (pump) as 87 octane is approx. 82 MON; and 92 RON.
Engines vary & most very modern engines with fuel injection now have the ignition automatically retarded & thus the maximum power produced is lessened ...if the fuel's octane is lower than the designed-for octane ...this is not so for Airheads, which have no such special computerized controls.
Below is a chart of the MINIMUM NEEDED RON (remember, RON is perhaps 5 or 6 points HIGHER than USA marked pumps which are (R+M)/2. This means that the values below can be REDUCED by about 5 or 6 points, for what YOUR engine is LIKELY to need, for United States marked pumps. NOTE that your engine LIKELY has a HIGHER compression ratio than its mechanical calculation...due to carbon buildup, etc. Keep in mind also that RON is NOT done by the most stringent testing; RON is for low & medium throttle/power settings. It is MON that is for high power output. Remember, that in the USA, RON+MON divided by 2, an average, is what is printed on the USA pumps.
This chart is for a near perfectly machined, clean & smooth combustion chamber, under near ideal conditions, & with single plug per cylinder ignition. For a dual-plugged ignition, might be best to use the same figures & just know that the near perfectly machined & clean & smooth combustion chamber is likely not as necessary.
| Compression Ratio | Needed RON. For USA marked pumps, subtract about 5 or 6 points. |
| 7.0 | 75 |
| 8.0 | 88 |
| 9.0 | 94 |
| 10.0 | 98 |
| 11.0 | 104 |
Practical situations:
(a) A stock Airhead with 9.5 rated CR, having single spark plug per cylinder and reasonably carbone'd combustion chamber, riding at sea level on a hot day, from the above chart, needs about 96 RON, and subtracting 5 points means the pump in the USA needs to be marked as 91 octane. I would use that as a minimum, and if 92 or 93 was available, use that.
If you had a dual spark plugs modification, you could probably use mid-grade 89, and some may be able to use Regular, which is usually shown as 87 octane.
(b) If your Airhead had a stock 8.2 or 8.45 CR; you can use "regular" grade of gasoline, typically that is shown on USA pumps as 87 octane. You could also do OK on 85, shown on some high altitude pumps, when at high altitudes.
(c) If your Airhead has near 10:1, you need dual plugs and premium fuel, USA pump 91 is a MINIMUM.
I've been asked about how much lead (TEL) was used in the leaded car gasoline's we used to have, years ago. It was up to 2.4 grams per gallon. Aircraft piston engines had, generally, ~ twice that (or more). PRESENT day piston engine aircraft fuel is sold as "100LL", & has about 2.12 grams per gallon.
There is a considerable amount of information scattered throughout this article of mine, that covers leaded fuels:
https://bmwmotorcycletech.info/valves.htm
There is a good discussion of compression ratios, head milling, cylinder shaving, etc., here:
https://bmwmotorcycletech.info/dualplugging.htm
9. FITTING OTHER FUEL TANKS TO YOUR AIRHEAD. SEATS, SEAT HINGES, FROZEN SCREWS, RUSTED,....ETC.:
Often someone wants to install a fuel tank or seat or both that is/are not the original version. There is often confusion about what fits what, & what the problems are, if any, when fitting some other tank or seat.
There were a number of various /5 tanks; and there is a lot more to know about.....>>>see much further below.
Just before the disc brakes came out on the /6, BMW modified the underside of the fuel tanks to allow for the master cylinder (MC) that was coming. The 1973-1/2 (+-) tanks had the underside cutout for the MC, but the MC did not actually appear until the 1974 models. The first disc brakes were ATE swinging caliper brakes. There were two types of early brake calipers, the swinging type, and a later fixed type that looked somewhat like a Brembo, but with ATE printed on them. With the front Brembo (and earlier non-swinging ATE) brakes came the MC on the handlebars. The reason for the bars Master Cylinder is that in 1981 the metal pad under the fuel tank where the ATE MC had been mounted would be used for the ignition module for the upcoming electronic ignition (1981). Years later, the metal pad was no longer used, and the ignition with its heat sink was mounted to the right of the top frame tube.
It is common to swap various tanks and seats:
The /5 and /6 SEATS are LONGER than the /7 seats.
The /7 SEAT will be OK with a /5 or /6 tank.
The /7 tank can fit a /5 or /6, but modifications are needed, otherwise it is rather ugly. The /7 tank will fit on a /6. But, best to use a /7 seat. In general ...some tanks when substituted, depending on what tank, will require, or might be nice, to have a shorter or longer nose on the seat. The seats themselves may look similar at first glance, but may not be.
Because of these variables, frozen screws, etc., many converted the seat to a LIFT OFF style. Some did that because the seat would not open enough with a right side saddlebag fitted.
The /5 models and the /6 to 1976, had the seat pins on the subframe facing each other. You had to REMOVE one hinge to remove the seat. Be SURE to put anti-seize on the threads!
The 1977 /7 "U.S." seat pins faced in the SAME direction, and used CLIPS. /7 and later pins face the rear.
Subframes from the /7 will fit PRIOR long wheelbase bikes.
With minor work, you can interchange these seats: R100S, RS, RT, from 1977-1984; and R100 and R80, T, RT....from 1981-1984.
Seat dimensions: I have only one I've measurements for:
1977 R100/7: 29" front to rear; 12-1/4" widest point; 10" from front lip to seat post.
The later seats have the hinges welded to the steel pan. The early ones had screws, and you might have to unscrew them to get the seat on and off. Some early seats had the hinge portion screwed to the seat with allen screws, and if they rust, it can be difficult to remove them. This makes it hard to get the seat off the bike. There were some that used other screws, and they sometimes have to be drilled or ground with a rotary tool of some sort.
It is common for the area around the seat portion of the hinges to rust rot out, from moisture accumulation. This can be fixed by making up small flat plates in a U configuration, and having them welded to the seat bottom. This CAN be done with the upholstery intact, if wet cloths are used. It is a good idea to drill the recess area of these hinges, whether during welding repair...or stock....to allow any accumulated water to escape. Some seats have a rather pronounced area and act like a mini-reservoir for water. BE SURE to drill such areas to let water escape.
Use antiseize compound on seat screws.
TANKS:
There were a LOT of variables, and although this is not information pertinent to fitting them (note: all /5 tanks fit all /5) ...here are some details:
The standard capacity 6 gallon tanks had black knee pads.
In 1972 the Toaster tank was, however, standard for the U.S....withOUT pin striping.
Early in 1973 production there were not only the toaster chrome panels, but also pin stripes.
Rubber pads were available for the small tanks...AFTER the chrome panels were discontinued.
Authorities tanks (Police) look like the /6 tanks, with the rubber pads too....but the top has a lid.
/5 tanks have screwed-on Roundels.
1970-1971: a larger tank was available, and had either 6 or 6.3 gallons, the books are unclear as to official value. In 1972-3 this larger tank was no longer stock, but a special order. I think a few were produced that way for 1973.
1970-1971 fuel caps were hinged at the FRONT; 1972-3 caps were hinged at the REAR.
1973-1/2 (+-), had the underneath master cylinder cutout. The master cylinder came in the 1974 models.
Standard tanks had black knee pads.
1972: "Toaster" tanks were STANDARD for U.S. shipped bikes. They had NO pin striping, and this tank WAS available for 1973. The 1972 tank was about one gallon less capacity.
Early 1973 tanks had the chrome panels, but ADDED pin stripes, round the panels. There were rubber pads available for the small tanks after the chrome panels were discontinued.
GS or R100R tanks WILL fit a R80ST, will add 5 liters. A GS tank, used on a ST, needs rubber 16-11-2-307-014, plus fuel splitter and hose; ...or, block off one petcock outlet. With this arrangement of GS on ST, will be a small seat to tank gap.
R100GS tank WILL fit a R80G/S.
A PD tank adds 6 liters over stock.
The early R90S had a 24 liter tank, with a RAISED filler cap.
You can modify the later tanks with the flapper restrictors, to increase fuel capacity. Plug the crankcase downpipe in the starter motor area. You can remove all the solenoids, etc...too. Do it properly. See my pulse air article for details: https://bmwmotorcycletech.info/pulseair.htm
Don't depend on factory printed information on fuel tank capacity. Normally, when BMW published a fuel tank capacity, you add the tank & reserve amounts to get the total amounts. Unfortunately, the literature has gotten rather corrupted on gas tank volumes; and the corruption continued with the flapper-containing tanks.
Because BMW has a month-long vacation shutdown (the factory is closed in August), a year model could have been produced near the end of the prior calendar year, typically the next following CALENDAR year begins the PRIOR September.
10. Throttle ...and choke (enrichener) ...cables: This section is not concerned much about what cable fits what bike with what handlebars. See your Dealership, and, see Anton Largiader's website on CABLES. But, here is some information on LENGTHS, etc., that are not always easy to find. Lengths of BMW cables MIGHT be printed on the cable sheath. USUALLY the cable assembly part number IS printed on the cable sheath.
32-73-1-242-135 528 mm long, for 40 mm carbs.
32-73-1-454-584 1158 mm long.
32-73-1-454-090 1130 mm long, and is the left cable on such as a 1989 G100GS.
32-73-1-454-091 1165 mm long, and is the right cable on such as a 1989 G100GS.
32-73-2-311-827 1143 mm long, and is the left cable on such as a 91-95 R100PD using 40 mm carbs.
32-73-2-311-828 1178 mm long, and is the right cable on such as a 91-95 R100PD using 40 mm carbs.
See www.siebenrock.com
for more control cable information.
Here is an article that gets into the cables more in-depth: https://bmwmotorcycletech.info/controlcables.htm
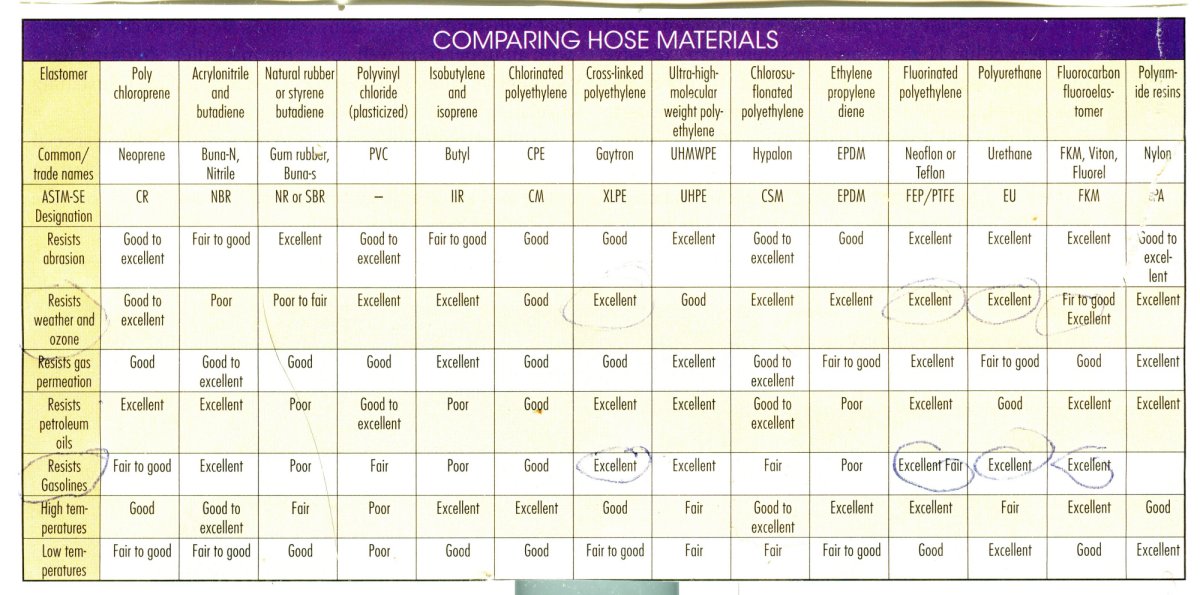
11. Fuel hose:
Fuel hose is made in many sizes. The basic size is the INSIDE diameter. For Airhead motorcycles, fuel hose is a 'nominal 6 mm' size. Some have used 5/16" & 1/4" SAE American sizes. OUTSIDE diameters vary! American (SAE type) O.D. hose may not fit easily or properly into the crossover area of the airbox, if you have a crossover hose.
Hoses vary greatly in materials & how constructed. The hose may remain on the spigot/nipple from friction of the nipple ridges against the mostly unchanged inside diameter. It may remain on from the nipple ridges & actually making very distinct depressions to match, on the inside of the hose. A fairly stiff hose material can get some goodly ridges, & need a lot of force to remove the hose unless, and even if, you pressure the end of the hose. You do not want to pull so hard on a hose that the petcock spigot breaks (that HAS happened, particularly to the plastic spigots). Some fuel hoses are made of two types of rubber in the same hose, with distinctly different characteristics. Some are cloth covered for a particular appearance.
Hoses made of the wrong material to match your gasoline may swell, & may come off, or eventually split. Many fuel hoses seem to harden, and possibly shrink, over time. Many hoses degrade/deteriorate and then "rubber" particles cause havoc at the float and float needle seat, or even the carburetor jets. Some hoses or tubing take many years to harden noticeably. I have done plenty of hose testing, including very long term testing submersed in a variety of fuels and solvents, and also had a number of people reporting to me about particular hoses and their experiences.
You can get away with most any fuel hose, for awhile. Just how long you want your fuel hoses to last or how long before 'rubber' hose's rubber particles start causing problems, or you have stiffness problems, or other deterioration ...and ....how original you want them to look, are things to consider. You should also consider if your selected hose is relatively easy to fit ...and remove.
Hoses should almost never be just 'pulled off'. They also should not be lubricated internally for easier fit and removal. The old fabric covered hoses ...and plenty of others ....were, and are ...made in several types; some would act like the Chinese finger torture toy ...if you pulled on them ..., it got tighter & tighter. Quite a few modern hoses are still like that, the hose tightens while pulling on it; until brute force pulls the hose off...or breaks/damages the nipple. The PROPER method of removing a hose is to have a tool on the petcock side (or, better said, at hose end of the hose), & push on the tool while gently pulling on the hose. That eliminates any severe tightening of the hose. Hint: put a large 'fender washer' on the spigot, before installing the hose. Then, when you want to remove the hose, you push on the fender washer while the hose pulling force needed is vastly less! If the hose is mightily stuck, CUT IT OFF ....rather than take a chance on snapping/breaking a plastic spigot/nipple. I do not recommend you install such a washer that has an overly large center hole, and/or that does not have the hose snug against it; because the washer could then vibrate. I have never seen a problem from any vibration myself, but, I'm adding this caution after a comment on the Airheads LIST on 06/03/2017. The comment was that a heavy metal washer could wear and weaken the spigot, plastic or metal. I have only seen faint polishing, if a washer was too loose. But, for extra caution, I advise using a thick large diameter fiber or plastic washer. Install BEFORE you push the hose over the spigot, of course!
The original silver colored braided outside fuel hose is still available, from such as Bing Agency in the U.S.
Würth makes a good fuel hose, seems to have a quite low inside deterioration; although, like all hoses, it won't last forever.
The new-style BMW black hose from your BMW dealership is a DIN specification hose, fits better, particularly the cross-over at the air-cleaner housing, where American hose is too large in diameter. A one meter length of BMW fuel hose is 13-11-1-338-115, and is 6 mm inside diameter and 11 mm outside diameter.
Some automotive parts stores do carry metric fuel hose.
Old Volkswagen beetles, etc., used a fuel hose that you may find and fit easily: It is a 7 mm ID hose (x 2.5 mm wall). It was used on 60's and 70's, etc., VW's. The VW number is N-203571; sometimes shown as N203571 or N-203 571.
You can still purchase GERMAN-made cloth covered fuel hose, which is of high quality, and seems to last at least two years with exposure to 'modern' rotgut gasolines (with oxidizers, alcohol, and other nasty ingredients). Change your hoses! Don't get the non-German cloth covered hoses!
There are problems with poor-quality, or better-said 'characteristics', of modern fuels.... & with many fuel hoses too. When fuel hoses deteriorate, they often release microscopic particles of various rubber, etc., into the fuel, & these can cause problems with the Airhead's carburetors. THIS INCLUDES overflow of the float bowls due to failure of the float needle & seat to fully shut off the fuel. It also includes blocking of idle jets, etc. These various problems have WORSENED over the years since ALCOHOLS have been put into fuels (and some of the nastier other stuff). It is not easy to find out what the INNARDS of the multiple layer fuel hoses are made of. For K bikes, the fuel pump & some immediate hoses, are all INSIDE the fuel tank, covered by fuel. That is an even worse situation; & SUBMERSIBLE RATED hoses are A MUST inside the fuel tank (besides the need for a FI pressure type specification).
In general, fuel hoses used to be made of nitrile rubbers, usually called NBR or acrylonitrile butadiene. These can soften & will deteriorate in the presence of alcohol. Another type of hose is EPDM, which is ethylene propylene diene monomer. That hose will not stand up to most gasoline's, over time. The best fuel hose for an Airhead used to be, but it certainly does not look original, a fluorohydrocarbon elastomer, (FKM), such as Dupont's VITON. It used to hold up for many dozens of years, & wouldn't harden appreciably. It came in various colors. I can no longer recommend that hose due to changes in composition of pump gasoline's. A hose material that did NOT pass my tests (various solvents, gasoline components, ETC. ...short term & long term) is Masterflex "FDA Viton" 96412-D.
So: what do you use for fuel hose for your Airhead?
Well, it is your choice. VW and Bing have near-original-look silvery braid looking hose, you may have to change it now and then. BMW has its black colored hose, it holds up fairly well. Würth has a good hose. VW dealerships may carry GERMAN-made cloth covered hose that looks like the original that came with your Airhead, and it holds up fairly well, and is not overly stiff like some imitation cloth covered hoses are.
The best fuel hose I have ever tested is real brand name Tygon type F-4040A. It is not pretty. In fact, it is ugly. Holds up to ALMOST everything & does not harden too much ....even after many years of use. For the nerdy here, its flexability is Shore A, 57. NOTE: I've seen TWO exceptions, and have no answers as to why one sample an owner sent me shrunk more than I had ever seen before, and it also discolored more.
http://www.mcmaster.com/#tygon-f-4040-a-tubing/=kh4623
There are other types of Tygon hoses. LP1100 is yellowish, has a fluoropolymer lining. LP1200 is clear and excellent. LP1500 is particularly flexible, and seems OK with gas-o-hol. LP1600 might be the best....but unsure, have not tested it.
Want to cover it with braid? http://www.mcmaster.com/#catalog/121/848/=10oyb2k
NOTE: My suspicion is that Fluorinated Ethylene Propylene, available in clear, would be the best for all gasoline's, and it is available from mcmaster. ONLY with that description would I recommend you try it.
Fuel hose for Fuel Injected bikes (K bikes) is special...see my K bike section of this website.
There are other hoses used with the fuel system, not used for fuel itself. One is the vent hose, a non-braided flexible hose. Comes in 1330 mm lengths (~52"), 6 mm ID, 9 MM OD, as number 16-13-2-307-010.
There is a 3-1/2 mm hose used for the vacuum system, 11-72-7-545-323.
See your on-line fiche for more details.
© Copyright 2023, R. Fleischer
Return to Technical Articles LIST Page
Last check/edit: Thursday, May 11, 2023