
|
|
Fuel caps
For BMW Airhead ....and Classic K Motorcycles
(K1, K75, K100, K1100 ....)
© Copyright 2020, R. Fleischer
See article 75A on later luggage, etc., style locks used on the Airheads, but not ignition or fuel cap; from ~1989.
WARNING! ....BMW SCREW CAPS SHOULD NOT BE USED LIKE CAR CAPS!
AVOID spinning these motorcycle caps to the ratcheting point when tightening them! The ratcheting parts WILL wear out, and WILL cause you problems in trying to remove the cap!
BMW Airhead fuel caps are not constructed like car caps. On most modern car fuel caps, the cap is designed to be rotated to the ratcheting point. That is done because the car caps must seal fully a complicated fuel fumes collecting & venting system; if a car cap is not rotated enough, the cap can leak fumes, which will likely be detected by the car's computer monitoring system, and a "Check Engine" light will illuminate on the car's dashboard. On our Airhead BMW's, the early caps for the earliest Airheads, simply designed to keep liquid fuel from sloshing out, and, perhaps to provide a very small amount of air, through a tiny hole perhaps, to the inside of the fuel tank, to replace a vacuum that would otherwise exist, as fuel was used-up. The vent on many caps would also relieve excessive pressure as the fuel heated up by such as parking the motorcycle in the hot sun. Later models had cap vents and simple venting to improve crankcase-fumes-holding. The last versions had more complicated caps, called a SHED cap, but it is best not to rotate them to the ratcheting position; even though that is often done by those locking their caps. Much more on these various caps with the ratcheting mechanisms further down this article!
Fuel caps and venting methods for the BMW fuel tanks vary by year & model. For information on the Pulse-Air system, the fuel tank venting system, & other associated items, please read: https://bmwmotorcycletech.info/pulseair.htm See that article for removal of some items, fixing insufficient tank capacity modification, ETC!
It is common to hear about an Airhead "running out of fuel"....stumbling, loses power, etc. The problem will often be the tank vent ...or the fuel cap. Both problems are provable by loosening the fuel cap and usually hearing a whoosh of air entering ...but, within 15 seconds, the motorcycle then runs OK. Stumbling from this problem usually happens much more quickly with a more-filled tank and faster yet when using a lot of fuel, such as from high speeds.
There can be other types of problems, such as fuel leaks at the caps, etc.
This comprehensive article, below, deals with fuel cap problems, including the lock.
FYI: Fuel cap cork seals are replaceable. So is the black surround on the later caps.
From the /7 onwards, BMW changed to a screwable, removable, fuel cap. There were changes further on too...so all are not the same, even if they look to be so! My coverage here is general, for USA caps, but most of the information applies to foreign-shipped fuel caps too. The caps with the BMW emblem on top may not be the same internally, which affects how you go about drilling, locking, etc. Late model caps that are used with the crankcase fumes capture system, have SHED stamped into the bottom.
The late 1977-1978 (probably some into 1979) gas caps are changed in design; they allow air to pass to the inside of the tank, but fumes are not supposed to pass to the outside of the tank. To accomplish this, there are two valves built into the cap. These 2 or 3 years of caps are fairly well known to sometimes have problems. Usually the problem is exclusively that of not allowing outside air into the tank as the fuel level goes down, creating a very slight vacuum in the tank. The symptom of this particular venting problem is that the bike starts running very lean, may buck and run out of fuel. This typically happens after some time on the highway, the time can be shorter if the tank was rather full to start with & if large amounts of throttle are being used.
On almost all BMW caps, opening the cap (unscrewing it a bit or otherwise opening a cap, such as a flip cap) will 'fix' the fuel flow problem within 10 to 15 seconds, and this 'test' is nearly 100% for a bad cap vent (early models, flip caps or screw caps; and, all later screw caps).
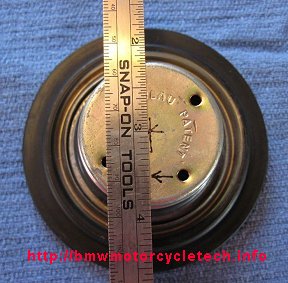
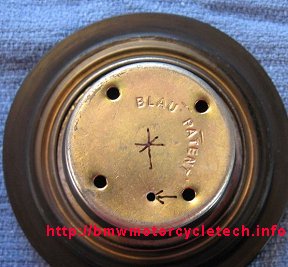
Another problem, one that was also addressed by a SI from BMW, is that in extremely hot weather the cap venting may be inadequate. A 5th hole was added to the cap, see sketches below. That 5th hole was added in production after certain bike serial numbers. The EARLY SCREW CAPS can be modified to fix the problem permanently. Put it upside down on your workbench. Drill AWAY from the center, any direction, about 1/2" from the center. Thus the hole you will drill is off-center. Drill, 3/32", from the bottom of the cap, through the metal shell & continue drilling carefully ....go through the air space, and drill into the softer material that you then feel you are drilling through ....it is maybe 1/8" thick. Drill through it, & then stop drilling. Clean out the cap as best you can of drilling swarf. Install the cap on the tank. That's all there is to this.
Because some will definitely have trouble identifying the particular SCREW cap since they look so much alike, I offer the following. Note that Oak uses different dimensions on this than I do. His description is a bit different also. Oak says to mark the center, as I do. Then he says to use ~1/16" drill bit, and drill at a point 5/16" outwards from the center, anywhere's on the bottom. So, it looks like my sketch, below, just not drilled so far outwards. Oak gives the following instructions: Lightly centerpunch the spot, then drill carefully through the metal bottom. He notes that the drill will go further into an empty space internally within the cap, then strikes another object inside the cap. That is the lock and vent area. It is plastic. Drill further into that, CAREFULLY, until you feel the drill has gone through the next internal plastic layer (about 1/8"). THEN STOP.
Although the above methods will work, the official factory method is more detailed. The method used by the factory, & for the upgraded caps, is to locate the center (with reference to the 4 existing holes, that is) similar as in the sketches below, but the hole is drilled IN THE CENTER, where the photos show the cross marks. BMW specifies the hole as 1 mm in size, and that EXACTLY a depth of 22 mm, and NO MORE, is to be drilled (to avoid the key lock). 1 mm is a bit larger than 1/32". You can use any size drill near to 1 mm. DO hold to the 22 mm depth, which is 0.866".
No matter which procedure, blow out the cap with compressed air and maybe a solvent. The original key will still work.
The two photos below are of the early 4 hole caps!
On the last of the Airheads screw caps (and on the K bikes, which don't remove by unscrewing, but flip up/down), the fuel caps are different. They now have a new type of venting system for the fuel tank. The Airheads type now vents via electrically controlled valves located on the inside of the starter motor cover, sending the tank fumes to the crankcase for storage. Both the Airheads and the K caps now have both a pressure & vacuum release built-in. See: https://bmwmotorcycletech.info/pulseair.htm, and the article you are reading. The later caps are drilled on center, through TWO layers of metal, with a very small drill (1 mm is OK). See a few paragraphs downwards for the SHED cap.
UNable to unscrew your Airhead cap...it just rototes? The ratchet has failed. Problems are similar with all Airhead SCREW caps. See later in this article.
Rubber seal for the screw-in gas caps: This is NOT the black trim ring, but the SEAL, originally RED (which broke after awhile). The updated seal is 51-25-1-453-148. The black trim ring is 16-11-2-307-360. This is NOT a seal, but a trim piece, and it also helps keep rain from getting into the 'shelf' of the tank under the cap (where a drain hole is).
If you are having venting problems caused by a faulty fuel cap on one of the later Airheads that has the SHED system (solenoid valves in the starter compartment, connected to the fuel tank, etc); then, since the caps are $$$$ for the SHED type, and $$$ for the non-SHED type, you might consider the following, posted by Tom Cutter on the Airheads LIST on August 26, 2013. You will find that this information is, strangely (???), similar to what I have had well above for a long time, but, it's another opinion, too, eh?
"......take off the SHED cap, put it upside down on the table and locate the center of the cap (you are looking at the underneath side). Drill a 1 mm hole in the steel cap. Push the drill bit down about 1.5" until you hit metal again, carefully drill through THAT metal and stop. Voila! Instant non-shed cap. Never have another tank vent problem. Tom Cutter, Yardley, PA www.RubberChickenRacingGarage.com
If you drill the bottom of either the old style screw cap or the later SHED-market screw cap, DO NOT over-fill the fuel tank. Filling to about half-way ...maybe somewhat more, ...up the filler pipe area, ...is OK, as it leaves a bit of air space for fuel expansion and fumes collection, such as when the tank is in the hot sun. Very little extra fuel can be put into the tank above that point. If you want to measure it, ~1/2" of free area will be enough for even extreme conditions.
If you regularly tighten the Airheads cap well into the ratcheting point, you will, or at least may, eventually strip the ratcheting parts and have difficulty, sometimes a lot of difficulty, in removing the cap; although if you JUST tighten to the FIRST ratchet, that may never happen. I understand you may want the cap locked. If you insist, then tighten them to just one ratchet. The BMW ratcheting gas caps will usually wear out and cause you problems if you insist on ratcheting them a lot, particularly by spinning them on, with quite a few ratchet sounds. The plastic pin jumps into and out of 4 holes when you do that, and wears it badly. If you wear the ratcheting mechanism enough, and THIS IS COMMON, the cap may then seem totally non-removable, & just spins in place. There are several methods of removing the caps when you have that problem:
1. ANY of these caps can be DRILLED downwards through the TOP, and then you lock the top and bottom sections together with some sort of 'tool'. This drilling can be done with a 1/8" drill, and you then use a long shank with rim from a 1/8" pop rivet ...or, even a nail. If you drill in the handle area, or at the hinge area, the drilled area will not be seen, and the cap can be left that way, ...the biggest problem is that the lock won't work in the future. You can drill (NO electrical sparks, please!) through the LOGO if the cap has one, or, under the handle or hinge area. About 7/8" ...or 15/16" ...from the center of the cap is about the right distance. You can drill under the wide area of the handle, and countersink the drilled area, and use a long countersunk head screw as the method of locking the top and bottom of the cap together. If you drill the cap downward, through the top, into the metal, through the open space, and down through the lower metal, you will need a several inch long drill bit. My suggestion is that you drill the cap with a drill size that fits a nice convenient nail, and you can use the nail permanently in the cap, or use it as a new type of cap key!! A screw can also be used, you can even put a thread or two in the cap.
This is NOT the drilling method shown earlier, used for venting problems on the earliest and latest of these caps.
2. If your cap has the BMW LOGO, and you do NOT want to drill it, you can grab the plastic skirt with pliers, and slowly pull it sideways away from the cover .....keep pulling (it stretches), until clear of the cap; then lift and pull until it comes off. You will now see that in the groove that this plastic skirt fit into, there are THREE holes, 120° apart. Take a nail or piece of broken coat hangar wire, etc., and insert a bent tip end of that into one of the holes, and lift on the cap cover, whilst gently turning it and pushing the wire inwards. You are 'feeling' for a dimpled area, and when found, you have the parts temporarily locked, and can UNscrew the cap.
3. If your cap does NOT have the LOGO, and you do not want to drill it, the body ridge snaps into a cover groove, and you might try pulling the cover off the body.
4. Another method of getting the cap to unscrew, is to wrap a very strong belt or rope around your waist, through the cap handle, and stand on the pegs; and, holding with a moderately strong upward force, try to unscrew the cap. Don't go too strongly on this, unless your purpose is to try to break off the top portion, not just unscrew the cap. I suggest that you use only a moderate amount of force ...thus you will also protect the tank from bending. With the LOGO cap, the cap cover has a rolled metal edge, is very strong, and you might bend the tank before the cap pops off (that happens under extreme force), so do not overdo it.
5. If you can get the cap off without drilling from the top, then there is another method to use. Drill a hole, through the SECOND metal layer. That means you drill through FROM the bottom of the cap, and continue until you drill through the next layer. The size of that hole is unimportant ....well, relatively. Hole of about 3/32" is OK, although smaller will also work. You can now lock the sections together with an appropriate rod, screw, etc., and you have not drilled to or from the top of the cap.6. Here is a hyperlink to Anton Largiader's website article on the caps; read it to further your knowledge & understanding: http://largiader.com/articles/gascap/
NOTE: The information is rather limited. For a fuller treatment, with photos, see the BMW Riders Association publication called On The Level (OTL), dated April 2006. That has an article by Anton Largiarder that is quite informative on the later screw caps ....including information on changing the locks, etc.
The 1977+ Airheads fuel caps (these are the ones that screw into the tank) create lots of questions at times. Here is some information, but you may well have to ask your local BMW dealer about the present status of these items. You may need to find a parts-person willing to spend the time with you on this, particularly if you want to order a cap with a key that matches your other bike keys. It is possible, sometimes, to carefully remove the old lock cylinder by drilling it out and removing the bits. This has been done in various ways, including doing it mostly downwards, then adding a sheet metal screw and prying the lock upwards.
Usually, folks want their 'new' cap to have the same key as their ignition/bags key. This can't be done on early caps by the normal means of re-keying as done with the bags, as the fuel cap lock is a plastic affair. I would not be surprised if BMW changes the design so it CAN be rekeyed by the normal method of taping the body (keep pins and springs from flying), inserting OLD key instead of the new key, and filing down the protruding pins (NOT the last, END, locking pin!)....then inserting the lock unit.
For the cap with a LOGO, the cover is held to the body by a crimped lip ...you can undo that crimp, remove the body, and with a new cap, pry the body out of the cover, and extract the plastic lock cylinder assembly. By thinking this over, you can see that you can transfer an old lock cylinder to a new cap. When a key is in the lock, and turned, you can see a small release point in a small opening in the plastic. PUSH that part inwards with a tiny tool, and then you can withdraw the key lock assembly! If the key lock assembly is not broken, cracked, etc., you can clean it, lube it with some light grease, and insert it into your NEW cap, by aligning it and pushing it into the cap ....you MIGHT need to turn the cap via a bit of force, to push it all together ....to allow the lock to fully install. Once installed, it is permanent.
Some fuel systems have smog/vapor 'enhancements'. Some remove the vapor items entirely, and plug the vertical pipe in the starter motor area. Some remove the tank flapper valve, some remove all the solenoids, etc. Your choice. The caps for that system are different ....and say SHED247. Do not use the wrong cap, unless plugging.
The black standard cap is 51-25-2-307-125.
The plastic trim ring is not included with caps, and is 16-11-2-307-360.
The standard cap with a lock and a key is 51-25-2-307-168.
SHED caps are available in both black & chrome. The black one is 51-25-2-307-140; & the chrome one is 51-25-2-316-185. They are costly (except the ring).
A new lock cylinder is 51-25-307-166. The key will not fit your other locks. The original keys for the motorcycle included stamping of a number on the knock-out part of the key; and also a small tag came with the keys, with a number on it. If you supply the number to the dealer, he MAY be able to order a custom-keyed cap for you. I say MAY, because you need a knowledgeable parts person; AND, this number may no longer be available from BMW. Custom keyed cap: 51-25-2-307-173. A new cap with new cylinder and 2 keys (obviously not keys that match your other bike keys) is 51-25-2-307-168. Caps without lock cylinders are no longer available; unless a dealer happens to have one.
Because the cap internal plastic pins wear from ratcheting use, I do NOT recommend trying to re-key an old cap. I would ONLY get a brand new custom keyed cap, which will take time to order and get it, or just get a new cap with whatever lock and keys it comes with. Custom caps used to cost the same as a cap with lock that had no common keys to what you already have. There is also the transferring of the old lock, you can also consider that, but consider the details.
This was the information on removing the lock, and this is verbatim:
a. Remove the rubber splash ring from the cap. Using a hacksaw, placed in the groove for the splash ring, saw off the top of the cap. During this cut, the cap must be rotated so that the hacksaw blade does not cut into the lock.
b. Once the top is removed, the lock movement, complete with the installed lock cylinder, can now easily be removed from the housing.
c. The lock cylinder is now removed from the lock movement by depressing the locking tumbler pin and simultaneously pulling out on the lock cylinder. The locking tumbler pin is visible through the slot found midway down the body of the lock movement, with the lock turned to either stop, and can be depressed with a paper clip or other suitable tool.
d. The lock cylinder can now be installed into the new cap by aligning the locking tumbler pin with the ramp in the lock movement and pushing the lock cylinder fully into the lock movement.
The second bulletin is dated June 1986, 16-012-86 (2212), it is from BMWNA, and entitled 'Matching New Fuel Cap Locks to Existing Keys. It is THIS bulletin that REALLY confuses the issue (about how to remove, intact, an existing lock cylinder), due to the wording of the initial paragraph: "In many cases, a dealer will find it necessary to replace the lock cylinder in a fuel cap due to shortage or failure of the original fuel cap/lock cylinder. In these cases, it is possible to retain the one-key locking system by RECODING A NEW LOCK CYLINDER AT YOUR DEALERSHIP". You could be confused if you read this the wrong way. It is not REALLY saying that one removes the OLD lock cylinder intact, ...OR...that one places the the NEW lock cylinder in a new cap by using your original key.
I will quote, verbatim, the entire pertinent part of the rest of this bulletin:
"Purchase the appropriate uncoded lock cylinder by ordering:
Boxers (all) 51-25-1-243-797
K's (all) 51-25-1-455-109
This lock cylinder accepts the standard ignition key used on all BMW motorcycle models since 1974.
Install your original ignition key into the new lock cylinder. Observe the brass blades (tumblers) that protrude above the surface of the cylinder. With the key inserted into the new lock cylinder, grind or sand the brass blades down until they are smooth with the outside contour of the cylinder.
IMPORTANT: Do not disturb the last blade located at the bottom of the cylinder. This blade secures the lock cylinder into the fuel cap. When sanding the blades, hold this one down to protect it. Remove any burrs if necessary, lubricate with an aerosol lubricant and clean with a jet of compressed air. Install the newly recoded cylinder into the replacement fuel cap.
"
No...we are NOT YET done with the locks and caps fun and games and various bits of information ....more follows, below.
A message from Airhead Guru O. Okleshen, aka OAK, was published to the Airheads LIST on 08/03/2003. I am reprinting it without editing:
The gas cap lock mystery has been reasonably solved with some hard core digging in the archives. Here is the way it sits at present:
If you have a gas cap (77/later models with screw in flush cap) that is ruined in terms of corrosion, damage to the cap proper or its locking mechanism etc, and would likely involve needing a new cap, there are several options:
If you have the key code from your original key (stamped on the key), you can order a new cap from your dealer that will fit your key but you must supply the key code number when ordering. The older keys had the number stamped on the key. Some of the newer keys had a knockout with the number on it. If you kept the knockout or its number in a safe place and still have it, you are in business. The part number for the custom keyed cap is 51-25-2-307-173 and seems still available to date. Cost is about 50 dollars.
If you do NOT have a key code and want a new cap with a new key (that will not match the rest of the locks), the part number for the cap with new key is 51-25-2-307-168. Cost is about 50 dollars.
NOTE: There is sometimes confusion over what is what with the caps and parts. The above -168 number is a locking cap, with 2 keys, for 1977+ bikes, it is round, and it will click if turned far enough. Early gas caps had a metal top. The 1977 had a RECESSED lock, while the 1978 and later had a FLUSH lock. Later caps were plastic. The early caps had the rubber dust ring, later were plastic. Caps were available with custom keying, from YOUR key number. That cap/order number was 51-25-2-307-173. For the lock cylinder part only, it is 1-25-2-307-166.
If you can carefully drill out the tumbler cylinder without damaging the lock interior, you can order a new lock cylinder with a new coded key that will NOT operate the rest of the locks as part number 51-25-2-307-166. Cost is about 30 dollars. There is no official known way to otherwise remove the original lock tumbler except by carefully drilling and nibbling away from the top of the cap. Procedure to the best of knowledge was never published and the Motobins procedure previously discussed hadn't been successful and if "force" tried as they suggest is likely to end up with a permanently damaged unusable cap.
At one time there was a new cap available with no cylinder and a blank "stretch socks" cylinder that could be surgeried by the local dealer to fit your existing key, coded or not. But according to the latest records that part is no longer available (since at least 1995) and if available would be old stocks on the dealer shelf. You would have to inquire. Cost for that part circa 1995 was about 18 dollars.
The most sensible approach if your cap and lock is in trouble is to order the cap with a factory tuned lock cylinder to match your key code (first option listed.) That way you get an all new replacement cap and is operable with your existing key and matches your remaining locks. You may have to wait for the cap as a special order. May take a month or so.
This is a somewhat complex issue and if you make a move, measure twice and cut once. The parts and availability as well as the price are certainly subject to change. You might run into a counter parts man who is not adept at this level of intelligence need so be patient in dealing with him and if it gets too heavy try another dealer.
Hope that helps clarify the mysteries about the elusive gas cap..........Oak--ABC #35......
If the key is broken off, you may be able to remove it, using small tools like a thin needle-nose pliers. If the mechanism is fully frozen, you need to drill the lock, or have a locksmith remove it ...or, read on, for MY method. The K fuel cap is quite different from the problems of the Airheads later type caps.
The Classic K fuel cap key mechanism is one in which a metal tab (that locks the cap to the tank), is moved inwards, when the key is turned in the proper direction. This tab, as you may suspect, moves in and out horizontally. There is a way I have done it, that will allow the cap to be opened whether or not a key is broken off. First, note where the hinge is. Directly opposite the hinge, on the other side of the cap, is a depression in the edge of the cap, which is for your fingers to grab if the cap does not spring slightly open when the normal use of the key is accomplished. Locate the center of that finger opening, as far as around the cap circumference is concerned. At that point, make a mark 7/16" towards the cap center.
Drill that mark down into the cap with a ¼" drill. Best to start with a smaller drill. Do not drill too far. What you are doing is making a hole that is just a wee bit to the outside of where that movable internal tab is. Manipulate the tab inwards, while you put mild pressure on the cap, downwards, so the tab moves more easily. The cap will open. There is another way to accomplish this, and that is to, at the same outer circumference EDGE point, Dremel away the EDGE of the cap, for maybe 1/8" or so. This is right next to the tank, so be careful. You can now stick a common nail sideways into that place and push the tab inwards, at which point the cap will open.
Return to Technical Articles List Page
Last check/edit: Friday, February 19, 2021