|
|
The advertisements above, are Google-sponsored.
These support the testing I do. ..AND...thank you for
clicking on them, and, your donations! The donating
article explains, in-depth, this
website's history,
philosophy, and operation.
The EZS steering damper
(Possibly useful information for both EZS & EML sidecar owners)
https://bmwmotorcycletech.info/ezs-steering-damper.htm
sidecar section, article #SC11
© Copyright 2020, R. Fleischer
NOTE: See both articles 54-8A and SC2 for steering dampeners and shock absorber units that cover sidecar usages in depth!
The purpose of a steering damper on a sidecar rig is to eliminate, or nearly so, any steering oscillations, usually initiated/caused by road irregularities. This oscillation effect, very common to sidecar rigs, particularly without dampers, is due to the reduced trail and/or effects of the sidecar loading, & occurs at rather low speeds, no greater than 40 mph, & usually considerably lower, from, perhaps, 8 to 20 mph. The effect has been likened to a supermarket shopping cart where the wheels might suddenly oscillate, fast and even furiously.
If excessive damping is used, the steering will be heavy, requiring more force, which is tiring to the driver. The steering will also have less of the desirable good tendency to return to straight ahead, more or less. The amount of this is a variable depending on how the rig was designed & aligned. Never use more steering damper than is required to just eliminate most, but perhaps not all, of any oscillation effect or tendency. In some instances, the stock steering damper than came with the motorcycle (many have none) may work. Some old bikes came with friction dampers instead of the more modern hydraulic cylinder types. The friction dampers have slightly better characteristics for sidecaring use, and last nearly forever. They can also have extra friction and metal discs added, if more effect is not available as standard.
If you decide to purchase and install a hydraulic steering damper, do not get one that requires excessive force to move the rod/piston. If that is excessive, you will likely not find a stroke adjustment that will work well. See next paragraph.
In many instances, you can mount the damper in such a way that you can adjust the stroke distance per unit of steering movement. Use the minimum damper rod movement that does the required job. I have photographs of the VW type of steering damper that I used on my BMW Airhead (R100RT) Ural chair rig, on this site; ....I made the stroke length adjustable, by using several mounting holes at various distances from the fork, so I could select the stroke I wanted ....as the amount of stroke needed varies with the type of tire! Flatter tread tires require less stroke, that is, less shock rod/piston movement, per steering input amount. The VW steering dampers are inexpensive, very commonly available with a variety of ends. Some think them as having way too much dampening, but the truth is that the stroke amount needs to be adjustable in your design so you can minimize it. That, in effect, adds 'gearing'.
For photos of my adjustable mounts & more discussion on dampers for use with sidecars, see the following article, and scan down half way to the section on steering dampers: https://bmwmotorcycletech.info/sidecartech.htm"
The primary problem I personally had with my second street rig, a K1100LT-EZS-EML rig (EML sidecar attached to motorcycle with EZS sidecar conversion to the TUG ...front end and wheels, brakes, etc.) was that the EZS damper was leaking at its rubber sleeve area, which was starting to create a dead zone in the shock absorber's action. A secondary problem was its excessive damping. This rig has automobile tires, which, in themselves, require less steering dampening than motorcycle tires, due to the auto tires having more rubber contacting the road. AFAIK, the EZS damper was designed for an EZS sidecar rig with car type tires, and note that on my rig the wheels are EZS, the front forks are EZS, the dampener is EZS. Still, the EZS damper was too strong. I actually removed it, and tested the rig without any damper, and it was nearly acceptable under even severe conditions. One conclusion I tentatively made was that the EZS damper might well work fine, if its oil was changed to a much lighter viscosity.
The EZS steering damper is a bit unusual in that it has a rubber sleeve acting as a bellows that fits over the shock absorber at one end, and the bellows fills and empties oil from and into the shock absorber. The rubber sleeve bellows tends to crack from age & sun exposure. It will then leak oil. You will need Oetiker clamp pliers & the two Oetiker clamps to install it, although sturdy nylon zips will work OK (but can bunch up causing leaks).
After contacting Pete Larsen (Liberty Motors, EZS sidecars USA) about this item, he referred me to EZS in Holland. The factory, at first, wanted me to return the entire shock damper unit to them in Holland, for overhaul or exchange! The cost was 152 Euros & 35 Euros for shipping. Keep in mind this was some years ago, when the Euro had a lot more value compared to the U.S. Dollar, so the cost was high. A new damper, no exchange, was 195 Euros, and the same 35 Euros for shipping! After several communications, not altogether satisfactory due to the language & interpretation problems with the EZS factory, I determined that the rubber sleeve was priced, in October 2008, at 16.75 Euros, plus 9.00 Euros for shipping. They could not accept any form of payment but Wire Transfers. The cheapest Wire Transfer I found at any commercial bank at the time was $30.00. This brings the total price to a ridiculous amount, not to mention the cost of the part which was high, in my estimation.
I was not going for any of this. I could easily modify an inexpensive damper, such as the VW style. I decided to first try to fix this EZS damper.
The rubber sleeve covers two small ports (holes) in the metal body. These two shock holes allow the bleed of air/fluid into the bellows and can not be plugged (I did experiment; and performance was not good enough). The rubber expands & contracts only modestly during operation of the dampener, even over large strokes. The rubber is used as a mild bellows, although there are no folds, curves, etc. Very little fluid nor air is ever in the stock bellows. Too bad the shock did not have a larger metal area at one end, but that would have run its cost to manufactur up considerably.
A garden hose section was considered, but I would need one with the proper inside diameter. I could possibly stretch a 1" I.D. type to fit, but it would not have much bellows action, so that idea was rejected.
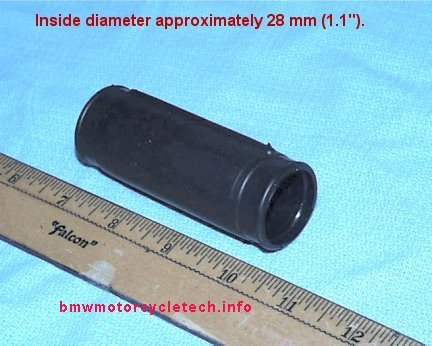
The shock absorber body tube outside diameter measured 28 mm (1.10").
Below are photos of the stock shock with the stock rubber bellows:
|
|
|
|
Stock rubber bellows |
Stock rubber bellows, up-close |
Note that just inside the end is a ridge of rubber, that fits into a groove on the shock absorber body, providing a decent oil seal. The substitute (bellows) I used does not have that ridge, yet there were no leaks, after thousands of miles in using the substitute bellows. Should there be leaks in the future, it is likely going to be from the zip ties I used, & if that happens I may look for a narrow metal adjustable band-clamp, such as an Oetiker type.
During my search for an acceptable rubber part, suggestions made to me included the possibility that some existing motorcycle damper may have a similar rubber part. I visited several motorcycle stores, & the parts men did not recognize the part. A messy looking substitute that I did not try was a hub coupling as used with piping. There is also a plumbing shop item called a Dressler fitting, but the size was wrong, & the look horrible.
In my older McMaster-Carr (www.mcmaster.com) catalog, I found a rubber bellows used for 'small U-joints', as item 94205K67 on page 3673. That catalog page number is probably obsolete now, but the item number may be good. That item looked promising. The size was 1.79" long & 2.03" O.D.; the inside diameter is 1.12"....very close to the shock diameter. There is no internal ridge as noted a few paragraphs above, but I thought it was worth a try. This rubber bellows is actually a product of the Lovejoy company, 2655 Wisconsin Avenue, Downers Grove, IL 60515. It is sold to McMaster Carr as "D8 upper boot w/ties". I ordered one of these. In October 2008, the cost was $13.66 plus shipping.
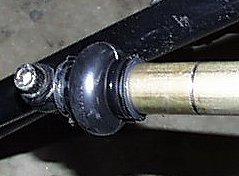
Photo of the new bellows as installed:
To install it I first removed the original Oetiker clamps & old sleeve. I held the shock with the ports downward, & manipulated the shock rod in and out until the shock was totally emptied of fluid.
I then carefully clamped the shock in soft vice jaws (I made dual curved wood pieces), with the ports end upwards.
I did some research on the needed oil, because I knew that an exceptionally low viscosity oil was going to be needed to even slightly reduce the shock absorber action, as I wanted. I am comfortable in recommending the following oils. I doubt that any installation, even with motorcycle tires and not car tires (mine are car tires, requiring less dampener action) would require the original slightly heavier oil. I test rode my rig without the damper. The damper is barely needed, so I wanted a very light oil, preferably thinner than stock as shipped with the damper. I could not find any oils lighter than the ones below, and the ones below are OK, & similar to the stock oil, maybe a small amount lighter. The viscosity index of the Belray is lower than the others, this is OK for this application, as the damper does not get hot.
Spectro SX400 (order number O.SXSF) Shock & Fork oil, 2.5W. 16 ounce size (1 pint) was lots more than needed. Specification: 10.9 Cst @ 40°C, 1.9 Cst @100°C.
Golden Spectro ULTRAlight shock fluid (order number L.SFUL). Specification is 10.4 Cst @ 40°C, 4.4 Cst @ 100°C. Compared to the above SX400, this oil would have a higher viscosity, compared to the O.SXSF, as temperature rose (in the shock from lots of bumpy roads, and atmospheric temperature increase). That effect would have been nearly unnoticeable.
BelRay Fork oil 2.5W. specification: 9.2 Cst @40°C, 1.9 Cst @ 100°C. This oil is almost the same as the SX400, and if you prefer the BelRay brand, I do suggest you use this one.
Needed is ~ 100 cc of fluid, to fill the dampener. You will need an additional small amount to add to the bladder (rubber bellows). A total of ~ 132 cc will be needed. You do not have to fully fill the bellows, not at all. To fill the shock I used a hypodermic of 20 cc, with a long non-sharp needle.
You may want to obtain Oetiker clamps and the Oetiker clamp tool for this bellows, as these clamps work better than the zip ties I used.
How to fill the shock:
Start slowly injecting fluid while you lower the rod a little bit at a time. You can tape over one of the holes if this is helpful for you to avoid spillage ...I simply used my finger.
When the rod is fully down wait a minute, then very slowly raise the rod again. When oil just barely starts to come out the hole(s), then repeat the process. Repeat until you cannot add any more. The process of installing fluid will cause aeration & microscopic bubbles. You may have to set the rod in some position & let it sit overnight. I did the filling over several days & nights. I preferred to do it this way rather than the 'bucket of fluid & suck the stuff in' method, which aerates the fluid badly.
Once the shock is filled, you can hold your fingers over the two ports using some pressure & see if the shock works well over the entire range of rod travel, without any dead spots. Finish this portion of the filling with the shock itself only filled, & the rod fully out. Try to put more fluid in if you can.
NEXT TO DO:
Keep the shock vertical, ports upwards. I suggest mounting the other end in soft jaws of your bench vice. Clean the shock body very carefully. Get every bit of oily fluid off of it. Use a good solvent that evaporates to very dry. Wipe the inside of the new bellows with solvent. This is particularly so where the new bellows will fit to the shock body. Let that solvent also evaporate. Install the bellows over the shock eye, & position the bellows. The bellows comes with two kind of narrow zip nylon ties; which are OK. I used stronger slightly wider ones from my shop. Oetiker clamps would be best. Fasten the lower only zip tie (or, Oetiker) as tight as you can without busting it. Be sure the top of the bellows is even with the top of the shock body. If using Zip ties, do clean up sharp edges after you cut the excessive length.Using the hypo again, add about 10 or 15 cc more oil, sliding the blunted needle down between the bellows top & the shock body. Try not to get the top of the bellows oily, nor the body, where the final zip tie will be put.
Note, in case you have not read the above carefully, the bellows is only zip-tied at one end to the shock body at this point ...so don't try to overfill or oil-pressurize the bellows ...a totally unnecessary thing to do.
Now add the zip tie at the other end (an Oetiker clamp is better!). Tighten quite securely, snip excess, clean up sharp edges. Wipe the area with a rag that has some evaporating solvent on it.
Operate the shock, with the bellows both upwards and downwards this time. The shock should not leak oil & should provide good action over any portion of rod travel. The bellows may expand and contract as you test the shock.
Re-clean the bellows at both ends ...I used a strong spray solvent. I then used black RTV to seal the bellows ends to the body. This was strictly an idea to add some additional oil sealing. Probably was not needed, and probably RTV was the wrong sealant anyway.
I installed the shock & adjusted the mounts slightly so the steering could be moved through its entire range without binding the shock ends (no Heim joint is needed on this installation).
Time will tell ....but no leaks, not even any weeping, ....many years later.
Note: this bellows can hold lots more oil than the stock sleeve.
© Copyright 2020, R. Fleischer
Return to Technical Index page
Last check/edit: Monday, December 07, 2020