
|
|
This R100RT-Ural sidecar rig was sold quite some time ago.
This article is for reference purposes for those who were or are
interested in how I built this sidecar rig ... in case they want to
build a similar rig, ...or are just curious.
There is additional information on how/what/why, in these two articles:
https://bmwmotorcycletech.info/sidecartech.htm
https://bmwmotorcycletech.info/misclsidecartech.htm
https://bmwmotorcycletech.info/RigSale.htm
Sidecar section of Technical Index, item SC12
© Copyright 2023, R. Fleischer
I purchased the tug, a 1983 R100RT, brand-new in early 1985; it was a dealer showroom leftover. The sidecar is a 2002 model URAL which I purchased brand-new.
This sidecar rig had a top speed of ~90, but I only once drove it that fast. It would comfortably tour at highway speeds. I liked to cruise it about 55-65, as that was the most comfortable area on most highways, for me on that rig. No matter what rig I'd be on, 55-75 will likely be the more comfortable area for me for touring. I have done a tour 'in a hurry', and held higher speeds, and my rigs do fine, but I don't like rushing, preferring to see the scenery. The fuel mileage on any sidecar rig is atrocious at higher speeds anyway, and there is no sense in working the Airhead engine that hard (although my K1100 rig doesn't work as hard at those speeds).
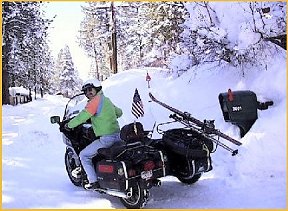
This BMW-Ural rig was WELL-SORTED-OUT, and VERY sturdily built by me. Tire wear is good. If you are not aware of the matter of sidecar tire wear (all regular type of sidecar rigs), the sidecar wheel hardly wears, the front wears slowly, but the rear tire wears moderately fast. Due to my careful design and sorting-out, handling was quite good. It has BMW snowflake wheels on the tug, and uses motorcycle and/or sidecar type tires, depending on what I want, at all three positions. That really is me, below, with my pet raccoon, Rocky, on my head. No, Rocky doesn't stay on my head for actual driving.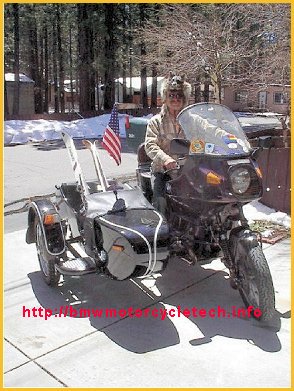
Below:
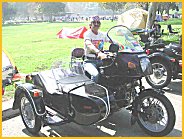
Two days after I first got it running reasonably well, I drove it to Palm Springs, & then onwards to Griffith Park for the annual Sidecar Rally. This was its shake-down tour, ~650 miles each way, as I made side detours on the way and in my return. In this photo there is no spare tire mount nor luggage rack on the rear trunk of the Ural sidecar, nor is there the chrome luggage rack on the Ural fender, nor the Ural front nerf bar; those all came later. That's the grassy camping area at Griffith Park. We are no longer allowed to camp there, per the Park officials. BOO HOO. The Griffith Park Sidecar Rally is usually in October, but has been in September & November at times. Doug Bingham was the Organizer www.sidestrider.com. Doug died in early 2016, but the website was still up the last time I edited this portion (April 2018). http://www.motorcyclemuseum.org/halloffame/detail.aspx?RacerID=406
Details:
1983/1984 BMW R100RT tug. The "1983/1984" is because this was a California-delivered bike, and the 1983-1984 transition year was one in which BMW failed to, on time, get the bikes smog certified, or, perhaps better said, to do the paperwork .....thus this bike has a frame and engine ID that is 1984, but also carried a factory label on the driveshaft housing, with the SAME full VIN, except that the D for 1983 is changed to an E for 1984. Thus, this motorcycle is identified for both 1983 and 1984.
This is the large valves, 40 mm carburetors model. I'm the original owner, I purchased the bike brand-new in 1985; it had been in dealer stock, un-ridden. Except for one approximately 7 month period of time, when I, in a poor decision, sold the tug; then bought it back, it had always been in my possession.
Stock BMW electronic ignition, but dual-plugged with Accell coils. The heads, including installation of the 1985+ valve seats, and machining for slightly higher compression ratio, were done by my old friend O.Okleshen (better known as OAK), who was, before he passed-away, the top guru for BMW Airhead motorcycles in the United States. Earlier style longer valve guides were also used. The valves were very stable over the normal 5000 mile clearance checking interval, and the engine did not use hardly any oil between changes. I changed the oil regularly, and the filter every other oil change. Oonly BMW filters were used. The canister depth was been measured and one metal shim, and no outer paper gasket, is standard and was perfect for this particular bike. The canister depth remained stable. I used only Golden Spectro 4, 20W50 oil.
Rear end ratio was changed to 3.36:1; and I purchased, brand-new, a matching and very accurate 85 mph BMW speedometer. BMW Brembo disc brake rear. Up front are dual BMW Brembo calipers/discs with UNIT SS lines, on a UNIT Leading Link forks (purchased brand-new in 2002), with Hagon sidecar special (and adjustable) shock absorbers for this particular front end. Koni adjustable damping rear shocks. The steering head bearings are adjusted for sidecar type of preload. There is a VW beetle type of hydraulic steering damper on the downtube-to-right-upper-hack-strut. This damper is connected to the front fork by a clamp that has several holes in it ...to allow different stroke amounts for the damper. One simply moves the damper one hole further outward or inward, depending on if the front tire is a motorcycle type or a flat tread sidecar type. The effect is variable steps of damping. I purposely left the stock lower triple mounted hydraulic damper in place, which can be used in very rough going, to give additional damping, should that be needed ...but I never found the need.
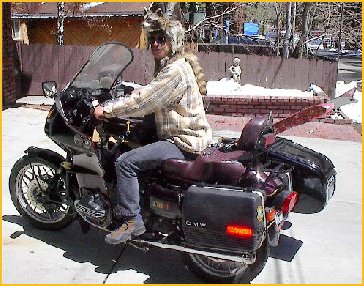
Full "RT" fairing, modified to accommodate the front upper hack strut. NO welding was done on the BMW frame. All connections are by VERY sturdy clamps, custom made. The windshield was the original BMW type when I sold the rig and it had the usual time/mileage stress cracks at the bottom center mounts, and there were crude looking bolts and rubber pieces at the center ....this was done when on a tour, and I never felt the need, cosmetically, to change that ...but, it did not look good. The next owner put on a new windshield custom made with a Honda Wing type vent, etc.
There are both left and right BMW Tour Saddlebags. The left bag was replaced many years ago by me, as it got cracked. There is a heavy duty rack and heavy duty backrest. Both of those items are specially modified for strength.
The front turn signal housings are internally modified for small running lamps ...and the rear turn signal units have been modified for commonly available dual-filament lamps and matching sockets, to also give a 'running lights' function. Those rear units have RED inserts.
The electrical system has been modified in several other ways. As examples, the better of the voltage regulators, a metal can Bosch voltage regulator was modified so it is easily adjustable and was been set for the best battery life/performance. I installed a new Panasonic AGM battery.
The dash no longer had the original voltmeter nor the original clock. In their holes I put round red figures digital versions; the voltmeter was the original first limited production versions that I designed some time ago, and as such, they are not quite as pretty as the final versions. All hack wiring was done 'right', and is not the stock Russian setup. An umbilical cord with plugs is used between hack and tug. The tug headlight shell has a switch to turn off the tug right rear turn signal, to comply with all of the various States and Country laws, etc. ...all done 'right'. I installed a jack for heated clothing, charger, whatever. This tug is driveable with motorcycle tires, with the hack disconnected ...and it is NOT difficult to remove the hack ...4 bolts and one electrical connection plug. When I sold the rig, the tug had a sidecar tire, an Avon Triple Duty 3.50-19, on the front, so the tug best not be driven without the hack. The UNIT front fork is adjustable for TRAIL.
Automatic high power headlight modulator, on photocell. There are NO sensitivity problems with this setup; it does NOT give the unstable adjustment problems of the Kisan model; and will handle another headlight, or a larger one. This heavy duty modulator is NOT mounted inside the headlight. The sidecar umbilical cord wiring/plug/etc., was done in such a way that additional electrics, radio, intercom, etc., are not at all difficult to add to the hack ...which DOES have electrical outlet terminals to one side of the hack 'dash', for easy operation of temporary 12 volt devices. A dashboard was never installed in the hack, as I did not like the idea of a passenger's legs potentially banging into it. I also never installed a locking trunk ...although I have available two designs for that. I simply felt it unnecessary.
The original side trim panels were included. They were removed to install the rear upper strut ...and the left side Luftmeister 1 gallon fuel tank. The right side Luftmeister tank, not mounted, was included.
This bike has been the 'test bed' for a lot of the BMW Airheads Club, etc., modifications over the years. It was hardly a showpiece ...It was a heavy-duty reliable touring rig, capable of going off-road.
BMW oil cooler and thermostat. Lowell Neff style heavy duty subframe. Cross brace to transmit forces from the hack into both sides of the frame above the battery. Front upper strut mount is designed to transmit forces to BMW cross bar, for same idea. Battery tray messily modified to accommodate that cross-brace. Russell Day-long two-up saddle, matching backrest with metal insert. Hand guards (brush guards). Reinforced rear rack.
Tug has the stock BMW 6 gallon fuel tank, but also has the mentioned one gallon Luftmeister side tank on the left side, automatic feeding. Included is the one gallon right side Luftmeister tank, which is rather easily to install if the bike is used as a solo. All petcock outlet lines are filtered by commonly available filter elements. The center-stand and a modified sidestand were left in place, so solo use was possible.
There is a sequential Bak-Off light array that operates automatically from either brake.
There are NO steering instabilities. The damping was not excessive, so there was still plenty of return-to-center force.
Included was the originally purchased BMW Multivario tank bag, old, but usable, and has had its lousy original pressed-paper sides replaced with genuine leather and a new plastic insert for maps. Spare brand-new control cables and quite a few other items went with the rig.
Maintained ...by me!
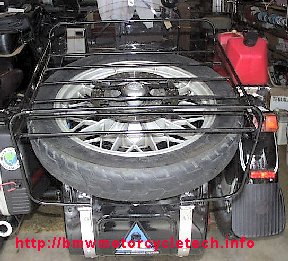
I added a black Ural rear rack/Ural spare tire carrier and it is modified to fit a BMW spare wheel, included. Bearings and preload and seals are, of course, properly done. When I sold the rig I installed the spare BMW rear wheel, modified to fit the disc brake and later rear drive of this 1983 tug. That particular wheel requires a spacer washer on the left side, and that is in the bike ....not needed with the original wheel, which was included and was mounted on the Ural trunk. Thus this rig has a REAL spare! There is a Ural chrome fender rack. The sidecar was ordered with the windshield and tonneau. I think the new owner eventually had a custom Tonneau made for it, as the original Russian type is just not all that great. I added the Ural black nerf bar in front, having lots of fun installing it. I did not get around to putting a headlight onto that nerf bar. I think a 10 watt Halogen is a good size for it.
There is NO RUST, has not been in any wrecks.
Hack has a nice braking setup with both separate and coupled, 'BMW' pedals. The stock tug rear brake actuates the hack brake at lesser force than just the separate hack brake pedal alone. With triple discs and the hack brake, this rig STOPS! ....and turns nicely. There is extensive information on the brakes in my other articles, see link at the beginning.
The Ural sidecar has been modified in several ways to its frame and brakes and no faulty or garbage welding will be found! Probably the frame and mounts work is overkill, more heavy duty than really needed. The front lower mount is no longer the stock Ural fixed mount, but is the Ural adjustable collet/sliding clamp type, similar to the stock Ural rear, but modified and beefed up. This allows for proper alignment and fitting in any direction. Done somewhat similarly ...(but, I think nicer) ...than Dave Hough did his. In fact, I consulted with Dave on this rig ...and Dave supplied the real Russian tubing I used during some of the modifications.
This rig runs only a 6 inch lead, and minimum toe-in, and thus is relatively easy on tires, but if one wanted to be a hot-dogger, especially in LEFT turns, I suggested the lead be increased. The 6" lead is too small for most average-talent-skills sidecarists, and I would not recommend it; for most, 9" would be better.
The sidecar has the mentioned Ural front nerf bar, not shown in any of the photos. This was a real PIA to install, as noted!
Front and rear rims are stock BMW cast wheels of the 'snowflake' design; 2.75" width, 18" rear; 19" front. The 19" front is NOT the 'Recalled' one ...it is the later, web-reinforced model. The rear stock original wheel, and perhaps the other rear wheel, may have the wider internal spacer on the right side, to clear the swing arm, with up to 120-18 road tires. I do not remember what I left in them for that purpose ...stock or the wider top hat spacer. No matter, as the wheels were properly fitted and clear just fine.
When I sold the rig, and possibly still on it, the sidecar tire was the original Russian rubber, 3.50x18 in excellent condition. I personally trued the chromed wheel (they are never perfect from the factory), and I installed a Ural hubcap. I was not at all happy with the bearings in the wheel, they were not even assembled correctly, so I redid them. The Russian wheel moves its shape a bit over time, when the spokes are adjusted, so one final spoke adjustment might be needed in the future. Very easy to do.
Hack is easily separated, and if a front motorcycle tire is used on the tug (and the rear is kept as a M/C tire), the tug can be ridden solo, even quite hard, even with the LL front end, withOUT problems ...I HAVE done that. The trail is EASILY adjusted by loosening 4 allenbolts and sliding two clamps.
The hack is Ural black; tug is BMW 572 red (a darkish maroon)....and seat and backrest also match the tug color. The tug Russell Day-Long seat, backrest; and the sidecar upholstery, are all in good condition. The backrest matches the seat, and I made a very strong internal METAL plate inside that backrest ...the original stuff was flimsy pressed paper or some sort of weird stuff that did not have any strength; particularly noticeable when pushing on the backrest.
It was not a showroom queen, this rig has been ridden, and has sand pitting on the front part of the fairing paint.
The Ural front nerf bar installation required some hacksawing on the right and left of the footrest area inside the hack tub, for access for nuts and bolts, but is fine.
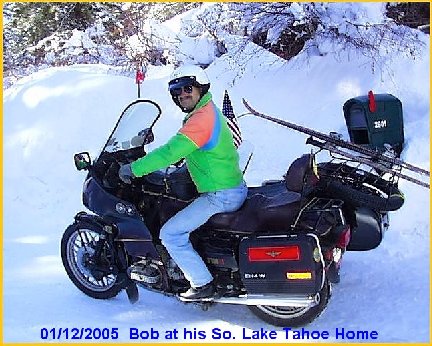
Below is an earlier photo, no rack, no spare tire.
Below photos show with the rack, here holding my downhill skis
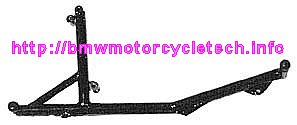
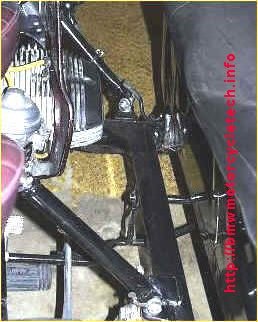
Above is the very heavy duty Lowell Neff style main subframe, very sturdy, made of heavy wall steel tubing, and beautifully TIG welded if I do say so myself (and I DO!). Besides this piece, there is a force-spreading piece above the battery, and a special piece at the steering head for the upper front strut mounting. This rig is STURDY!!
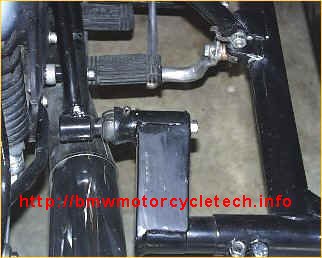
Above is the rear lower mount, plainly showing the box extension to allow the 6 inch wheel lead. That is easily shortened to allow a longer lead. NOTE the 2 bolts at the slider, and note the brake pedal mounting, etc. The Ural frame has gussets added here and there, for, probably, overkill sturdiness. This rig is set up for a 6 inch wheel lead. That may be somewhat short, if one likes to take very swift left-hand turns. But, it reduces tire wear, and makes for quicker handling on the right. In order to change the wheel lead, one reduces the length of that vertical box section in the center of the photo above, a simple job, and you then simply relocate the rear strut weld point at the Ural frame. This is all relatively easy to do, as are a couple other minor things. The front Ural mount is an adjustable type, not fixed as was stock, so this, and alignment, etc., is much easier to do....and much easier for forward tilt, and other alignment. The rig has under 1 inch of toe-in, toe-in does not change with tilt and vice versa, and the rig has classic handling. If one installs a regular front motorcycle rounded profile tire, and not the present Avon Triple-Duty sidecar tire, then one should make ONE adjustment in the damping, which will take less than TWO MINUTES.
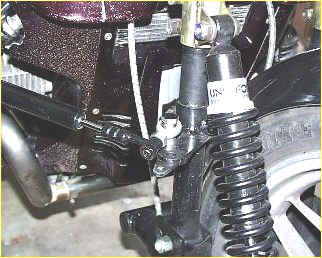
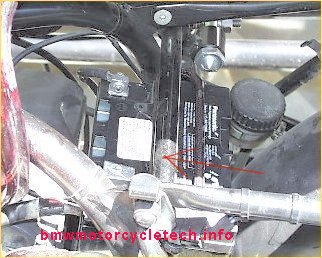
Above is the steering damper; two views...note the extra holes on the above photo, at the Heim joint area, to change the effect and stroke length. The second photo, below, clearly shows the beefed up front mount, some of the additional webbing and bolt, etc. The photo is not as good as I would have liked, to show some of the details....but the photo was purposely lighted to show the gravel pitting of the paint, in the worst possible illustration of it I could. This pitting was NOT on the sides, upper area, etc.
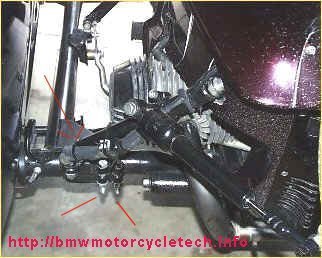
In the photo just below, note the 2 bolts at the slider, and note the flat metal at-corner gusset where the two large round frame tubing's join, and you can see a VERTICAL gusset piece underneath the area just barely to the left of the two bolts. This is one heavy-duty construction! And, yes, there are extra bolts at each clamp. I did not like having only one bolt, as the Ural came with that.
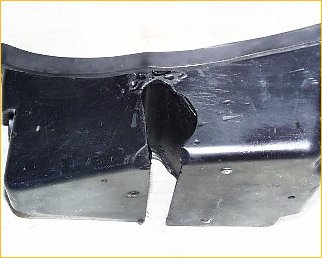
The very crude work done to the tool tray, to allow the round bar to be installed above the battery. I am NOT happy with this, I had originally intended to get another tool tray and make a really nice modification, never got to it. The purpose of that round bar is to put sidecar forces into both sides of the BMW frame. The opening above is sealed by bending up some aluminum and riveting it to the tray, and sealed that...not easy to see in the photo; thus, the tool tray is usable. I never made up anything fancier. Frankly, I hacked this out in a couple of hours. 'Tain't pretty.
The next two photos show that crossbar, located above the battery, it is simply bolted in place to existing BMW frame tabs. It is gray-black in this view. It is easily removable to change the battery. You do NOT need to remove or even loosen the subframe for this. The battery is a Panasonic sealed type. The voltage regulator is a metal shell Bosch type, modified to be adjustable, and set to match this battery. If you look carefully, at the top of this photo, you can see the large nut, the eye, and part of the rear upper strut mount. Yes, all the forces do get put into the BMW frame, both sides.
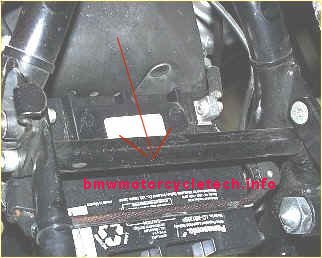
The above force-distributing bar is gray-black, round, solid aluminum alloy, threaded into both ends, and fits between stock existing BMW frame tabs. It was due to my insistence on installing such a forces-spreading bar, that I had to modify the tool tray. Note the lower right side shiny large nut...to the right of that, not seen, is the upper rear sidecar strut.

These two views show the two brake pedals. What can not be put easily into the photo is how they are arranged, including the underside of the top pedal (100% sidecar brake pedal), so that the braking is proportional and balanced. It is all done mechanically, very simply, and works wonderfully. The hack-only brake pedal was a BMW pedal, that I modified, by cutting off the short leg from the left side, and heli-arcing it to the right side! The bushings, etc., are home-made. A jury-rigged return spring should probably be replaced with a nicer one...you can't see it in this photo very well. The UNDERSIDE of the upper brake pedal has a smooth ramp (shaped rib), and is so arranged that excessive force on that pedal will NOT increase braking effort.
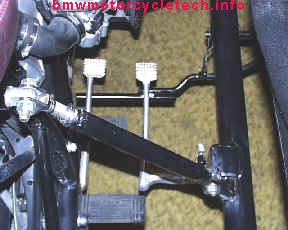
When the normal rear brake pedal is used, it acts normally on the tug; and, it puts SOME, but not too much, pressure on the sidecar brake. If you use your foot on JUST the sidecar brake, you can get as much brake on just the sidecar as you would want...and then some. It is possible to use one's boot on both pedals at the same time. This system is VERY simple, VERY effective, VERY reliable. It was done this way on purpose...I wanted it SIMPLE, EASY to maintain, and I wanted a separate sidecar brake pedal, for slow and very sharp right slow turns. I wanted the brakes to allow panic stopping in a relatively straight line.
Rev:
10/13/2012: Add QR code, add language button, update Google Ad-Sense code.
Sometime in 2013, I removed the troublesome language button and its code.
03/21/2016: Update meta code, minor article updates. Improve layout, fonts, colors.
10/20/2016: Metas, scripts, layout, excessive html fixed.
04/09/2018: Reduce excessive html, fonts, colors. Update content.
© Copyright 2023, R. Fleischer
Return to Technical Articles LIST Page
Return to HomePage
Last check/edit:
Friday, August 18, 2023